background image

Medi-Minder Installation Manual Rev1.11

3

3 . I n t r o d u c t i o n

Your SmartLink Medi-Minder unit has been designed to provide you with the freedom and peace of mind in that, should
you need assistance or HELP, it is available to you 24 hours a day with the simple press of a Button.

The modern slim line design of the SmartLink Medi-Minder unit allows it to be installed unobtrusively anywhere and is
ready when you need help. HELP can be summonsed by pressing a Button on your personal Pendant or Wristwatch, which
you can wear both inside your home or outside in the garden, ready for any emergency, giving you the freedom you enjoy
for total control at all times.

The SmartLink Medi-Minder unit has been built to the highest of technical standards for the protection of people and
property and manufactured to Australian and International quality standards.

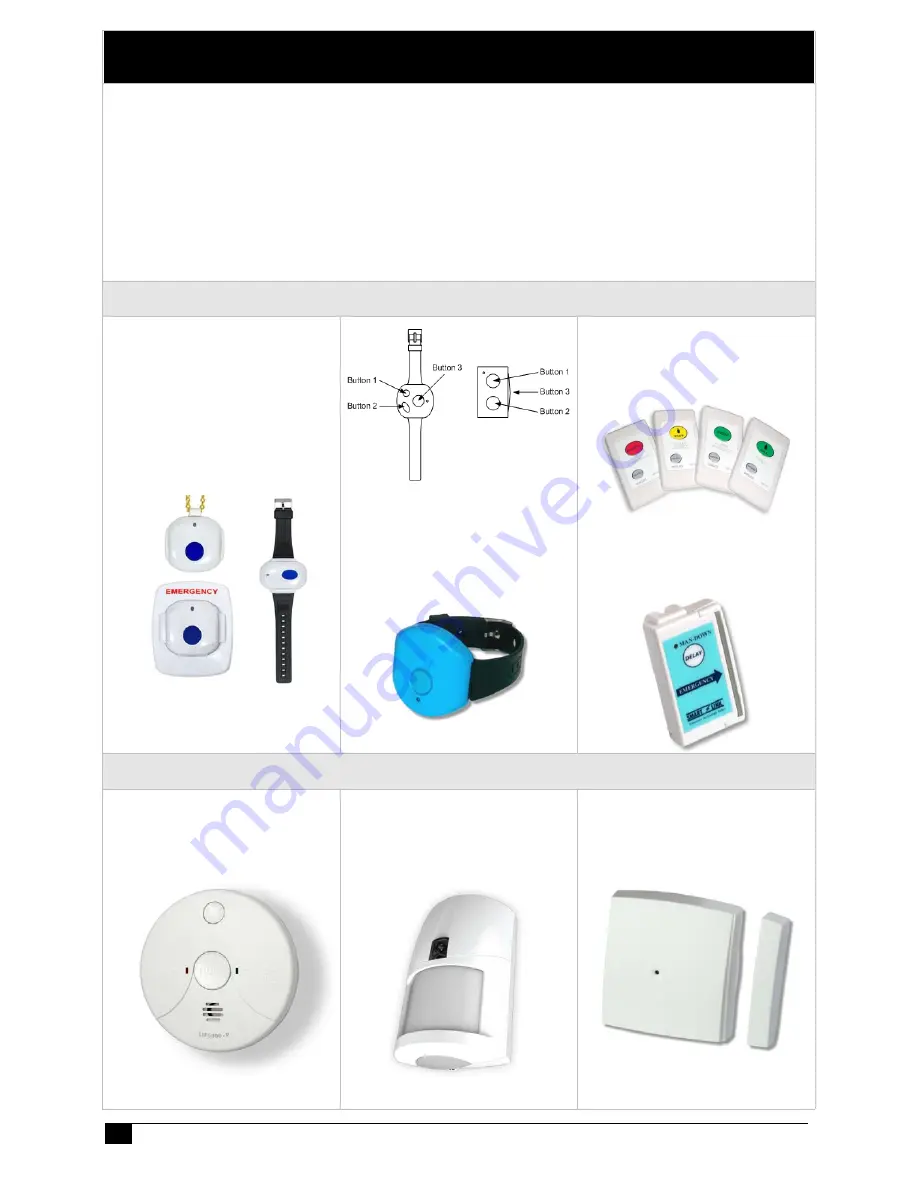
Your SmartLink Medi-Minder unit can be supplied with additional fixed or portable Radio Key Pendants, which can be
worn or placed around the home as needed. Please contact your supplier for more information.

RADIO KEY PENDANTS

Wristwatch, Neck Chain or

Fixed Waterproof 2-Way

Long Range Pendants

(915.8MHz to 927.2MHz)

(Part No. 106-183)

Button 1 = ARM or CALL
Button 2 = OFF or CANCEL
Button 3 = PANIC

Dementia Proximity Key

(Blue Colour)

(Part No. 100-677)

New Wall Mounted

Call Points (Wireless)

(Part No. 100-821)

Man-Down

Water Resistant Pendant

(Part No. 100-698)

RADIO DETECTORS

PSA 240VAC Smoke Detector

with 9V Rechargeable Battery

(Part No. 100-054)

Radio PIR Detector (with

Inbuilt LED Night Light)

(Part No. 106-174)

Radio Reed Switch

(Inactivity)

(Part No. 100-529)

Содержание MEDI-MINDER

Страница 1: ...MEDI MINDER INSTALLATION MANUAL Medi Minder Installation Manual Rev1 11 ...

Страница 2: ...there are various external factors that may impede or restrict the operation of this product in accordance with the product s specification These factors include but are not limited to 1 Erratic or reduced radio range Ness radio products are sophisticated low power devices however the presence of in band radio signals high power transmissions or interference caused by electrical appliances such as...

Страница 3: ... SETTING TIME DATE 22 8 UPDOWNLOAD SOFTWARE 22 9 CELLULAR SIGNAL QUALITY 23 10 CELLULAR UDP SERVER 23 11 NORMAL OPERATION MODE 24 12 DISPLAYS WARNINGS 24 13 DIALLER REPORTING FORMAT 25 13 1 ADEMCO HIGH SPEED EXTENDED REPORTING 25 13 2 CONTACT ID REPORTING 26 13 3 BRITISH DTMF UNIVERSAL REPORTING 27 14 SPECIFICATIONS 28 2 Equipment List A Medi Minder Unit consists of the following equipment 1 Medi ...

Страница 4: ... built to the highest of technical standards for the protection of people and property and manufactured to Australian and International quality standards Your SmartLink Medi Minder unit can be supplied with additional fixed or portable Radio Key Pendants which can be worn or placed around the home as needed Please contact your supplier for more information RADIO KEY PENDANTS Wristwatch Neck Chain ...

Страница 5: ...nual Rev1 11 4 4 Medi Minder Features Rechargeable Battery 4 8V 1600mAh Ni MH Part No 142 031 I P 1 2 O P 1 2 3 Aux Inputs Outputs Part No 450 191 Common Black Input 1 Red Input 2 White Output 1 Green Output 2 Brown Output 3 Blue ...

Страница 6: ...rsion number eg 1 1 for 2 seconds and beep once 4 _A is displayed to indicate that it is in Programming Options 5 Now go to Section 6 Programming Options 5 3 Product Programming Default Medi Minder Ademco Skip this Section if you re NOT changing the Product Type The Product Type is programmed by entering the Special Code on the Medi Minder unit This will reset all Programming Options and will have...

Страница 7: ... 7 CLIENT ACCOUNT Programming Options 7 PHONE NUMBERS Programming Options 8 SERVER Options Medi Minder 3G Version Only 9 PENDANTS Programming Options 10 DETECTORS Programming Options 11 HARDWIRED INPUTS Programming Options 11 AUXILIARY OUTPUTS Programming Options 12 PREFERENCES Programming Options 16 SYSTEMS Programming Options 17 CELLULAR Options Medi Minder 3G Version Only 18 DAYLIGHT Programmin...

Страница 8: ... Maximum Primary Phone Number Monitoring Centre Phone Number 1 Star Hash Pause 1 _n is displayed Press the HELP Button 2 n1 is displayed Press the HELP Button again to view programmed Phone Number The programmed Phone Number will be flashed on status display If you wish to view the Phone Number again press the CANCEL and then HELP Button is displayed and flashes on the unit 3 Pressing the HELP But...

Страница 9: ...tion Server 1 Port Number up to 5 Digits Maximum Note Programmed as the first Digit will delete Server 1 Port Number to Digits 0 to 9 6 P1 is displayed Press the HELP Button 7 is displayed Press the HELP Button again to view programmed Server 1 Port Number The programmed Server 1 Port Number will be flashed on status display If you wish to view the Server 1 Port Number again press the CANCEL and t...

Страница 10: ...n selected press the CANCEL and HELP Buttons at the same time The unit will beep twice while flashing the display to acknowledge that the option has been selected 4 Press the CANCEL Button to move to the next Program Option To Erase a Radio Key Pendant User Key 1 Go to the Pendant Option you wish to erase u1 to u8 2 Press the HELP Button to select until an option Er Erase 3 Press the CANCEL and HE...

Страница 11: ...ttons at the same time The unit will beep twice while flashing the display to acknowledge that the option has been selected 5 Press the CANCEL Button to move to the next Program Option To Erase a Detector 1 Go to the Detector Option you wish to erase d1 to d8 2 Then using the HELP Button to select until an option Er Erase 3 Press the CANCEL and HELP Buttons at the same time The will beep twice whi...

Страница 12: ... same time and the unit will beeps three times to indicate that ALL Inputs Inputs i1 to i2 have been Disabled 2 Press the CANCEL Button to move to the next Program Option 6 2 7 AUXILIARY OUTPUTS Programming Options Auxiliary Output 1 Open Collector Output to Ground when Activated OFF Output Disabled Enabled Output for 1 to 9 minutes if Alarm Restored then Output is switched Off Toggles Output On w...

Страница 13: ... du and dP 3 To store an option selected press CANCEL and HELP Buttons at the same time The unit will beep twice while flashing the display to acknowledge that the option has been selected Press CANCEL Button to move to the next Program Option Exit Time 10 to 60 Seconds The time requesting Arm Mode and Medi Minder unit being in that Mode 1 E1 is displayed Press the HELP Button to view programmed t...

Страница 14: ...displayed and flashes on the unit 2 Pressing the HELP Button again to step through the digits 1 2 3 4 5 6 7 8 9 and 0 Press the CANCEL and HELP Buttons at the same time to store each digit The unit will beep twice and display the next digit to be programmed Repeat this process until all digits are programmed 3 Press the CANCEL Button to display the programmed time The unit will flash on status dis...

Страница 15: ...P Buttons at the same time The unit will beep twice while flashing the display to acknowledge that the option has been selected 4 Press the CANCEL Button to move to the next Program Option Call Back Pendants Disabled or Enabled Automatically Answers a Incoming Call an alarm event Pendants 1 cP is displayed Press the HELP Button on the unit 2 E is displayed Pressing the HELP again toggles between E...

Страница 16: ...tion 2 1 is displayed Pressing the HELP Button again to step through 1 2 3 4 3 To store an option selected press the CANCEL and HELP Buttons at the same time The unit will beep twice while flashing the display to acknowledge that the option has been selected Press the CANCEL Button to move to the next Program Option Up Download Remote DTMF Control Enabled all the time and DTMF Enabled Enabled only...

Страница 17: ...n to move to the next Option Microphone Sensitivity 0 1 2 or 3 Microphone Sensitive 1 uP is displayed Press the HELP Button to view programmed Microphone 1 is displayed 2 Pressing the HELP Button again to select 0 1 2 or 3 Sensitivity To store an option selected press the CANCEL and HELP Buttons at the same time The unit will beep twice while flashing the display to acknowledge that the option has...

Страница 18: ...o Store an option selected press the CANCEL and HELP Buttons at the same time The unit will beep twice while flashing the display to acknowledge that the option has been selected Cellular Mode default 5 MediLink Setting refer SmartLink Cellular In Level default 0 refer SmartLink Cellular In Attenuation default 255 refer SmartLink Cellular Out Level default 0 refer SmartLink Cellular Out Attenuatio...

Страница 19: ... First 2 Second 3 Third 4 Fourth 5 Last Disabled 1 Lo is displayed Pressing the HELP Button again to step through 0 1 2 3 4 5 and 2 To store an option selected press the CANCEL and HELP Buttons at the same time The unit will beep twice while flashing the display to acknowledge that the option has been selected 3 Press the CANCEL Button to move to the next Program Option DLS End Day 0 Monday 1 Tues...

Страница 20: ...ery 8 Weeks Sunday Every 31 Weeks Sunday Every 32 Weeks 1 td is displayed Pressing the HELP Button again to step through 0 to 9 A and FE 2 To store an option selected press the CANCEL and HELP Buttons at the same time The unit will beep twice while flashing the display to acknowledge that the option has been selected 3 Press the CANCEL Button to move to the next Program Option Test Call Hour 0 to ...

Страница 21: ...he HELP Button to view programmed option d is displayed 2 Pressing the HELP Button again toggles between d Disabled and E Enabled 3 To store an option selected press CANCEL and HELP Buttons at the same time The unit will beep twice while flashing the display to acknowledge that the option has been selected Press the CANCEL Button Mains Fail Delay 1 to 24 Hours delay before reporting a Mains Fail r...

Страница 22: ...as the first digit will delete the tune Note up to 50 Digits maximum 0 Pause 1 C4 Middle C 2 D4 3 E4 4 F4 5 G4 6 A5 7 B5 8 Halves the duration of the previous tune 9 Doubles the duration of the previous tune The tune is scaled up by an octave Sharp 1 t1 is displayed Press the HELP Button to view programmed tunes The programmed tunes will sound and flash on status display 2 Pressing the HELP Button...

Страница 23: ...t Minute is displayed 0 to 59 Press the CANCEL Button to begin setting the Date To Set the Date Sd is displayed Pressing the HELP Button until the correct Date is displayed 1 to 31 Press the CANCEL Button to begin setting the Month To Set the Month Sn is displayed Pressing the HELP Button until the correct Month is displayed 1 to 12 Press the CANCEL Button to begin setting the Year To Set the Year...

Страница 24: ...di Minder 3G VERSION ONLY The Medi Minder 3G unit has an internal GPRS GSM Module to perform Network Reporting This reporting is used to transmit alarm reporting messages from a subscriber s site to a Data Monitoring Centre via a mobile data network and internet The alarm reporting messages has packeted into ARMOR IP REPORTING PROTOCOL format and use the UDP IP internet protocol to transmit the al...

Страница 25: ...aller Monitoring Centre SmartLink Medi Minder unit will also beep for 25 seconds is on the Display The CELLULAR has failed Check and make sure that the Antenna SIM Card is plugged in Contact your Installer Monitoring Centre SmartLink Medi Minder 3 G unit will also beep for 25 seconds or is on the Display HELP RED Button also Flashing The HELP RED Button on the Medi Minder Unit has been Pressed to ...

Страница 26: ... P 2 none CH 3 DET3 LOW BATT P3 none HELP P 3 none CH 4 DET4 LOW BATT P4 none HELP P 4 none CH 5 DET5 IN1 LOW BATT P5 none HELP P 5 none CH 6 DET6 IN2 LOW BATT P6 none HELP P 6 none CH 7 DET7 IN3 INACTIV LOW BATT P7 none HELP P 7 none CH 8 DET8 IN4 LOW BATT P8 none HELP P 8 none Note The Medi Minder unit HELP will be on the channel programmed in the System S_ Main Menu Option and the Medi Minder u...

Страница 27: ... Mode Option Ho 131 Perimeter 9 16 Detector Fire Option Fi 133 24 hour 9 16 Detector Silent Option Si 130 Burglary 9 16 Tamper Alarms Detector Tamper 383 Tamper 9 16 Panic Alarms Medi Minder unit Help Button 120 Panic Alarm 6 Hardwired Inputs 1 to 2 i1 to i2 120 Panic Alarm 21 22 Radio Keys Panic Option Pc or An 120 Panic Alarm 1 8 Radio Keys Delay Panic Option dP 100 Medical Alarm 1 8 Radio Keys ...

Страница 28: ...Minder unit should be set to enhance only if increased volume has previously been selected 6 If the DTMF digit 1 is received INC VOL button the Base Station has requested volume increase The Medi Minder unit should be set to enhance mode when the Base Station is in listen mode Enhance mode will time out after 15 seconds 7 If the DTMF digit 2 is received DEC VOL button the Base Station has requeste...

Страница 29: ...z to 928 MHz Australia New Zealand 100 uW or various international compliances Conforming Standards IS09001 2000 AS4607 TS002 PSTN1 TBR21 AS2201 4 C2 AS4268 2012 International Quality manufacturing Standards Personal Response Systems Public Switched Telephone Network Australia New Zealand ACA Public Switched Telephone Network Singapore Public Switched Telephone Network UK Europe Intruder Alarm Sys...

Страница 30: ...k ness com au Web Site www smartlink com au To the best of our knowledge the information contained in this manual is correct at the time of print SmartLink A division of NESS CORPORATION PTY LTD reserves the right to make changes to the features and specifications at any time without prior notice in the course of product development ...

Отзывы: