7
english
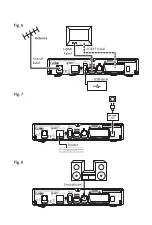
3.4 connecting a usb storage device
Fig. 6
Use this connector to access files from your USB storage devices for Multimedia functions or update
the software of your receiver. HDD can only be supported with a maximum current of800 mA. It is
recommended to use at least USB 2.0 storage devices for playback of video files or HD movies.
3.5 connecting to the internet for Rss feeds and weather forecasts
Fig. 7
To use RSS feeds and weather forecast, the receiver must be connected to the Internet. Connect the
Ethernet (RJ-45) connector at least with a class CAT5E cable to your router/socket/Extender or similar
applicable equipment, which provides access to the Internet.
3.6 connection to main power supply
Fig. 7
After all the connections are established you can connect your new HD receiver to the main power by
using the included external power adapter and connect the plug it to the wall socket.
3.7 extended connections for your home entertainment
Fig. 8.
connecting to a digital audio amplifier with s/pdif
By connecting your receiver to a digital amplifier or home theatre system, you can enjoy the best
possible sound quality and multi-channel audio (depending on broadcast). Connect your Digital Audio
Amplifier or home theatre system with a suitable cinch cable to the S/PDIF connector on the back of the
receiver
connecting to a digital audio amplifier and Tv using Hdmi
By connecting your receiver to the latest digital amplifiers or Home Cinema systems you will enjoy the
best possible sound quality and multi-channel audio (depending on broadcast). Connect the HDMI
output of the receiver to an input of your amplifier, and then connect the HDMI output of the amplifier
to your TV set. Select the correct input on your amplifier to watch and listen to programmes.
4.0 sTaRTing up fOR THe fiRsT Time
Make sure that your receiver and antenna are connected/aligned correctly. If you have any related
questions accordingly, please contact your local service or retailer. The first time installation will guide
you through the required steps, after that you will be able to enjoy your HD TV completely. If you already
connected an Ethernet cable to your receiver, you can access RSS feeds and weather forecasts. We wish
you lots of fun with your new product.
4.1 Language selection
When you use your receiver for the first time, the “Bevorzugte Sprache” (Preferred Language) menu
appears. Use
pq
to select the desired language. Once you have selected your language, press the
gReen
Next
button to go to the next page.
4.2 Region, subtitles, scan mode and screen settings
The receiver will now show the “First Time Installation” screen where you can adapt some of the most
important settings. Use
pq
to move to the desired setting and use
t
u
to change values. Press the
gReen
Next
button to go to the next page or press the
Red
Back
button to go one step back. The
following settings are available:
Region
:
The region is set to
Germany
and this can’t be changed as this receiver is destined for
Germany.
Содержание SKW-T20
Страница 1: ...User Manual Inhaltsverzeichnis Empf nger f r hochaufl sendes Antennenfernsehen SKW T20 SM...
Страница 2: ......
Страница 3: ......

