


52
Appendices
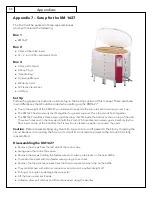
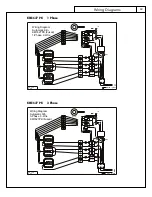
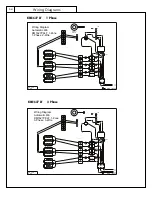
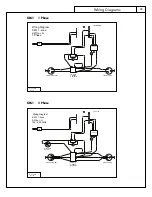
Appendix 8 — The Wall-Mounted KilnMaster Controller
The wall-mounted KM-1 KilnMaster gives automatic kiln control to
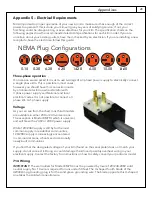
most modern Skutt 208/240V kilns and any other brand kiln which
uses NEMA 6-50 (single phase) or NEMA 15-50 (3-phase) plugs and
receptacles. It can be moved quickly from one kiln to another and
can control virtually any kiln in a studio which has the proper cord
plug and receptacle configuration.
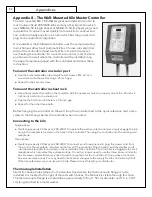
Once installed, the KilnMaster controller uses the same operating
instructions as other Skutt Automatic kilns. Choose a location that
will put the controller at least two feet from the kiln to prevent
overheating the controller. To mount the controller, mark the hole
positions on the wall where the controller will be installed using
the paper template supplied with the controller and follow these
instructions:
To mount the controller on stud or post
●
Use the holes marked
A
on the template and screw a #12 x 2 inch
wood screw into the wall leaving a .25 inch gap.
●
Repeat for the second screw.
To mount the controller in sheet rock
●
Using holes marked A and B on the template, drill the necessary holes to properly mount the .25 inch x 2
inch molly bolts into the sheet rock.
●
Tighten the first bolt until there is a 1/8 inch gap.
●
Repeat for the other three bolts.
Before hanging the controller on the wall, loop the cord attached to the quick reference card over a
screw so that it hangs below the controller when mounted.
Connecting to the kiln
Single-phase:
●
(Switching capacity 48 Amps on 208-240V) To operate the wall-mounted controller, simply engage the kiln
plug in the receptacle located on the back of the controller. Then plug the controller into the existing wall
receptacle.
Three-phase:
●
(Switching capacity 40 Amps on 208-240V) To connect your three-phase kiln, plug the power cord from
the kiln into the receptacle mounted on the back of the controller. Plug the pilot cord (the smaller cord)
into the small receptacle mounted on the underside of the controller. The controller is plugged into a wall
receptacle which provides three phase voltage. You will no longer need to use the three-phase contractor
box. However, an electrician may need to wire a receptacle for the controller if a three-phase contractor
box was used previously. You may need to make other changes to the supply for kilns not made by Skutt.
Other manufacturers may not use pilot cords. Please discuss this with your distributor.
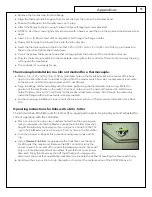
Thermocouple Installation
Skutt kilns have a hole stamped in the stainless band where the thermocouple flange is to be
installed. It is located to the right of the red switch boxes. The firebrick is visible through this hole.
The thermocouple flange is a metal tube approximately 5/8 in. (1.59 cm) diameter and 1.5 in. (3.81
cm) long attached to a metal washer.