background image

61 77 476 D 3495
D 3495

.

201.01.02

.

02

08.2007

21

Sirona Dental Systems GmbH

5


Installation

Operating Instructions and Installation


XIOS USB

Installing USB modules

5.3

Installing USB modules

5.3.1

Hardware requirements

Explanation

A USB module can be connected to your PC either directly or via a USB hub.

Prerequisites

z

The USB port of the PC selected for USB modules must not be shared 
with other USB components!

z

If multiple USB modules are connected to a single PC, all of them must be 
connected to the PC via a common USB hub with a separate power 
supply!

- The technical requirements for the common USB hub are described in 

the chapter "Technical description" [

 13].

- The USB hub must be installed prior to the actual installation of a USB 

module.

- Install the USB hub as described in the relevant operating instructions.

5.3.2

Installation instructions

Operational reliability

5.3.3

Installation of a USB module on a PC

Prerequisites

z

The PC is ready for operation.

z

SIDEXIS XG Version 2.2 or higher is installed.

z

Optionally: A USB hub has been installed as specified by Sirona.

Installation

9

Connect the USB module to the PC or to the USB hub only after being 
prompted to do so. 

1.

Insert the Installation CD in the relevant PC. 

ª

The setup program starts automatically. If it does not start 

automatically, execute the 

„Autorun.exe"

 program in the root directory 

of the CD. 

2.

Select the 

"XIOS plugin & driver"

3.

Click the 

"Next"

 button. 

4.

Follow the instructions in the dialog boxes of the setup program and click 
the 

"Next"

 buttons in between until the 

"Finish"

 button appears. 

 NOTE:  Operational reliability

If multiple USB modules are connected simultaneously, a suitable USB hub 
with a separate power supply must be used!

 WARNING:  

The USB hub must be set up and operated outside of the patient 
environment [

 10].

 CAUTION:  

When installing the USB cable and the individual components, make sure 
that the connections cannot be accidentally loosened, disconnected or 
damaged (e.g. due to tripping over or pulling them, etc.).

Содержание XIOS

Страница 1: ...uflp rp_ l f f k W MUKOMMT b...

Страница 2: ...61 77 476 D 3495 2 D 3495 201 01 02 02 08 2007 1 Sirona Dental Systems GmbH Operating Instructions and Installation XIOS USB...

Страница 3: ...Sirona 14 3 5 Ambient conditions 14 3 6 Minimum requirements for PC systems 15 3 7 Requirements for intraoral X ray tube assemblies 15 3 8 Requirements for the USB hub optional 16 4 Operating and disp...

Страница 4: ...33 8 3 1 Anterior tooth exposure 33 8 3 2 Posterior tooth exposures 34 8 3 3 Bite wing exposures 35 8 3 4 Endodontics 36 8 4 Half angle technique without radiation limiter 37 8 4 1 Endodontic exposur...

Страница 5: ...2007 5 Sirona Dental Systems GmbH 1 Operating Instructions and Installation XIOS USB Contents 12 Electromagnetic compatibility 49 12 1 Accessories 49 12 2 Electromagnetic emission 49 12 3 Interference...

Страница 6: ...61 77 476 D 3495 6 D 3495 201 01 02 02 08 2007 1 Sirona Dental Systems GmbH Contents Operating Instructions and Installation XIOS USB...

Страница 7: ...exposures Please always observe the valid radiation protection directives and the safety information in these instructions These operating instructions are based on the assumption that you are familia...

Страница 8: ...ile them in the X ray System Logbook in the FR of Germany Within the Federal Republic of Germany the attached Declaration of Conformity with the Medical Device Directive must be filled out by the syst...

Страница 9: ...manufacturers of medical electrical equipment we can assume responsibility for the safety properties of the system only if maintenance and repairs on the system are performed by us or by agencies we h...

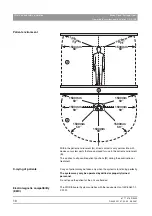
Страница 10: ...ll possible patient positions B during the examination or treatment X raying of patients X raying of patients X rays of patients may be taken only when the system is functioning perfectly The system m...

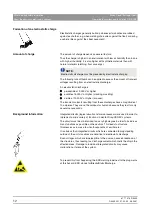
Страница 11: ...ent s body Disturbance of electronic devices worn on the patient s body To prevent the malfunctioning of electronic devices and data memories e g radio controlled watches telephone cards etc these obj...

Страница 12: ...igher arc over The transient currents resulting from these discharges have a magnitude of 10 amperes They are not hazardous for humans because they last for only several nanoseconds Background informa...

Страница 13: ...nsors Original language of the present document German This product bears the CE mark in accordance with the provisions of the Council Directive 93 42 EEC of June 14 1993 concerning medical devices Pa...

Страница 14: ...ress of water Year of manufacture on the rating plate Dimensions H x W x L in mm 132 x 80 x 37 Weight 104 g USB port of USB module Version 2 0 or 1 1 USB Version 2 0 A USB Universal Serial Bus is a se...

Страница 15: ...XP at least 256 MB Drives CD ROM writer Operating system Windows XP Graphics system Resolution at least 1024 x 768 pixels Color depth at least 16 bits USB port of PC system Version 1 1 or 2 0 Safety T...

Страница 16: ...nstallation XIOS USB 3 8 Requirements for the USB hub optional Type of protection against electric shock Protection class II USB standard USB 1 1 or higher Power supply Separate power supply not bus p...

Страница 17: ...ting and display elements 4 1 System design To be ready for use a system must include z USB module A z USB cable B z Sensor C with cable and connector size 1 or size 2 z PC D with integrated USB inter...

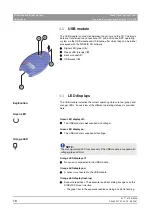
Страница 18: ...lanation The USB module indicates the current operating status via two green and orange LEDs An overview of the different operating statuses is provided here Green LED Green LED display off z The USB...

Страница 19: ...ation Instructions and Operator s Manual for SIDEXIS XG as well as the relevant manuals for your PC and its operating system NOTE Installation on multiple SIDEXIS XG PCs The complete installation must...

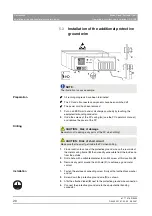
Страница 20: ...a location to connect the protective ground wire on the rear side of the metal casing frame B that is readily accessible from the inside and from the outside 2 Drill a hole with a suitable diameter f...

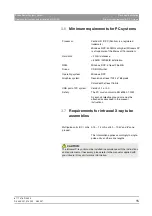
Страница 21: ...a USB module on a PC Prerequisites z The PC is ready for operation z SIDEXIS XG Version 2 2 or higher is installed z Optionally A USB hub has been installed as specified by Sirona Installation 9 Conn...

Страница 22: ...b with the supplied USB cable The USB module is now installed 5 3 4 Installation of additional USB modules on a PC Prerequisites z The PC is ready for operation z A USB hub has been installed as speci...

Страница 23: ...via internet When activating exposure readiness SIDEXIS XG checks whether the sensor has been installed If the sensor has not yet been installed the user is asked whether it should be installed automa...

Страница 24: ...the sensor correction file SGF 8 Copy the sensor correction file SGF to your XIOS computer using e g a USB stick 9 Install the sensor on your XIOS computer by double clicking on the sensor correction...

Страница 25: ...61 76 577 Wall holder for XIOS X ray sensors Order No 61 74 879 Test phantom for constancy test of size 1 and size 2 XIOS sensors Order No 61 77 328 USB cable 3 m Order No 61 77 401 XIOS sensor holde...

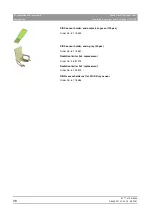
Страница 26: ...structions and Installation XIOS USB XIOS sensor holder endo universal green 100 pcs Order No 61 76 544 XIOS sensor holder endo gray 50 pcs Order No 61 76 551 Radiation limiter 3x4 replacement Order N...

Страница 27: ...by registering a patient in SIDEXIS XG 2 To take a single exposure click the intraoral exposure button Exposure readiness is restored automatically Exposure readiness displays z The exposure readines...

Страница 28: ...sposable items z Only for the same patient The sensor holder can be removed and reglued repeatedly during a series of exposures even if it already has come into contact with saliva Exposure 1 Before t...

Страница 29: ...it on a patient CAUTION Risk of damage Handle the sensor carefully Do not drop the sensor Do not swirl the sensor about by its cable Do not bend the sensor and USB cables or run over them e g with a c...

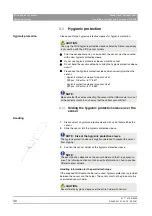
Страница 30: ...tective sleeve with a size that matches the sensor 2 Slide the sensor into the hygienic protective sleeve 3 Position the sensor holder on the hygienic protective sleeve Handling information for the pa...

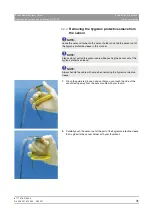
Страница 31: ...ensor facing away from the sensor cable with your thumb 2 Carefully push the sensor out of the part of the hygienic protective sleeve that is glued to the sensor holder with your thumbnail NOTE Leave...

Страница 32: ...ona Dental Systems GmbH Hygienic protection Operating Instructions and Installation XIOS USB 3 Slide the sensor further out of the hygienic protective sleeve with your thumb 4 Hold the sensor cable fi...

Страница 33: ...he matching localizer ring are color coded blue z The triple offset guide rod and the blue localizer ring for anterior tooth exposures must be used z The following illustrations show how to attach the...

Страница 34: ...h exposures z This sensor holder and the matching localizer ring are color coded yellow z The double offset guide rod and the yellow localizer ring for posterior tooth exposures must be used z The fol...

Страница 35: ...hygienic protective sleeve following the patient examination 5 The guide rod and localizer ring must be sterilized 8 3 3 Bite wing exposures Explanation The bite tab type sensor holder is available fo...

Страница 36: ...the middle of the sensor X ray exposure 1 Position the sensor in the patient s mouth 2 Place the X ray tube assembly in the correct position Change the position of the sensor holder if necessary 3 Re...

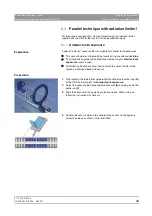
Страница 37: ...e sensor holder to the hygienic protective sleeve with sensor Preparation 1 Slide the sensor into the hygienic protective sleeve When doing so follow the instructions for sensors 2 Select the green se...

Страница 38: ...61 77 476 D 3495 38 D 3495 201 01 02 02 08 2007 8 Use of the X ray sensor Sirona Dental Systems GmbH Half angle technique without radiation limiter Operating Instructions and Installation XIOS USB...

Страница 39: ...1 and size 2 XIOS X ray sensors The exposure parameters specified for Sirona X ray sensors in the documentation for the various Sirona intraoral X ray systems therefore do not apply to size 1 and size...

Страница 40: ...gher number appears briefly after the unit is switched on Classification of recommended exposure times by tooth region z A adults z B children z C Mandibular anterior tooth z D Mandibular canine tooth...

Страница 41: ...terior tooth z F Maxillary molars z G Maxillary canine tooth Mandibular molars z H occlusal exposure If a 12 SSD cone is used together with a size 1 size 2 XIOS X ray sensor the above exposure times a...

Страница 42: ...Settings for the 8 cone z Setting for adult patients mandibular maxillary anterior tooth mandibular premolar z Setting for adult patients maxillary premolar mandibular maxillary molar occlusal exposur...

Страница 43: ...he 12 cone z Setting for adult patients mandibular maxillary anterior tooth mandibular premolar z Setting for adult patients maxillary premolar mandibular maxillary molar occlusal exposure z Setting f...

Страница 44: ...476 D 3495 44 D 3495 201 01 02 02 08 2007 9 Exposure times Sirona Dental Systems GmbH HELIODENT DS up to Serial No 15863 wall model and 4415 ceiling model Operating Instructions and Installation XIOS...

Страница 45: ...an order the list in one of the following two ways z Order it from your local dental depot z Order from Sirona Tel 49 0 62 51 16 16 16 Fax 49 0 62 51 16 18 18 Order No 59 70 905 10 2 Cleaning USB modu...

Страница 46: ...nly be disinfected by wiping them off z USB module z USB cable z Size 1 and size 2 XIOS X ray sensors Sensors The following should be observed regarding XIOS sensors and their connecting leads z Senso...

Страница 47: ...ned securely 11 3 Annual check performed by the system owner or authorized persons Image quality check The image quality should be assessed by the system owner at regular intervals at least once a yea...

Страница 48: ...D 3495 48 D 3495 201 01 02 02 08 2007 11 Inspection and maintenance Sirona Dental Systems GmbH Annual check performed by the system owner or authorized persons Operating Instructions and Installation...

Страница 49: ...in the electromagnetic environment specified below NOTE XIOS complies with the requirements for electromagnetic compatibility EMC according to IEC 60601 1 2 2001 XIOS is referred to in the following...

Страница 50: ...ltages according to IEC 61000 4 5 1 kV differential mode 2 kV common mode voltage 1 kV differential mode 2 kV common mode voltage The quality of the line power supply should be that of a typical comme...

Страница 51: ...repositioning of the UNIT 3 Over the frequency range 150kHz to 80MHz field strengths should be less than 3V m Portable and mobile radio equipment must not be used within the recommended working clear...

Страница 52: ...the relevant communication device as specified below For transmitters whose maximum nominal output is not specified in the above table the recommended working clearance d in meters m can be determined...

Страница 53: ...61 77 476 D 3495 D 3495 201 01 02 02 08 2007 53 Sirona Dental Systems GmbH 12 Electromagnetic compatibility Operating Instructions and Installation XIOS USB Working clearances...

Страница 54: ...t K p a p d e OMMT p W m d a PQVRKOMNKMNKMOKMO MUKOMMT KJk KW NMU UPO f p a p d e rp W W c PN SQSOR _ d K K p a p ii QUPR p a I p NMM I k OUOTP rp p PORM o a J r R j I l iRi RvS l k SN TT QTS a PQVR...

Отзывы: