


båÖäáëÜ
59 38 399 D3352
D3352.076.01.13.02
07.2008
4 – 3
Tab 4
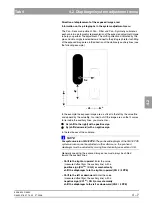
4.1 Important information concerning adjustment
4.
1
4
Adjustment
4.1
Important information concerning adjustment
WARNING
When performing the following tests, be sure to observe the radiation
protection regulations applicable in your country (see operating instruc-
tions).
CAUTION
Before starting the service routines for system adjustment, make sure that no
unit movements are active (especially diaphragm travels)! Otherwise the sys-
tem may become inoperable in rare cases.
NOTE
i
“Radiation” is signaled with the message “X-RAY active!” (only for XG
Plus
),
a beep and an X-RAY LED.
NOTE
i
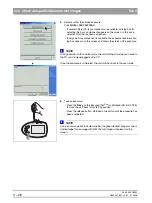
Be sure to take screenshots of the
PAN
-
RESET
ADJUSTMENT
and
CEPH
-
RESET
ADJUSTMENT
menus before and after the adjustment (see sec-
tion 4.6) and save them to the C:\SIDEXIS\XGRAW directory along with the
time and date!
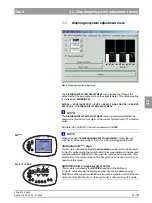
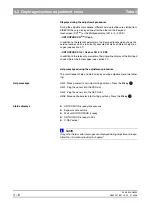
Coarse and precision adjustment using the Diaphragm/system
adjustment menu in SIDEXIS XG
NOTE
i
The Pan - Sensor adjustment, Pan - Diaphragm and Ceph - Fixed point of ro-
tation submenus provide a coarse adjustment and a precision adjustment
(precision adjustment is preset).
Always try to use precision adjustment first when adjusting the unit. In most
cases, previous coarse adjustment is not necessary.
With SIDEXIS Version V02.20 and higher, a message window indicates when
a coarse adjustment is necessary.
Only if you cannot achieve your goal with precision adjustment, e.g. if the
exposed area is completely outside the image field, should you perform a
coarse and then a precision adjustment.
If a coarse adjustment proves necessary, deactivate the
PRECISION
ADJUSTMENT
check box and follow the adjustment steps de-
scribed in the present chapter to perform a coarse adjustment.
The steps and correction procedure required for coarse adjustment are iden-
tical to those for precision adjustment. The only difference between the two
modes is the size of the image area considered. Furthermore, there are fewer
auxiliary lines in the coarse adjustment mode.
Содержание ORTHOPHOS XG 3 DS
Страница 4: ......
Страница 9: ...ORTHOPHOS XG 1General information...
Страница 12: ...59 38 399 D3352 1 4 D3352 076 01 13 02 07 2008 Tab1...
Страница 59: ...ORTHOPHOS XG 2 Messages...
Страница 124: ...59 38 399 D3352 2 66 D3352 076 01 13 02 07 2008 2 6 List of available service routines Tab 2...
Страница 125: ...ORTHOPHOS XG 3 Troubleshooting...
Страница 152: ...59 38 399 D3352 3 28 D3352 076 01 13 02 07 2008 3 10 Check data paths Generate test images Tab 3...
Страница 153: ...ORTHOPHOS XG 4 Adjustment...
Страница 268: ...59 38 399 D3352 4 116 D3352 076 01 13 02 07 2008 4 6 Resetting the adjustment XGPlus 5 3 3 PPE Tabs 4...
Страница 269: ...ORTHOPHOS XG 5 Service routines...
Страница 433: ...ORTHOPHOS XG 6 Repair...
Страница 436: ...59 38 399 D3352 6 4 D3352 076 01 13 02 07 2008 Tab6...
Страница 530: ...59 38 399 D3352 6 98 D3352 076 01 13 02 07 2008 6 21 Replacing cables Tabs 6...
Страница 531: ...ORTHOPHOS XG 7 Maintenance...
Страница 575: ...b 59 38 399 D3352 D3352 076 01 13 02 07 2008 7 45 Tab 7 7 14 Checking the device leakage current 7 14...
Страница 577: ...b 59 38 399 D3352 D3352 076 01 13 02 07 2008...