Start--up procedures
89
851--164300 / C
9.4 Starting up the Hull Unit
Introduction
Observe the following procedure to start up the Hull Unit. To
ensure correct performance, tick off every item when the action has
been carried out.
WARNING
Before starting up the sonar equipment on a
recently launched vessel, make sure the depth
under the keel is sufficient for the transducer to
be lowered safely.
When starting up the equipment on board a
vessel in dry dock, check first under the vessel
and inside the sonar room. Personnel, tools and
other potential obstructions must be kept clear
of the transducer and related lowering and
hoisting machinery to avoid personal injury or
damage to the equipment.
Functional check
Before you start the functional check, make sure that the mains
fuses for the hull unit has been disconnected in the fuse box. This
check will only require the +24 Vdc standby power from the
Transceiver Unit.
1
Use a spanner to open the door on the Motor Control Unit.
- The unit is mounted on the Hull Unit.
2
Press the red button marked
0
on the motor overload switch
S301
in the Motor Control Unit.
→
Refer to figure 31 on page 90.
3
Check that the hoisting/lowering switch
S302
in the Motor
Control Unit is set in the
Stop
position.
4
Remove the plastic plug on the top cover of the Hull Unit.
5
Locate the hand crank inside the Motor Control Unit, and
mount the hand crank onto the stub shaft through the hole in
the top cover.
6
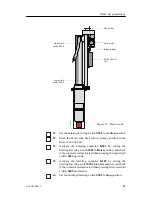
Locate the brake release screw on the motor, and use an 4 mm
Allen key to tighten up the screw until the motor brake is
mechanically released (approximately 2 - 3 turns clock-
wise).
→
The location of the brake release screw is indicated in
figure 32 on page 91.
Содержание SH80 - REV C
Страница 2: ......
Страница 14: ...Simrad SH80 X 851 164300 C Blank page...
Страница 61: ...Transceiver unit 45 851 164300 C Figure 13 Mounting the Transceiver Unit CD3110A...
Страница 186: ...Simrad SH80 170 851 164300 C 12 3 Installation drawings The SH80 installation drawings are provided on the next pages...
Страница 195: ...Installation remarks 179 851 164300 C Party Date Signature Party Date Signature Party Date Signature...
Страница 196: ...Notes...
Страница 197: ...Notes...
Страница 200: ......


