background image

SimpliFire •  SF-INS25, SF-INS30, SF-INS35 Service Manual  •  2042-960  •  3/21

2

Glass Replacement (GLAS-INS

**

)


1.  If necessary, place a drop cloth or other material

     on the hearth or flooring to prevent scratching.  
2.  Remove front.  Refer to Front Replacement section 


     for details.
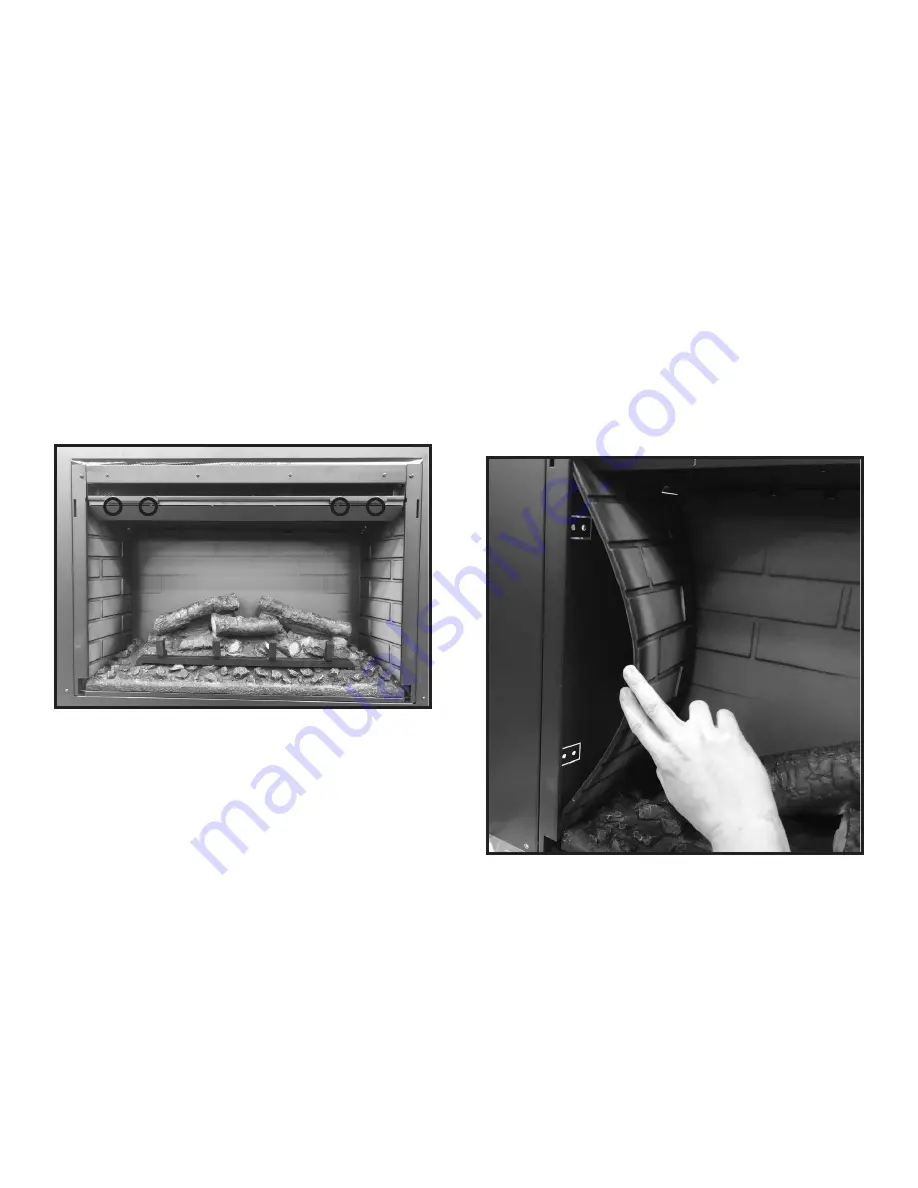
3.  Remove four (4) screws from two glass retaining 


     brackets. Hold glass from tipping forward.  See 


     Figure 1.
4.  Pivot glass away from appliance and lift out of bottom 

     retainer channel.
5.  Install replacement glass into bottom retainer chan-


     nel.  Take care to properly align the glass with the 


     rubber seal inside the bottom retainers.
6.  While supporting glass, install two glass retainer 


     brackets with four (4) screws.  Do not over tighten 

     screws.
7.  Re-install front. 

Figure 1 Top Glass Retainer Screw Location

Interior Side Panel Replacement (PANEL-INS

**

)


1.  If necessary, place a drop cloth or other material

     on the hearth or flooring to prevent scratching.  
2.  Remove front.  Refer to Front Replacement section 


     for details.
3.  Remove glass. Refer to Glass Replacement section


     for details. 


4. Grasp the INTERIOR Side  Panel and pull it away 


    from the appliance side wall, releasing the magnets. 


    See Figure 2.
5. Gently bend the panel out of position from beside the 


    logs and remove from the appliance.
6.  Repeat for both sides.
7.  Install replacement panels in the same manner as 


     removal.
8.  Re-install glass.
9.  Re-install front.

Figure 2  Interior Side Panel

Содержание SF-INS25

Страница 1: ...ty glasses Flat blade screwdriver Front Replacement STFRONT INS FT MISSION 1 If necessary place a drop cloth or other material on the hearth or flooring to prevent scratching 2 Grasp front with two hands Lift up and off of the ap pliance 3 Install replacement front by aligning the hooks on the back side of the door to the slots in the appliance Press evenly down with two hands to fully engage the ...

Страница 2: ...ile supporting glass install two glass retainer brackets with four 4 screws Do not over tighten screws 7 Re install front Figure 1 Top Glass Retainer Screw Location Interior Side Panel Replacement PANEL INS 1 If necessary place a drop cloth or other material on the hearth or flooring to prevent scratching 2 Remove front Refer to Front Replacement section for details 3 Remove glass Refer to Glass R...

Страница 3: ...e pin connector from back side of ember bed by gently pulling on connector Do not pull on wires See Figure 4 8 Reconnect lighting LED power source pin connector to back side of replacement ember bed Position the log assembly See Figure 4 9 Rotate log ember bed and align with floor of opening Engage back side of ember bed into the opening Pivot the front of the ember bed into position flat on the f...

Страница 4: ...boards 10 Install replacement lighting LED circuit boards into the appliance Fully engage all clips See Figure 8 and 9 11 Connect the two lighting LED power source connectors and the jumper wire to the three LED circuit boards See Figure 8 12 Install metal brackets by attaching with three 3 screws See Figure 7 Install metal flame panel with eleven 11 screws 13 Re install Flame Screen 14 Re install...

Страница 5: ...connect each of the seven connectors See Figure 11 8 Reconnect the seven 7 connectors from the replacement Blower Heater module to the appliance See Figure 11 9 Carefully align the replacement Blower Heater module horizontally with the opening of the appliance Install it straight into the opening so that the back edge interlocks with the back wall of the appliance 10 While supporting the Blower He...

Страница 6: ... Figure 13 8 Remove three screws that attach motor mount bracket to the appliance chassis and cut the wire tie See Figure 14 9 Remove the motor and bracket from the chassis until the electrical connector is visible See Figure 14 10 Disconnect the electrical connector to the motor See Figure 14 11 Install the replacement motor on the bracket 12 Reconnect the electrical connector between the motor a...

Страница 7: ...eceiver is positioned in the center of the appliance behind the plastic diffuser panel Using a pliers compress each barbed clip while lifting the remote receiver board evenly to disengage it from the clip See Figure 15 7 Disconnect the wiring harness from the top of the receiver See Figure 15 8 Securely reconnect the wiring harness to the new remote receiver See Figure 15 9 Carefully align the new...

Страница 8: ...r and allow it to cool for 15 minutes Then plug in the unit or turn power back on at circuit breaker and turn unit back on Defective main control board Replace control board PCB Defective heater assembly Replace heater assembly Heater shuts off automatically or won t stay on Room temperature temperature at the appliance thermistor is higher than the set point on the remote Increase thermostat set ...

Страница 9: ... control board PCB Replace control board PCB Similar infrared signal from another remote causing unit to turn on pre 2019 manufactured units only Some TV remotes may cause the fireplace to turn on for appliances manufactured before 2019 Replace control board PCB Excessive noise with heater on Interference with fan blade Inspect heater assembly and fan for obstructions or interference Defective blo...

Отзывы: