Simpli Home AXCBC-007-WH Скачать руководство пользователя страница 6


ASSEMBLY


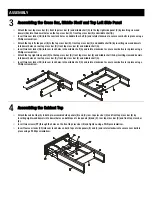
Assembling the Cabinet Top, Top Left Side Panel, Top Right Side Panel and 
Front Top Cross Bar


Lay down the cabinet top (A) and screw four cam bolts (BB) into the pre-drilled holes using a Phillips screwdriver.    


Lay down the top left side panel (B) and screw two cam bolts (BB) into the pre-drilled holes using a Phillips screwdriver. 


Lay down the top right side panel (C) and screw two cam bolts (BB) into the pre-drilled holes using a Phillips screwdriver. 


Attach the wood block (I) to the front top cross bar (E), by inserting two screws (NN) through holes on the wood block (I) and 
tighten to the front top cross bar (E) using a Phillips screwdriver. 


Attach the magnet (FF) to the wood block (I) by inserting two screws (EE) through the holes on the magnet (FF). Tighten using a 
Phillips screwdriver. 


Assembling the Doors


Lay down the left side door (K) and attach two metal hinges (LL) to the left side door (L) by inserting four screws (KK) through the 
holes on the metal hinge (LL) and tighten the left side door (L) using a Phillips screwdriver.     


Attach the magnet plate (MM) to the left side door (K) by inserting one screw (KK) through the hole on the magnet plate (MM) and 
tighten using a Phillips screwdriver.   


Lay down the right side door (L) and attach two metal hinges (LL) to the right side door (L) by inserting four screws (KK) through the 
holes on the metal hinge (LL). Tighten the right side door (L) using a Phillips screwdriver. 


Attach the magnet plate (MM) to the right side door (L) by inserting one screw (KK) through the holes on the magnet plate (MM) and 
tighten to the right side door (L) using a Phillips screwdriver. 


Lay down the left side door (K) and attach two metal hinges (LL) to the left side door (K) by inserting four screws (KK) through the 
holes on the metal hinge (LL). Tighten the left side door (K) using a Phillips screwdriver. 


Attach the magnet plate (MM) to the left side door (K) by inserting one screw (KK) through the holes on the magnet plate (MM) and 
tighten to the left side door (K) using a Phillips screwdriver. 


Содержание AXCBC-007-WH

Страница 1: ...AVINGTON MIA HAYES SPACE SAVER CABINET MODEL AXCBC 007 WH...

Страница 2: ...DO NOT RETURN FOR REPLACEMENT PARTS OR OTHER INQUIRIES PLEASE CONTACT US AT simpli home com customer support PLEASE ENSURE TO HAVE THE MODEL FROM THE PACKAGING OR INSTRUCTION BOOKLET...

Страница 3: ...n and pets We recommend that you assemble this unit on a carpeted floor to avoid scratches We do not recommend the use of power tools for assembly as this could damage the unit Only use manual tools R...

Страница 4: ...Screw 2 FF Magnet 1 GG Screw 4 HH Handle 2 II Screw 2 JJ Plastic Anchor 2 KK Screw 18 LL Metal Hinge 4 MM Magnet Plate 2 NN Screw 2 OO Shelf Support 4 PP Screw 2 QQ Cam Lock 4 RR Screw 8 SS Cap 16 TT...

Страница 5: ...elf 1 H Bottom Shelf 1 I Wood Block 1 J Rear Bottom Cross Bar 1 K Left Side Door 1 L Right Side Door 1 M Top Back Panel 1 N Middle Back Panel 1 O Bottom Back Panel 1 P Panel Connector 1 Q Bottom Left...

Страница 6: ...by inserting four screws KK through the holes on the metal hinge LL and tighten the left side door L using a Phillips screwdriver Attach the magnet plate MM to the left side door K by inserting one s...

Страница 7: ...bolts are in place using a Phillips screwdriver Attach the top right side panel C to the top cross bar D front top cross bar E and middle shelf G by inserting six wood dowels into dowel holes on rear...

Страница 8: ...gh the bottom right side panel R and tighten using a Phillips screwdriver Cover the screws RR with caps SS 6 Assembling the Bottom Left Side Panel Attach the bottom right side panel Q to the bottom sh...

Страница 9: ...panels B and C and both bottom side panels Q and R and rotate clockwise to secure cam bolts are in place using a Phillips screwdriver Cover the cam locks CC with caps SS 8 Assembling the Back Panel C...

Страница 10: ...s K and L Insert four screws GG through holes on both doors K and L and tighten to handles HH using a Phillips screwdriver 10 Attaching to the Wall Place the cabinet against the wall of the desired lo...

Страница 11: ...11 Assembling the Shelf Insert four shelf supports OO into holes in the space saver on both side panels B and C at the same level Insert the middle shelf F into the space saver on top of the shelf sup...

Страница 12: ...e line at 1 866 518 0120 ext 262 from 9 am to 5 pm Monday to Friday Eastern Standard Time or by email at simpli home com customer support We reserve the right to repair or replace the defective produc...

Страница 13: ...tomer Support at simpli home com customer support or call Customer Service at 1 866 0518 0120 ext 262 Monday to Friday between 9 am 5 pm EST For more information visit us on our website www simpli hom...

Страница 14: ...niture in your home with a short review to our facebook page and have a chance to Win your choice of any one of Simpli Home furniture pieces Free www facebook com simplihomefurnishings draws monthly s...

Отзывы: