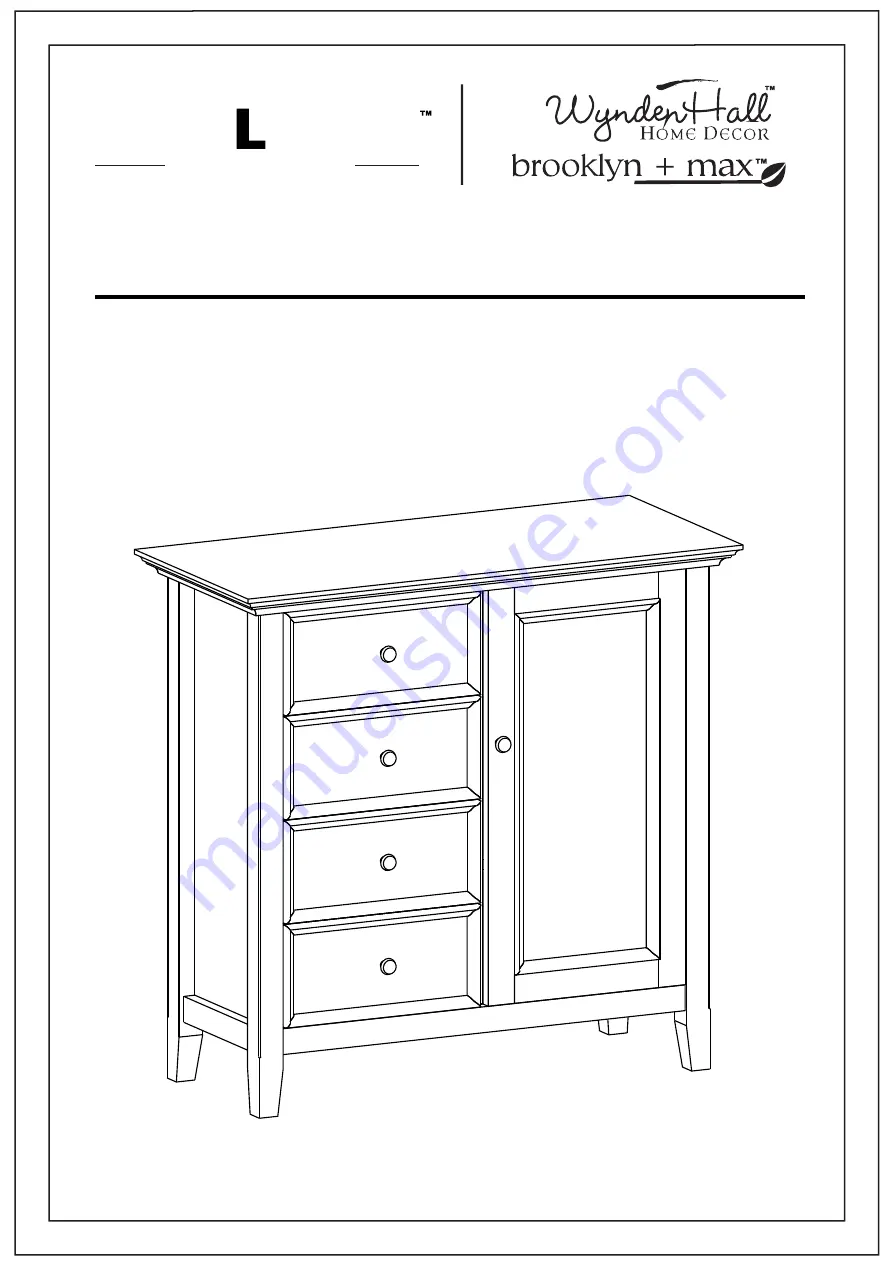
AMHERST / HALIFAX / WASHINGTON
MEDIUM STORAGE CABINET
MODEL
# AXCR
B
AMH15-LG
1/21
SIMP
I
HOME
L I F E B Y D E S I G N
Страница 1: ...AMHERST HALIFAX WASHINGTON MEDIUM STORAGE CABINET MODEL AXCR B AMH15 LG 1 21 SIMP I I HOME L I F E B Y D E S I GN...
Страница 2: ...0120 ext 262 Monday to Friday between 9 am 4 pm EST or go to www simpli home com parts request In order to assist you in a timely manner please have the following information ready Model ____________...
Страница 3: ...service department in order to obtain another kit before using the furniture Identify all the parts and hardware Do not discard of the packaging until you have checked that you have all of the parts...
Страница 4: ...umidistat automatically works to balance the humidity in your home so it is constant Dry indoor air can suck enough moisture from its surroundings to do permanent damage to wood causing it to crack or...
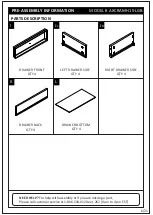
Страница 5: ...o 4 pm EST PRE ASSEMBLY INFORMATION MODEL AXCRAMH15 LGB A PARTS DESCRIPTION 5 21 TOP QTY 1 LEFT SIDE QTY 1 BOTTOM SHELF QTY 1 CENTRE SUPPORT QTY 1 DOOR QTY 1 B C D E F GL RIGHT SIDE QTY 1 LEFT BACK PA...
Страница 6: ...rt Please call customer service at 1 866 518 0120 ext 262 9 am to 4 pm EST PRE ASSEMBLY INFORMATION MODEL AXCRAMH15 LGB PARTS DESCRIPTION 6 21 I DRAWER FRONT QTY 4 LEFT DRAWER SIDE QTY 4 JL RIGHT DRAW...
Страница 7: ...ver Not Included MAGNET AND PLATE QTY 1 SET ADJUSTABLE HINGE QTY 2 PHILLIPS SCREW ROUND HEAD M4 X 15 mm QTY 17 HANDLE QTY 5 SETS CAM LOCK PIN CAM LOCK QTY 22 SETS ALLEN KEY SCREW M6 X 30 mm QTY 28 ALL...
Страница 8: ...COMPONENTS KEY DIAGRAM A GR B C E D F H H K JR JL L I MODEL AXCRAMH15 LGB 8 21 GL Front Avant Front Avant Front Avant Front Avant Front Avant...
Страница 9: ...ront I STEP 2 1 Attach 4 Cam Lock Pins 2 to back of Drawer Front I 2 Align Cam Lock Pins with guide holes and attach Drawer Sides JL JR 3 Insert 2 Cam Lock 2 into guide holes on each Drawer Side JL JR...
Страница 10: ...er drawers 1 Align Drawer Back K with Drawer Bottom L and press firmly into slot 2 Attach back using 2 Allen Key Screws 1 through guide holes on each side 3 Use Allen Key 3 to tighten Screws Do not ov...
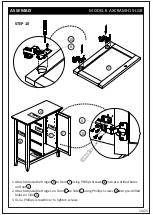
Страница 11: ...P 6 1 Attach Cam Lock Pins 2 into pre drilled holes on each Side B C 2 Align and insert Cam Lock Pins 2 into guide holes on Bottom Shelf D 3 Insert Cam Locks 2 into guide holes in Bottom Shelf D 4 Onc...
Страница 12: ...helf E using Allen Key 1 Tighten the Centre Support Shelf to pre drill hole at the right side support bar underneath of top 3 Use Allen Key 3 to tighten Screws Do not over tighten MODEL AXCRAMH15 LGB...
Страница 13: ...guide holes 2 Use Phillips screwdriver to tighten screws MODEL AXCRAMH15 LGB 13 21 NOTE The triangle ruler is not included in the hardware pack Adjust the cabinet frame before assembling the back pan...
Страница 14: ...0 into pre drilled holes on Door F 2 Attach Adjustable Hinges on Door F to Side C using Phillips Screws 10 into pre drilled holes on Side C 3 Use a Phillips screwdriver to tighten screws 6 10 A B C F...
Страница 15: ...ructions 1 Side adjustment 4 mm To move the door towards the side panel loosen screw I and tighten screw II To move the door away from the side panel loosen screw II and tighten screw I 2 Depth adjust...
Страница 16: ...of Door F using Phillips Screws 9 into pre drilled holes on Door F 2 Attach Magnet 7 using Phillips Screws 9 into pre drilled holes on Bottom Shelf D 3 Use a Phillips Screwdriver to attach Handle 4 t...
Страница 17: ...shelf level 1 shelf level 2 shelf level 3 shelf support anti tipping 8 8 F H H H 1 Use 4 Shelf Supports 8 for each Cabinet Shelf H in desired location 2 2 Shelf Supports 8 may be used on back top of e...
Страница 18: ...ASSEMBLY STEP 13 1 Insert assembled drawers into glides on assembled Medium Storage Cabinet MODEL AXCRAMH15 LGB 18 21...
Страница 19: ...WARNING Serious or fatal crushing injuries can occur from furniture tip over If the furniture tip over restraint kit is not in the box please contact our customer service department in order to obtain...
Страница 20: ...rely attach the bracket to the wall 5 Place the furniture so the back edge is in line with the bracket on the wall 6 Lace an end of the nylon zip tie strap down through each bracket Bring both ends to...
Страница 21: ...120 ext 262 from 9 am to 4 pm Monday to Friday Eastern Standard Time or by email at customerservice simpli home com We reserve the right to repair or replace the defective product at its discretion Th...