


SDP660 – USER MANUAL
TNM-U-E-0114
Jun 15 (Iss. 1.4)
Page 31
BASIC OPERATIONS
When receiving a private call, the
icon will be displayed. When receiving a group call, the
icon will be displayed.
When receiving a call, press the PTT key within the preset time period to call back.
5.10
S
CAN
/V
OTING
F
UNCTIONS
The Scan Function allows the sequential searching of up to 16 channels, if the selected zone
channel is programmed as a Scan channel, for a valid signal (Carrier + CTCSS/DCS tone for
Analogue FM or Colour Code for DMR). When found, the radio will stop on that channel until the
signal disappears again.
To activate Scanning, select a channel that has been programmed as a Scan channel. Once
selected, the scanning will either start automatically, if programmed, or the programmed scan
function button will need to be pressed. (FPP configurable).
While listening on the channel, the user is able to PTT on that channel. After the signal
disappears, the radio will remain listening on the channel for a short time (FPP configurable,
typically 4 seconds for scanning and 2 seconds for voting) before resuming scanning.
A Priority Channel may only be assigned to a Scan group.
If a Priority Channel is assigned to Scan mode, the radio will interleave a check of this channel
between each normal Scan channel. The radio may also check the Priority Channel every few
seconds while stopped on a channel. If a signal is found on the Priority Channel then the radio will
switch to that channel immediately.
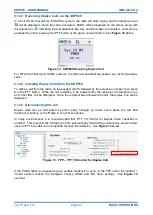
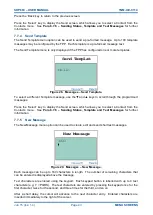
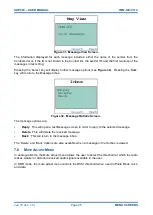
5.10.1
Scan/Voting Screen
A Scan can be started by:
1.
Pressing the function key that has been assigned the scan function by the FPP; or
2.
Selecting a zone channel that has been assigned to automatically scan by the FPP; or
3.
Selecting the SCAN ON option under the ‘User Options’ menu.
The top line of the display still shows the name of the current selected channel. The second line of
the display shows the name of the current selected zone while scanning/voting.
The Channel can be changed by using the ▼ and ▲ keys. Other channels may be either Scan or
Normal channels, depending on the radio’s configuration.
Scanning is indicated by a rotating arrow symbol.
When scanning stops on a channel, on the screen, the second line from the top shows the name of
the channel from the scan group that the radio has stopped on. If stopped on a channel, that
channel can be “skipped” by pressing the programmed skip function key. Once a channel is
“skipped” it will not be scanned for the duration that Zone/Channel selection.
When transmitting on a channel, the second line of the display shows the name of the current
channel that the radio is transmitting on.