


ENGLISH
Do not use the machine to the functions that it has been designed.
SIMA SA is not responsible for any consequences that may result in inappropriate use of the milling firm
6.
STARTING UP AND USE INSTRUCTIONS
Warning: Follow all the mentioned safety recommendations and comply with the directives about labour
accidents and risks.
For further details, consult the engine manual.
6.1
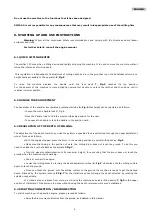
QUICK LIFTING DEVICE
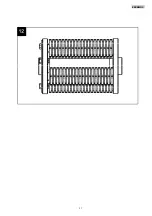
The scaifier CAT model has a lifting device and rapidly dropping the machine. It is used to move the machine without
losing the reference of milling depth.
This regulation is independent of adjustment of milling depth and is in the grip that is on the handlebar column at a
height easily accessible to the operator. E, Fig.5
To raise the machine displace the handle until the lock pawl T, Fig.5 reaches its top position.
For the descent of the machine is moved slightly upward first handle to unlock the ratchet and then down until it
reaches its lower position.
6.2
HANDLE TUBE ADJUSTMENT
The handlebar of the scarifier incorporates a rectangular tube A, Fig.6 that height can be regulated as follows:
- Loosen the crank handle lock M, Fig.6
- Move the handle tube to find the most comfortable position for the user.
- To squeeze the handle to lock the handle in the position held.
6.3
REGULATION OF THE DEPTH OF MILLING.
The adjustment of the depth to which you want to perform a specified task is performed through the upper adjustment
wheel. Proceed as follows:
• With the engine stopped, place the drum in the working position by quickly lifting device. Fig.5
• Make sure that being in the position of work, the milling drum does not touch the ground. To do this you
need to unlock the nut that attaches the spindle P Fig.7.
• Turn the wheel counterclockwise to its maximum height, thus ensuring that the drum does not touch the
ground when the machine starts working.
• Start or connect the engine.
• Lower the milling drum by turning the depth adjustment wheel V, Fig.7 clockwise until the milling cutters
begin to touch the ground.
• Once you touch the ground with the milling cutters on the ground the machine is ready to get the desired
depth. Blocked by the spindle locknut P Fig.7 for the vibrations cannot change the depth selected by rotating the
spindle unexpectedly.
• To make a stop or a break from work, we will raise the machine by quickly lifting device T, fig5 to the upper
position of stalemate. This allows us to pause without losing the depth reference work soon established.
6.4
STARTING CONNECTION / DISCONNECTION
To start a machine with a gasoline engine, please proceed as follows:
•
Raise the drum some centimetres from the ground, as indicated in this manual.
9
Содержание CAT 202
Страница 1: ...CAT 202 CAT 202 E 1 ...
Страница 2: ...ESPAÑOL 2 ...
Страница 13: ...ESPAÑOL 12 ESQUEMAS ELÉCTRICOS ESQUEMA ELECTRICO CAT 202 MONOFÁSICO ESQUEMA ELECTRICO CAT 202 TRIFÁSICO 13 ...
Страница 15: ...ESPAÑOL 15 ...
Страница 16: ...16 ESPAÑOL ...
Страница 17: ...ESPAÑOL 17 ...
Страница 20: ...ESPAÑOL 20 ...
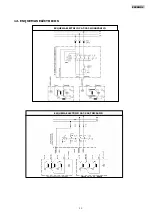
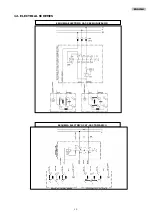
Страница 31: ...ENGLISH 12 ELECTRIAL SCHEMES ESQUEMA ELECTRICO CAT 202 MONOFÁSICO ESQUEMA ELECTRICO CAT 202 TRIFASICO 13 ...
Страница 33: ...ENGLISH 15 ...
Страница 34: ...16 ENGLISH ...
Страница 35: ...ENGLISH 17 ...
Страница 38: ...ENGLISH 20 ...
Страница 49: ...FRANÇAIS 12 SCHÉMAS ELECTRIQUES SCHÉMAS ELECTRIQUES CAT 202 MONOPHASE SCHÉMA ELECTRIQUE CAT 202 TRIPHASE 13 ...
Страница 51: ...FRANÇAIS 15 ...
Страница 52: ...16 FRANÇAIS ...
Страница 53: ...FRANÇAIS 17 ...
Страница 56: ...FRANÇAIS 20 ...
Страница 67: ...PORTUGUÊS 12 ESQUEMAS ELÉCTRICOS ESQUEMA ELÉCTRICO CAT 202 MONOFÁSICO ESQUEMA ELÉCTRICO CAT 202 TRIFÁSICO 13 ...
Страница 69: ...15 PORTUGUÊS ...
Страница 70: ...16 PORTUGUÊS ...
Страница 71: ...PORTUGUÊS 17 ...
Страница 74: ...PORTUGUÊS 20 ...
Страница 87: ...DEUTSCH 15 ...
Страница 88: ... 16 DEUTSCH ...
Страница 89: ...DEUTSCH 17 ...
Страница 92: ......
Страница 103: ...POLSKI 12 SCHEMATY ELEKTRYCZNE SCHEMAT ELEKTRYCZNY CAT 202 JEDNOFAZOWY SCHEMAT ELEKTRYCZNY CAT 202 TRÓJFAZOWY 13 ...
Страница 105: ...POLSKI 15 ...
Страница 106: ...POLSKI 16 ...
Страница 107: ...POLSKI 17 ...
Страница 110: ...POLSKI 20 ...
Страница 121: ...ITALIANO 12 SCHEMI ELETTRICI SCHEMA ELETTRICO CAT 202 MONOFASICO SCHEMA ELETTRICO CAT 202 TRIFASICO 13 ...
Страница 123: ...ITALIANO 15 ...
Страница 124: ...16 ITALIANO ...
Страница 125: ...ITALIANO 17 ...
Страница 128: ...ITALIANO 20 ...
Страница 141: ...15 РУССКИЙ ...
Страница 142: ...16 РУССКИЙ ...
Страница 143: ...РУССКИЙ 17 ...
Страница 146: ...РУССКИЙ 20 ...
Страница 147: ...РУССКИЙ 21 ...


