background image

17

Silhouette Cameo® 4 User Manual 

Download Designs

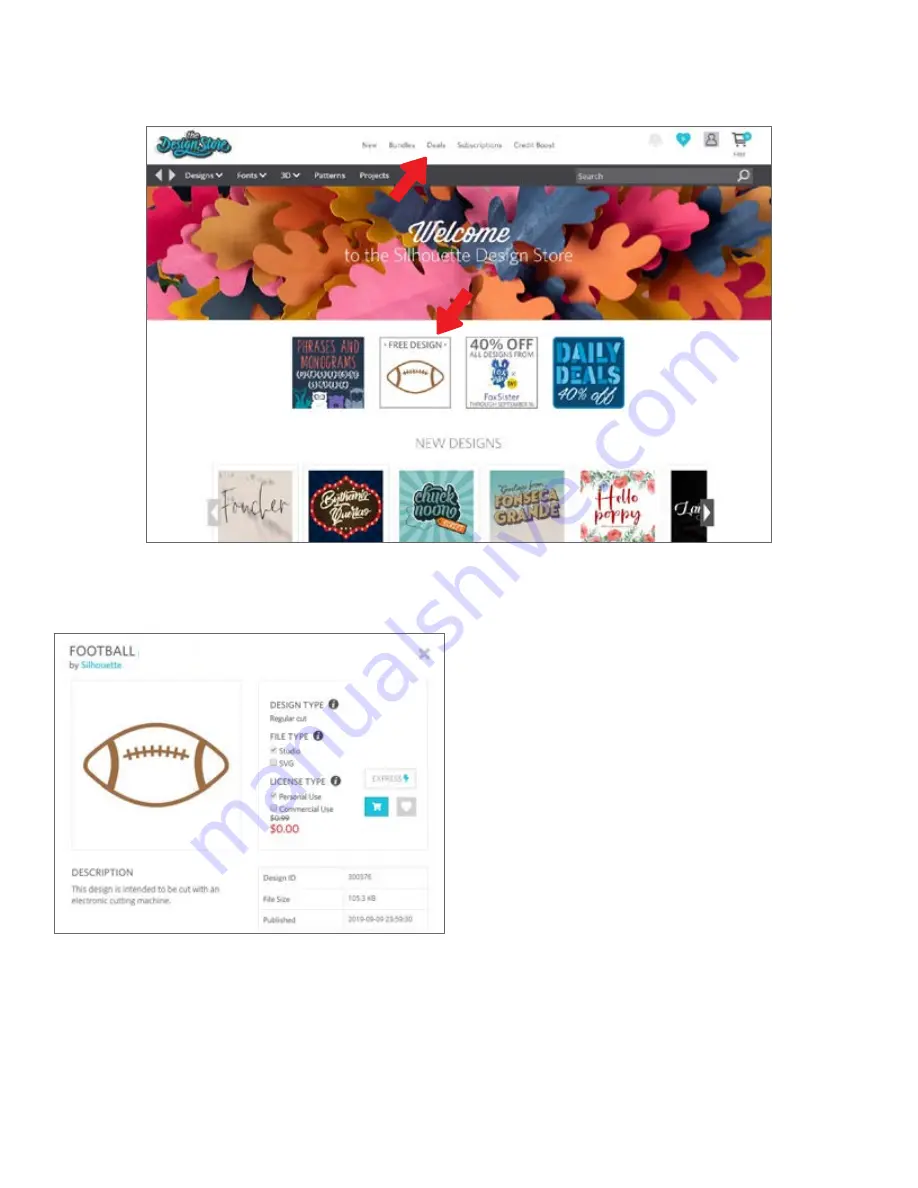
For now, try downloading a free design by clicking this week’s free design. You can also find the Free Design on the Deals 
page. 

When you click a design, a window will pop up to give you more information about that design. Here you can see what 
type of design this is, the file type, and the price. 

To add the design to your shopping cart, click the blue 
cart icon. Next click the arrow or click the icon in the 
upper right corner of the Design Store to go to your 
shopping cart. 

Since you’re downloading a free design, you shopping 
cart total should be $0.00.

Once you’ve reviewed your shopping cart, click the 
Checkout button to proceed. At this time the Design 
Store will ask you to sign in before downloading your 
design. 

You should have already created a Silhouette account, but 
if you haven’t, creating a new account only takes a few 
seconds. Click the “Sign up FREE” link on the login page 
to create a new account.

Once your account is created, you will need to access your shopping cart again and try the checkout process once more. 
You will be asked to validate your password each time you download designs. 

Содержание CAMEO 4

Страница 1: ...User Manual ...

Страница 2: ...ple Shapes 10 Text 11 Library 12 Sign In 12 Organize Your Library 13 Search Library for Designs 14 Use Designs from Library 14 Show Library Split Screen 15 Silhouette Design Store 16 Download Designs 17 Send Panel 18 Prepare the Cameo 4 19 Place Material on the Cutting Mat 19 Turn On the Cameo 19 Load the Tool 20 Adjust the Rollers 22 Load the Material 22 Use the Roll Feeder 23 Use the Crosscutter...

Страница 3: ...eck that all the items have been included before you proceed to use the machine If you are missing any items listed below please contact support silhouetteamerica com Silhouette Cameo desktop cutting machine A C adapter and power cable USB cable 12 inch cutting mat Handheld blade adjuster Tool adapters AutoBlade for Cameo 4 ...

Страница 4: ...f tape that are holding the lid and any machine pieces in place Remove the three tabs that are holding the clear plastic covers in place on the front of the machine you ll remove the two pieces on the side panels and the piece along the top of the machine Next lift the lid slightly and slide it back Remove the tape cardboard insert and any foam pieces you see here Don t forget to remove the strip ...

Страница 5: ...y have a Silhouette account click the Sign In link Fill in your information When you re finished click the Submit Registration button After you click the Sign In link and input your login credentials you ll see this screen which you ll use to register your machine Here is where you ll enter the serial number of your machine You can find that information on a sticker on the back of your machine abo...

Страница 6: ...of Silhouette Studio Click on your operating system Mac or Windows and follow the prompts on your computer to finish the installation The software is necessary to run your Cameo 4 cutting machine so don t forget this step You ll learn more about how to use the Silhouette Studio software later in the manual For now finish the machine setup process ...

Страница 7: ...by opening a web browser and going to SilhouetteDesignStore com or clicking on the STORE button in Silhouette Studio found in the upper right hand corner of the software Sign in to your Silhouette account in the Design Store This is the same account information you used when you registered your machine To sign in to your account click Sign In located in the upper right hand corner Input your email...

Страница 8: ...rt silhouetteamerica com NOTE While you do need to be connected to the internet for initial setup all content in the Silhouette Library can be accessed and used offline The Silhouette Library experience including content and library structure is synced between all devices you sign in to Connect the Cameo 4 Connect the Silhouette Cameo to the power supply Start by connecting the cable and the adapt...

Страница 9: ...ools that come up are specific to the task you are doing to help make adjustments easier 3 Drawing Tools The drawing tools are what you ll use to make shapes and add text to the design area 4 Library Split Screen This button allows you to create a library design space split screen 5 Document Tabs These tabs are what you ll use to switch between documents you have open 6 Holding Area Gray The holdi...

Страница 10: ...ge Store When you are connected to the internet the Store tab opens a browser window and takes you to the Silhouette Design Store where you can browse and purchase designs Library You can access your stored designs from the Library tab Sort and organize your designs any way you would like by adding folders and subfolders Designs can be stored on your computer or on the Silhouette Cloud Send The Se...

Страница 11: ...eath will jump up to fill their place Sticky Panels Panels are sticky meaning they snap to the top of the design area or to each other But panels don t need to stick to each other You can move groups of panels or individual panels anywhere on your screen Depending on your project you might want lots of panels open to make adjustments using a wide variety of tools or you might only want a single pa...

Страница 12: ...e creating a line to make a perfectly vertical horizontal or 45 line Rectangles Squares To draw a rectangle choose the Rectangle Tool from the left hand toolbar Either click and drag with the mouse to draw a rectangle or click once to set one corner and click a second time to set the opposite corner f f Hold SHIFT while creating a rectangle to make a perfect square f f Hold ALT OPTION on Mac to dr...

Страница 13: ...e right hand side of the screen In this panel you can change the font text size weight justification character spacing and line spacing Use the mouse to highlight your text before making adjustments to the font size weight etc To finish typing your text click anywhere off the page This will end the text editing mode and deselect the text If you need to make a change to the text double click the te...

Страница 14: ...ck on the Library tab you may be asked to sign in to your Silhouette account if you haven t already done so Input your email address and password and click Sign In If you don t already have a Silhouette account you can click the Sign up FREE link Once you ve signed in you ll see folders on the left and designs on the right If you don t have any designs yet don t worry There will be plenty of time ...

Страница 15: ...ch folder indicate how many designs are included in each folder When you purchase designs from the Silhouette Design Store those designs will show up in your Recent Downloads From there you can move the designs to different folders To add folders to your library click on the Designs folder Right click on any empty space in the folder and select New Folder A new folder will pop up called Untitled F...

Страница 16: ...search box on the top right hand side and type in your keyword Use Designs from Library Once you find a design you d like to use double click the design to place it on your page You can also right click the design and select Open file name This will automatically close the library and take you to the design page The library can be easily reopened by clicking Library tab To close the library withou...

Страница 17: ...ointing arrow otherwise known as the Library icon or click the triangle pointing to the right This will open up the split screen Once your split screen is open you can navigate through your library folders to find the right design you want to add to the design page You can either double click a design or click and drag a design to place it on the design page When you are done with the split screen...

Страница 18: ...he Design Store regularly and generally there is a free design posted every week To access the Silhouette Design Store click the Store tab in the upper right corner of the software This will open up a browser window and navigate you to the store The free design of the week will be displayed on the home page You can also view other deals new designs trending designs and more Search for designs by i...

Страница 19: ...r of the Design Store to go to your shopping cart Since you re downloading a free design you shopping cart total should be 0 00 Once you ve reviewed your shopping cart click the Checkout button to proceed At this time the Design Store will ask you to sign in before downloading your design You should have already created a Silhouette account but if you haven t creating a new account only takes a fe...

Страница 20: ... the Send tab cut lines in your design will become thicker and bolder so you can see exactly what your Silhouette is going to cut If you want to make any adjustments to your design you must go back to the Design screen by clicking on the Design tab You can move your design while you are in the Send tab but you cannot make any other adjustments to the design The first option on the Action panel is ...

Страница 21: ...Turn the Silhouette Cameo on by pressing the power button and waiting for the machine to start up To feed the cutting mat into the machine f f Lift the lid and slide it back f f Align the left edge of the mat with the blue alignment mark on the left side of the machine f f Press the mat against the white rollers f f Press the arrow pointing up on the touch panel to load your mat into cutting posit...

Страница 22: ...Premium Blade Fabric Blade and Sketch Pens work only in the left tool holder or Tool Holder 1 The above blade settings are applicable only with the AutoBlade the Ratchet Blade or the Premium Blade In all cases higher blade settings expose more of the blade and are for cutting thicker materials Refer to Silhouette Studio for recommended blade settings for different materials When you re not using y...

Страница 23: ...ide The Cameo 4 blades have either a 1 or 2 on them These numbers indicate which tool holder you can use that tool in If you are using a tool with an adapter such as ratchet blade for the Cameo 3 that tool can be used only in the 1 spot Lock and Unlock Tools First unlock the Tool 1 position by pulling out the lock lever Insert the AutoBlade or whichever tool or tool adapter you are using into Tool...

Страница 24: ...process is the same if you are loading material without a cutting mat Just make sure your rollers are adjusted to the width of your material see above before you attempt to load it into your machine If you wish to adjust the starting cut point after you ve loaded your material you can use the arrows on the control panel or in the Silhouette Studio software Load Unload Locate the release lever on t...

Страница 25: ...ay With the tray all the way out flip open the inserted piece to reveal where you can place the roll feeder There are two end pieces you ll also flip up and this is where your rolled material will rest Slide the right end piece to match the width of your material either 9 inches or 12 inches Place your rolled material on the roll feeder Take the end piece and feed it through the roll feeder slot T...

Страница 26: ...ngs Change the Feed Option to Feed and set how much of the material you want to feed through Don t worry about getting the measurement exactly right because you can always use the arrows on the touch panel of your Cameo to adjust the feed as needed after you re done making your cut Next send your design to your machine To use the crosscutter make sure your design feeds through the back of your mac...

Страница 27: ...e out It will be the long piece that is shown below Note Make sure the crosscutter is in the locked position before you attempt to remove the cartridge To insert the crosscutter cartridge back in the machine line up the feet at the bottom of the crosscutter cartridge with the grooves at the bottom of the crosscutter cartridge opening on the Cameo Once you re sure the alignment is correct lift the ...

Страница 28: ...nu and add your own cut settings Next select the tool or make sure the right tool is selected With Auto Tool Detection your machine should automatically detect which tool is in the tool holder Here we ve put two different tools in the Cameo 4 the AutoBlade and the Sketch Pen tool adapter Now you re ready to click the Send button and watch your Silhouette cut your design precisely If you ever need ...

Страница 29: ... More Information Complete Software Manual View the complete illustrated User s Manual within Silhouette Studio by clicking Help User s Manual Website Visit the tutorials section of SilhouetteAmerica com for help with specific features and step by step instructions on how to cut different media types with the Silhouette Cameo Blog Visit the official Silhouette blog at Silhouette101 com for informa...

Отзывы: