background image


MU_S01 MY22_ENG - User Manual S01 MY22 (V002) 

Page 

10

 of 

64


Copyright© SILENCE Urban Ecomobility   

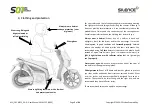
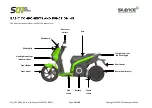
The basic components (user level) of this scooter are:  


Front fender 

Rear-view 

mirrors 

Tail light and rear 

indicator lights 

Rear wheel (motor) 

Seat 

Windshield 

Front wheel 

Side 

stand 

Battery 

Centre 

stand 

Rear fender 

Headlight and front 

indicator lights 

Dashboard 

Содержание S01 MY22

Страница 1: ...27 09 2021 Copyright SILENCE Urban Ecomobility USER MANUAL V002 MY22 ...

Страница 2: ... of around 133 km thanks to a 5 6 kWh battery It also has a TCU device that thanks to the My Silence app allows you to link the motorcycle to your smartphone being able to control it at any time and even share it with whoever you want It also has a USB power socket for charging your mobile phone for example On the other hand the Standard variant shares with the Connected variant all the features d...

Страница 3: ...on printing Scutum Logistic S L reserves the right to make changes at any time and without prior notice without incurring any obligation No part of this manual may be reproduced without written authorisation The images in this manual may show optional accessories installed not included in standard models as well as elements with colours that may differ in real life If you experience an incident wi...

Страница 4: ... scooter designed to be used only on roads carrying at most the driver and one passenger It is also important to respect the maximum load indicated in the Carrying loads section Respect your limits while driving Take your personal abilities and the road conditions into account to drive safely Do not overestimate them and allow for unforeseen events Do not drink or take drugs before driving Your re...

Страница 5: ...eir seriousness We recommend using full face helmets that cover the whole head instead of open face helmets jet or three quarter helmets in light bright colours or with reflector strips that are lightweight and fit properly Protect your eyes Always use eye protection either the visor of the helmet or the appropriate glasses Other garments Wear stiff boots and leather gloves to protect your feet an...

Страница 6: ...carry Recommendations Distribute the load evenly on the scooter and try to keep it as close to the centre as possible Make sure the load is firmly strapped down and avoid carrying loose objects Always make sure tyres are properly inflated and adjust the rear suspension to suit the specific load in each case 4 Accessories and modifications We recommend using only original SILENCE accessories as the...

Страница 7: ...number chassis number 9 2 Production information label 9 BASIC COMPONENTS AND FUNCTIONING 10 1 Battery pack be 11 2 Motor rear wheel 11 3 Dashboard 12 4 Vehicle controls and driving 20 5 Ignition 28 6 Lighting 29 7 Seat Compartment under the seat 31 8 Stands 36 9 Rear view mirrors 36 10 Accessories 36 APP MY SILENCE ONLY FOR CONNECTED VERSION 37 TECHNICAL SPECIFICATIONS 38 1 Scooter specifications...

Страница 8: ...t practices to ensure proper battery maintenance 49 10 Safety information regarding the battery 50 DISPOSAL AND RECYCLING 52 1 Recycling the battery pack 52 2 Recycling the scooter 52 MAINTENANCE SCHEDULE 53 1 Operations and frequency 54 2 Cleaning 54 3 Storage 55 4 Checks before driving 55 TROUBLESHOOTING 59 VEHICLE AND BATTERY WARRANTY 60 1 Delivery to buyer 60 2 Warranty terms and conditions gr...

Страница 9: ...chassis on the square section rear bar on the right side in front of the rear shock It can also be found indicated on a label under the seat The VIN standard is determined in the ISO standard The VIN number must be given when ordering replacement parts 2 Production information label This scooter has a second label with the chassis and homologation number among other information This label is found...

Страница 10: ... Urban Ecomobility The basic components user level of this scooter are Front fender Rear view mirrors Tail light and rear indicator lights Rear wheel motor Seat Windshield Front wheel Side stand Battery Centre stand Rear fender Headlight and front indicator lights Dashboard ...

Страница 11: ...ply by taking the battery to a power source This battery pack can also be used on other scooters or even used to power other devices For more information refer to the BATTERY PACK section which describes all the features and functions of your new battery 2 Motor rear wheel On the rear wheel this scooter has a 100 electric motor with Brushless technology direct transmission and an air cooling syste...

Страница 12: ...of 64 Copyright SILENCE Urban Ecomobility 3 Dashboard The dashboard provides you with all of the information you need about the scooter in order to drive it It features an LCD screen 2 buttons SET and INFO and 10 hazard lights which are explained below ...

Страница 13: ...ht SILENCE Urban Ecomobility a LCD display Charge level indicator The top of the display shows the battery s state of charge SoC This is shown as a percentage so when the battery is completely discharged it will read 0 and when it is fully charged it will show 100 ...

Страница 14: ...attery OUT being used or into it IN regenerated through the motor brake or charging Ambient temperature On the top right the ambient temperature is displayed in Celsius or Fahrenheit depending on the settings It shows both positive and negative temperatures Current time Just below that the current time is displayed battery data The time can be shown using the 12 hour or 24 hour clock system ...

Страница 15: ...Y or SPORT the latter exclusive to the Connected variant Estimated remaining range Below the driving modes there is information about the remaining range in kilometres or miles This is approximate and depends on the driving mode and current use of power Speedometer In the middle on the right under the SILENCE logo the scooter s current speed is shown It can be set to kilometres per hour or miles p...

Страница 16: ...eit Holding down the INFO button you can switch between TEMP BAT battery pack temperature TEMP ENG motor temperature TEMP INV inverter temperature Press INFO once to display TRIP1 Partial odometer 1 indicates the kilometres miles travelled since the last time it was reset Holding down the INFO button you can switch between KM MI kilometres miles travelled AVG average speed for these kilometres mil...

Страница 17: ... charging side stand out etc or operating errors which start with 0x If the latter appear please contact your SILENCE Official Service Centre b Buttons The buttons on the dashboard are SET left and INFO right and the same on the controls on the right side of the handlebar Their functions are as follows Browsing panels Press INFO press once this will take you through the following screens with each...

Страница 18: ...itch between hours minutes and time mode they will start flashing With the time flashing press INFO press once it will increase by one unit per press Press INFO and hold the hour will increase quickly With the minutes flashing press INFO press once it will increase by one unit per press Press INFO and hold the minutes will increase quickly With the time mode flashing press INFO press once this wil...

Страница 19: ...s on when the scooter has done all the necessary checks and it is ready to drive Side stand or kickstand light It comes on when the stand is out Driving is not permitted with the stand out automatic safety shutdown Temperature indicator It flashes when a component is approaching its permissible upper or lower limit It stays on when it exceeds it Motor 100 ºC int 110 ºC fix Inverter 70 ºC int 75 ºC...

Страница 20: ... Vehicle controls and driving Dashboard Brake fluid tank Reverse gear button Brake fluid tank Rear view mirror Rear view mirror Brake Throttle Warnings Hazard switch INFO MODE Ignition Carry hook Horn Power socket USB only in S01 Connected Indicator lights switch Lights switch Brake Windshield ...

Страница 21: ...nerative brake it can be activated by lightly pressing each lever using it without needing to apply the mechanical brake Then both brakes are activated together Using the regenerative brake helps braking while maintaining battery charge The regenerative brake applied depends on the driving mode selected see MODE o The regenerative brake is activated when either of the two levers is pressed This sy...

Страница 22: ...ed down it returns to the central position FLASHING It allows you to flash high beam when it is pressed as a warning to other drivers on the road o Position 2 switch remains in position 2 top HIGH BEAM comes on When high beam is on the following blue light will come on in the dashboard Reverse gear button Lights switch Indicator lights switch Horn Reverse gear button not visible in this image ...

Страница 23: ...ess the central white button to reset the switch position and turn the indicator lights off Horn Press the button with the horn symbol to honk the horn Reverse gear switch This scooter has a reverse gear To use this function press the green button behind the left brake lever and while pressing it accelerate smoothly The following hazard light will come on in the dashboard and make an intermittent ...

Страница 24: ...ter are on the green light with the following shape on the instrument panel will do the same o Position 2 push button returns to the neutral position WARNINGS Switches the indicator lights on and off on both sides at the same time A beeping sound will be made with each flash of the indicator light You can switch on your hazard lights and leave them on with the key out of the ignition To do so swit...

Страница 25: ...N o Mode selector this scooter has two Basic variant or three Connected variant different driving maps which can be selected with the MODE button These are o CITY default mode in which the scooter starts which offers the best performance features It does not use the regenerative brake o ECO this mode is for more relaxed driving with limited speed and acceleration It gives the vehicle a longer rang...

Страница 26: ...is shown on the dashboard A single press will switch between ECO CITY or SPORT modes following the sequence C S C E C S C During the transition between one mode and another the name of the next mode will flash on the screen for a few seconds and will be activated and remain fixed In this way we can skip 2 modes without having to activate the immediately following mode in the sequence We can go dir...

Страница 27: ...ycle is NOT prepared to go on the highway continuously although it could go at specific times The vehicle is designed to circulate in CITY and ECO mode without causing any critical element to overheat If the vehicle is used in SPORT mode continuously Connected variant the Battery Pack BP could overheat For this reason SILENCE has developed a system that optimizes the consumption and power of the v...

Страница 28: ...be moved You can work on the scooter safely it is recommended in any case to remove the keys c ON On All functions are ready to be used The scooter is ready to be driven if you hold the MODE button and the left brake lever pressed until READY appears on the speedometer and the green drive light D comes on In this position the key cannot be removed In addition to the key the Connected version can b...

Страница 29: ...ighting groups are a Headlight Includes high beam top low beam bottom and side lights perimeter semi circles b Daytime and front indicator lights On each side of the headlight is an LED assembly that combines the functions of daytime running light and turn signal c Tail light A LED module is situated on the rear of the scooter which groups the rear side braking and rear turn lights d License plate...

Страница 30: ...ards high and low beam turn the screw clockwise facing the scooter headlight The screw is accessed from the opening between the headlight and the front fender The adjustment screw is in a place that is not easy to access if you cannot manage to adjust it yourself please take the scooter to your nearest SILENCE Official Service Centre ADJUSTING THE LIGHT BEAM POSITION DOWN To adjust the light beam ...

Страница 31: ...acity to store 2 helmets The seat is opened 1 with the scooter s key see section Ignition In the S01 Connected it can also be done by 2 braking with both levers with the scooter turned on and the side stand deployed or 3 via the My Silence app To close it lower it and press on the seat until it is locked Make sure it is locked before you start driving In the compartment under the seat you will fin...

Страница 32: ...ove the battery pack easily in just a few seconds follow these steps with the scooter on the centre stand WARNING BATTERY NOT CONNECTED When the battery does not make proper contact with the motorcycle the information BATT OUT appears on the instrument panel once properly connected the usual information will be displayed ...

Страница 33: ...ANT Never remove or insert the battery pack when the scooter is charging or with the key in the ignition Make sure not to unfold the handle before pulling the pack out unfold it after the battery has been removed from the scooter The wheels and base of the pack slide out and fold up automatically when you remove it or insert it into the scooter Nevertheless it is your responsibility to do this slo...

Страница 34: ...t in the scooter the part of the power multipin connector that is on the scooter must be covered with the rubber cap designed for this purpose The goal is to protect it while it is disconnected WARNING do not put the protective cap on while the scooter is plugged in and never get the connector wet even with the cap on ...

Страница 35: ...side the seat compartment The scooter has 4 fuses from top to bottom in the image or from left to right in the bike F1 Black 1A fuse to protect the USB port F2 Orange 5A fuse protecting the power source for lights horn etc 12 VDC VDC socket F3 Grey 2A fuse protecting the DC DC converter 60 VDC VDC inlet F4 Grey 2A fuse protecting the inverter MCU F1 F4 ...

Страница 36: ... a vertical position To lower the stand push the leg down with your foot as you push or pull the scooter gently up and rearwards we recommend holding the handlebar and rear handle while doing this The centre stand should be used when the ground is stable or flat and for long parking periods or servicing 9 Rear view mirrors 10 Accessories There is a wide range of accessories available to customise ...

Страница 37: ... is the first electric scooter connected as standard from its development to the end user Everything is designed by and for the client making the use of the motorcycle easier and always providing all the necessary information in a completely personalized way To make the link with your device you simply have to know your VIN see section VIN number chassis number and download the app available on Go...

Страница 38: ...h a battery 4 1 5 6 kWh 147 152 kg MAM rear axle 218 kg Weight of the battery 4 1 5 6 kWh 36 41 kg FRONT WHEEL ASSEMBLY REAR WHEEL ASSEMBLY FRONT WHEEL REAR WHEEL Front rim 15 Rear rim 14 Front tyre 120 70 15 Rear tyre 140 70 14 Front tyre pressure solo with passenger 1 8 2 2 bar Rear tyre pressure solo with passenger 2 0 2 3 bar FRONT BRAKE REAR BRAKE Type Disc hydraulic combined Type Disc hydrau...

Страница 39: ...ke Reverse gear Nominal power Basic Connected 5 7 kW Maximum vehicle speed Basic Connected 85 100 km h Peak power Connected 11 8 kW Power mass ratio 0 063 kW kg ENERGY EFFICIENCY S01 Basic BP 4 1 kWh S01 Connected BP 5 6 kWh Energy consumption 65 Wh km Energy consumption 70 Wh km Environmental regulations Euro 5 Environmental regulations Euro 5 Range 100 km Range 133 km ...

Страница 40: ... this could cause it to catch fire Avoid all contact with water o If there is any indication or you suspect the battery pack has been used improperly or has fallen do not plug it in Call a SILENCE Official Service Centre as this could be LIFE THREATENING A battery fire can be put out with water a CO2 fire extinguisher or class D fire extinguisher unless the battery is plugged in or near other batt...

Страница 41: ...70 mm Box height 270 mm Wheel width 330 mm Box depth 440 mm Nominal voltage of the battery 51 VDC Storage temperature not charging 20 to 45ºC max 0 to 25 ºC recommended Operating temperature 0 to 45ºC charging 10 to 60ºC use discharging Housing material Aluminium and PC Max charging current 30 A 35 A Max discharge current 160 A 280 A Charger type Onboard 90 240 VAC 600 W Max internal charger curre...

Страница 42: ...type removal system This system includes an extendible handle two wheels and a support base to use on flat horizontal surfaces To learn more about how to remove it from the scooter see the Removing the battery section b Internal charger Integrated into one of the side covers the internal 600 W charger allows the battery to be charged on the scooter or when removed using any conventional plug Schuk...

Страница 43: ...pposite directions Following this it will be shown in turquoise and then the remaining charge will be indicated as a portion of the ring lit up in green or the whole ring if the battery is 100 charged When the battery charge is low the entire ring will be shown in red CHARGING while the battery is charging a green light trail moving around the ring will alternate with a portion of the ring lit up ...

Страница 44: ...e power to charge the battery pack which at SILENCE we call Energy IN You can charge your battery in our quick charging cabinets or by plugging it directly into a normal socket WARNING only use the quick charging devices supplied by SILENCE to ensure the validity of the warranty o Energy OUT On the other hand Energy OUT is for everything that can be powered using the battery i e all the applicatio...

Страница 45: ...s the voltage from 60 V to 220 V It has 2 power points where you can plug in any electronic device or appliance according to the power limits wherever you are Available soon 3 Exchanging batteries available soon You will soon be able to use the Battery Swapping Stations BSS to exchange batteries You will be able to reserve a charged and available battery through the My Silence app and exchange it ...

Страница 46: ...d discharge currents It also includes an action plan in case of an irregular battery status triggering preventive measures in case of power voltage or temperature spikes or losses etc In short the BMS is the battery s brain ensuring optimal performance and safety 5 Connecting the charging unit You can charge your S01 battery on the scooter or separately Both the scooter and the battery have an IEC...

Страница 47: ...mperature an internal heater will be switched on until the battery reaches a temperature of 15ºC in the case of battery units with this element activated This heater works when plugged into the mains and allows the power to be transferred at the right temperature However this has an impact on the charge time which will take longer than if the temperature conditions were within the normal range For...

Страница 48: ...or lower warning or failure the following light will come on Temperature indicator It flashes when a component is approaching its permissible upper or lower limit It stays on when it exceeds it Motor 100 ºC int 110 ºC fix Inverter 70 ºC int 75 ºC fix Battery 50 ºC int 60 ºC fix 5 ºC int 10 ºC fix Depending on the situation the following actions should be taken Low temperature The battery will not ...

Страница 49: ...life of 1 000 cycles maintaining 80 of its capacity if it is maintained at the correct maintenance intervals and a series of recommendations are followed Avoid using the SPORT mode excessively trying to use the CITY mode as long as possible Reason avoid aggressive driving with continuous sudden accelerations Make sure that the battery is not fully discharged charge it when its charge level is at a...

Страница 50: ... OR EXPOSE IT TO LIQUIDS AS THE GENERATION OF EXCESS HEAT MAY LEAD TO FIRE WHICH COULD BE VERY DANGEROUS QUALIFIED AUTHORISED PERSONNEL YOU MUST READ THE WORKSHOP MANUAL BEFORE REPAIRING OR REPLACING THE BATTERY NEVER OPEN THE BATTERY BOX WARNING THIS MAY BE HIGHLY DANGEROUS AND WILL TOTALLY VOID THE WARRANTY ONLY AUTHORISED PERSONNEL MAY WORK ON THE BATTERY BOX IN THE EVENT THAT SMOKE STARTS TO C...

Страница 51: ...utes o Contact with skin remove contaminated clothing and flush the affected area with soap and water for at least 15 minutes Do not apply grease or ointments o Inhalation take outdoors and ventilate the contaminated area Provide oxygen or artificial respiration if necessary b Fire protection measures Extinguishing measures o The following can be used D type CO2 and dry chemical extinguishers Wate...

Страница 52: ...ontainers It must be deposited at an authorised SILENCE Service Centre to ensure it is recycled properly reducing its environmental impact 2 Recycling the scooter When you need to dispose of your SILENCE scooter you must do so according to the applicable regulations and always respecting the environment For more information about recycling and disposal of your scooter please contact an authorised ...

Страница 53: ...ve all the materials you need and a clear idea of what you are going to do If your S01 is involved in an accident request an inspection of the main components by a SILENCE Official Service Centre Failure to properly maintain the scooter correctly follow instructions or resolve a problem before driving could cause an accident in which there is a SERIOUS RISK OF INJURY OR DEATH Always follow this sc...

Страница 54: ...pecifications chassis motor Every week Lights Clean any hardened dirt with a soft sponge As needed Windshield Clean with a soft sponge to remove any insects or dirt Every day of use Suspensions Check for leaks in both the fork and rear shock absorber Every month 2 Cleaning Clean the scooter as indicated in the previous section As with any vehicle it is important to clean it regularly to keep it in...

Страница 55: ...and o Check the scooter to make sure there have not been any problems in the past o A cover protects your scooter from the elements and is a good investment o Put some kind of protection on the floor to protect from any leaks 4 Checks before driving a Charge level Check the charge level on the LCD screen If it is too low recharge the battery before using your scooter b Lamps and indicator lights R...

Страница 56: ...els on the rear tyre since the motor is housed inside this wheel It is important to remember that this vehicle has more weight on the rear wheel than conventional vehicles those without an in wheel motor so the rim or motor can be affected when going over kerbs potholes or road humps if travelling at the same speed as a conventional vehicle WARNING If you go over kerbs potholes or road humps at hi...

Страница 57: ...ater and seek medical attention quickly Brake pads When the brake pads are less than 1 mm thick they are less effective Consult your point of sale for replacements Brake levers If there is too much play on the brake levers but the brake pads are still in good condition take the scooter to the official point of sale as soon as possible to have it checked Before the D icon lights up scooter ready to...

Страница 58: ...fort The adjustment device is mounted on the brake levers Rotate the adjustment device forwards or backwards to adjust the position of the brake levers WARNING The brake lever adjustments only affect the lever position and have no effect on the braking power or range f Battery anchoring Check the correct fastening of the battery verifying that when pulling it firmly it does not come out of the mot...

Страница 59: ...the scooter to the nearest official distributor The scooter will not start Key not in the ignition The scooter is charging The battery is dead Damaged fuses Check that the key is in the ignition Wait for the battery to charge and disconnect the charger Charge the battery fully Replace damaged fuses If the problem persists take the scooter to the nearest official distributor The battery will not ch...

Страница 60: ...uyer This document is the basis for processing any warranty claims warranty claims cannot be processed if the documents are not filled in properly or are incomplete VIN Vehicle Identification Number Full name Address City Town Postcode Country Telephone Mobile phone e mail Date of delivery Distributor number ...

Страница 61: ...e original features certified expressly by the manufacturer provided that the problem is associated with the modification d The vehicle has been used in sporting competition e The operations maintenance and service instructions set out in this manual have not been followed WARNING Regular use definition At least once a week for a minimum of 10 hours Occasional use When not performing a regular use...

Страница 62: ...e passed at the same time The number of kilometres between inspections of the scooter and battery is shown automatically on the scooter s display the screen will show a spanner icon to indicate that it is time for an inspection based on the kilometres travelled and is as follows first inspection at 1 500 km second at 5 000 km third at 10 000 km and subsequent inspections every 5 000 km Inspections...

Страница 63: ...PECTION INFO km 9th INSPECTION INFO km NEXT INSPECTION BEFORE 1 year 5 000 km NEXT INSPECTION BEFORE 1 year 5 000 km or km or km must be greater than must be greater than must be greater than must be greater than 3rd INSPECTION INFO km 10th INSPECTION INFO km NEXT INSPECTION BEFORE 1 year 5 000 km NEXT INSPECTION BEFORE 1 year 5 000 km or km or km must be greater than must be greater than must be ...

Страница 64: ...MU_S01 MY22_ENG User Manual S01 MY22 V002 Page 64 of 64 Copyright SILENCE Urban Ecomobility ...

Отзывы: