background image


REMOTE ACCESS HOW TO 


07.10.2021 

Page 13 

3.3 

LED Status Display 

3.3.1 

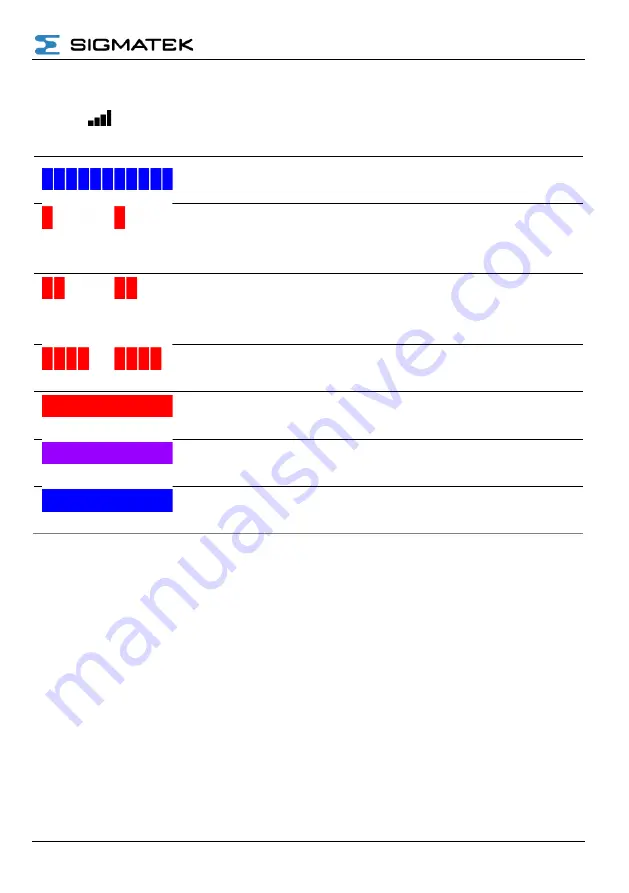
 Signal LED 


Blue blinking 

Initializing the mobile radio module 


Red blinking  

1 pulse 

No receive or no connection to the 

network possible (APN or SSID may 

be wrong) 


Red blinking  

2 pulses 

PIN invalid or PUK required 

(A phone is required to unlock the SIM 

card with PUK) 


Red blinking  

4 pulses 

SIM card is invalid or missing 


Constant red 

Connected, poor signal 


Constant violet 

Connected, medium signal 


Constant blue 

Connected, good signal 

Содержание RAE 100

Страница 1: ...2 Optional hardware switch for VPN management 7 3 2 Preparing Hardware with Optional Interfaces 9 3 2 1 Cellular 3G 4G 9 3 2 2 WIFI 10 3 2 3 Using WIFI RAR as an Access Point AP 11 3 3 LED Status Disp...

Страница 2: ...work settings RAR only 33 5 6 Additional network settings RAE only 36 5 7 Setup of remote services 37 5 7 1 Establishing a VPN Connection 37 5 7 2 VNC over VPN 39 5 8 Data Acquisition and Retention 43...

Страница 3: ...RAR WIFI dual CPU solution 70 6 1 5 Example 5 RAR cellular single CPU solution 71 6 1 6 Example 6 RAR cellular dual CPU solution 72 6 2 Remote Access Embedded RAE Solutions 73 6 2 1 Example 7 RAE100 s...

Страница 4: ...sections and introduce examples The meanings of the 3 symbols are as follows Attention This symbol means that the information directly following requires your complete attention The information here i...

Страница 5: ...rst use p21 2 Setup the remote product as relevant a RAR hardware p6 b RAE application p15 not required for RAR 3 Register the device on first use a RAR using ethernet p26 b RAR using WIFI p29 c RAR u...

Страница 6: ...tage by connecting the supply voltage Shielding should be connected to the protective earth PE Install cables using ferrules to reduce strain on the wires A digital input is available for hardware bas...

Страница 7: ...complete Figure 3 3 and it has been registered with the RAP Refer to section 5 3 for registration 2 On the RAP select the device to be configured 3 Locate the WAN settings click show more Figure 3 4...

Страница 8: ...REMOTE ACCESS HOW TO Page 8 07 10 2021 Figure 3 3 RAR with switch installed on digital input 1 Figure 3 4 WAN settings in the RAP...

Страница 9: ...N management of the digital input 3 2 Preparing Hardware with Optional Interfaces 3 2 1 Cellular 3G 4G With power off 1 Insert the SIM card into the SIM card slot Figure 3 6 2 Screw the antenna onto t...

Страница 10: ...lular option 3G 4G antenna installed on the SMA connector for the cellular radio 3 2 2 WIFI With power off connect the WIFI antenna to the RAR using the SMA connector marked DIV Figure 3 8 RAR with WI...

Страница 11: ...istration 2 On the RAP select the device to be configured 3 On the config page edit the LAN settings 4 Click on the slide switch labelled Enable Wi Fi hotspot 5 Assign the SSID and password as require...

Страница 12: ...3 10 LAN settings enable and configure the wifi hotspot AP Figure 3 11 Edit the firewall settings to configure access via the AP to the internet and host networks Figure 3 12 Configuration changes mu...

Страница 13: ...ulse No receive or no connection to the network possible APN or SSID may be wrong Red blinking 2 pulses PIN invalid or PUK required A phone is required to unlock the SIM card with PUK Red blinking 4 p...

Страница 14: ...d blinking 3 pulses LAN WAN conflict conflicting subnets Red blinking 4 pulses Removed from the platform RAR must be re configured and registered Red blinking 5 pulses Previously registered at RAP rem...

Страница 15: ...File Transfer Edit Autoexec lsl as shown in Figure 4 13 3 Apply settings valid for the current LAN Figure 4 14 a IP address b IP subnet c IP gateway IP address of the router used to access the intern...

Страница 16: ...on via the Remote CLI enter the command ping www google com or a site accessible from your region in the command line and press Enter or Execute If the machine can reach the internet a latency value w...

Страница 17: ...REMOTE ACCESS HOW TO 07 10 2021 Page 17 Figure 4 14 Editing the IP configuration Figure 4 15 File Commander interface Make Dir button highlighted...

Страница 18: ...REMOTE ACCESS HOW TO Page 18 07 10 2021 Figure 4 16 Packages folder within C lslsys Figure 4 17 Copying the packages to the machine...

Страница 19: ...07 10 2021 Page 19 Figure 4 18 Opening the Remote CLI tool Figure 4 19 Executing the RAE application install command via the CLI Figure 4 20 Installation successful confirmation Figure 4 21 Starting...

Страница 20: ...22 Appending the RAE application start command to the Autoexec lsl Figure 4 23 Confirmation message that the RAE application started successfully Figure 4 24 Executing the PING command against a doma...

Страница 21: ...a company account please register with the Remote Access Platform 1 Open the RAP main page https www sigmatek connect com To register click on the link labelled Don t have an account Register Figure 5...

Страница 22: ...REMOTE ACCESS HOW TO Page 22 07 10 2021 Figure 5 26 RAP entering requested details Figure 5 27 RAP complete the registration by clicking on the button sent via email...

Страница 23: ...d Interface To log in to the platform 1 Go to the main page https www sigmatek connect com 2 After entering login data click on LOG IN 3 Select the company required to view and register new devices Fi...

Страница 24: ...ls device registration 5 2 2 User Settings The User Settings can be opened by clicking on the white arrow Figure 5 29 it provides access to Profile Settings localisation email address security and vie...

Страница 25: ...nfig file is transferred to the router a factory reset should be performed if the router has already been registered before Attention The factory reset deletes the router configurations This includes...

Страница 26: ...outer address should be specified in the range 192 168 111 x b Additional LAN networks may be added later 7 Download the RAR configuration file Figure 5 37 on most Windows based browsers the file ixro...

Страница 27: ...07 10 2021 Page 27 Figure 5 32 Left select Tools from the RAP main menu Right choose the option to start configuration Figure 5 33 Select the company the device should be registered to Figure 5 34 Sel...

Страница 28: ...REMOTE ACCESS HOW TO Page 28 07 10 2021 Figure 5 35 Accept edit the WAN interface settings Figure 5 36 LAN interface configuration Figure 5 37 Download the RAR configuration file...

Страница 29: ...layed in the RAP main interface 5 4 3 Remote Access Router using WIFI WAN Refer to the procedure in section 0 p26 At step 4 select the type of internet connection select wireless network as the method...

Страница 30: ...REMOTE ACCESS HOW TO Page 30 07 10 2021 Figure 5 40 Select the internet connection method wireless Figure 5 41 Provide the host network WIFI credentials...

Страница 31: ...net connection select cellular network as the method of accessing the internet Figure 5 42 Enter the SIM card APN and SIM card PIN code These details may be obtained from the network provider Figure 5...

Страница 32: ...RAP 1 Using the Remote CLI execute the command ixagent register companyID Figure 5 44 The RAP company ID may be found from the RAP interface under My Company Figure 5 45 2 Successful registration will...

Страница 33: ...s allocation pool Enable disable source NAT Example to assign an additional subnet mask to the router 1 On the RAP go to CONFIG Figure 5 47 2 On the LAN panel click the pencil symbol to edit settings...

Страница 34: ...REMOTE ACCESS HOW TO Page 34 07 10 2021 Figure 5 47 Open the Device config page Figure 5 48 Edit the LAN configuration...

Страница 35: ...REMOTE ACCESS HOW TO 07 10 2021 Page 35 Figure 5 49 LAN configuration after clicking show more the add additional subnet option is revealed...

Страница 36: ...2 2 Open the Autoexec lsl using Class 2 Debug File Transfer Edit Autoexec lsl Add firewall commands to handle the forwarding and NAT to downstream devices a Example control with IP address 10 100 3 3...

Страница 37: ...aded from RAP Tools VPN Client Figure 5 51 b There are optional settings available by clicking the gear icon from the Tools page i Client log mode ii Stealth mode support for restrictive networks Data...

Страница 38: ...E ACCESS HOW TO Page 38 07 10 2021 Figure 5 52 Each device has a VPN connect button to establish secure communications Figure 5 53 After establishing a VPN connection the device status indicator turns...

Страница 39: ...tup 1 From the RAP main menu select Devices and click on the relevant remote device Figure 5 54 2 Click on the Services tab and click the button Figure 5 55 3 Assign a name for the device service and...

Страница 40: ...REMOTE ACCESS HOW TO Page 40 07 10 2021 Figure 5 54 Adding a new service to the device Figure 5 55 Setting the service target by IP address...

Страница 41: ...REMOTE ACCESS HOW TO 07 10 2021 Page 41 Figure 5 56 Select VNC Server as the service Figure 5 57 Set the VNC server port and password...

Страница 42: ...nder services select the required VNC Click on VNC Server Figure 5 58 3 The viewer will be opened in the same window to return to the info tab click on the x in the left corner Figure 5 59 Figure 5 58...

Страница 43: ...will provide the data source Figure 5 61 3 Click Next and in the following dialogue click Data source Figure 5 62 4 Enter the details for the data source a From the presented list select the relevant...

Страница 44: ...REMOTE ACCESS HOW TO Page 44 07 10 2021 Figure 5 61 For the service specify the target Figure 5 62 Select Data Source as the type of service...

Страница 45: ...RAP Device CONFIG and click on PUSH CHANGES 4 To add variables a From RAP Device Services click on the pencil icon of the relevant control Figure 5 63 b Select the Data Source service Figure 5 64 c C...

Страница 46: ...O Page 46 07 10 2021 Figure 5 63 From the RAP Devices Services tab click on the edit button of the station with the data source to add variables Figure 5 64 Click on the data source to edit the data s...

Страница 47: ...REMOTE ACCESS HOW TO 07 10 2021 Page 47 Figure 5 65 The Open Configurator button provides access to edit the variables Figure 5 66 Data Configuration interface...

Страница 48: ...t be added to the control that is the data source 1 Add the ModbusTCPSlave class Note the port number for the RAP configuration 2 Setup the data sources in the ModbusTableBase class This class assigns...

Страница 49: ...ck on ADD g Click on SYNC in the configurator header line 6 After sync is complete begin a test of the data server connection and variable acquisition by clicking on RUN TEST Figure 5 69 Overview of a...

Страница 50: ...REMOTE ACCESS HOW TO Page 50 07 10 2021 Figure 5 71 Configuring the data source settings for Modbus Figure 5 72 Data Configurator interface...

Страница 51: ...REMOTE ACCESS HOW TO 07 10 2021 Page 51 Figure 5 73 Adding a variable from a Modbus data source...

Страница 52: ...icence available licences are displayed under Billing Figure 5 74 Figure 5 74 RAP billing page displaying the cloud logging licence 5 8 2 1 Enable Cloud Logging 1 Obtain a licence from your SIGMATEK r...

Страница 53: ...d Logging Figure 5 77 2 From the Cloud Logging menu click on tags 3 Click on the button to add a tag Figure 5 78 4 In the tag editor enter a data source select the logging interval and data retention...

Страница 54: ...REMOTE ACCESS HOW TO Page 54 07 10 2021 Figure 5 78 Cloud Logging interface the button is used to add new tags Figure 5 79 Tag editor interface Figure 5 80 Available tags are listed...

Страница 55: ...ck Add to move to the design step 5 Dashboard widgets can be selected and tags assigned to each widget in the Dashboard designer Figure 5 84 a Value widget a data value display Figure 5 86 b Status wi...

Страница 56: ...REMOTE ACCESS HOW TO Page 56 07 10 2021 Figure 5 82 Select a dashboard type report or live Figure 5 83 Assign a dashboard name and select theme Figure 5 84 Example Dashboard layout...

Страница 57: ...REMOTE ACCESS HOW TO 07 10 2021 Page 57 Figure 5 85 Dashboards are accessed from RAP Device Info Figure 5 86 Value widget on a live dashboard Figure 5 87 Status widget on a live dashboard...

Страница 58: ...REMOTE ACCESS HOW TO Page 58 07 10 2021 Figure 5 88 Gauge widget on a live dashboard Figure 5 89 Graph widget on a live dashboard...

Страница 59: ...for Cloud Notification available licences are displayed under Billing Figure 5 90 RAP billing page displaying the Cloud Notify licence 5 8 3 1 Enable Cloud Notification 1 Obtain a licence from your SI...

Страница 60: ...otification d Set the alarm parameters Figure 5 95 i Name ii Severity iii Trigger conditions value operator iv Instructions for alarm resolution e Click Add to store the new alarm f From the RAP main...

Страница 61: ...REMOTE ACCESS HOW TO 07 10 2021 Page 61 Figure 5 93 Add tags using the Cloud Notify interface Figure 5 94 Create alarms as the basis of notifications...

Страница 62: ...REMOTE ACCESS HOW TO Page 62 07 10 2021 Figure 5 95 Setting the source and parameters for the cloud alarm Figure 5 96 Specifying the alarm severity levels sent to the users...

Страница 63: ...main menu select Users Figure 5 30 New user o Click the icon to invite a new user with specific permissions o Invited users are displayed under pending invites o The invited user receives an email wit...

Страница 64: ...gned access 2 Click on the access tab Figure 5 99 3 Click on the edit icon to add remove access to this device by user Figure 5 100 4 From the same interface access to all devices in the company may b...

Страница 65: ...plary setup procedure based on Example 1 1 Open LASAL CLASS 2 and establish an online connection to the HMI 2 To access the HMI via the RAR the default gateway must be changed to the IP address of the...

Страница 66: ...REMOTE ACCESS HOW TO Page 66 07 10 2021 Figure 6 103 Entering the IP gateway into the Autoexec lsl Figure 6 104 HMI connected to the RAR may be accessed securely via the RAP...

Страница 67: ...REMOTE ACCESS HOW TO 07 10 2021 Page 67 6 1 1 Example 1 RAR wired single CPU solution...

Страница 68: ...REMOTE ACCESS HOW TO Page 68 07 10 2021 6 1 2 Example 2 RAR wired dual CPU solution...

Страница 69: ...REMOTE ACCESS HOW TO 07 10 2021 Page 69 6 1 3 Example 3 RAR WIFI single CPU solution...

Страница 70: ...REMOTE ACCESS HOW TO Page 70 07 10 2021 6 1 4 Example 4 RAR WIFI dual CPU solution...

Страница 71: ...REMOTE ACCESS HOW TO 07 10 2021 Page 71 6 1 5 Example 5 RAR cellular single CPU solution...

Страница 72: ...REMOTE ACCESS HOW TO Page 72 07 10 2021 6 1 6 Example 6 RAR cellular dual CPU solution...

Страница 73: ...REMOTE ACCESS HOW TO 07 10 2021 Page 73 6 2 Remote Access Embedded RAE Solutions 6 2 1 Example 7 RAE100 single CPU solution...

Страница 74: ...E ACCESS HOW TO Page 74 07 10 2021 6 2 2 Example 8 RAE100 dual CPU solution Additional setup is required to enable this solution in the form of port forwarding on the control running RAE Refer to sect...

Страница 75: ...REMOTE ACCESS HOW TO 07 10 2021 Page 75 6 2 3 Example 9 RAE100 As Gateway...

Страница 76: ...T to destination 192 168 111 61 5900 FIREWALL A FORWARD j ACCEPT p tcp dport 5900 sport 5902 d 192 168 111 62 m state state NEW FIREWALL t nat A PREROUTING p tcp dport 5902 j DNAT to destination 192 1...

Отзывы: