SIFA - QUAD B-30 Скачать руководство пользователя страница 1

GUIDA TECNICA

User's Manual - Technische Anleitung
Guide Technique - Manual Técnico

Pasticceria - Pralineria
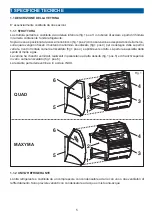
QUAD - MAXYMA

PASTRY/PRALINES DISPLAY UNIT - KONDITOREIVITRINEN/
PRALINENVITRINEN - VITRINE PATISSIERE/CONFISERE - 
PASTELERÍA/PRALINERÍA

Istruzione d'uso
Montaggio
Manutenzione

Istructions for Use
Assembly
Maintenance

Bedienungsanweisung
Montage
Wartung

Utilisation
Assemblage
Entretien

Manual para el uso,
ensamblaje y 
mantenimiento

QMPS 0410

Содержание - QUAD B-30

Страница 1: ...TRY PRALINES DISPLAY UNIT KONDITOREIVITRINEN PRALINENVITRINEN VITRINE PATISSIERE CONFISERE PASTELER A PRALINER A Istruzione d uso Montaggio Manutenzione Istructions for Use Assembly Maintenance Bedien...

Страница 2: ...NDEX INHALTS VERZEICHNIS SOMMAIRE SOMARIO ITALIANO 3 ENGLISH 31 DEUTCH 59 FRAN AIS 87 ESPA OL 115 SCHEMI ELETTRICI 143 ELECTRICAL DIAGRAMS 143 SCHALTSCHEMEN 143 SCHEMAS ELECTRIQUES 143 ESQUEMAS EL CRI...

Страница 3: ...CCERIA CON MENSOLE REFRIGERATE 21 3 5 OPERAZIONI PRELIMINARI DI CONTROLLO 21 3 6 REGOLAZIONE DELLA REFRIGERAZIONE MENSOLE g 25d 21 VERSIONE PRALINERIA 22 3 7 OPERAZIONI PRELIMINARI DI CONTROLLO 22 3 8...

Страница 4: ...ogni responsabilit per l impiego di ricambi non originali SIMBOLOGIA Questo simbolo indica pericolo e verr utilizzato tutte le volte che sia coinvolta la sicurezza dell operatore Questo simbolo indic...

Страница 5: ...i di alluminio anodizzato g 1 pos 3 per il sostegno delle super ci vetrate Il vetro frontale camera e riscaldato g 1 pos 4 apribile verso l alto L apertura assistita dalla spinta di molle a gas La vet...

Страница 6: ...mpre il NUMERO DI MATRICOLA della vetrina che apposto sulla targhetta Fig 3 pos A 1 4 NORME APPLICATE La vetrina risponde alle seguenti norme 2006 95 CE Direttiva Bassa Tensione 97 23 CE Apparecchiatu...

Страница 7: ...9 3 Classe Climatica C UR 35 C 60 35 C 60 35 C 60 35 C 60 Temperatura Espansione C 10 C 10 C 10 C 10 C Temp di Condensazione C 45 C 45 C 45 C 45 C Temp di Esercizio C 4 C 8 C 4 C 8 C 4 C 8 C 4 C 8 C R...

Страница 8: ...Unit di Misura 1100 1600 2100 3200 A 30 B 30 B 45 Resa W 1160 1375 1375 2360 1375 1375 1375 UNITA CONDENSATRICI REMOTE MENSOLE REFRIGERATE 0 10 mt Unit di Misura 1100 1600 2100 Resa W 1930 2360 2670 U...

Страница 9: ...9 A C B B A C B A C I Fig 4 a Fig 4 b NOTA I valori riportati in tabella non tengono conto dell eventuale peso di imballi particolari richiesti dal cliente...

Страница 10: ...no motore considerare gli spazi necessari per consentire l uso e le manutenzioni in condizioni di sicurezza veri care l esistenza di un idoneo impianto di messa a terra come previsto dalle Norme togli...

Страница 11: ...funzionamenti che non saranno coperti da garanzia Fig 6 Fig 7 a Fig 7 b Fig 7 c B A D C Fig 7 d 2 5 MONTAGGIO PIEDINI ATTENZIONE PERICOLO DI SCHIACCIAMENTO Operazione effettuata da 2 3 persone 1 Alzar...

Страница 12: ...on il freno g 8 b pos C devono essere montate nella parte lato operatore inoltre il numero delle ruote varia a seconda della lunghezza della vetrina Se il corpo va accoppiato con altre unit NON QUAD M...

Страница 13: ...serire la vite g 9 pos C e serrarla con il dado g 9 pos D TRA MODELLO LINEARE E MODELLO ANGOLARE Inserire il blocchetto g 10 pos A di canalizzazione nel pro lo di alluminio e ssarlo con le viti g 10 p...

Страница 14: ...li con i grani g 12 pos B LATO CLIENTE In lare il perno g 12 pos C e bloccarlo con i grani g 12 pos D Fig 12 C D D Fig 11b E E E E 2 7 2 CANALIZZAZIONE CASTELLO VETRI per versione VBD Inserire le appo...

Страница 15: ...terie utilizzare il foro C g 13 NOTA per canalizzare una gelateria ed una pasticceria utilizzare il foro D g 13 Appoggiare la staffa di canalizzazione g 14 pos A Inserire il vetro fig 15 pos A sopra l...

Страница 16: ...16 2 7 4 CANALIZZAZIONE BASAMENTO TUBOLARI Fissare le gambe con le apposite viti g 16 pos A e dadi g 16 pos B 2 8 MONTAGGIO CAPPELLO IN VETRO Montare il cappello in vetro g 17 solo versione VAD A A B...

Страница 17: ...ccostare il anco terminale e serrare le viti M6 TCEI g 18 pos C Serrare i grani g 18b pos D Collegare elettricamente i anchi in vetro g 19 pos E ed in larli nella propria sede g 19 pos F NOTA Montare...

Страница 18: ...a QUAD g 20 pos A od una vite per la vetrina MAXYMA g 20 pos B Fig 20 A B Montare il pannello anteriore fig 21 pos C avvitando le relative viti g 21 pos D Montare lo zoccolo tramite aggancio magnetico...

Страница 19: ...Fig 23 deve essere installato a cura del Tecnico Elettricista secondo le norme vigenti 2 11 NOTE AMBIENTALI Imballaggio Non gettare nella spazzatura eventuali parti dell imballo del banco ma selezion...

Страница 20: ...ntare o diminuire la temperatura no al valore desiderato Attendere 10 secondi automaticamente lo strumento memorizzer il valore impostato e il visore mostrer il valore della temperatura In alternativa...

Страница 21: ...OLAZIONE DELLA TEMPERATURA FARE RIFERIMENTO AI PARAGRAFI 3 2 3 3 E 3 4 3 6 REGOLAZIONE DELLA REFRIGERAZIONE MENSOLE g 25d E possibile controllare la refrigerazione delle mensole agendo sui tasti e del...

Страница 22: ...LA TEMPERATURA pos 7 VISORE LUMINOSO pos 8 L accensione si effettua semplicemente posizionando l interruttore sezionatore vetrina pos 1 su I ON e premendo il tasto ON OFF pos 2 Se necessario premere i...

Страница 23: ...13 SBRINAMENTO MANUALE L attivazione manuale del ciclo di sbrinamento si ottiene tenendo premuto per 5 secondi il tasto UP g 24a b pos 6 Se non vi sono le condizioni per lo sbrinamento per esempio la...

Страница 24: ...L apertura del cappello in vetro per la versione VBD va effettuata come raf gurato g 26b 3 16 APERTURA VETRO ANTERIORE versione VAD ATTENZIONE Durante l uso l assemblaggio la manutenzione o qualsiasi...

Страница 25: ...dicato rimuovere la protezione svitando le viti poste ai lati della mascherina g 27 togliere la polvere e lo sporco presente nelle alette del condensatore usando un pennello g 28 riposizionare la grig...

Страница 26: ...ondensa quando presente Asciugare l interno vasca con un panno asciutto Riposizionare i supporti e le relative vaschette NOTA Usare sempre poca acqua ed asciugare accuratamente Non lavare mai la vetri...

Страница 27: ...ordinaria o correttiva devono essere effettuate da personale specializzato ATTENZIONE Munirsi di guanti e indumenti protettivi prima di effettuare qualsiasi operazione di manutenzione 5 2 SOSTITUZIONE...

Страница 28: ...re il tettino fig 34 pos A solo versione VAD Svitare le 2 viti per la vetrina QUAD g 35 pos A od una vite per la vetrina MAXYMA g 35 pos B Scollegare elettricamente il anco con il vetro g 36 pos C e s...

Страница 29: ...pos C svitando le relative viti g 37 pos D Svitare le viti e togliere la griglia del vano motore g 38 Svitare le viti di ssaggio della vasca g 39 pos A e le viti di ssaggio basamenti g 39 pos B S lar...

Страница 30: ...vetro anteriore Con l ausilio di un punteruolo togliere l anello seeger fig 42 pos A di fissaggio del pistone g 42 pos B S lare il perno g 42 pos C dal pistone Smontare il pistone g 42 dalla sua sede...

Страница 31: ...TMENT 48 PASTRY DISPLAY UNIT VERSION WITH REFRIGERATED SHELVES 49 3 5 PRELIMINARY CHECKS 49 CAUTION 49 3 6 SHELF REFRIGERATION ADJUSTMENT Fig 25d 49 CHOCOLATE DISPLAY UNIT version 50 3 7 PRELIMINARY C...

Страница 32: ...use of AUTHENTIC SPARE PARTS we decline all liability wherever non authentic spare parts are used SYMBOLS USED This symbol indicates a hazard It will be used every time the safety of the operator may...

Страница 33: ...ort for the glass surfaces The front double glazed panel Fig 1 pos 4 can be opened by lifting it upwards The opening mechanism is assisted by gas springs The painted side panels of the display unit ar...

Страница 34: ...SERIAL NUMBER of the display unit which can be found on the data plate Fig 3 Pos A 1 4 REFERENCE STANDARDS The display unit complies with the following regulations 2006 95 EC Low Voltage equipment Dir...

Страница 35: ...9 3 Climatic class C RH 35 C 60 35 C 60 35 C 60 35 C 60 Expansion temperature C 10 C 10 C 10 C 10 C Condensation temperature C 45 C 45 C 45 C 45 C Operating temperature C 4 C 8 C 4 C 8 C 4 C 8 C 4 C 8...

Страница 36: ...ITS 10 20 m U n i t o f 1100 1600 2100 3200 A 30 B 30 B 45 Output W 1160 1375 1375 2360 1375 1375 1375 REMOTE CONDENSER UNITS REFRIGERATED SHELVES 0 10 m UM 1100 1600 2100 Output W 1930 2360 2670 REMO...

Страница 37: ...37 GB NOTE The values listed in the table do not take account of the weight of any packaging requested by the customer A C B B A C B A C Fig 4 a Fig 4 b...

Страница 38: ...any other item on both the operator side and the customer side so that air can circulate in the motor compartment Calculate the space required to operate the unit and perform maintenance in safe condi...

Страница 39: ...warranty Fig 7b Fig 7c B A D C 2 5 FITTING THE FEET CAUTION RISK OF CRUSHING This operation requires two or three people 1 Lift the display unit using a suitable device pallet stacker etc Fig 7a 2 Pla...

Страница 40: ...Fig 8b pos C should be xed to the operator side of the product the number of wheels will vary depending on the length of the display unit If the body is to be coupled with other NON QUAD MAXIM units...

Страница 41: ...he screw Fig 9 pos C and x it in place using the nut Fig 9 pos D A LINEAR MODULE AND A CORNER MODULE Position the ducting block Fig 10 pos A inside the aluminium contours and x it in place using the s...

Страница 42: ...pos A and lock them in place using the dowels Fig 12 pos B CUSTOMER SIDE Slot in the pin Fig 12 pos C and lock them in place using the dowels Fig 12 pos D Fig 12 C D D 2 7 2 GLASS SHELVING DUCTING for...

Страница 43: ...wo ice cream display units use hole C Fig 13 NOTE when ducting an ice cream display unit and a pastry display unit use hole D Fig 13 Position the ducting bracket Fig 14 pos A Place the glass panel Fig...

Страница 44: ...7 4 BASE AND BOX CONNECTION Fix the legs in place using the corresponding screws Fig 16 pos A and nuts Fig 16 pos B 2 8 FITTING THE GLASS COVER Fit the glass cover Fig 17 VAD model only A A B B Fig 16...

Страница 45: ...B Put the end side ajar and tighten the M6 TCEI screws g 18 pos C Tighten the beads g 18b pos D Connect the glass side panels g 19 pos E to the electricity supply and slot them into position g 19 pos...

Страница 46: ...QUAD model g 20 pos A or one screw in the MAXYMA model g 20 pos B Install the back panel g 21 pos C and tighten its screws g 21 pos D Install the baseboard using its magnetic docking g 21b pos E Fig...

Страница 47: ...23 must be installed by an electrical technician in compliance with current local regulations 2 11 NOTES ON THE ENVIRONMENT Packaging Do not discard any elements of the counter packaging but separate...

Страница 48: ...or decrease the temperature until the desired value is reached Wait for approximately 10 seconds the instrument will automatically memorise the set value and the display will show the temperature valu...

Страница 49: ...CATOR LIGHTS AND TEMPERATURE ADJUSTMENT PLEASEREFERTOPARAGRAPHS 3 2 3 3 AND 3 4 3 6 SHELF REFRIGERATION ADJUSTMENT Fig 25d It is possible to adjust shelf refrigeration by pressing buttons and of the p...

Страница 50: ...DISPLAY pos 8 The machine can be switched on simply by moving the display unit disconnection switch 1 to the I ON position and pressing the ON OFF button pos 2 If necessary press the display unit lig...

Страница 51: ...on of the defrosting cycle is achieved by pressing and holding the UP button Fig 24a b pos 6 for 5 seconds If the conditions are not suitable for the defrosting process for example if the temperature...

Страница 52: ...elicately The glass cover for the VBD version should be opened as illustrated Fig 26b 3 16 OPENING THE FRONT GLASS COVER VAD model CAUTION During operation assembly maintenance or any other operation...

Страница 53: ...e Fig 27 Remove all dust and grime on the condenser tabs using a paintbrush Fig 28 Replace the grille correctly and tighten the screws NOTE Do not use compressed air forced air or steam Do not use met...

Страница 54: ...ere present Dry the inside of the tub using a clean cloth Replace the supports and the corresponding tubs NOTE Always use a tiny amount of water and dry thoroughly Never clean the display unit using d...

Страница 55: ...ust be performed by quali ed personnel CAUTION Use protective gloves and overalls when performing any maintenance procedure 5 2 REPLACING THE FRONT GLASS PANEL for the VAD version CAUTION This procedu...

Страница 56: ...PANELS Remove the cover Fig 34 pos A VAD version only Loosen 2 screws in the QUAD model g 35 pos A or uno screw in the MAXYMA model g 35 pos B Cut power from the glass side g 36 pos C and take it off...

Страница 57: ...y loosening its screws g 37 pos D Loosen the xing screws and remove the motor compartment protection grille Fig 38 Loosen the tub xing screws Fig 39 pos A and the base xing screws Fig 39 pos B Remove...

Страница 58: ...erators Open the glass cover at the front Using a punch remove the Seeger ring Fig 42 pos A xing the piston in place Fig 42 pos B Remove the piston pin Fig 42 pos C Take the piston Fig 42 out of its s...

Страница 59: ...EMPERATUR 76 VERSION PATISSERIE MIT GEK HLTEN B DEN 77 3 5 VORABKONTROLLEN 77 3 6 EINSTELLUNG DER K HLB DEN Abb 25d 77 VERSION PRALINEN 78 3 7 VORABKONTROLLEN 78 3 8 START 78 3 9 KONTROLLLEUCHTEN Abb...

Страница 60: ...tzteilen wird jede Haftung abgelehnt SYMBOLE Dieses Symbol weist auf eine Gefahr hin und wird immer dann verwendet wenn die Sicherheit des Bedieners gef hrdet ist Dieses Symbol weist darauf hin dass V...

Страница 61: ...tze der verglasten Fl chen befestigt werden Die Frontscheibe aus beheiztem Verbundglas Abb 1 Pos 4 l sst sich nach oben hin ffnen Die ffnung wird durch den Druck von Gasfedern erleichtert Die Seitente...

Страница 62: ...ene FABRIKATIONSNUMMER der Vitrine anzugeben 1 4 ANGEWANDTE NORMEN Diese Vitrine entspricht den Normen Richtlinie 2006 95 EG Elektrische Betriebsmittel zur Verwendung innerhalb bestimmter Spannungsgre...

Страница 63: ...6 7 2215 9 3 Klimaklasse C UR 35 C 60 35 C 60 35 C 60 35 C 60 Expansionstemperatur C 10 C 10 C 10 C 10 C Kondensationstemp C 45 C 45 C 45 C 45 C Betriebstemp C 4 8 4 8 4 8 4 8 Leistung W 840 1160 1375...

Страница 64: ...0 20 m Ma einheit 1100 1600 2100 3200 A 30 B 30 B 45 Leistung W 1160 1375 1375 2360 1375 1375 1375 SEPARATE KONDENSATOREINHEITEN GEK HLTE B DEN 0 10 m Ma einheit 1100 1600 2100 Leistung W 1930 2360 26...

Страница 65: ...65 D HINWEIS Die in den Tabellen angef hrten Werte ber cksichtigen nicht das etwaige Gewicht spezieller Verpackungen die vom Kunden angefordert wurden A C B B A C B A C Abb 4 a Abb 4 b...

Страница 66: ...raum zirkulieren kann Ber cksichtigen Sie den notwendigen Platz damit eine sichere Benutzung und Wartung m glich sind pr fen dass eine den Vorschriften entsprechende Erdungsanlage vorhanden ist Die ge...

Страница 67: ...en um eventuelle Betriebsst rungen zu vermeiden f r die in diesem Fall keine Haftung bernommen wird 2 5 MONTAGE DER STELLF SSE ACHTUNG QUETSCHGEFAHR Dieser Arbeitsschritt erforder den Einsatz von 2 3...

Страница 68: ...rsehenen Rollen sind bedienungspersonseitig einzusetzen die Anzahl der Rollen variiert au erdem je nach L nge der Vitrine Wird der Korpus mit anderen NICHT QUAD MAXIM Einheiten verbunden ist die dazug...

Страница 69: ...tzen und mit der Mutter Abb 9 Pos D festziehen ZWISCHEN LINEAREMR UND ECKMODELL Das Verbindungsteil Abb 10 Pos A in das Aluminiumpro l einsetzen und mit den Schrauben Abb 10 Pos B mitgeliefert befesti...

Страница 70: ...t den Gewindestiften Abb 12 Pos B KUNDENSEITIG Stecken Sie den Stift Abb 12 Pos C ein und befestigen Sie diesen mit den Gewindestiften Abb 12 Pos D Abb 12 C D D 2 7 2 VERBINDUNG DES GLASAUFBAUS f r Ve...

Страница 71: ...rinen verwenden Sie das Loch C Abb 13 HINWEIS Zum Zusammenbau einer Eisvitrine und einer Konditoreivitrine benutzen Sie das Loch D Abb 13 Positionieren Sie den Verbindungsb gel Abb 14 Pos A Setzen Sie...

Страница 72: ...DUNG DES UNTERBAUS MIT DEN ROHREN Die F sse mit den entsprechenden Schrauben Abb 12 Pos A und Muttern befestigen Abb 16 Pos B 2 8 MONTAGE DER ABDECKHAUBE AUS GLAS Die Glashaube montieren Abb 17 nur Ve...

Страница 73: ...ringen und die Schrauben M6 TCEI anziehen Fig 18 Pos C Die Zapfen festmachen Fig 18b Pos D Die Glas Seitenteile abb 19 pos E elektrisch anschlie en und in ihre Sitze einsetzen abb 19 pos F H I N W E I...

Страница 74: ...ne Schraube f r den Glasschrank MAXYMA Fig 20 Pos B anziehen Abb 20 A B Abb 21b E Das Vorderpaneel durch Befestigung der entsprechenden Schrauben Fig 21 Pos D zusammensetzen Fig 21 Pos C Der Sockel du...

Страница 75: ...f hren ACHTUNG Der Trennschalter Hauptschalter Abb 23 ist von einem Elektrotechniker entsprechend den geltenden Vorschriften zu installieren 2 11 UMWELTHINWEISE Verpackung Werfen Sie die Verpackung de...

Страница 76: ...os 6 oder DOWN Abb 24a Pos 7 dr cken um die gew nschte Temperatur zu erh hen oder zu senken Warten Sie etwa 10 15 Sekunden ab speichert das Instrument automatisch den eingestellten Wert und auf der An...

Страница 77: ...OLLLEUCHTEN UND DIE EINSTELLUNG DER TEMPERATUR LESEN SIE DIE ABSCHNITTE 3 2 3 3 UND 3 4 3 6 EINSTELLUNG DER K HLB DEN Abb 25d Die K hlung der K hlb den wird ber die Tasten und des Potentiometers geste...

Страница 78: ...die Position I ON zu stellen und die Taste ON OFF Pos 2 zu dr cken Wenn notwendig die Taste Beleuchtung Vitrine Pos 3 dr cken 3 9 KONTROLLLEUCHTEN Abb 25b BELEUCHTUNG Pos 9 Kontrollleuchte f r Beleuch...

Страница 79: ...g des Abtauvorgangs halten Sie die Taste UP Abb 24a b Pos 6 f r 5 Sekunden gedr ckt Sollten die Abtau Bedingungen nicht gegeben sein z B die Temperatur des Verdampferf hlers ist h her als die Temperat...

Страница 80: ...ie ffnung der Glashaube bei der Version VBD wird wie abgebildet ausgef hrt Abb 26b 3 16 FFNUNG DER ABDECKHAUBE AUS GLAS Version VAD ACHTUNG W hrend des Gebrauchs des Zusammenbaus der Wartung oder jede...

Страница 81: ...des Kondensators mit einem Pinsel Abb 28 Setzen Sie das Gitter wieder in seinen Sitz ein und ziehen Sie die Schrauben an HINWEIS Bitte verwenden Sie weder Druckluft noch Pressluft noch Dampf Metallb r...

Страница 82: ...den k nnte Trocknen Sie das Wanneninnere mit einem trockenen Tuch Setzen Sie die Halterungen und die zugeh rigen Eisschalen wieder ein HINWEIS Verwenden Sie grunds tzlich nur wenig Wasser und trocknen...

Страница 83: ...beiten m ssen von Fachleuten ausgef hrt werden ACHTUNG Tragen Sie f r alle Wartungsarbeiten Schutzhandschuhe und Schutzkleidung 5 2 AUSTAUSCH DER FRONTSCHEIBE f r Version VAD ACHTUNG Hierf r sind mind...

Страница 84: ...Abb 34 Pos A nur Version VAD DiezweiSchraubenf rdenGlasschrankQUAD Fig 35 Pos A oder eine Schraube f r den Glasschrank MAXYMA Fig 35 Pos B abschrauben Die mit dem Glas versehene Flanke elektrisch tren...

Страница 85: ...ig 37 Pos C Schrauben Sie die Schrauben heraus und nehmen Sie das Gitter des Motorraumes ab Abb 38 Schrauben Sie die Befestigungsschrauben der Wanne Abb 39 Pos A sowie die Befestigungsschrauben des So...

Страница 86: ...eeger Ring Abb 42 Pos A mit dem der Kolben befestigt ist Abb 42 Pos B Ziehen Sie den Stift Abb 42 Pos C aus dem Kolben Entfernen Sie den Kolben Abb 42 aus seinem Sitz Eine Person muss das Glas beim Au...

Страница 87: ...ERSION PATISSERIE AVEC ETAGERES REFRIGEREES 105 3 5 OP RATIONS DE CONTR LE PR ALABLES 105 3 6 R GLAGE DE LA R FRIG RATION DES TAG RES g 25d 105 VERSION CONFISERIE 106 3 7 OP RATIONS DE CONTR LE PR ALA...

Страница 88: ...ces SYMBOLES Ce symbole indique un danger il est utilis chaque fois que la s curit de l agent est compromise Ce symbole d avertissement indique qu il faut prendre des pr cautions et veut attirer l att...

Страница 89: ...surfaces vitr es La vitre avant est en double vitrage chauff g 1 pos 4 Elle peut tre relev e L ouverture est facilit e gr ce des v rins gaz Les pi ces lat rales de la vitrine sont vernies Elles sont f...

Страница 90: ...ujours indiquer le NUM RO DE S RIE de la vitrine appos sur l tiquette g 3 pos A 1 4 NORMES APPLIQU ES Cette vitrine est conforme aux normes suivantes 2006 95 EC Directive basse tension 97 23 EC Les qu...

Страница 91: ...asse Climatique C UR 35 C 60 35 C 60 35 C 60 35 C 60 Temp rature d Expansion C 10 C 10 C 10 C 10 C Temp de Condensation C 45 C 45 C 45 C 45 C Temp de Fonctionnement C 4 8 4 8 4 8 4 8 Rendement W 840 1...

Страница 92: ...nit s de mesure 1100 1600 2100 3200 A 30 B 30 B 45 Rendement W 1160 1375 1375 2360 1375 1375 1375 UNIT DE CONDENSATION DISTANCE TAG RES R FRIG R ES 0 10 m Unit s de mesure 1100 1600 2100 Rendement W 1...

Страница 93: ...93 F REMARQUE Les valeurs gurant dans le tableau ne tiennent pas compte du poids ventuel des emballages particuliers demand s par le client A C B B A C B A C Fig 4 a Fig 4 b...

Страница 94: ...lient a n de permettre la circulation de l air au niveau du moteur envisager les espaces indispensables une utilisation et un entretien en toute s curit s assurer de l existence d une installation de...

Страница 95: ...pas dans le champ d application de la garantie Fig 7 a Fig 7 b Fig 7 c B A D C Fig 7 d 2 5 MONTAGE DES SOCLES ATTENTION DANGER D CRASEMENT Op ration r alis e par 2 3 personnes 1 Soulever la vitrine l...

Страница 96: ...ON Les roulettes frein g 8 b pos C doivent tre mont es du c t du pr pos au service le nombre de roulettes varie d ailleurs en fonction de la longueur de la vitrine Si le corps A doit tre associ d autr...

Страница 97: ...oduire la vis g 9 pos C et la serrer avec l crou g 9 pos D ENTRE MOD LE LIN AIRE ET MOD LE EN ANGLE Introduire le bloc g 10 pos A de liaison dans le pro l d aluminium et le xer l aide des vis g 10 pos...

Страница 98: ...jons g 12 pos A et les xer l aide des vis sans t te g 12 pos B C T CLIENT Introduire le goujon g 12 pos C et le xer l aide des vis sans t te g 12 pos D Fig 12 C D D 2 7 2 CANALISATION DU B TI VITRAGE...

Страница 99: ...deux vitrines glaces utiliser l ori ce C g 13 REMARQUE pour canaliser une vitrine glaces et une vitrine p tisseries utiliser l ori ce D g 13 Placer le support de canalisation g 14 pos A Placer la vitr...

Страница 100: ...17 F 2 7 4 CANALISATION EMBASE TUBULAIRES Fixer les pieds l aide des vis pr vues g 16 pos A et des crous g 16 pos B pr vus cet effet 2 8 MONTAGE DE LA GLACE COUVRANTE Assembler la glace couvrante g 17...

Страница 101: ...8 pos B Juxtaposer le cot nal et serrer les vis M6 TCEI g 18 pos C Serrer les ergots g 18b pos D Raccorder lectriquement les glaces lat rales g 19 pos E et les en ler dans leur logement g 19 pos F REM...

Страница 102: ...20 pos A ou une vis pour la vitrine MAXYMA g 20 pos B Fig 20 A B Fig 21b E Monter le panneau ant rieur g 21 pos C en vissant les vis correspondantes g 21 pos D Monter le socle par l interm diaire du...

Страница 103: ...ar un lectricien qualifi conform ment aux normes en vigueur 2 11 PROTECTION DE L ENVIRONNEMENT Emballage Ne pas jeter aux ordures les mat riaux formant l emballage de la vitrine mais les trier selon l...

Страница 104: ...UP g 24a pos 6 ou DOWN g 24a pos 7 pour augmenter ou diminuer la temp rature Attendre 10 secondes l appareil m morise automatiquement la valeur s lectionn e et l af cheur indique nouveau la temp ratu...

Страница 105: ...POUR LE R GLAGE DE LA TEMP RATURE CONSULTER LES PARAGRAPHES 3 2 3 3 ET 3 4 3 6 R GLAGE DE LA R FRIG RATION DES TAG RES g 25d La r frig ration des tag res est contr lable l aide des touches et du poten...

Страница 106: ...7 AFFICHEUR LUMINEUX pos 8 Pour l allumage positionner tout simplement l interrupteur sectionneur de la vitrine pos 1 sur I ON et appuyer sur la touche ON OFF 2 Appuyer si n cessaire sur le bouton d...

Страница 107: ...3 D GIVRAGE MANUEL Pour activer manuellement le cycle de d givrage appuyer 5 secondes de suite sur la touche UP g 24a b pos 6 Si les conditions pour le d givrage ne sont pas atteintes par exemple si l...

Страница 108: ...e de la glace couvrante de la version VBD se fera conform ment aux illustrations de la g 26b 3 16 OUVERTURE DE LA GLACE AVANT version VAD ATTENTION Lors de l utilisation de l assemblage de l entretien...

Страница 109: ...c t s de la protection g 27 retirer la poussi re et la salet au niveau des ailettes du condenseur l aide d un pinceau g 28 replacer la grille et serrer les vis REMARQUE N utiliser ni air comprim ni ai...

Страница 110: ...l int rieur de la cuve avec un chiffon sec Replacer les supports et les r cipients REMARQUE Utiliser peu d eau et bien essuyer Ne jamais laver la vitrine l aide de jets d eau directs Eviter l utilisat...

Страница 111: ...ion doivent tre effectu es par le personnel sp cialis ATTENTION Mettre des gants et des v tements de s curit avant d effectuer toute op ration d entretien 5 2 REMPLACEMENT DE LA VITRE AVANT pour la ve...

Страница 112: ...ie couvrante g 34 pos A uniquement la version VAD D visser les 2 vis pour la vitrine QUAD g 35 pos A ou une vis pour la vitrine MAXYMA g 35 pos B D connecter lectriquement le cot avec la vitre g 36 po...

Страница 113: ...sant les vis correspondantes g 37 pos D D visser les vis de xation et enlever la grille du moteur g 38 D visser les vis de xation de la cuve g 39 pos A ainsi que les vis de xation des socles g 39 pos...

Страница 114: ...rir la vitre avant Avec l aide d un poin on retirer la bague Seeger g 42 pos A qui maintient le piston g 42 pos B D gager le goujon g 42 pos C du piston Sortir le piston g 42 de son logement Une perso...

Страница 115: ...ELER A CON BALDAS REFRIGERADAS 133 3 5 OPERACIONES PRELIMINARES DE CONTROL 133 3 6 REGULACI N DE LA REFRIGERACI N BALDAS g 25d 133 VERSI N BOMBONER A 134 3 7 OPERACIONES DE CONTROL PRELIMINARES 134 3...

Страница 116: ...responsabilidad por el uso de repuestos no originales SIMBOLOG A Este s mbolo indica peligro y se emplear toda vez que se vea afectada la seguridad del operador Este s mbolo indica precauci n e intent...

Страница 117: ...s montantes de aluminio anodizado g 1 pos 3 para el soporte de las super cies de vidrio El vidrio frontal c mara calentado g 1 pos 4 se abre hacia arriba La abertura se efect a mediante el empuje de r...

Страница 118: ...lquier comunicaci n con el fabricante o con centros de asistencia indicar siempre el N MERO DE MATR CULA de la vitrina colocado en la placa Fig 3 Pos A 1 4 NORMAS APLICADAS La vitrina cumple con las s...

Страница 119: ...3 Clase Clim tica C UR 35 C 60 35 C 60 35 C 60 35 C 60 Temperatura expansi n C 10 C 10 C 10 C 10 C Temp de condensaci n C 45 C 45 C 45 C 45 C Temp de funcionamiento C 4 C 8 C 4 C 8 C 4 C 8 C 4 C 8 C R...

Страница 120: ...20 mt Unidadde Medici n 1100 1600 2100 3200 A 30 B 30 B 45 Rendimiento W 1160 1375 1375 2360 1375 1375 1375 UNIDADES CONDENSADORAS REMOTE BALDAS REFRIGERADAS 0 10 mt Unidadde Medici n 1100 1600 2100 R...

Страница 121: ...121 E NOTA Los valores indicados en la tabla no tienen en cuenta el peso de embalajes especiales pedidos por el cliente A C B B A C B A C Fig 4 a Fig 4 b...

Страница 122: ...ue circule el aire en el compartimiento del motor Considerar los espacios necesarios para permitir el uso y mantenimiento en condiciones de seguridad Comprobar la presencia de una conexi n a tierra id...

Страница 123: ...e v i t a r Fig 7 a Fig 7 b Fig 7 c B A D C Fig 7 d malfuncionamientos que no ser n cubiertos por la garant a 2 5 MONTAJE PIES ATENCI N PELIGRO DE APLASTAMIENTO Operaci n realizada por 2 3 personas 1...

Страница 124: ...NCI N Las ruedas con el freno g 8 b pos C deben montarse en la parte del lado operador adem s el n mero de ruedas cambia seg n el largo de la vitrina Si el cuerpo se acopla a otras unidades NO QUAD MA...

Страница 125: ...Introducir el tornillo g 9 pos C y ajustarlo con la tuerca g 9 pos D ENTRE MODELO LINEAR Y MODELO ANGULAR Introducir el bloque g 10 pos A de canalizaci n en el per l de aluminio y jarlo con los tornil...

Страница 126: ...oquearlos con los tornillos prisioneros g 12 pos B LADO CLIENTE Introducir el perno g 12 pos C y bloquearlo con los tornillos prisioneros g 12 pos D Fig 12 C D D 2 7 2 CANALIZACI N CASTELLO VIDRIOS pa...

Страница 127: ...las dos vitrinas emplear el ori cio C g 13 NOTA Para canalizar una vitrina y una vitrina de pasteler a emplear el ori cio D g 13 Apoyar el estribo de canalizaci n g 14 pos A Introducir el vidrio g 15...

Страница 128: ...A A B B Fig 17 E 2 7 4 CANALIZACI N BASE TUBULARES Fijar los pies con los tornillos espec cos g 16 pos A y las tuercas g 16 pos B 2 8 MONTAJE TAPA DE VIDRIO Montar la tapa de vidrio g 17 solo en la v...

Страница 129: ...que el lado de acabado y apriete los tornillos M6 TCEI g 18 pos C Apriete las tuercas g 18b pos D Conectar el ctricamente los costados de vidrio g 19 pos E y colocarlos en su asiento g 19 pos F NOTA M...

Страница 130: ...vitrina QUAD g 20 pos A y un tornillo en la vitrina MAXYMA g 20 pos B Fig 20 A B Fig 21b E Monte el panel delantero g 21 pos C apretando los tornillos adecuados g 21 pos D Monte el rodapies con el eng...

Страница 131: ...tor general Fig 23 debe ser instalado por un t cnico electricista siguiendo las normas vigentes 2 11 NOTAS SOBRE EL MEDIOAMBIENTAL Embalaje No arrojar a la basura partes del embalaje del mostrador sin...

Страница 132: ...g 24a pos 7 para aumentar o disminuir la temperatura hasta el valor deseado Espere 10 segundos autom ticamente el instrumento memorizar el valor seleccionado y el visor mostrar el valor de la tempera...

Страница 133: ...CADORES LUMINOSOS Y A LA REGULACI N DE LA TEMPERATURA CONSULTAR LOS P RRAFOS 3 2 3 3 Y 3 4 3 6 REGULACI N DE LA REFRIGERACI N BALDAS g 25d Es posible controlar la refrigeraci n de las baldas utilizand...

Страница 134: ...LUMINOSO pos 8 El encendido se realiza simplemente colocando el interruptor seccionador vitrina pos 1 en I ON y presionando el bot n ON OFF pos 2 Si es necesario presionar el pulsador iluminaci n vit...

Страница 135: ...r 3 13 DESCONGELACI N MANUAL La activaci n manual del ciclo de descongelaci n se consigue manteniendo presionado durante 5 segundos el bot n UP g 24 pos 6 Si no est n las condiciones para la descongel...

Страница 136: ...rtura de la tapa de vidrio para la versi n VBD se efect a como se representa en la g 26b 3 16 ABERTURA VIDRIO ANTERIOR versi n VAD ATENCI N Durante el uso el ensamblaje el mantenimiento o cualquier ot...

Страница 137: ...s tornillos colocados a los lados de la placa g 27 Quitar el polvo y la suciedad presente en las aletas del condensador empleando un pincel g 28 Reposicionar la rejilla en su lugar ajustando los torni...

Страница 138: ...uando est presente Secar dentro de la cuba con un pa o seco Reposicionar los soportes y sus respectivas cubetas NOTA Usar siempre poca agua y secar cuidadosamente No lavar nunca la vitrina con chorros...

Страница 139: ...cci n deben ser realizadas por personal especializado ATENCI N Emplear guantes e indumentaria de protecci n antes de realizar cualquier operaci n de mantenimiento 5 2 SUSTITUCI N VIDRIO FRONTAL para l...

Страница 140: ...g 34 pos A solo en la versi n VAD Desenrosque los 2 tornillos para la vitrina QUAD g 35 pos A y un tornillos para la vitrina MAXYMA g 35 pos B Desconecte el ctricamente el lateral con el cristal g 36...

Страница 141: ...os relativos tornillos g 37 pos D Desenrosque los tornillos y quite la rejilla del compartimiento motor g 38 A ojar los tornillos de jaci n de la cubeta g 39 pos A y los tornillos de jaci n de la base...

Страница 142: ...delantero Con la ayuda de un punz n quitar el anillo seeger g 42 pos A de jaci n del pist n g 42 pos B Quitar el perno g 42 pos C del pist n Desmontar el pist n g 42 de su asiento Un operador deber s...

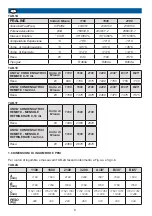
Страница 143: ...143 SCHEMI ELETTRICI ELECTRICAL DIAGRAMS ELEKTRISCHE SCHEMAS SCH MAS LECTRIQUES ESQUEMAS EL CTRICOS 10 0491 S GR C GR...

Страница 144: ...144 SCHEMI ELETTRICI ELECTRICAL DIAGRAMS ELEKTRISCHE SCHEMAS SCH MAS LECTRIQUES ESQUEMAS EL CTRICOS 10 0492 S GR C GR...

Страница 145: ...145 SCHEMI ELETTRICI ELECTRICAL DIAGRAMS ELEKTRISCHE SCHEMAS SCH MAS LECTRIQUES ESQUEMAS EL CTRICOS 10 0493 C GR...

Страница 146: ...146 SCHEMI ELETTRICI ELECTRICAL DIAGRAMS ELEKTRISCHE SCHEMAS SCH MAS LECTRIQUES ESQUEMAS EL CTRICOS 10 0494 S GR C GR...

Страница 147: ...147 SCHEMI ELETTRICI ELECTRICAL DIAGRAMS ELEKTRISCHE SCHEMAS SCH MAS LECTRIQUES ESQUEMAS EL CTRICOS 10 0495 S GR C GR...

Страница 148: ...148 SCHEMI ELETTRICI ELECTRICAL DIAGRAMS ELEKTRISCHE SCHEMAS SCH MAS LECTRIQUES ESQUEMAS EL CTRICOS 10 0491 S GR C GR...

Страница 149: ...149 SCHEMI ELETTRICI ELECTRICAL DIAGRAMS ELEKTRISCHE SCHEMAS SCH MAS LECTRIQUES ESQUEMAS EL CTRICOS 10 0492 S GR C GR...

Страница 150: ...150 SCHEMI ELETTRICI ELECTRICAL DIAGRAMS ELEKTRISCHE SCHEMAS SCH MAS LECTRIQUES ESQUEMAS EL CTRICOS 10 0493 C GR...

Страница 151: ...151 SCHEMI ELETTRICI ELECTRICAL DIAGRAMS ELEKTRISCHE SCHEMAS SCH MAS LECTRIQUES ESQUEMAS EL CTRICOS 10 0494 S GR C GR...

Страница 152: ...152 SCHEMI ELETTRICI ELECTRICAL DIAGRAMS ELEKTRISCHE SCHEMAS SCH MAS LECTRIQUES ESQUEMAS EL CTRICOS 10 0495 S GR C GR...

Страница 153: ......

Страница 154: ...SIFA Societ Industria Frigoriferi e Arredamenti S p A 61022 Colbordolo Pesaro Italy Via Nazionale 15 19 Tel 0721 4741 Fax 0721 497507 info sifaspa it www sifaspa it...

Отзывы: