background image

E n g l i s h

32

(Continued on Next Page)

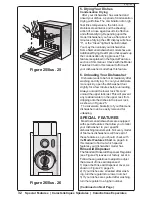
Figure 25/Ilus. 25

Special Features | Caractéristiques Spéciales | Caractísticas Especiales

5. Drying Your Dishes

Condensation Drying
  After your dishwasher has washed and
rinsed your dishes, a period of condensation
drying will follow. The combination of a high
final rinse temperature, the tub’s cool
stainless steel interior, and the sheeting
action of a rinse agent results in effective
and efficient drying. Depending upon the
model dishwasher you have, after about 12
minutes of drying the LED display will show
“0”, or the “Clean” light will be illuminated.
You may then unload your dishwasher.
Some Siemens dishwasher models have an
Additional Drying Heat Option that speeds up
the condensation drying process. This
feature is explained in the Special Features
section of this manual. Check with the Model
Features Chart in this manual to find out if
your dishwasher model has this feature.

6. Unloading Your Dishwasher

  Dishware tends to be hot immediately after
washing and drying. To cool your dishware
more quickly, open the dishwasher door
slightly for a few minutes before unloading.
Always unload the lower rack first and
unload the upper rack last. This will prevent
any residual water on the upper rack from
dripping onto the dishes in the lower rack,
as shown in Figure 25.
  The silverware basket(s) of your Siemens
dishwasher can be easily removed for
unloading.

SPECIAL FEATURES

  Most Siemens dishwashers are equipped
with special features that allow you to tailor
your dishwasher to your specific
dishwashing requirements. Not every model
of Siemens dishwashers will have all of
these features, so you should check with
the Model Features Chart on page 6 in
this manual to find out which special
features your dishwasher model has.

Rinse Aid Dispenser

The Standard Rinse Aid Dispenser Regulator
(see Figure 26) leaves our factory set at 4.
Follow these guidelines to adjust to adjust
the amount of rinse aid dispensed:
1) Open the Rinse Aid Dispenser cover, as
shown in Figure 20, page 24.
2) If your dishes are streaked after wash-
ing, turn the regulator to a lower number.
3) If your dishes are spotted after washing,
turn the regulator to a higher number.

Figure 26/Ilus. 26

Содержание SL34A

Страница 1: ...e Only Utilisation résidentiel seulement Uso residencial únicamente Dishwasher Use and Care Manual Lave Vaisselle Guide d utilisation et d entretien Lavadora de Platos Manual de uso y cuidado Models SL34A SL84A SL95A ...

Страница 2: ...t ce guide avant d utiliser le lave vaisselle la première fois Pour plus de commodité un glossaire sur les CARACTÉRISTIQUES DU LAVE VAISSELLE SIEMENS a été ajouté dans ce guide afin que vous puissiez mieux comprendre et apprécier cet exceptionnel appareil Si l on a un problème avec le lave vaiselle Siemens ou téléphoner au 1 866 447 4363 Profitez en pleinement Remarque Le lave vaisselle Siemens in...

Страница 3: ......

Страница 4: ...nformation sur le produit 5 Fonctionnement 15 Caractéristiques Spéciales 33 Entretien et Nettoyage 43 Guide de Dépannage 50 Information technique 52 Information sur la garantie 54 Sevice à la clientèle 56 TABLE DES MATIÈRES Información del Producto 5 Operación 15 Caractísticas Especiales 33 Cuidado y Limpieza 43 Autoayuda 50 Información de Técnica 52 Información de Garantías 54 Servicio al Cliente...

Страница 5: ...e Open your dishwasher door and find the Model and Serial Number Label on the right edge of the door Figure A will show you where to look and what the label looks like On the label you will see a large print number that begins with SL That s the model number of your Siemens dishwasher WRITE THE FIRST FIVE POSITIONS OF THAT NUMBER ON THE INSIDE FRONT COVER OF THIS MANUAL 4 Turn to the Model Feature...

Страница 6: ...ara obtener el mejor resultado de su lavadora de platos SIEMENS uste debe realizar cuatro cosas muy importantes 1 GUARDE ESTE MANUAL No lo tire a la basura 2 LEA ESTE MANUAL Aunque ya haya usado otras lavadoras de platos este manual le proporciona la información necesaria para el uso seguro y apropiado de la lavadora de platos que le pertenece AHORA De todos modos no se tardará mucho tiempo en lee...

Страница 7: ...r Refill Rinse Aid Indicator Light X X X Power Scrub Plus X X X Scrub Wash Regular Wash X X X Delicate Econ Wash X X Quick Wash X X RInse Hold X X X Delay Start X Top Rack Only Wash X OptiMISER X Cycle Completion Signal X X Additional Drying Heat X X Micro Filter X Flow Control X Digital Countdown Display X X AVS Sound Silencing Rating db 54 50 48 Model Features Chart Product Information Informati...

Страница 8: ...nt le lavage récurage plus Power scrub plus le lavage récurage scrub wash lavage régulier et délicat économique Voir le tableau des caractéristiques de modèle à la page 6 de ce guide Lorsque ces cycles sont complétés le voyant désinfecté s allume sur le panneau de commandes Toutefois si l eau de la résidence est trop chaude le temps de chauffage du lave vaisselle peut être réduit et le voyant peut...

Страница 9: ...fin de cycle Une sonnerie optionnelle indique que le cycle est complété Mise en marche différée Disponible sur certains modèles Mise en marche différée jusqu à 19 heures Affichage à rebours numérique Indique lorsque le cycle en cours est complété Commandes électroniques Touches faciles à utiliser avec programmes Faible utilisation d eau Aussi peu que 2 5 gallons au cycle délicat économique Dents à...

Страница 10: ...lavage à 125 F pour tremper et laver la vaisselle ayant des aliments incustrés Lavage rapide Cycle de 29 minutes nettoyant les articles légèrement sales comme verres tasses Lavage régulier Pour les charges de tous les jours articles moyennenent sales Rinçage et attente Rince les petites charges puis passe en mode attente en vue d une pleine charge Lavage récurage Utilise moins d eau que le récurag...

Страница 11: ...et b Charger les couteaux et autres objets pointus les MANCHES VERS LE HAUT afin de réduire tout risque de blessures 5 Ne pas laver d articles en plastique à moins qu ils portent la mention pour lave vaisselle Dans le cas contraire vérifier les recommandations du fabricant 6 Ne pas faire fonctionner l appareil tant que tous les panneaux ne sont pas en place 7 Ne pas jouer avec les commandes 8 Ne p...

Страница 12: ...TRUCTIONS INSTRUCTIONS DE MISE À LA TERRE Cet appareil doit être mis à la terre sur un système de câblage permanent en métal ou un conducteur de mise à la terre doit être acheminé avec les conducteurs de circuit et branché sur une borne de mise à la terre du lave vaisselle AVERTISSEMENT Cet appareil doit être mis à la terre conformément au Code national d électricité et ou les codes locaux S assur...

Страница 13: ...se décolorer pâlir ou faire des taches Laver à la main Positionner les verres fragiles de façon à ce qu ils ne se touchent pas pendant le cycle de lavage Verre Opalin Le verre opalin de lait peut jaunir Enduit antiadhésif Appliquer une couche d huile végétale aux surfaces antiadhésives après le séchage Acier inoxydable argenterie Placer de façon à ce qu ils ne touchent pas aux autres articles MATE...

Страница 14: ...le Le lave vaisselle Siemens est destiné à une utilisation de nettoyage SEULEMENT pour articles domestiques Étain laiton bronze L étain ternira Laver à la main et assécher immédiatement Fer blanc Rouillera Laver à la main et assécher immédiatement Bois Bols ustensiles en bois peuvent craqueler se voiler et perdre leur fini MATERIALES No Se Recomiendan Acrílico El acabado podría agrietarse Piezas P...

Страница 15: ...you attempt to wash the first load of dishes 1 Door gasket 2 Upper rack 3 Upper spray arm 4 Lower Rack 5 Lower spray arm 6 Detergent and Rinse Aid Dispenser 7 Filters The number of filters varies by model For more information see page 44 8 Silverware baskets 9 Model and Serial number label Figure 1 Ilus 1 Operation Fonctionnement Operación 1 2 4 5 6 8 9 3 7 ...

Страница 16: ...ctionnement Operación COMPONENTES DE LA LAVADORA DE PLATOS La Ilustración 1 identifica los componentes de su lavadora de platos e indica el número de la página en este manual donde figura más información referente a los mismos Entérese de las diferentes partes de su lavadora de platos antes de lavar la primera carga de vajilla 1 Empaque Sello de la puerta 2 Estante superior 3 Brazo de rocío superi...

Страница 17: ...ralGuidelines B LoadingtheUpperRack C Loading the Lower Rack D AccomodatingExtraTallItems E Loading the Silverware Baskets A General Guidelines Load the dishwasher so that water can circulate freely and reach every part of every item Placeitemssothatnothingprotrudes from the bottoms of the racks Place pots pans cups bowls and glasses upside down in the racks as shown in Figure 2 Do not allow delic...

Страница 18: ...12 couverts Suite à la page suivante COMOSELIMPIALAVAJILLA CON SU LAVADORA DE PLATOS SIEMENS Los 6 pasosbásicosdecomolimpiarlavajillaensu lavadoradeplatosSiemensson 1 PrepararlaVajilla 2 CargarsuLavadoradePlatos 3 AñadirDetergenteparaLavadorasde PlatosydeEnjuague 4 ComoPoneren MarchalaLavadora 5 SecarlaVajilla 6 DescargarsuLavadoradePlatos 1 Como Preparar la Vajilla NoesnecesarioqueUd enjuaguelosp...

Страница 19: ...e point that it can be lifted upward as shown in Figure 6 2 Pull the rack outward and up until the rollers are completely free of the roller guides 3 Re insert the rack with the other set of rollers on the roller guides as shown in Figure 7 Using the RackMatic Adjustment To lower the upper rack 1 Pull the upper rack out of the dishwasher until it stops rolling 2 Grasp the rack as shown in Figure 8...

Страница 20: ...avadora empújelo hasta que se detenga contra la cara interior trasera de la tina de otro modo podría resultar que el brazo rociador superior no se conecte a la alimentación de agua Según el modelo de su lavadora de platos el estante superior podría estar equipado de accesorios y funciones que facilitan cargarlo Estos accesorios y funciones incluyen ajustes de elevación guías plegables y portatazas...

Страница 21: ...e Standard and RackMatic upper racks 1 Pull the empty upper rack out of the dishwasher to the point that it can be lifted upward 2 Pull the rack outward and up until the rollers are completely free of the roller guides 3 Slide the roller guides back into the dishwasher tub Install the Sprinkler 1 Insert the Sprinkler into the upper rack spray outlet at the back of the dishwasher tub as shown in Fi...

Страница 22: ...ide 3 Pousser le panier supérieur dans la cuve du lave vaisselle C Como Cargar el Estante Inferior Segúnelmodelodesulavadoradeplatos el estanteinferiorpuedecontarcon características y accesorios que facilitan la carga variada Estas características y accesorios incluyen guías plegables y varias canastas para los cubiertos cuchara tenedor cuchillo Revise el Cuadro de las Características del Modelo e...

Страница 23: ...inse Aids C Filling With Detergent D Filling With RinseAid A General Dispenser Information The detergent and rinse aid dispenser is located on the inside of the dishwasher door as shown in Figure 16 The detergent chamber has lines that measure dishwashing detergent to 15 milliliters ml and 25 ml as shown in Figure 17 45 ml of detergent will completely fill the detergent chamber B Detergents and Ri...

Страница 24: ...ILLOS Y OTROSARTICULOSPUNTIAGUDOSCON ELMANGOHACIAARRIBAPARAREDUCIR ELRIESGODECORTARSE TodaslaslavadorasdeplatosSiemenscuentan conunodedostiposdecanastaparaloscubiertos cuchara tenedor cuchillo paraelestanteinferior 1 LaCanastaEstándar o2 LaCanastaFlexible Ustedpuedeaveriguarmásinformaciónacercade laCanastaFlexibleparalosCubiertosenlaSección Caractísticas Especialesdeestemanual Lasdoscanastastienen...

Страница 25: ...igure 20 2 Add liquid rinse aid to the dispenser as shown in Figure 21 until the level indicator Figure 21A is dark 3 Close the rinse aid dispenser cover by returning it to its closed position and pressing it firmly until snaps shut 4 Refill the rinse aid dispenser when the level indicator shows a silver background with black lines as shown in Figure 21B Note Siemens dishwasher have an additional ...

Страница 26: ...cado disminuye las manchas de agua y enjuaga las partes interiores de la lavadora Siempre use un agente de enjuague y use únicamente un agente de enjuague líquido con su lavadora de platos Siemens C Llenar Con Detergente 1 Abra la cubierta del surtidor de detergente por medio de oprimir la lengüeta de desenganche azul hacia adentro de la cubierta tal como indica la flecha A en la Ilustración 18 No...

Страница 27: ...k Wash A small load with normal soiling can be kept in your dishwasher until you have enough dishes for a full load by selecting the Rinse and Hold Cycle A small load can also be placed in the top rack and given complete washing by the Top Rack Only cycle For delicate or heirloom dishware and silver ware or other special pieces select Delicate Economy Wash referring to the Materials section on pag...

Страница 28: ...onar el Ciclo de Lavado Apropiado B Manejar los Controles A Como Seleccionar el Ciclo de Lavado Apropiado Los requisitos para lavar platos varían de hogar a hogar A continuación presentamos algunas instrucciones generales para ayudarle en seleccionar el ciclo adecuado para realizar el mejor lavado Recuerde que no todos los modelos de lavadoras de platos Siemens tendrán instalados todos los ciclos ...

Страница 29: ...ding on the model of dishwasher you have the Clean light will illumninate the LED display will show 0 the dishwasher will beep the Sanitized light will illuminate When the Sanitized light illuminates it means that the wash cycle has met very strict requirements of time and temperature for certification as Sanitized by the National Sanitation Foundation For more information on this certification tu...

Страница 30: ...les continúa Control Superior 1 Abra la puerta de la lavadora de platos suficientemente sólo para poder alcanzar los botones de control 2 Pulseelbotón Prender Apagar On Off 3 Pulseelbotóndelciclode lavado queUd prefiere 4 Cierrelapuertadelalavadoradeplatosy verifique que esté bien asentada 5 La lavadora de platos se pone en marcha y siguefuncionandoautomáticamentehasta terminarelcicloseleccionado ...

Страница 31: ... 24 2 You may now begin a new cycle by following the instructions in the Operate the Controls section of this manual Top Control WARNING YOU COULD BE SERIOUSLYSCALDEDIFYOUOPEN THEDISHWASHERDOORQUICKLY DURINGAWASHORRINSECYCLE ALWAYS WAITAT LEAST 10 SECONDS OR UNTILWATER NOISES STOP BEFOREFULLYOPENINGTHEDISH WASHERDOOR 1 Open the dishwasher door far enough to expose the control buttons 2 Press and h...

Страница 32: ...r les commandes dans ce guide Como Interrumpir y Cancelar un Ciclo continúa Como Interrumpir un Ciclo Control Superior AVISO USTED CORRE EL RIESGO DEESCALDARSEGRAVEMENTESIABRE TOTALMENTELAPUERTADELA LAVADORADEPLATOSDURANTEUN CICLODELAVADOOENJUAGUE SIEMPREESPEREPORLOMENOS10 SEGUNDOS OHASTAQUETERMINEEL RUIDOPRODUCIDOPORELAGUA ANTES DEABRIRLAPUERTATOTALMENTE 1 Abra la puerta de la lavadora de platos ...

Страница 33: ... and drying To cool your dishware more quickly open the dishwasher door slightly for a few minutes before unloading Always unload the lower rack first and unload the upper rack last This will prevent any residual water on the upper rack from dripping onto the dishes in the lower rack as shown in Figure 25 The silverware basket s of your Siemens dishwasher can be easily removed for unloading SPECIA...

Страница 34: ...ada del enjuague final el interior de la tina de acero inoxidable con temperatura reducida y eliminación de agua en hoja por medio de un agente de enjuague resulta en un secado eficaz y eficiente Después de unos 12 minutos de secado el indicador con diodo emisor de luz LED proyectará un 0 o se iluminará la luz Clean es decir Limpio En este punto usted puede descargar su lavadora de platos Algunos ...

Страница 35: ... only the upper rack Note The Top Rack Only cycle does not reduce wash time To use the Top Rack Only Cycle 1 Load the upper rack Figure 27 shows a typical mixed load placed correctly in the upper rack 2 Press the On Off button 3 Press the button for the desired wash cycle 4 Press the Top Rack Only button OptiMISER This feature used in conjuncton with the other wash cycles reduces wash time by abou...

Страница 36: ... marche arrêt 2 Presser la touche pour le cycle désiré 3 Presser la touche OptiMISERmc Suite à la page suivante Características Especiales continúa Atraso de Operaciones Estafunciónlepermiteretardarlapuestaen marcha de un ciclo de lavado por hasta 19 horas Control Delantero 1 PulseelbotónPrender Apagar On Off 2 Pulseyoprimapordossegundoselbotón TiempodeAtraso TimeDelay Oprimaelbotón TimeDelayhasta...

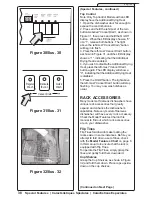
Страница 37: ...rt Button button until the tone is at the desired volume or until it is silent The display will show a 0 1 or 2 for the volume level 4 Press the On Off Button 5 Close the dishwasher door The Cycle Completion Signal is now set and you may wash your dishes as usual Additional Drying Heat With this special feature you can raise the temperature of the rinse water which will result in better condensati...

Страница 38: ...sselle Le signal de fin de cycle est maintenant réglé et l on peut laver la vaisselle comme habituellement Suite à la page suivante Características Especiales continúa Señal de Terminación del Ciclo Este accesorio suena cuando su lavadora de platos Siemens termina de lavar y secar su vajilla y se dispone ÚNICAMENTE en los modelos con Control Superior Usted tiene la facilidad de desactivar el timbr...

Страница 39: ...utton The light above the left most Cancel Drain button will stop flashing You may now wash dishes as usual RACK ACCESSORIES Many models of Siemens dishwashers have various rack accessories that greatly expand and enhance the dishwasher s capabilites Not every model of Siemens dishwasher will have every rack accessory Check the Model Features Chart in this manual to find out which rack accessories...

Страница 40: ...e comme à l habitude Suite à la page suivante Características Especiales continúa Calor Extra Secante Con esta característica especial usted puede elevar la temperatura del agua de enjuague y así producir mejores resultados en el secado por condensación Control Delantero 1 Pulse y oprima el botón a la izquierda de los dos rotulados Cancel Drain como muestra la Ilustración 30 después pulse y oprima...

Страница 41: ...alves that may be placed in a variety of positions in the lower rack greatly increasing the lower rack s loading versatility To split the Flexible Silverware Basket 1 Grasp the basket as shown in Figure 35 and slide the two halves in opposite directions as shown in Figure 35 2 Pull the two halves apart as shown in Figure 36 Some suggestions for placing the two halves in the lower rack are shown in...

Страница 42: ...illustrées à la figure 37 Suite à la page suivante ACCESORIOSPARALOSESTANTES Muchosmodelosdelaslavadorasdeplatos Siemensofrecenunavariedaddeaccesorios paralosestantesqueamplíanlascapacidades y funciones de las lavadoras No se encuentran todos los accesorios en todos los modelosdelavadorasdeplatosSiemens ConsulteelCuadrodelaCaracterísticasdel Modeloenestemanualparaaveriguarcuales accesorios de los ...

Страница 43: ... The maintenance tasks are easy to do and will ensure continued superior performance from your Siemens dishwasher These tasks are Winterizing Your Siemens Dish washer Check Clean the Large Object Trap Check Clean the Spray Arms Clean the Stainless Steel Inner Door and Tub Clean the Exterior Door Panel Clean the Door Gasket WARNING TO AVOID MOLD GROWTH AND OR FLOOR DAMAGE DO NOT ALLOW STANDING WATE...

Страница 44: ...illos Se puede usar el Portacuchillos que se ve en la Ilustración 38 para diferentes propósitos Sin embargo se diseñó principalmente para acomodar los cubiertos finos de plata y la cuchillería Usted puede extraer el Portacuchillos por medio de jalarlo delicadamente hasta sacarlo de las abrazaderas por presión que lo sujetan al estante Accesorio Suplementario para el Estante Rack Attachment Se pued...

Страница 45: ... the ring handle counter clockwise 1 4 turn and lift out the Large Object Trap Micro FilterAssembly as shown in Figure 41 WARNING DO NOT REACH INTO THE LARGE OBJECT TRAP AS IT MAY CONTAIN SHARP OBJECTS 2 Carefully examine the Large Object Trap 3 If you find debris in the Large Object Trap turn it upside down and gently tap it on a surface such as a countertop to dislodge and remove the debris Flus...

Страница 46: ...no y finalmente la Ensambladura Trampa de Objetos Grandes Filtro en Cilindro 2 Firmemente encaje en su posición la Ensambladura Trampa de Objetos Grandes Filtro Fino 3 Dele vuelta a la manilla en forma de anillo un 1 4 de la vuelta con el reloj hasta que se tranque La flecha en la manilla y la flecha en el filtro fino deben indicarse una a la otra tal como muestra la Ilustración 40 Continúa en la ...

Страница 47: ...pper rack is on page 18 of this manual 2 Turn the rack upside down The upper spray arm is held in position by a locking nut as shown in Figure 46A Turn the locking nut counter clockwise 1 8 turn and remove it as shown in Figure 46B to release the spray arm 3 Gently remove the spray arm as shown in Figure 47 If the spray nozzles need cleaning flush them under running water To reinstall the upper sp...

Страница 48: ... assurer que le réservoir d agent de rinçage est plein Suite à la page suivante Cuidado y Limpieza continúa 4 Delicadamente jale la manilla en forma de anillo para asegurarse de que la Ensambladura esté bien encajada Como Revisar Limpiar los Brazos de Rocío Periódicamenteexaminelosbrazosderocío para verificar que los orificios de aspersión esténlibresdecualquierobstrucción Esfácil extraer y reinst...

Страница 49: ...for stainless steel For the best results apply the stainless steel cleaner to the cloth then wipe the surface Do not use metal scouring pads to clean the stainless steel surface as they can scratch the surface and leave their own metal particles that can rust Clean the Door Gasket Regularly clean the door gasket with a damp cloth to remove food particles and other debris Care and Cleaning Continue...

Страница 50: ... régulièrement le joint de la porte avec un chiffon humide pour enlever les particules d aliments et autres débris Cuidado y Limpieza continúa Como Limpiar la Cara Exterior de la Puerta Puertas de colores Use únicamente un paño de tela suave ligeramente humedecido con agua jabonosa Nunca use toallas de papel ni telas ásperas Puertas de acero inoxidable Use un paño suave con un agente limpiador no ...

Страница 51: ...isser couler jusqu à ce que l eau soit chaude Fermer l eau et mettre le lave vaisselle en marche Le cycle n avance pas La canalisation d eau est fermée ou le filtre d entrée est bloqué en position rinçage Ouvrir la soupape d eau et ou vérifier le filtre d entrée L eau n est pas vidée Le tuyau de vidange est plié Le filtre bouché l évier de la cuisine est du lave vaisselle obstrué Vérifier le tuyau...

Страница 52: ...e de détergent utilisé Employer seulement du détergent lave vaisselle conçu pour lave vaisselle automatiques Résultats insatisfaisants Quantité incorrecte de détergent et d agent de rinçage Ustensiles mal placés ou panier trop chargé Rotation du bras de lavage bloqué par des ustensiles Filtres mal enclenchés Ouvertures bloquées dans le s bras de lavage Sélection de programme incorrecte PROBLEMA PO...

Страница 53: ...52 SL84A SL34A Technical Information Information technique Información Técnica SL95A Front View ...

Страница 54: ... e T h s a W F º p m e T e s n i R º 1 6 1 º 1 6 1 º 0 5 1 º 5 5 1 º 0 4 1 º 5 5 1 º 0 2 1 º 5 5 1 º 4 0 1 º 0 4 1 g n i m o c n I g n i m o c n I r e w o P b u r c S s u l P r a l u g e R h s a W e t a c i l e D y m o n o c E e s n i R d l o H e m i T e l c y C s e t u n i m n i 6 3 1 8 0 1 7 8 9 r e t a W n o i t p m u s n o C s n o l l a g n i m u m i n i M 4 6 4 4 7 3 3 1 m u m i x a M 8 8 6 7...

Страница 55: ...tie limitée complète d un 1 an partir de la date d installation Siemens réparera ou remplacera toute composante présentant un défaut dans des conditions d usage domestique normal sans frais frais de main d oeuvre et d expédition compris Les réparations doivent être effectuées par un centre de service autorisé Siemens Garantie limitée de deux 2 ans à partir de la date d installation Siemens fournir...

Страница 56: ... maison ou pour réparer tout lave vaisselle utilisé d une façon autre que l usage domestique normal et habituel De plus les garanties décrites dans cet énoncé excluent tout défaut ou dommage survenant à la suite d accident de modification de mauvais usage d abus d installation inadéquate d un service non autorisé de circonstance externes hors du contrôle de Siemens tels incendies inondations et au...

Страница 57: ...ations Toute réparation effectuée par un personnel non autorisé peut annuler la garantie Si l on a un problème avec le lave vaisselle SIEMENS et que l on n est pas satisfait du service effectué 1 Communiquer d abord avec l installateur ou le centre de service autorisé Siemens dans la région 2 ou écrire à l adresse ci dessous BSH Home Appliances Corp 5551 McFadden Avenue Huntington Beach CA 92649 3...

Страница 58: ...ation du problème De plus si par écrit inclure un numéro de téléphone pendant la journée Le numéro de série et le numéro de modèle sont situés sur l étiquette apposée sur le côté droit de l intérieur de la porte du lave vaisselle Voir Figure 1 pour un exemple Faire une photocopie de la facture et la conserver dans ce guide SERVICIO AL CLIENTE Por favor asegúrese de incluir si nos escribe o de tene...

Страница 59: ...58 NOTES ...

Страница 60: ...59 NOTES ...

Страница 61: ...60 NOTES ...

Страница 62: ...61 NOTES ...

Страница 63: ...62 NOTES ...

Страница 64: ...63 NOTES ...

Страница 65: ...64 NOTES ...

Страница 66: ...56 02 05 89 07 8307 ...

Отзывы: