


In any case, you must make sure that the selected option indicates also the position of the monitored circuit
breaker. If you have not yet generated an indication for control and feedback of the breaker to be monitored
you should do so now. Detailed information is given in the SIPROTEC 4 System Description.
Example:
The group “Control Devices” of the configuration matrix contains a double-point indication
Q0
. Assuming this
should be the breaker to be monitored, you have determined during configuration the physical inputs of the
device at which the feedback indications of the breaker Q0 arrive. For example, if the breaker failure protec-
tion should monitor the breaker at the high-voltage side (= Side 1) of the transformer in
you set:
Address 831
SwitchgCBaux S1
(because breaker at Side S1 is monitored) =
Q0
(because indication
„Q0“ indicates feedback of the breaker).
Of course, you can define any desired input indication which indicates the breaker position via an correspond-
ingly assigned physical input.
Manual Close Indication of a Circuit Breaker
If a protection function is to make use of an external manual-close command indicated via a binary input, you
must have selected that logical input indication during the configuration of the binary inputs that corresponds
to the side or measuring location to which the protection function is assigned. From the internal control, the
device uses the same switching objects that were selected at the addresses 831 to 840.
Example:
If you have assigned the time overcurrent protection for phase currents to measuring location M4 and want it
to receive the manual-close command from circuit breaker CB2, you connect the Close command for breaker
CB2 to a binary input and allocate that input to
>ManualClose M4
(No 30354).
Command Duration
The minimum trip command duration 851 is set in address
TMin TRIP CMD
. This duration is valid for all
protection functions which can issue a trip command. This parameter can only be altered in DIGSI at Display
Additional Settings.
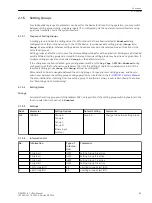
Settings
Addresses which have an appended “A” can only be changed with DIGSI, under “Additional Settings”.
Addr.
Parameter
Setting Options
Default Setting
Comments
211
No Conn.MeasLoc
2
3
4
5
3
Number of connected Measuring
Locations
212
No AssigMeasLoc
2
3
4
5
3
Number of assigned Measuring
Locations
213
NUMBER OF SIDES
2
3
4
5
3
Number of Sides
2.1.4.5
Functions
2.1 General
72
SIPROTEC 4, 7UT6x, Manual
C53000-G1176-C230-5, Edition 09.2016
Содержание SIPROTEC 4 7UT6 Series
Страница 394: ...394 SIPROTEC 4 7UT6x Manual C53000 G1176 C230 5 Edition 09 2016 ...
Страница 482: ...482 SIPROTEC 4 7UT6x Manual C53000 G1176 C230 5 Edition 09 2016 ...
Страница 504: ...504 SIPROTEC 4 7UT6x Manual C53000 G1176 C230 5 Edition 09 2016 ...
Страница 522: ...522 SIPROTEC 4 7UT6x Manual C53000 G1176 C230 5 Edition 09 2016 ...
Страница 528: ...528 SIPROTEC 4 7UT6x Manual C53000 G1176 C230 5 Edition 09 2016 ...
Страница 538: ...538 SIPROTEC 4 7UT6x Manual C53000 G1176 C230 5 Edition 09 2016 ...
Страница 664: ...664 SIPROTEC 4 7UT6x Manual C53000 G1176 C230 5 Edition 09 2016 ...
Страница 666: ...666 SIPROTEC 4 7UT6x Manual C53000 G1176 C230 5 Edition 09 2016 ...
Страница 683: ...Z Zero sequence currents 109 Index SIPROTEC 4 7UT6x Manual 683 C53000 G1176 C230 5 Edition 09 2016 ...
Страница 684: ...684 SIPROTEC 4 7UT6x Manual C53000 G1176 C230 5 Edition 09 2016 ...