


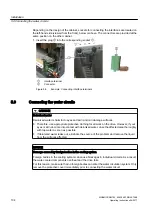


NOTICE
Installation of the re-cooling unit on its own
The transmission of mechanical vibrations may, for instance, cause cracks in the piping or
other mechanical damage.
If the re-cooling unit is screwed to the drive this may be damaged.
Install the re-cooling unit on its own, without a screw connection to the drive.
5.2
Tools required
Installation of the connections requires the following tools:
● Wrench or socket wrench, width across the flats 10, 13, 16/17, 18/19
● Allen key, size 8
● Torque wrench up to 50 Nm
● Screwdriver, size 2
● Torx T20 and T30 screwdrivers
5.3
Attaching side panels
WARNING
Side panels that are not attached
Voltages of over 1000 V are present when this equipment is operational. If the device is
operated without side panels, this can result in death or serious injury.
Make sure that the side panels are installed on the left and right outer ends of the drive.
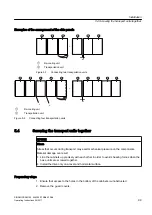
A basic unit consists of two transportation units (modules). There is a side panel on the left-
hand side of each transportation unit. Mount the side panels of each transportation unit to the
correct side. To do so, proceed as follows:
1. Arrange the transportation units in accordance with the specifications provided in the
dimension drawings.
2. Make sure that on the left-hand transportation unit
②
the side panel is mounted on the left-
hand side.
3. If the drive comprises more than two transportation units, then disassemble the side panels
of the following transportation units.
4. Mount the side panel of the last transportation unit from the left to the right-hand side.
Installation
5.2 Tools required
SINAMICS SM150 6SL3845-7NN46-7AA0
98
Operating Instructions 04/2017
Содержание SINAMICS SM150
Страница 2: ...20 04 2017 13 53 V27 00 ...
Страница 14: ...Table of contents SINAMICS SM150 6SL3845 7NN46 7AA0 14 Operating Instructions 04 2017 ...
Страница 16: ...Introduction 1 1 About these instructions SINAMICS SM150 6SL3845 7NN46 7AA0 16 Operating Instructions 04 2017 ...
Страница 82: ...Description 3 6 Description of options SINAMICS SM150 6SL3845 7NN46 7AA0 82 Operating Instructions 04 2017 ...
Страница 106: ...Installation 5 9 Connecting the water circuits SINAMICS SM150 6SL3845 7NN46 7AA0 106 Operating Instructions 04 2017 ...
Страница 120: ...Electrical connection 6 5 Connection SINAMICS SM150 6SL3845 7NN46 7AA0 120 Operating Instructions 04 2017 ...
Страница 122: ...Start up SINAMICS SM150 6SL3845 7NN46 7AA0 122 Operating Instructions 04 2017 ...
Страница 190: ...Maintenance 9 7 Repairs SINAMICS SM150 6SL3845 7NN46 7AA0 190 Operating Instructions 04 2017 ...
Страница 192: ...Spare parts SINAMICS SM150 6SL3845 7NN46 7AA0 192 Operating Instructions 04 2017 ...
Страница 196: ...Service Support SINAMICS SM150 6SL3845 7NN46 7AA0 196 Operating Instructions 04 2017 ...
Страница 217: ......


