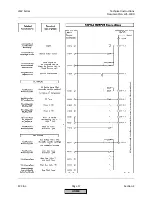


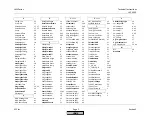


LMV Series
Technical Instructions
LV5-1000
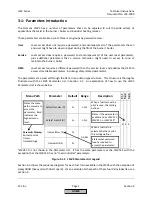
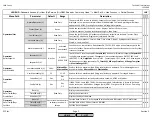
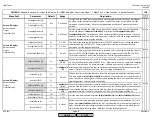
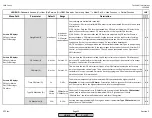
Menu Path
Parameter
Default
Range
Description
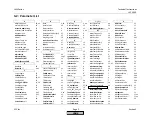
51.1
52.2
52.4
LEGEND -
Password Access:
(U)=User, (S)=Service, (O)=OEM, Shaded = Commonly Used, ** = Must Set, X = Has Function, / = Partial Function
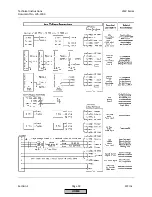
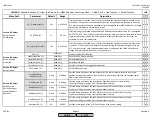
LMV
Operation
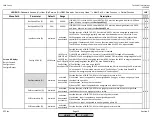
O2Ctrl activate (U)
deact
activated
deactivated
Activates the O2 trim system. If control automatically deactivates, can be reactivated here.
x x
SetLoad (U)
Not Set
0-100%
S1-S3
When in manual mode (see next parameter), this sets firing rate (load). Other parameter
settings may limit the maximum achievable load.
Autom/Manual/Off (U)
Automatic
Automatic
Burner off
Manual
1) Automatic - Enables the burner allowing it to respond to setpoints and switch on / switch
off points.
2) Burner off - Manually turn the burner off.
3) Manual - Enables the load of the burner to be set with
SetLoad
. When in manual,
setpoints and switch on/ off points are ignored. If INPUT X5-03.1 (burner switch) is enabled,
it must be energized for the LMV5 to start, regardless of parameter setting.
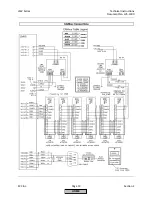
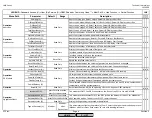
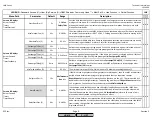
MinTmeStartRel (S)
1s
0.2-63s
When the LMV5 gets a call for heat, this defines the minimum time the LMV5 will hold in
phase 21. Start releases could be made, but the LMV5 will still hold in phase 21 for this
period of time.
FanRunupTme (S)
2s
0.2-63s
Time allowed to let the fan accelerate up to speed before the actuators start driving to
prepurge.
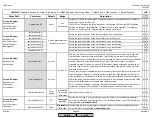
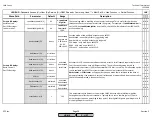
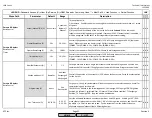
PrepurgeTmeGas (S)
120s
PrepurgeTmeOil (S)
120s
MinT_PrepurgeGas (O)
20s
MinT_PrepurgeOil (O)
15s
PrepurgeSafeGas (S)
20s
PrepurgeSafeOil (S)
15s
Params & Display
>
BurnerControl>
Times>
TimesStartup1
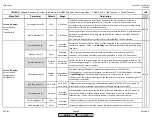
NOTE: There are numerous prepurge time parameters to provide options for purging FGR piping. For boilers without FGR, these times should be set the following way.
PrepurgeTmeGas(Oil)
should be set for the desired prepurge time after a normal shutdown.
PrepurgeSafeGas(Oil)
should be set for the desired prepurge time after a safety shutdown.
PrepurgePt1Gas(Oil)
and
PrepurgePt3Gas(Oil)
should be set to 0.2 seconds so that they are ignored. See below for more detail on each parameter.
x x x
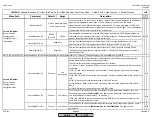
ManualOperation
Prepurge timing begins when actuators / VSD have reached their specified purge positions.
Total prepurge time (phase 30-34) will be equal to this setting or longer (other prepurge
time parameters may cause a longer prepurge). This parameter cannot be set less than
MinT_PrepurgeGas
or
MinT_PrepurgeOil
respectively.
Sets the minimum allowable time for
PrepurgeTmeGas(Oil)
above. This parameter should be
set by the OEM for code-required air exchanges of combustion chamber volume.
After a safety shutdown, this time replaces
PrepurgePt1Gas(Oil)
and
PrepurgePt3Gas(Oil)
.
The LMV5 will stay in phase 30 for half of this time. Then the LMV5 will progress to phase 34
for half of this time or longer (if
PrepurgeTmeGas(Oil)
is set larger than this parameter). This
parameter cannot be set less than
MinT_PrepurgeGas
or
MinT_PrepurgeOil
respectively.
Setting has no effect on startups after a normal shutdown.
0.2s-63min
MinT_Prepurg
eGas(Oil)
-
63min
MinT_Prepurg
eGas(Oil)
-
63min
Params & Display
>
BurnerControl>
Times>
TimesStartup1
Params & Display
>
BurnerControl>
Times>
TimesStartup1
x x x
x x x
x x x
SCC Inc.
Page 7
Section 3
HOME
HOME
P - LIST
Содержание LMV 5 Series
Страница 2: ...Intentionally Left Blank ...
Страница 25: ...LMV Series Technical Instructions Document No LV5 1000 SCC Inc Page 21 Section 1 Intentionally Left Blank HOME ...
Страница 27: ...LMV Series Technical Instructions Document No LV5 1000 SCC Inc Page 23 Section 1 Intentionally Left Blank HOME ...
Страница 41: ...LMV Series Technical Instructions Document No LV5 1000 SCC Inc Page 7 Section 2 HOME ...
Страница 42: ...Technical Instructions LMV Series Document No LV5 1000 Section 2 Page 8 SCC Inc HOME ...
Страница 43: ...LMV Series Technical Instructions Document No LV5 1000 SCC Inc Page 9 Section 2 HOME ...
Страница 44: ...Technical Instructions LMV Series Document No LV5 1000 Section 2 Page 10 SCC Inc HOME ...
Страница 45: ...LMV Series Technical Instructions Document No LV5 1000 SCC Inc Page 11 Section 2 HOME ...
Страница 46: ...Technical Instructions LMV Series Document No LV5 1000 Section 2 Page 12 SCC Inc HOME ...
Страница 47: ...LMV Series Technical Instructions Document No LV5 1000 SCC Inc Page 13 Section 2 HOME ...
Страница 48: ...Technical Instructions LMV Series Document No LV5 1000 Section 2 Page 14 SCC Inc HOME ...
Страница 49: ...LMV Series Technical Instructions Document No LV5 1000 SCC Inc Page 15 Section 2 HOME ...
Страница 50: ...Technical Instructions LMV Series Document No LV5 1000 Section 2 Page 16 SCC Inc HOME ...
Страница 51: ...LMV Series Technical Instructions Document No LV5 1000 SCC Inc Page 17 Section 2 HOME ...
Страница 52: ...Technical Instructions LMV Series Document No LV5 1000 Section 2 Page 18 SCC Inc HOME ...
Страница 53: ...LMV Series Technical Instructions Document No LV5 1000 SCC Inc Page 19 Section 2 HOME ...
Страница 54: ...Technical Instructions LMV Series Document No LV5 1000 Section 2 Page 20 SCC Inc HOME ...
Страница 55: ...LMV Series Technical Instructions Document No LV5 1000 SCC Inc Page 21 Section 2 HOME ...
Страница 56: ...Technical Instructions LMV Series Document No LV5 1000 Section 2 Page 22 SCC Inc Intentionally Left Blank HOME ...
Страница 116: ...Technical Instructions LMV Series Document No LV5 1000 Section 3 Page 58 SCC Inc Intentionally Left Blank HOME ...
Страница 150: ...Technical Instructions LMV Series Document No LV5 1000 Section 4 Page 32 SCC Inc Intentionally Left Blank HOME ...
Страница 170: ...Technical Instructions LMV Series Document No LV5 1000 Section 5 Page 18 SCC Inc Intentionally Left Blank HOME ...
Страница 290: ...Technical Instructions LMV Series Document No LV5 1000 Section 8 Page 20 SCC Inc Intentionally Left Blank HOME ...
Страница 306: ...Technical Instructions LMV Series Document No LV5 1000 Section 9 Page 14 SCC Inc Intentionally Left Blank HOME ...
Страница 373: ...Intentionally Left Blank ...