background image

en

    Flex Zone

16

|

Flex Zone

Flex Zone

You can use each flex zone as a single hotplate or as 

two independent hotplates, as required.
It consists of four inductors that work independently of 

each other. If using the flexible cooking zone, only the 

area that is covered by cookware is activated.

Advice on using cookware

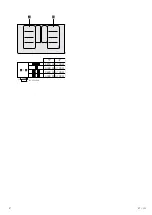
To ensure that the cookware is detected and heat is 

distributed evenly, correctly centre the cookware:

As a single hotplate

The flexible cooking zone is activated as a single 

hotplate.

Activation

1.

Select the flexible cooking zone.

2.

Select the heat setting you require from the settings 

area. The heat setting and the indicator showing the 

active cooking mode will be lit in the centre of the 

flexible cooking zone.

The Flex cooking zone has now been activated.

To change the heat setting:

Select the flexible cooking zone and adjust the heat 

setting to the setting you require in the settings area.

Adding new cookware

Place the new item of cookware onto the flexible 

cooking zone and follow the instructions on the display 

panel.

Note: 

If the cookware is moved to the hotplate being 

used or lifted up, the hotplate begins an automatic 

search and the heat setting selected previously is 

retained.

Deactivating

Select the flexible cooking zone and set the heat setting 

to 0. The flexible cooking zone will switch itself off and 

the residual heat indicator will appear.

As two independent hotplates

Use the flexible cooking zone as two independent 

hotplates.

Unlinking the two hotplates

Touch the 

`

 symbol. The heat setting and the indicator 

showing the active cooking mode will be lit at the 

hotplate on which the cookware is placed.
The flexible cooking zone functions as two independent 

hotplates.

Linking the two hotplates

Touch the 

`

 symbol. The heat setting and the indicator 

showing the active cooking mode will be lit in the centre 

of the flexible cooking zone.
The flexible cooking zone functions as a single hotplate.

Notes

If the hob switches itself off and then on again, the 

flexible cooking zone is used as a single hotplate 

again.

To change the configuration settings for the flexible 

cooking zone, refer to section 

~

 "Basic settings"

.

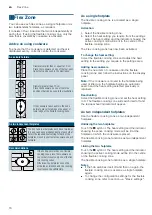
As a single hotplate

Diameter smaller than or equal to 13 cm 

Place the cookware on one of the four posi-

tions that can be seen in the illustration.

Diameter greater than 13 cm 

Place the cookware on one of the three 

positions that can be seen in the illustration.

If the cookware takes up more than one 

hotplate, place it starting on the upper or 

lower edge of the flexible cooking zone.

As two independent hotplates

The front and rear hotplates each have two induc-

tors and can be used independently of each other. 

Select the required heat setting for each of the 

hotplates. Use only one item of cookware on each 

hotplate.

Recommendations

If the hob has more than one flexible 

cooking zone, place the cookware on 

top so that it covers only one of the flex-

ible cooking zones.
Otherwise, the hotplates will not be 

activated as intended and the cooking 

result will not be satisfactory.

Содержание EX8..KY Series

Страница 1: ...en Instruction manual Hob EX8 KY ...

Страница 2: ...2 Ø cm ...

Страница 3: ...imer 19 Stopwatch function 19 v PowerBoost function 20 Activation 20 Deactivating 20 x ShortBoost function 21 Recommendations for use 21 Activation 21 Deactivating 21 z Keep warm function 22 Activation 22 Deactivating 22 s Transferring settings 22 Activation 22 Ü Cooking assist functions 23 Cooking assistant function types 23 Suitable cookware 24 Sensors and special accessories 24 Functions and he...

Страница 4: ...e network 49 Control the hood via the hob 50 Hood control settings 51 D Cleaning 52 Hob 52 Hob surround 52 Frequently Asked Questions FAQ 53 3 Trouble shooting 54 Information warnings and fault codes 54 Tips 54 Demo mode 55 4 Customer service 56 E number and FD number 56 E Test dishes 57 Produktinfo Additional information on products accessories replacement parts and services can be found at www s...

Страница 5: ...th an external clock timer or a remote control This appliance may be used by children over the age of 8 years old and by persons with reduced physical sensory or mental capabilities or by persons with a lack of experience or knowledge if they are supervised or are instructed by a person responsible for their safety how to use the appliance safely and have understood the associated hazards Children...

Страница 6: ...fuse box Contact the after sales service Risk of electric shock Do not use any high pressure cleaners or steam cleaners which can result in an electric shock Risk of electric shock A defective appliance may cause electric shock Never switch on a defective appliance Unplug the appliance from the mains or switch off the circuit breaker in the fuse box Contact the after sales service Risk of electric...

Страница 7: ...the hob Overview You will find the most frequently caused damage in the following table Damage Cause Measure Stains Boiled over food Remove boiled over food immediately with a glass scraper Unsuitable cleaning agent Only use cleaning agents that are suitable for this type of hob Scratches Salt sugar and sand Do not use the hob as a work surface or storage space Cookware with rough bases scratch th...

Страница 8: ...uilds up directly in the item of cookware This offers numerous advantages Saves time when boiling and frying Saves energy Easier to care for and clean Spilled food does not burn on as quickly Heat control and safety the hob increases or decreases the heat supply as soon as the user changes the setting The induction hotplate stops the heat supply as soon as the cookware is removed from the hotplate...

Страница 9: ...base of the cookware is uneven this may impair the heat supply Absence of pan or unsuitable size If no pan is placed on the selected hotplate or if it is made of unsuitable material or is not the correct size the power level displayed on the hotplate indicator will flash Place a suitable pan on the hotplate to stop the flashing If this takes more than 90 seconds the hotplate will switch off automa...

Страница 10: ...otes Always keep the control panel clean and dry Moisture can prevent it from working properly Never place hot cookware on the touchscreen display The electronics could overheat 9 Ñ Touch controls Main switch FlexZone V Short term timer þ Stopwatch function a Extractor hood control E Wi Fi b Docking menu e Basic settings Ñ Lock the control panel for cleaning Childproof lock l Info menu x Set the c...

Страница 11: ...up The Docking menu will display the following options Lock the control panel for cleaning Ñ Childproof lock Info menu l Basic settings e To close the Docking menu touch the symbol again and swipe down Info menu You can access information about the appliance using the Info menu To navigate to the Info menu open the Docking menu and touch the l symbol The available options will be displayed To exit...

Страница 12: ... the symbol until the indicator beside the main switch goes out The residual heat indicator remains lit until the cooking zones have cooled down sufficiently Notes The hob automatically switches off if all cooking zones have been switched off for more than 30 seconds The selected settings are stored for 10 minutes after the hob has been switched off If the hob is switched back on within this time ...

Страница 13: ...he residual heat indicator will light up If you touch and hold the cooking zone indicator on the main display for a few seconds the heat setting will automatically be set to 0 0 Information on how to deactivate this setting can be found in the section entitled Basic settings Chef s recommendations Recommendations When heating up puree cream soups and thick sauces stir occasionally Set heat setting...

Страница 14: ...ulash frozen 3 4 35 55 Poaching simmering Potato dumplings 4 5 5 5 20 30 Fish 4 5 10 15 White sauces e g Béchamel sauce 1 2 3 6 Whisked sauces e g sauce béarnaise hollandaise 3 4 8 12 Boiling steaming braising Rice with double the volume of water 2 5 3 5 15 30 Rice pudding 2 3 30 40 Unpeeled boiled potatoes 4 5 5 5 25 35 Boiled potatoes 4 5 5 5 15 30 Pasta noodles 6 7 6 10 Stew 3 5 4 5 120 180 Sou...

Страница 15: ...7 8 4 10 Sautéeing fresh vegetables and mushrooms 7 8 10 20 Stir fry vegetables meat cut in Asian style strips 7 8 15 20 Stir fry frozen 6 7 6 10 Pancakes baked in succession 6 5 7 5 Omelette cooked in succession 3 5 4 5 3 10 Fried eggs 5 6 3 6 Deep fat frying 150 200 g per portion in 1 2 l oil deep fat fried in portions Frozen products e g chips chicken nuggets 8 9 Croquettes frozen 7 8 Meat e g ...

Страница 16: ...he flexible cooking zone as two independent hotplates Unlinking the two hotplates Touch the symbol The heat setting and the indicator showing the active cooking mode will be lit at the hotplate on which the cookware is placed The flexible cooking zone functions as two independent hotplates Linking the two hotplates Touch the symbol The heat setting and the indicator showing the active cooking mode...

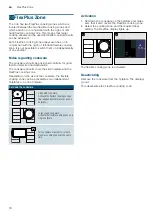
Страница 17: ...vated If the cookware is moved within the flexible cooking zone or lifted up the hob automatically starts searching and the heat setting of the area in which the vessel was detected is set You can find information on the size and positioning of the cookware in the section on Flex Zone Activation 1 Select a hotplate from the flexible cooking zone 2 Touch the active cooking mode 3 Select the ÿ power...

Страница 18: ...re should cover the side hotplate and the FlexPlus cooking zone Depending on the size of the cookware the flexible cooking zone can be activated as two independent hotplates or as one hotplate Activation 1 Set down the cookware on the hotplate and make sure that it also covers the FlexPlus cooking zone 2 Select the cooking zone and the required heat setting The FlexPlus display lights up The flexi...

Страница 19: ... Reset To return to the main screen touch the cooking zone display When the time has elapsed The cooking zone will switch itself off An audible signal will sound and the heat setting will be set to 0 0 Touch the cooking zone display to make the time disappear and stop the audible signal The short term timer The short term timer operates independently of the cooking zones and other settings An audi...

Страница 20: ... the flexible area if the cooking zone is being used as a single hotplate Activation 1 Select a hotplate 2 Set boost in the settings area The ï and Ý symbols will be lit 3 Select the ï symbol This function has now been activated Deactivating Select the hotplate and set a different heat setting in the settings area This function has now been deactivated Note In certain circumstances the PowerBoost ...

Страница 21: ...base Do not use cookware with a thin base Never leave empty cookware oil butter or lard to heat up unattended Do not place a lid on the cookware Place the cookware on the centre of the hotplate Ensure that the diameter of the base of the cookware corresponds to the size of the hotplate You can find information on the type size and positioning of the cookware in section Induction cooking Activation...

Страница 22: ...te Note You can find additional information on the positioning of the cookware in the section on Flex Zone Activation 1 Move the cookware from the active cooking zone to a different one The cookware is detected After a short delay the display will give you the option to adopt the present settings for the new cooking zone 2 Confirm settings The settings are transferred to the new cooking zone The i...

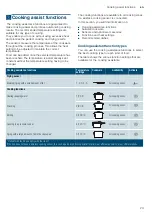
Страница 23: ... you will find information on Cooking assistance functions Suitable cookware Sensors and optional accessories Functions and heat settings Recommended dishes Cooking assistant function types You can use the cooking assistance functions to select the best cooking type for each kind of food The table shows the various function settings that are available for the cooking assistants Cooking assistance ...

Страница 24: ...e the temperature of the pot throughout the entire cooking process This ensures that the cooking power is controlled with high precision to maintain the correct temperature and achieve optimum cooking results Your hob has two different temperature measuring systems for achieving the best results Temperature sensors that are located inside the hob and monitor the temperature of the base of the cook...

Страница 25: ...s not need to be changed A signal sounds once the water or oil has reached the optimum temperature for adding the food The table shows if the food needs to be added right at the start Notes Use pots and pans with a thick flat base Do not use pots and pans with a thin or domed base Fill the pot so that the contents reach high enough to cover the cooking sensor s silicone patch Use the frying sensor...

Страница 26: ...he boiling point basic setting see section Basic settings The basic setting is set to 200 400 m by default If your home is between 200 and 400 metres above sea level you do not need to set the boiling point Otherwise select the setting that matches your home s height above sea level Note Temperature setting 3 100 ºC is sufficient for efficient boiling even if the water does not boil very strongly ...

Страница 27: ... 4 10 15 Steak rare 3 cm thick 2 Õ 5 6 8 Steak medium 3 cm thick 2 Õ 5 8 12 Steak well done 3 cm thick 1 Õ 4 8 12 Poultry breast 2 cm thick 1 Õ 3 10 20 Meat cut into strips 3 Õ 4 7 12 Gyros 3 Õ 4 7 12 Bacon 1 Õ 2 5 8 Minced meat 3 Õ 4 6 10 Hamburgers 1 5 cm thick 1 Õ 3 6 15 Meatballs 2 cm thick 1 Õ 3 10 20 Rissoles 1 Õ 3 10 20 Boiled sausages 1 Õ 3 8 20 Raw sausages 1 Õ 3 8 20 Simmering Sausages 4...

Страница 28: ...sounds 5 Add the food at the start 6 Heat the oil with the lid on Fry one portion after the other without the lid Fish Cooking assis tance functions Temperature level Total cooking time from signal tone mins Frying with a little amount of oil Fish fillet plain 1 Õ 4 10 20 Fish fillet breaded 1 Õ 3 10 20 Prawns 1 Õ 4 4 8 Scampi 1 Õ 4 4 8 Fried whole fish 1 Õ 3 10 20 Poaching Stewed fish 2 2 90 ºC 1...

Страница 29: ...requently 4 Time indicated per portion Fry individually 5 Add the food at the start Vegetables and pulses Cooking assis tance functions Temperature level Total cooking time from signal tone mins Frying with a little amount of oil Garlic 1 Õ 2 2 10 Onions glazed 1 Õ 2 2 10 Onion rings 1 Õ 3 5 10 Courgettes 2 Õ 3 4 12 Aubergines 2 Õ 3 4 12 Peppers 1 Õ 3 4 15 Green asparagus 2 Õ 3 4 15 Mushrooms 1 Õ ...

Страница 30: ... pressure cooker 4 4 120 ºC 10 20 Deep frying with a large amount of oil Deep frying breaded vegetables 5 5 170 ºC 4 8 Deep frying vegetables in beer batter 5 5 170 ºC 4 8 Deep frying breaded mushrooms 5 5 170 ºC 4 8 Deep frying mushrooms in beer batter 5 5 170 ºC 4 8 Vegetables and pulses Cooking assis tance functions Temperature level Total cooking time from signal tone mins 1 Stir frequently 2 ...

Страница 31: ... 4 120 ºC 10 20 1 Stir frequently 2 Time indicated per portion Fry individually 3 Add the oil and food to the frying pan after the signal sounds 4 Heat up and cook with the lid on Add the food after the signal sounds 5 Add the food at the start Pasta and cereals Cooking assis tance functions Temperature level Total cooking time from signal tone mins Simmering Rice 1 2 90 ºC 25 35 Polenta 2 2 90 ºC...

Страница 32: ... amount of oil Tomato sauce with vegetables 1 Õ 1 25 35 Béchamel sauce 1 Õ 1 10 20 Cheese sauce 1 Õ 1 10 20 Reducing sauces 1 Õ 1 25 35 Sweet sauces 1 Õ 1 15 25 1 Stir frequently Desserts Cooking assis tance functions Temperature level Total cooking time from signal tone mins Simmering Rice pudding 1 2 90 ºC 40 50 Porridge oats 1 2 90 ºC 10 15 Chocolate pudding 1 2 90 ºC 3 5 Boiling Compote 2 3 10...

Страница 33: ...1 Õ 3 10 20 Fish fillet breaded 1 Õ 3 10 20 Fish fingers 1 Õ 4 8 12 Fry French fries 2 Õ 5 4 6 Stir fries 2 Õ 3 6 10 Spring rolls 1 Õ 4 10 30 Camembert 1 Õ 3 10 15 Keeping warm heating Vegetable in cream sauce 2 1 70 ºC 15 20 Boiling Green beans frozen 3 3 100 ºC 15 30 Fry with a large amount of oil Deep frying French Fries 4 5 170 ºC 4 8 1 Turn frequently 2 Stir frequently 3 Heat up and cook with...

Страница 34: ...eals 3 Õ 1 5 10 Toasting almonds 4 Õ 4 3 15 Toasting nuts 4 Õ 4 3 15 Toasting pine nuts 4 Õ 4 3 15 Keeping warm heating Heating goulash soup 5 1 70 ºC 10 20 Heating mulled wine 5 1 70 ºC 5 15 Simmering Heating milk 5 2 90 ºC 3 10 1 Turn frequently 2 Stir frequently 3 Add the water after the signal sounds Add the food as soon as the water boils 4 Add the food after the signal tone sounds 5 Add the ...

Страница 35: ... dishes and is arranged by food type The temperature and the cooking time depend on the amount the condition and the quality of the food Note Set up the Flex Zone as a single cooking zone to ensure the function is activated correctly Cookware Temperature level Total frying time after the signal tone sounds min Meat Escalope plain1 4 6 10 Fillet1 4 6 10 Chops1 3 10 15 Steak rare 3 cm thick 1 5 6 8 ...

Страница 36: ...ncake4 3 10 15 Miscellaneous Toasting5 4 4 6 Croûtons2 3 6 10 Toasting almonds6 4 3 15 Toasting nuts6 4 3 15 Toasting pine nuts6 4 3 15 Cookware Temperature level Total frying time after the signal tone sounds min 1 Add oil if necessary and the food after the signal tone sounds Turn if necessary 2 Add oil if necessary and the food after the signal tone sounds Stir regularly 3 Add butter and the fo...

Страница 37: ...ng Changing the battery The silicone patch and the cooking sensor can be purchased at a later time from specialist retailers our technical after sales service or our official website To do this quote the relevant reference number Adhering the silicone patch The silicone patch attaches the temperature sensor to the cookware When a pan is used for the first time with the cooking functions the silico...

Страница 38: ...sensor is drained Reset the cooking sensor and repeat the connection procedure If the temperature sensor and the control panel are not connected correctly due to a transmission error repeat the connection procedure If the display continues to indicate a connection error contact our technical after sales service Resetting the wireless temperature sensor 1 Touch the symbol on the cooking sensor for ...

Страница 39: ...e must align with the notches on the lower section of the housing Tighten the screws with a screwdriver 4 Reattach the silicone cover to the lower section of the temperature sensor housing Note Use only high quality batteries of the type CR2032 in order to guarantee a long service life Declaration of Conformity BSH Hausgeräte GmbH hereby declares that the appliance with wireless temperature sensor...

Страница 40: ... control panel for cleaning function Activation Open the docking menu and touch the Ñ symbol An audible signal will sound The control panel will remain locked for 30 seconds You will now be able to clean the surface of the control panel without altering the settings Deactivating After 30 seconds an audible signal will sound and the control panel will be unlocked To deactivate the function early fo...

Страница 41: ...You can choose whether or not the appliance will sound when fields and symbols are touched on the touchscreen Display brightness You can change the brightness of the display flexInduction You can choose whether the Flex areas will work as one or separately when you switch on the hob powerMove levels You can change the preset settings for the cooking areas for the Move function Childproof lock You ...

Страница 42: ...settings and select the Cookware test option Follow the instructions on the display panel The function has now been activated After 10 seconds information on the quality and speed of the cooking process will appear in the hotplate displays If the test result is not as good as it could be test the saucepan again on one of the smaller hotplates To repeat the test call up the basic settings again and...

Страница 43: ...liance functions in the same way as a hob with no network connection The hob can always be operated via the control panel The availability of the Home Connect function depends on the availability of Home Connect services in your country Home Connect services are not available in every country You can find more information on this at www home connect com Notes Hobs are not designed to be used unatt...

Страница 44: ...6 Touch Next to begin the process of connecting to the app Once the login process is complete a message will appear to say that it has been successful The D symbol will appear in the main area on the control panel Manual registration in the home network 1 Touch the e symbol in the docking menu to open the basic settings 2 Touch the Home Connect setting 3 Touch Use wizard to configure settings to l...

Страница 45: ...ic login to your home network Use wizard to configure settings WPS not supported manually log into your home network Note This setting is only displayed if the hob is not yet connected to your home network Connect to app You can connect to one or more Home Connect accounts Note This setting is only displayed if the hob is connected to your home network Setting via app You can choose whether to all...

Страница 46: ...onnect setting 3 Touch Disconnect 4 Touch Next to confirm This disconnects the appliance from your home network the D symbol will go out on the control panel Note The network connection will also be deleted if you restore the factory settings on your appliance Connecting to the network Connectingtothenetwork 1 Touch the e symbol in the docking menu to open the basic settings 2 Touch the Home Conne...

Страница 47: ...tware update function your hob s software can be updated e g for the purpose of optimisation troubleshooting or security updates To do this you need to be a registered Home Connect user have installed the app on your mobile device and be connected to the Home Connect server As soon as a software update is available you will be informed by the Home Connect app and will be able to start the software...

Страница 48: ...ce with the basic requirements and the other relevant provisions of the directive 2014 53 EU A detailed RED Declaration of Conformity can be found online at www siemens home bsh group com on the product page of your appliance with the additional documents 2 4 GHz band max 100 mW 5 GHz band max 100 mW eHood connection Hoodconnection You can connect this appliance to a suitable extractor hood and th...

Страница 49: ...tion process on the extractor hood A message will be displayed to notify you when the hob is successfully connected to the extractor hood The symbols for the hood controls on the hob are displayed in the settings area Connecting via your home network You require a router that has WPS functionality Access to your router is required If you do not have this follow the steps listed under Direct connec...

Страница 50: ...e fan setting you require Touch int 1 or int 2 to select one of the intensive modes The fan has been activated Deactivating 1 Touch the I symbol in the settings area 2 Select fan setting 0 The fan has been deactivated Setting automatic mode Activation 1 Touch the I symbol in the settings area 2 Select Automatic mode is activated The fan starts automatically when steam is produced Deactivating 1 To...

Страница 51: ... mode The hood is switched on at a fixed setting when you switch on any of the cooking zones Fan run on The fan run on eliminates residual odours the fan automatically switches off once this is complete Fan off Switch on in automatic mode Switch on with standard fan run on The fan settings cannot be adjusted when the hob is switched off Automatic light activation If you wish you can set the hood l...

Страница 52: ...s best removed with a glass scraper available from retailers Observe the manufacturer s instructions You can obtain a suitable glass scraper from customer services or through our online shop Using a special sponge for cleaning glass ceramic hobs achieves a great cleaning result Note Do not use any cleaning agents while the hob is still hot This may mark the surface Make sure that any residue left ...

Страница 53: ...whistling noises Can occur when two hotplates are used at the highest heat setting at the same time The whistling noises disappear or become quieter when the heat setting is reduced Fan noise The hob is equipped with a fan that switches on automatically at high temperatures The fan may continue to run even after you have switched off the hob if the temperature detected is still too high Cookware W...

Страница 54: ...r consumption in the basic settings If a very large item of cookware is being used this may have an effect on the maxi mum heat setting for that half of the hob Place the cookware back on the hob An audible signal sounds when there is an object on the touch screen display Remove the object and reset the hob Do not place hot cookware on the control panel The hob responds in an unusual manner or can...

Страница 55: ...See the section entitled Changing the battery The connection to the cooking sensor has been broken ƒ Switch the function off and then on again The cooking sensor is faulty ƒ Contact the technical after sales service The cooking sensor indicator will not light up and the cooking sensor is not responding Replace the 3 V CR2032 battery See the section entitled Changing the battery If this does not so...

Страница 56: ...surface You can check the E number after sales service index KI and FD number by going to the basic settings Refer to the section entitled Basic settings to find out how to do this Please note that a visit from an after sales service engineer is not free of charge in the event that the appliance has been misused even during the warranty period Please find the contact data of all countries in the e...

Страница 57: ... 20 C Amount 450 g Cooking pot 16 cm diameter 9 1 30 without stir ring Yes 1 5 Yes Amount 800 g Saucepan 22 cm diameter 9 2 30 without stir ring Yes 1 5 Yes Lentil stew from a tin E g lentils with Erasco sausages Initial temperature 20 C Amount 500 g Cooking pot 16 cm diameter 9 Approx 1 30 stir after approx 1 minute Yes 1 5 Yes Amount 1 kg Saucepan 22 cm diameter 9 Approx 2 30 stir after approx 1...

Страница 58: ...lk 3 5 fat content and 1 g salt Cooking pot 16 cm diameter 8 5 Approx 5 30 No 3 No Ingredients 250 g short grain rice 120 g sugar 1 l milk 3 5 fat content and 1 5 g salt Saucepan 22 cm diameter 8 5 Approx 5 30 No 2 5 No Cooking rice Water temperature 20 C Ingredients 125 g long grain rice 300 g water and a pinch of salt Cooking pot 16 cm diameter 9 Approx 2 30 Yes 2 Yes Ingredients 250 g long grai...

Страница 59: ......

Страница 60: ...0DQXIDFWXUHG E 6 DXVJHUlWH PE XQGHU 7UDGHPDUN LFHQVH RI 6LHPHQV 6 DXVJHUlWH PE DUO HU 6WU 0 QFKHQ VLHPHQV KRPH EVK JURXS FRP 50 1 9001387772 9001387772 980830 01 ...

Отзывы: