


5
Mounting
5.1
Mounting instructions
•
Observe the technical data.
•
Protect the sensor from direct and indirect sunlight.
•
To prevent condensation, avoid exposing the device to rapid changes in tempera‐
ture.
•
The mounting site has to be designed for the weight of the device.
5.2
Overview of mounting procedure
The mounting of the device is divided into the following steps:
•
Mount the device.
•
Align the device with the object.
•
Connect the device to interfaces and supply voltage.
•
Adjust the device.
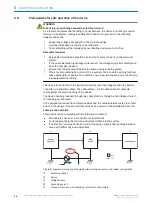
5.3
Preparation for mounting
5.3.1
Installation requirements
•
Typical space requirement:
see "Field of view diagrams", page 31
cific dimensional drawing
•
Comply with the technical data, such as the permitted ambient conditions for
operation,
.
•
Ensure a good dissipation of excess heat from the device to the surroundings, in
particular at higher ambient temperatures. Good heat transfer from the device can
be achieved, for example, by using a bracket on the mounting base or by ensuring
that the back of the device is located at a sufficient distance from the wall of an
enclosure.
•
Only mount the device using the threaded mounting holes provided or the movable
sliding nuts.
•
Mount the device in a shock and vibration insulated manner.
•
Make sure the device has a clear view of the codes.
Auxiliary equipment required
■
Mounting system with sufficient load-bearing capacity and suitable dimensions
■
4 or 2 M5 screws for mounting the device on a mounting system supplied by the
customer
■
Tool and tape measure
The screw length depends on the mounting base (wall thickness of the bracket). When
using an optional SICK mounting system, the screws for mounting the device are
included with delivery.
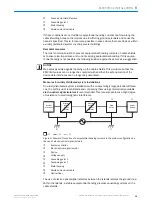
5.3.2
Mounting systems
Mount the device to the mounting systems using at least 2 threaded mounting holes
(M5) or sliding nuts.
The threaded mounting holes are located on the rear side of the device.
The sliding nuts can each be inserted into a slot on the side of the housing.
SICK offers prefabricated mounting systems that are optimally suited for mounting the
device,
.
5
MOUNTING
24
O P E R A T I N G I N S T R U C T I O N S | Lector63x Flex C-mount and S-mount
8018071/1E1C/2021-12-16 | SICK
Subject to change without notice


