background image

- 12 -

Step 1

Install the CPU:

1. Locate the CPU ZIF (Zero Insertion Force) socket on the upper-right

sector of your mainboard (between the back-panel connectors and the
DIMM memory banks).

2. Pull the CPU ZIF socket lever slightly sideways away from the socket

to unlock the lever,  and then bring it to an upwardly vertical position.

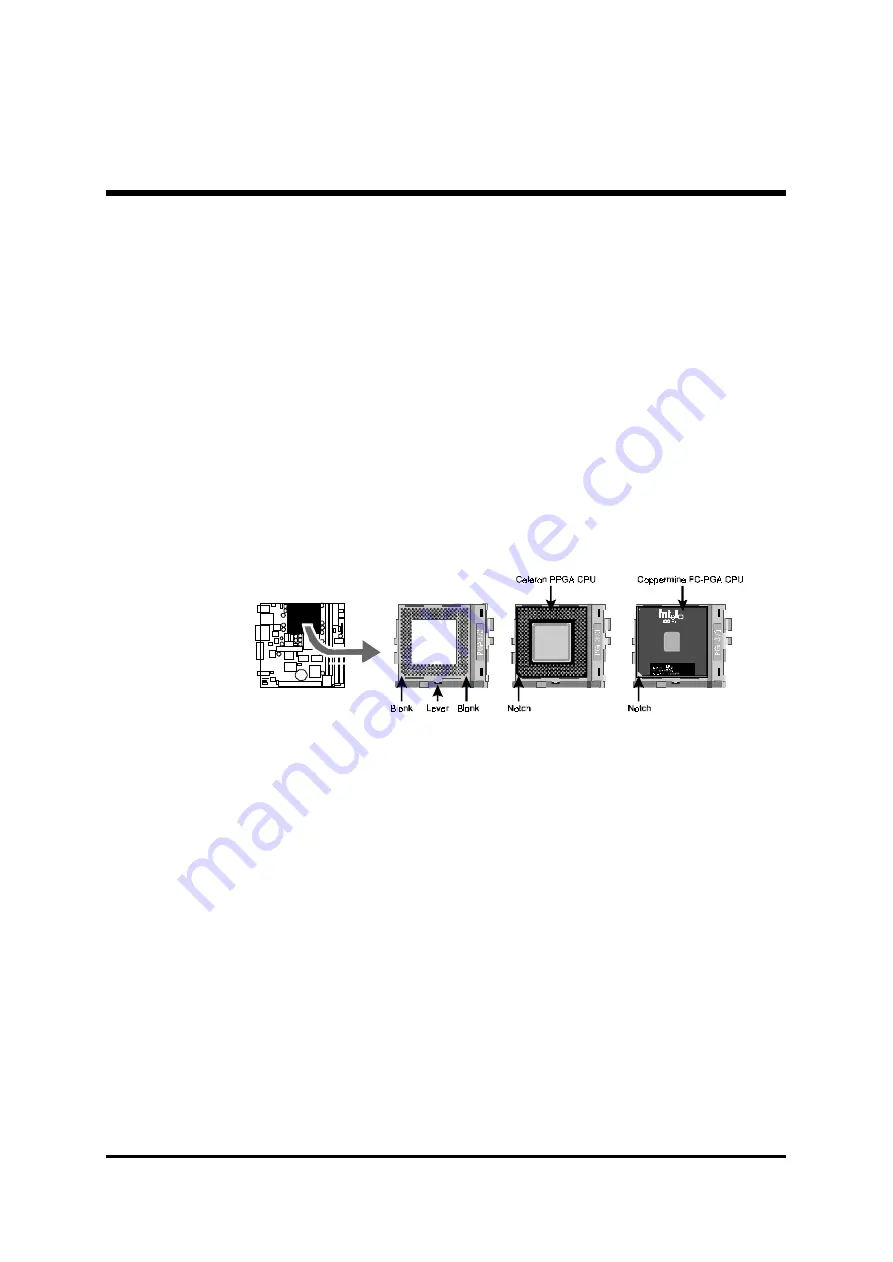
3. Place your PPGA/FC-PGA370 processor in the ZIF socket.  Note that the

CPU’s edges have been purposely designed non-symmetrically to prevent
from inserting the processor in the wrong direction.  The following diagram
dem onstrates the correct placement of the CPU in the ZIF socket.  You can
see that the two blunt-edged corners should face towards the socket-lever.

4. Slightly push the PPGA/FC-PGA370 processor into the socket without

applying excessive force while making sure there is no gap between CPU
and socket.   Then lower the socket-lever all the way down to its horizontal
position and lock it to secure the CPU in place.

5. The PPGA/FC-PGA370 processor requires a set of heatsink/fan to ensure

proper cooling of the processor.  If heatsink/fan having not been already
mounted on your CPU, you must purchase the heatsink/fan separately
and have it installed.  Plug the cable throught the heatsink/fan in the CPU
fan power connector located nearby.   Note that there are several types of
CPU fan connectors.  Normally, if your mainboard supports the hardware
monitoring function, a 3-pin fan power connector should allow your system
to detect the CPU fan’s speed .  The CPU fan can also run with a 2-pin fan
power connector, however, detection of CPU fan’s speed is not supported.
Another type of CPU fan may feature a large 4-pin fan power connector,
which does not support CPU fan's speed detection and must be directly
connected to the system’s power supply unit.  Please refer to the following
diagram.

Содержание Spacewalker FE22

Страница 1: ...75 FE22 Intel 810 Family Based Main Board User s Manual...

Страница 2: ...is given as to the correctness of the contents In the interest of continued product improvement this company reserves the right to revise the manual or include changes in the specifications of the pr...

Страница 3: ...12 STEP 2 Set Jumpers 13 STEP 3 Install SDRAM System Memory 13 STEP 4 Install Internal Peripherals in System Case 14 STEP 5 Mount the Mainboard on the Computer Chassis 15 STEP 6 Connect Front Panel Sw...

Страница 4: ...tor 28 COM1 Connector 28 VGA Connector 29 DFP Port Connector 29 Line In 29 Line Out 29 Front Panel Connectors ATX Power On Off Switch Connector PWON 30 Green LED Connector GLED 30 PWR LED Connector PW...

Страница 5: ...dio Connector CD_In JP6 34 3 3 SYSTEM MEMORY CONFIGURATION 35 Install Memory 35 Upgrade Memory 35 4 SOFTWARE UTILITY 36 4 1 Mainboard CD Overview 36 4 2 Install Chipset System Driver 37 4 3 Install AG...

Страница 6: ...BIOS FEATURES 57 ADVANCED CHIPSET FEATURES 60 INTEGRATED PERIPHERALS 63 POWER MANAGEMENT SETUP 65 PNP PCI CONFIGURATION 68 FREQUENCY VOLTAGE CONTROL 70 LOAD FAIL SAFE DEFAULTS 71 LOAD OPTIMIZED DEFAU...

Страница 7: ...11 Jumper Settings A Closer Look Page 24 Software Utility How to Install Page 36 BIOS Setup How to Configure Page 50 About This Manual For First Time DIY System Builder Page 6 For Experienced DIY Use...

Страница 8: ...our new Shuttle FE22 mainboard is just easy Bundled with an array of onboard functions the highly integrated FE22 mainboard provides you with a total solution to build the most stable and reliable sys...

Страница 9: ...P 4 JP 6 1 1 J6 6 1 1 J1 2 1 92 4 8B F 7 3 99 2 3 C A 9 3 02 2 0 I C S 1 1 1 I D E 1 F L P 1 I D E 0 JW R 1 J4 J5 K B U S B P C I 1 M S 1 JP 12 1 0 6 7 0 B 4 0 0 K A G 6 99 1 3 Q 0 0 4 J A P A N C M D...

Страница 10: ...AC 97 2 1 compliant AD1881A CODEC Onboard PanelLink Sil 164 Supports up to 1280 x 1024x24bits flat panel displays Onboard USB Hub CMD 670B Supports 2 USB port Onboard Lan Realtek 8139C Jumperless CPU...

Страница 11: ...USB Interface Onboard 2 USB connectors on back panel and 10 pin header for USB connectors on front panel PCI Bus Master IDE Controller Onboard Two UltraDMA 33 66 Bus Master Dual channel IDE ports prov...

Страница 12: ...top Management Interface DMI and bundled with NCR SCSI BIOS Flex ATX Form Factor System board conforms to the Flex ATX specification Board dimension 170mm 170mm 7 x 7 Advanced Features Dual Function P...

Страница 13: ...E S U9 230 31 Q 96 9 8 intel Intel 810 FW82810E L930T C20 SL3MD INTEL 98 KOREA M C intel FW82801AA L9340983 SL3MA INTEL 98 MALAY M C A D 1 88 1A JS T 00 09 CC095 1 4 RTL8139C 02175T1 0 09B TAIWAN RMC...

Страница 14: ...no gap between CPU and socket Then lower the socket lever all the way down to its horizontal position and lock it to secure the CPU in place 5 The PPGA FC PGA370 processor requires a set of heatsink...

Страница 15: ...ings if you are not totally familiar with mainboard configu ration procedures The factory set default settings are tuned for optimum system performance For the advanced users who wish to customize the...

Страница 16: ...umpers on board each device according to the instructions provided by the manufacturer IDE devices HDD and CD ROM have to set jumpers on Master or Slave mode depending on your willing to install more...

Страница 17: ...sis and the mainboard The studs are used to fix the mainboard and to keep a certain distance between the system chassis and the mainboard in order to avoid any electrical short be twine the board and...

Страница 18: ...D Power LED Reset Switch PC Speaker or connectors for USB devices etc These cables serve to connect the front panel switches LEDs USB connectors to the mainboard s front panel connectors group JP8 JP1...

Страница 19: ...17 4 HDD_LED 5 Hardware Reset Switch 6 PC Speaker 7 Front Panel USB Header 1 GLED PWR LED HDD LED PWON JP8 SPK RST 1 JP12 SPK RST 1 JP12 USB3 USB2 GND GND USB USB VCC VCC USB USB GND GND 2 1 10 9...

Страница 20: ...ep 7 Connect IDE Floppy Disk Drives 1 IDE cable connector 2 FDD cable connector Step 8 Connect Other Internal Peripherals 1 Line Out Line Mic In and CD In connectors 1 1 IDE1 IDE0 1 FL P1 JP11 1 JP4 1...

Страница 21: ...19 Step 9 Connect Power Supply 1 System power connector Step 10 Install Add on Cards in Expansion Slot 1 PCI Card JWR1...

Страница 22: ...anel You are now ready to put the computer case back together and get on to the external peripherals connections to your system s back panel 1 PS 2 Mouse and Keyboard 2 USB Devices 3 LAN Port PS 2 Mou...

Страница 23: ...21 4 VGA Connector 5 COM1 Port 6 DFP Connector 7 Audio Line_In Connector 8 Audio Line_Out Connector COM1 Port VGA Port DFP Port Line In Line Out...

Страница 24: ...ce available in the extended partition The FDISK utility will assign a drive letter i e C D E to each partition which will be shown in the FDISK program After FDISK procedure reboot your system by usi...

Страница 25: ...ady installed before running the drivers installation CD ROM programs 1 Insert the FE22 bundled CD ROM into your CD ROM drive The auto run program will display the drivers main installation window on...

Страница 26: ...the bottom Jumpers with two pins are shown as for Close On or for Open Off To Short jumper pins simply place a plastic jumper cap over the desired pair of pins Caution 1 Do not remove the mainboard f...

Страница 27: ...heir assigned functions CPU Memory Expansion Slots Socket 370 CPU Socket for PPGA FC PGA 370 processors J4 J5 Two DIMM Sockets for 8 16 32 64 128 256 and 512 MB of 3 3V SDRAM PCI One 32 bit PCI Expans...

Страница 28: ...ower LED HDD LED IDE Drive Active LED RST Hardware Reset Switch SPK Housing Internal Speaker USB Front Panel USB Connector Header J60 Internal Peripherals Connectors FDD Floppy Disk Drive Interface ID...

Страница 29: ...per cap on J12 pin 2 3 for a few seconds Step 4 Return the jumper cap to pin 1 2 Step 5 Turn on the system power PC On Boot Block Protection J16 J16 is used to protect the Boot Block in BIOS If the vi...

Страница 30: ...ug the PS 2 keyboard and mouse jacks into their corresponding connectors USB0 USB1 Port Connectors Two female connectors USB0 USB1 share the same USB Universal Serial Bus bracket at the rear panel of...

Страница 31: ...ector Line In Line In is a stereo line level input port that accepts a 1 8 inch TRS stereo plug It can be used as a source for digital sound re cording a source to be mixed with the output or both Lin...

Страница 32: ...the system resumes to normal operation mode the Green LED will go off Attach a 2 pin Green LED cable to GREEN LED header PWR LED Connector PWR LED Attach the 2 pin Power LED connector cable from the h...

Страница 33: ...system to restart Speaker Connector SPK Attach the PC speaker cable from the case to the 2 pin speaker connector SPK Front Panel USB Connectors Header This header is used to connect the cable attached...

Страница 34: ...es one 34 pin floppy disk controller FDC to accommodate the Floppy Disk Drive F D D Moreover this mainboard comes with one 80pin ATA66 ribbon cable to connect to IDE H D D and one 34 pin ribbon cable...

Страница 35: ...ower connector clicks into place to ensure a solid attachment Note 3 Your ATX power supply must be supplied to ACPI 5V standby power and at least 720mA compatible Note 4 Make sure your power supply ha...

Страница 36: ...hich are mounted on front panel This header share the same signal with Line In Mic In on back panel Pins Assignment 1 Right In 2 Left In 3 AGND 4 Voltage 5 MIC In Audio Connector CD In JP6 Port JP6 is...

Страница 37: ...hown as follows Note You do not need to set any jumper to configure memory since the BIOS utility can detect the system memory automatically You can check the total system memory value in the BIOS Sta...

Страница 38: ...not appear double click or run D Autorun exe assuming that your CD ROM drive is drive D Navigation Bar Description Install Mainboard Software Installing INF and AGP drivers Install Audio Device Softwa...

Страница 39: ...n the Install Chipset System driver bar to install Chipset driver Once you make your selection a Setup window will automatically runs the installation When the files are done copying make sure you reb...

Страница 40: ...oard Software Setup screen Select the item using your pointing device e g mouse on the Install Mainboard Software bar Then Mainboard Drivers Utilities windows will appear on your screen Click on the I...

Страница 41: ...oard Software Setup screen Select the item using your pointing device e g mouse on the Install Audio Device Software bar Then Ad1881 Audio Drivers Applications windows will appear on your screen Click...

Страница 42: ...creen Then PCI Ethernet Controller Properties windows will appear on your screen Click on the Reinstall Driver bar to install driver Select tab Device Manager You will find a yellow mark at PCI Ethere...

Страница 43: ...river and click on Next bar to continue Select Network adapters bar for LAN device and click on Next bar to con tinue Insert the support CD by the mainboard manufacturer and choose Have Disk bar to co...

Страница 44: ...CI Fast Ethernet NIC driver and click on Next Then the system will do the setup autimatically Completing the upgrade device driver and click on Finish to restart the system to take all the changes eff...

Страница 45: ...screen The Device Manager windows will appear on your screen You will find a yellow mark on Etherent Controller that means the driver is not recog nized Double click on the Etherent Controller Then E...

Страница 46: ...a list of the known drivers for this device so that I can choose a specific driver to the manual install driver and click on Next bar to continue Select Network adapter bar for LAN device and click o...

Страница 47: ...t Realtek RTL8139 A B C 8130 PCI Fast Ethernet NIC to install and then click on Next Make sure Realtek RTL8139 A B C 8130 PCI Fast Ethernet NIC driver and click on Next Then the system will do the set...

Страница 48: ...46 After restart you may check Network adapters under the location mentioned at right figure The Network adapters shows correctly...

Страница 49: ...and Add bar to install driver Insert the support CD by the mainboard manufacturer and choose Have Disk bar to continue next step Key in the driver s location as D lan WINNT4 In this location CD disk d...

Страница 50: ...ges effect Make sure Realtek RTL8139 A B C 8130 PCI Fast Ethernet Adapter driver and click on Close Setting yourself network Then the system will do the setup autimatically After restart you may check...

Страница 51: ...uble click on Autorun icon in My Computer to bring up Shuttle Mainboard Software Setup screen Select the item using your pointing device e g mouse on the Manual bar Then Online Information windows wil...

Страница 52: ...t routine checks Step 2 Press Del key immediately or at the following message Press DEL to enter SETUP or simultaneously press Ctrl Alt Esc keys Note 1 If you miss trains of words meationed in step2 t...

Страница 53: ...hat a brief description of each highlighted selection appears at the bottom of the screen Setup Items The main menu includes the following main setup categories Recall that some systems may not includ...

Страница 54: ...r the minimal stable performance of your system to operate Load Optimized Defaults Use this menu to load the BIOS default values that are factory set for optimal performance system operation While Awa...

Страница 55: ...the value you want in each item Date Month DD YYYY Set the system date Note that the Day automatically changes when you set the date Time HH MM SS The time is converted based on the 24 hour military...

Страница 56: ...5 in or 2 88M 3 5 in Video Select the default video device The choice EGA VGA CGA 40 CGA 80 or MONO Halt On Select the situation in which you want the BIOS to stop the POST process and notify you The...

Страница 57: ...let you select the number of cylinders heads etc Note PRECOMP 65535 means NONE The choice None Auto or Manual Access Mode Choose the access mode for this hard disk The choice CHS LBA Large or Auto Ca...

Страница 58: ...56 Precomp Warning Setting a value of 65535 means no hard disk Min 0 Max 65535 Landing zone Set the Landing zone size Min 0 Max 65535 Sector Number of sector per track Min 0 Max 255...

Страница 59: ...eone attempts to write data into this area BIOS will show a warning message on screen and an alarm beep Enabled Activates automatically when the system boots up causing a warning message to appear whe...

Страница 60: ...yte Initially the gate A20 was handled via a pin on the keyboard Today while key boards still provide this support it is more common and much faster set to Fast for the system chipset to provide suppo...

Страница 61: ...tered promptly The choice System or Setup Note To disable security select PASSWORD SETTING at Main Menu and then you will be asked to enter password Do not type anything and just press Enter it will d...

Страница 62: ...you discovered that data was being lost while using your system you might consider making any changes SDRAM CAS Latency Time When synchronous DRAM is installed the number of clock cycles of CAS laten...

Страница 63: ...resulting in better system performance However if any program is written to this memory area a system error may result The Choice Enabled or Disabled Memory Hole At 15M 16M You can reserve this area...

Страница 64: ...he Choice 2 or 3 Paging Mode Control Select the paging mode control The Choice Close or Open RAS to CAS Override Select the display cache clock periods control The Choice by CAS LT or Override 2 RAS T...

Страница 65: ...he onboard IDE inter face supports Modes 0 through 4 provide successively increased performance In Auto mode the system automatically determines the best mode for each device The choice Auto Mode 0 Mo...

Страница 66: ...Modem The choice Auto or Disabled IDE HDD Block Mode Block mode is also called block transfer multiple commands or mul tiple sector read write If your IDE hard drive supports block mode most new drive...

Страница 67: ...end The choice S1 POS or S3 STR Power Management This category allows you to select the type or degree of power saving and is directly related to the following modes HDD Power Down Doze Mode and Suspe...

Страница 68: ...nitial display power management signaling The choice V H SYNC Blank Blank Screen or DPMS Video Off In Suspend This determines the manner in which the monitor is blanked The choice Yes or No Suspend Ty...

Страница 69: ...d time When date and time expire system will turn to power on mode from power off mode The choice Enabled or Disabled Date of Month Alarm This item selects the alarm date Key in a DEC number Min 0 Max...

Страница 70: ...t Extended System Configuration Data ESCD when you exit from Setup if you have installed a new device or software and the system reconfiguration has caused such a serious conflict that the operating s...

Страница 71: ...t with the Plug and Play standard whether designed for PCI or ISA bus architecture The choice PCI Device or Reserved Memory Resources This sub menu can let you control the memory resource Reserved Mem...

Страница 72: ...70 Frequency Voltage Control CPU Clock Ratio This item allows you to select the CPU ratio The choice 2X 2 5X 3X 3 5X 4X 4 5X 5X 5 5X 6X 6 5X 7X 7 5X 8X...

Страница 73: ...N Pressing Y loads the BIOS default values for the most stable and minimal performance system operation Load Optimized Defaults When you press Enter on this item you will get a confirmation dialog box...

Страница 74: ...access to the options By setting separate Supervisor and User password a system supervisor can limit who will change critical Setup values Enter Password Type the password up to eight characters and...

Страница 75: ...r the system is rebooted or you try to enter Setup If you select Setup at Security Op tion of BIOS Features Setup Menu you will be prompted only when you try to enter Setup Warning Retain a record of...

Страница 76: ...next time you boot your computer the BIOS configures your system according to the Setup selection stored in CMOS After saving the values the system is restarted again Exit Without Saving Press Enter...

Отзывы: