


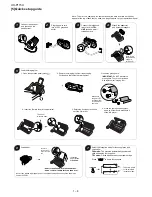


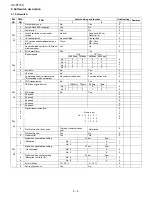

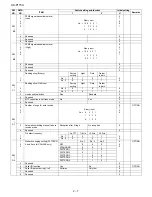


UX-P115U
1 – 6
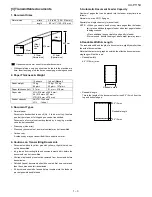
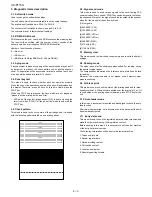
4. Loading printing paper
You can load letter or legal size paper in the paper tray. Recom-
mended paper weight is 20-lb. Copy Bond. The maximum number of
sheets is as follows:
Letter size:
Approx. 50 sheets (20-lb. copier paper at room tempera-
ture; maximum stack height should not be higher than the line on the
tray)
Legal size:
5 sheets
1) Fan the paper, and then tap the edge against a flat surface to even
the stack. Make sure the stack edges are even.
2) Insert the stack of paper into the tray, PRINT SIDE DOWN.
• If paper remains in the tray, take it out and combine it into a sin-
gle stack with the new paper.
• Be sure to load the paper so that printing takes place on the
side of the paper. Printing on the reverse side may result
in poor print quality.
•
GENTLY LOAD PAPER INTO THE PAPER TRAY.
•
DO NOT FORCE IT DOWN INTO THE FEED SLOT.
Note:
Do not use paper that has already been printed on, or
paper that is curled.
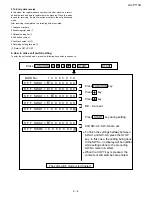
3) Setting the paper size.
The fax has been set at the factory to scale received faxes to letter
size paper. If you loaded legal paper, you must change the paper
size setting to LEGAL.
4) Print contrast setting.
You fax has been set at the factory to print at normal contrast. If
desired, you can change the print contrast setting to LIGHT.
The stack
should not
be higher
than this line.
Note:
If at any time the display shows
the alternating messages at right, check
the printing paper. If the tray is empty,
add paper. If these is paper in the tray,
take it out and then reinsert it.
When you are finished, press
.
START/MEMORY
ADD PAPER &
PRESS START KEY
↑
↑
1. Press
once and
once.
2. Press
once and
twice.
3. Press
once.
4. Select the paper size:
LETTER:
LEGAL:
5. Press
to return to the date and time display.
1
2
OPTION SETTING
Display:
PAPER SIZE SET
1=LETTER, 2=LEGAL
COPY CUT-OFF
The display briefly shows
your selection, then:
FUNCTION
STOP
1. Press
once and
once.
2. Press
once and
3 times.
3. Press
once.
4. Select the print contrast:
NORMAL:
LIGHT:
5. Press
to return to the date and time display.
1
2
OPTION SETTING
Display:
PRINT CONTRAST
1: NORMAL
PAPER SIZE SET
The display briefly shows
your selection, then:
FUNCTION
STOP
Содержание UX-P115
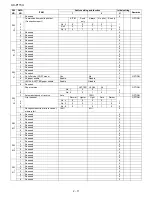
Страница 60: ...UX P115U 6 7 7 Control PWB parts layout Top side ...
Страница 61: ...UX P115U 6 8 8 Control PWB parts layout Bottom side ...
Страница 63: ...UX P115U 6 10 2 TEL LIU PWB parts layout Top side The TEL LIU PWB of the model employs lead free solder ...
Страница 64: ...UX P115U 6 11 3 TEL LIU PWB parts layout Bottom side The TEL LIU PWB of the model employs lead free solder ...
Страница 66: ...UX P115U 6 13 2 Power supply PWB parts layout Top side 3 Power supply PWB parts layout Bottom side ...
Страница 76: ...UX P115U 8 5 MEMO ...