5-70
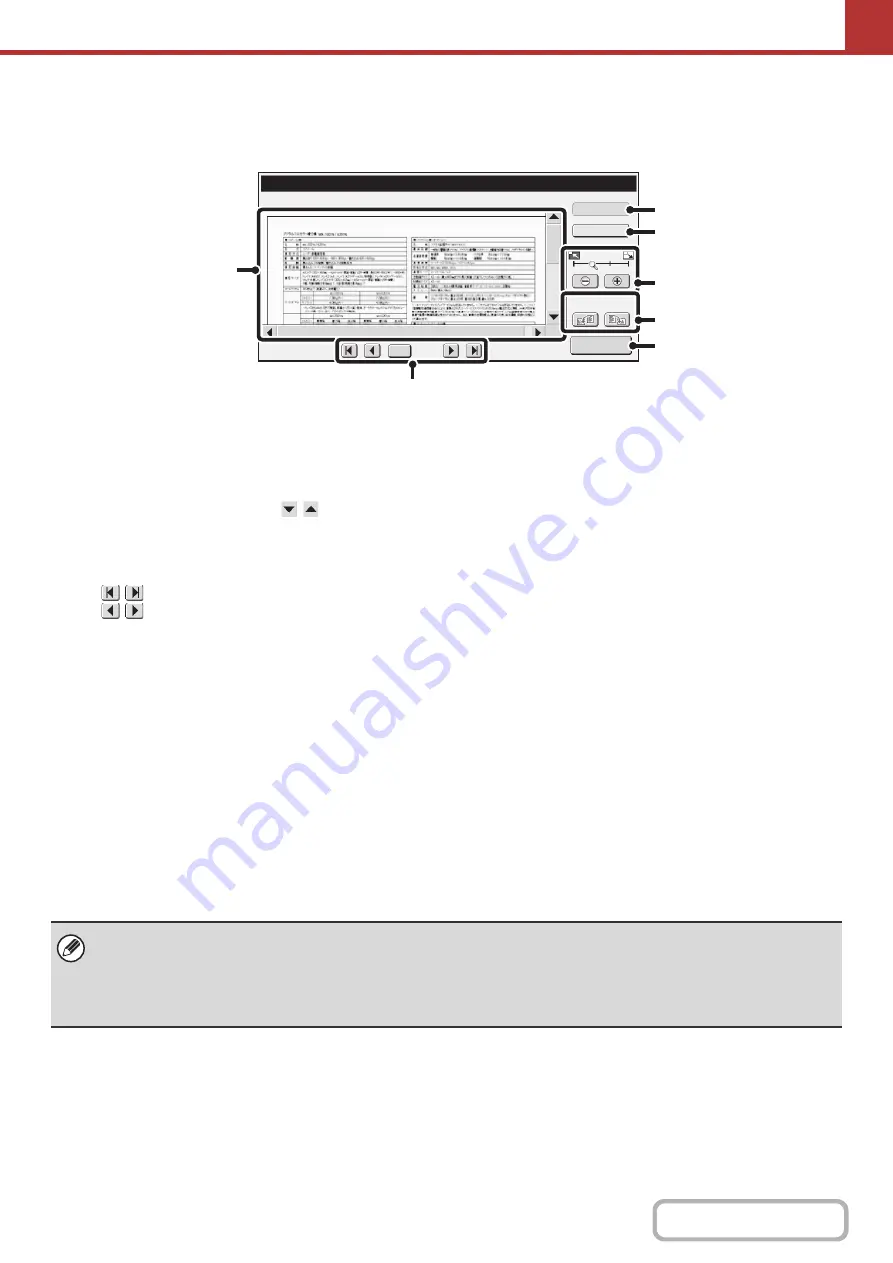
PREVIEW CHECK SCREEN
This section explains the preview check screen.
(1)
Preview ima
g
e
A preview of the scanned original appears.
If the image is cut off, use the scroll bars at the right and
bottom of the screen to scroll the image. Touch a bar and slide
it to scroll. (You can also touch the
keys to scroll.)
(2)
Chan
g
e pa
g
e keys
When there are multiple pages, use these keys to
change pages.
•
keys: Go to the first or the last page.
•
keys: Go to the previous page or the next
page.
• Page number display:
This shows the total number of pages
and the current page number. You can
touch the current page number key and
enter a number with the numeric keys
to go to that page number.
(3)
[Sender Info] key
When Internet fax mode is selected, touch to display the
sender information for I-fax own address send.
This key can only be touched when the entire preview
image is displayed in the preview screen.
(4)
[Function Rev.] key
Touch to check special mode settings or scan settings for
two-sided originals.
(5)
Display zoom key
Use this to set the zoom ratio of the displayed image.
Changes from the left in the order "Full Page", "Twice",
"4 Times", "8 Times". The setting applies to all pages in
the file, not just the displayed page.
(6)
"Display Rotation" key
This rotates the image right or left by 90 degrees. The
rotation applies to all pages in the file, not just the
displayed page.
(7)
[Start Sendin
g
] key
Touch to begin transmission.
Preview
Display Rotation
/0010
0001
Function Rev.
B/W
Start
Sending
Sender Info
(5)
(6)
(7)
(4)
(3)
(2)
(1)
• A preview image is an image for display on the touch panel. It will differ from the actual print result.
• The preview image reflects certain scanning and special mode settings.
Settings reflected in the preview image are as follows:
Scanning settings: Original
Special modes: Erase, Dual Page Scan, Card Shot, 2in1, Blank Page Skip
Содержание MX-M266N
Страница 6: ...Make a copy on this type of paper Envelopes and other special media Tab Paper Transparency film ...
Страница 8: ...Assemble output into a pamphlet Create a stapled pamphlet Staple output Create a blank margin ...
Страница 11: ...Conserve Print on both sides of the paper Print multiple pages on one side of the paper ...
Страница 12: ...Print without a computer Print a file in a USB memory device Print a file stored in the machine ...
Страница 34: ...Search for a file abc Search for a file using a keyword Search by checking the contents of files ...
Страница 35: ...Organize my files Delete a file Delete all files Periodically delete files Change the folder ...
Страница 259: ...3 19 PRINTER Contents 4 Click the Print button Printing begins ...
Страница 267: ...3 27 PRINTER Contents 1 Select Layout 2 Select Long edged binding or Short edged binding Macintosh 1 2 ...


