background image

38

PRINTER

PRINTING IN A WINDOWS ENVIRONMENT

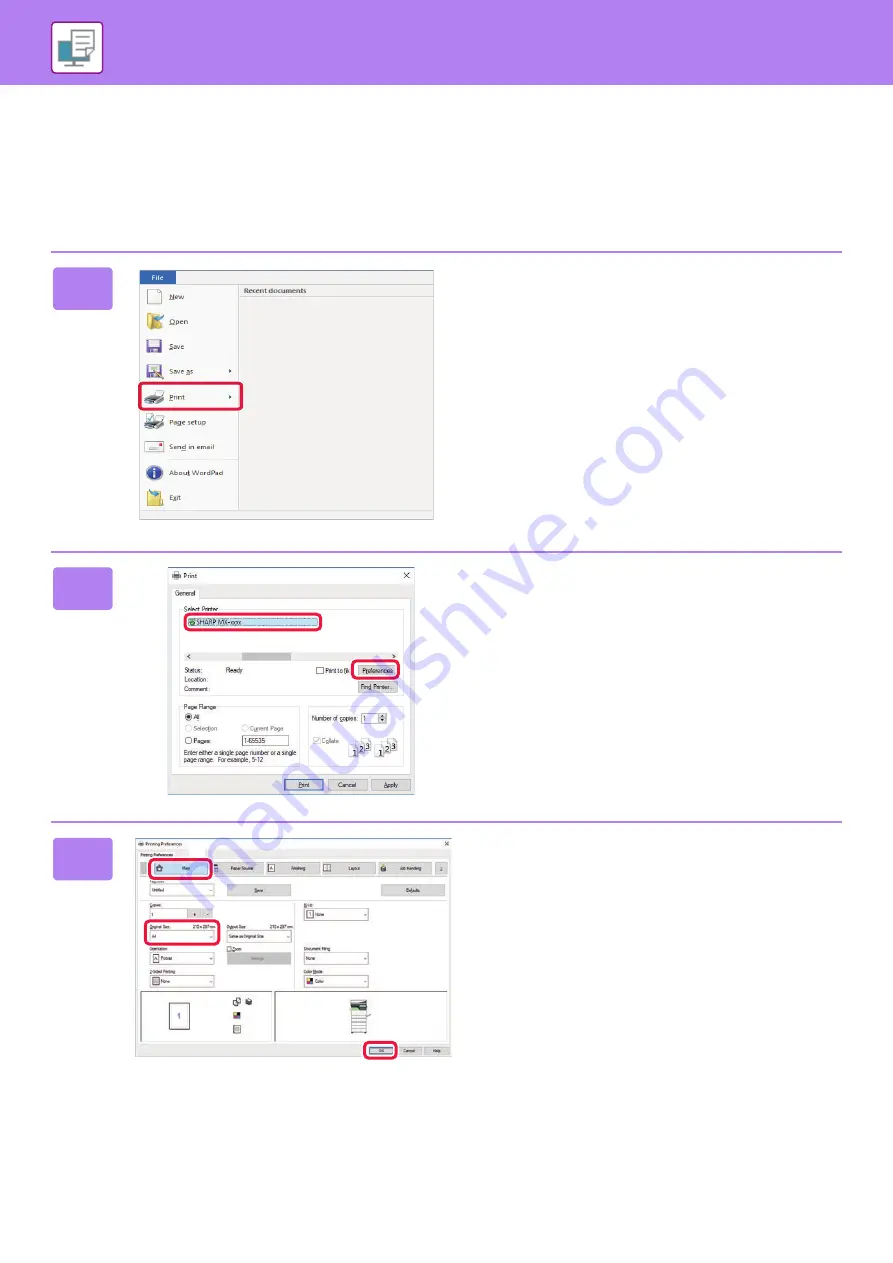
The following example explains how to print an A4 size document from "WordPad", which is a standard accessory 
program in Windows.
To install the printer driver and configure settings in a Windows environment, see the Software Setup Guide.
For information on the available printer drivers and the requirements for their use, see the User's Manual.

1

Select [Print] from the [File] menu of 
WordPad.

2

Select the machine's printer driver,  
and click the [Preferences] button.

If the printer drivers appear as a list, select the name of the 
printer driver to be used from the list.

3

Select print settings.

(1) Click the [Main] tab.
(2) Select the original size.

To select settings on other tabs, click the desired tab 
and then select the settings.

(3) Click the [OK] button.

• Help can be displayed for a setting by clicking the 

setting and pressing the [F1] key. 

• Click the [Help] button, the Help window will open to 

let you view explanations of the settings on the tab.

(1)

(2)

(3)

Содержание MX-C303

Страница 1: ...achine and procedures for placing originals and loading paper COPIER Using the copy function PRINTER Using the printer function FACSIMILE Using the fax function SCANNER Using the scan function DOCUMENT FILING Storing jobs as files on the hard drive SETTING MODE Configuring settings to make the machine easier to use MX C303 MX C303W MX C303WH MX C304 MX C304W MX C304WH MX C303 MX C303W MX C303WH MX...

Страница 2: ...information see the manuals in PDF format This guide appears when you tap the icon on the machine s touch panel The guide explains the basic procedures for operating the machine In addition the manuals can be printed page 3 User s Manual Detailed explanations of the functions that can be used on the machine are provided in the User s Manual The User s Manual can be downloaded from the machine Down...

Страница 3: ...tings Cloud Connect Guide Print Release Guide This guide explains how to use the print release function When you have multiple MFPs that support the print release function on the same network you can access and print the data that is saved on a MFP from any other MFPs This manual is intended to help you get started using the basic and convenient functions of the machine This manual provides answer...

Страница 4: ...e is selected other than a language that is displayed by step 2 of DOWNLOADING THE OPERATION GUIDE page 6 in the display languages on the touch panel and Operation Guide is tapped English may appear To change the language displayed on the touch panel refer to the User s Manual Operation Guide Enlarge Display Mode Settings Total Count Brightness Adjustment Easy Fax Easy Scan Easy Copy Job Status CL...

Страница 5: ... Chrome Windows Latest version or immediately previous major release The Web page will appear The machine settings may require that user authentication is performed in order to open the Web page Please ask the administrator of the machine for the password that is required for user authentication Easy Fax Easy Scan Easy Copy CLOUD PORTAL Toner Quantity Bk C M Y Operation Guide Enlarge Display Mode ...

Страница 6: ...e Web page 2 Select the desired language Only the displayed languages are supported 3 Select the manual you want to download and click the Download button Operation Manual Download English User Name Administrator Logout Sitemap 1 English Select a manual to be downloaded Download Language 2 This manual provides answers to frequently asked questions regardi Troubleshooting Download O 3 ...

Страница 7: ...LS 15 ADJUSTING THE VOLUME 16 LOADING PAPER 17 SAVING CONTACTS IN THE ADDRESS BOOK 26 USER AUTHENTICATION 27 FUNCTIONS THAT CAN BE USED ON THE MACHINE 28 MAKING COPIES 32 COPY MODE 34 COPYING ON SPECIAL PAPER Bypass Copy 35 PRINTING IN A WINDOWS ENVIRONMENT 38 PRINTING IN A Mac OS ENVIRONMENT 40 DIRECTLY PRINTING A FILE IN USB MEMORY 42 SENDING A FAX 44 FAX MODE 46 BEFORE USING THE MACHINE COPIER ...

Страница 8: ...ANNER FUNCTION 48 SCANNING AN ORIGINAL 49 SCANNER MODE 51 USES OF THE DOCUMENT FILING FUNCTION 54 SAVING A DOCUMENT ONLY Scan to HDD 55 PRINTING A SAVED FILE 58 SETTING MODE 60 SCANNER DOCUMENT FILING SETTING MODE ...

Страница 9: ...eral devices and the procedures for placing originals and loading paper PART NAMES AND FUNCTIONS 10 TURNING ON OFF THE POWER 12 OPERATION PANEL 13 PLACING ORIGINALS 15 ADJUSTING THE VOLUME 16 LOADING PAPER 17 SAVING CONTACTS IN THE ADDRESS BOOK 26 USER AUTHENTICATION 27 FUNCTIONS THAT CAN BE USED ON THE MACHINE 28 BEFORE USING THE MACHINE ...

Страница 10: ...e position TURNING ON OFF THE POWER page 12 11 Tray 1 Store paper in this tray A maximum of 250 sheets 80 g m2 20 lbs of paper can be loaded 12 Tray 2 when a 600 sheet paper feed unit is installed Store paper in this tray A maximum of 600 sheets 80 g m2 20 lbs of paper can be loaded 13 Tray 3 when two 600 sheet paper feed units are installed Store paper in this tray A maximum of 600 sheets 80 g m2...

Страница 11: ...e Supports USB 2 0 Hi Speed If USB memory devices are connected to both the front and back sides only the USB memory device that was inserted first will be recognized 6 Bypass tray Use this tray to feed paper manually When loading large paper open the extension guide LOADING PAPER IN BYPASS TRAY page 23 7 Toner cartridge This cartridge contains toner When the toner in a cartridge runs out replace ...

Страница 12: ...ch press the Power button on the operation panel and then turn the main power switch to the position In a sudden case of main power outage turn the power for the machine back on and then turn it off in the correct order If the machine is left for a long time with the main power having been turned off prior to the Power button being turned off abnormal noises degraded image quality or other problem...

Страница 13: ...er Quantity g Display Operation Guide h Use these keys to select functions that make the machine easier to use i Select functions that can be utilized in respective modes Tap the tab and the list of function keys is displayed 3 Error indicator Lights solidly or blinks to indicate the status of the error 4 Main power indicator This lamp lights up when the machine s main power switch is in the posit...

Страница 14: ...es the preview image of whole page in the arrow s direction The printing result is not rotated 1 2 This reduces the image 1 This displays preview images of respective pages 1 2 This displays the scroll bar for enlargement reduction operations Moving the slider to the left reduces the image and moving the slider to the right enlarges the image This displays thumbnails of preview images 1 2 This enl...

Страница 15: ...ers are not pinched when closing the automatic document feeder After placing the original be sure to close the automatic document feeder If left open parts outside of the original will be copied black causing excessive use of toner Set the orientation of the image to ensure that the orientation of the placed original is correctly recognized For details see the User s Manual Adjust the original gui...

Страница 16: ...ings Image Send Internet Fax Configure settings for sounds generated when an Internet fax is received and when a communication error occurs Sound Settings Beep Sound Settings Common Keys Touch Sound Configure settings for the sound generated when a key is tapped and whether a sound is generated when the key for a default setting is tapped Easy Copy Operation Guide Easy Copy Easy Scan HDD File retr...

Страница 17: ...he reverse orientation Place with the print side facing the direction indicated below Tray In normal status With letter head or pre printed paper set Trays 1 5 Facing up Facing down Bypass tray Facing down Facing up 1 2 3 4 5 6 1 Tray 1 2 Tray 2 when a 600 sheet paper feed unit is installed 3 Tray 3 when two 600 sheet paper feed units are installed 4 Tray 4 when three 600 sheet paper feed units ar...

Страница 18: ...queeze the separator plate lever and slide to the desired paper size Adjust to the non standard paper size so that the paper will not be too loose or too tight When loading 8 1 2 x 11 size paper remove the 2 regulation plates with green colour on the left side of the tray before loading the paper Keep the removed regulation plates in the inside storage space of the tray 3 Fan the paper Fan the pap...

Страница 19: ...to the paper width not to leave the gap from the guides A and B Do not load the paper as shown below The stack must not be higher than the indicator line maximum of 250 sheets Maximum of 80 sheets of A6 paper Do not add paper The paper must not be higher than the protrusion 5 Gently push the paper tray into the machine Push the tray firmly all the way into the machine slowly Forcefully inserting t...

Страница 20: ...an the paper Fan the paper well before loading it If the paper is not fanned multiple sheets may feed at once and cause a misfeed 3 Insert the paper into the tray Load the paper with the side you want to print on facing up positioning the paper under the protrusion on the A6 division plate and under the roller on the right side of the tray Load a number of sheets that is not higher than the indica...

Страница 21: ...ever and slide to the desired paper size Adjust to the non standard paper size so that the paper will not be too loose or too tight 3 Insert the paper into the tray Load the paper with the print side facing up The stack must not be higher than the indicator line Fan the paper well before loading it Otherwise multiple sheets may feed at once and cause a misfeed Do not load the paper as shown below ...

Страница 22: ...aper The plates are contained in the inside storage space of the back side of the tray When loading 8 1 2 x 14 paper remove divider plate A Move divider plate A all the way to the paper feed opening right side and pull up If the machine does not recognize the paper size even though 8 1 2 x 14 size is correctly loaded check if the holder is positioned at 8 1 2 x 14 Regulation plate Storage space 81...

Страница 23: ... skewed feeding or misfeeds The paper must not exceed the maximum number of sheets and must not be higher than the indicator line 4 Set the bypass tray guides correctly to the width of the paper Adjust the bypass tray guides so that they slightly contact the loaded paper To add paper press down the pressure plate until it locks remove any paper remaining in the bypass tray combine it with the pape...

Страница 24: ... occur even if envelopes within the specifications are used This problem may be alleviated by shifting the fusing unit release levers from their normal pressure position to the lower pressure position Follow the procedure on the this page Place the front side facing down When printing the front side Place the front side facing down Flap Address printing Open the flap of the envelope Move the fusin...

Страница 25: ...tings 1 2 3 4 Bypass Tray Brightness Adjustment Settings Enlarge Display Mode Total Count Operation Guide Brightness Adjustment Paper Tray Settings 10 15 Scan to HDD Document Filing Address Book Paper Tray Settings 10 15 Toner Quantity Job Status Job Status Job Status Operation Guide Enlarge Display Mode Settings Total Count Brightness Adjustment Paper Tray Settings Plain 1 60 79g m2 Plain 2 80 10...

Страница 26: ...ister for Frequent Use checkbox 2 Tap Fax Number E mail Address Internet Fax Address or Direct SMTP Address enter the address and tap 4 Tap the Register key The first address of each address type is set as the default address If no address has the checkbox next to it selected a confirmation screen will appear asking you if you want to select a default address Operation Guide Enlarge Display Mode S...

Страница 27: ... to log in using a login name and password received from the administrator of the machine or the administrator of the LDAP server When starting the machine the login screen appears AUTHENTICATION BY QUICK AUTHENTICATION This can only be used on the machine when carrying out user authentication This method provides simple authentication for an administer who has been previously registered on the ma...

Страница 28: ...1 2 x 8 1 2 size originals are mixed with A4 8 1 2 x 11 size originals When copying you can combine the mixed originals setting and auto ratio setting to change the ratio used for each original and print all pages on the same size of paper Counting the number of scanned original sheets and display the count before transmission Checking the number of scanned original sheets before transmission help...

Страница 29: ...iate for the original tap the Auto Set key in the base screen of Easy Mode Image Orientation Resolution and Blank Page Skip Duplex Setup PDF Skew Adjustment Automatically Detect Mono2 Grayscale are set automatically On the MX C303 MX C303W MX C303WH the OCR expansion kit is required Hidden Pattern Print Tracking Information Print Characters to prevent unauthorized copying such as pre set or custom...

Страница 30: ...d by making light areas of the original darker or lighter Use this function when you wish to scan thin originals using the automatic document feeder This function helps prevent thin originals from misfeeding Erase The erase function is used to erase shadows on images produced when scanning thick originals or books Without erase With erase ...

Страница 31: ...31 This section explains the basic procedures for using the copier function MAKING COPIES 32 COPY MODE 34 COPYING ON SPECIAL PAPER Bypass Copy 35 COPIER ...

Страница 32: ...n easy mode Paper Select 2 Sided Copy Copy Ratio Colour Mode Original Exposure N Up Card Shot To select more detailed settings tap the Detail key and select settings in normal mode COPY MODE page 34 Easy Fax Easy Scan Easy Copy CLOUD PORTAL Toner Quantity Bk C M Y Operation Guide Enlarge Display Mode Settings Total Count Brightness Adjustment Job Status Toner Quantity Bk C M Y Operation Guide Enla...

Страница 33: ... colour and black white binary scanning When you tap the B W Start key the machine scans in black white binary For details see the User s Manual To check a preview of a document tap the Preview key PREVIEW SCREEN page 14 Preview Copies CA 1 Auto Image Slightly Reduce 3 Reduction Original Paper By Paper Size Copy Ratio 100 25 400 A4 B5 B5 A5 A5 A6 A6 A4 Start Colour Start B W Original A4 Detail Pre...

Страница 34: ...ys other than the function keys indicated above FUNCTIONS THAT CAN BE USED ON THE MACHINE page 28 14 Indicates the presence or absence of an original and size of paper loaded in each tray Tapping this makes the paper select screen opened 15 Displays the functions that can be utilized in the Copy Mode Start Colour Start Preview Colour Mode Full Colour Paper Select Auto Exposure Auto Original A4 2 S...

Страница 35: ...A4 Plain Paper 1 60 89 g m2 Bypass Tray Current Bypass Tray Settings are as follows 1 Easy Scan Easy Copy CLOUD PORTAL 10 15 Total Count Brightness Adjustment Job Status Easy Fax Y Pre Printed Letter Head Colour Pre Punched Recycled Labels Transparency Glossy Paper Envelope Embossed User Type 1 User Type 2 User Type 3 User Type 4 User Type 5 User Type 6 Plain 1 Plain 2 Heavy Paper 1 Thin Paper 55 ...

Страница 36: ... a document tap the Preview key PREVIEW SCREEN page 14 Easy Fax Easy Scan Easy Copy CLOUD PORTAL Toner Quantity Bk C M Y Operation Guide Enlarge Display Mode Settings Total Count Brightness Adjustment Job Status Toner Quantity Bk C M Y Operation Guide Enlarge Display Mode Settings Total Count Brightness Adjustment Job Status 10 15 Original A4 Detail Preview Start Colour Start B W Copies CA A4 Bypa...

Страница 37: ...ocedures are primarily for Windows 10 in Windows environments and Mac OS X v10 12 in Mac OS environments The window varies depending on the operating system version the printer driver version and the application PRINTING IN A WINDOWS ENVIRONMENT 38 PRINTING IN A Mac OS ENVIRONMENT 40 DIRECTLY PRINTING A FILE IN USB MEMORY 42 PRINTER ...

Страница 38: ...Select Print from the File menu of WordPad 2 Select the machine s printer driver and click the Preferences button If the printer drivers appear as a list select the name of the printer driver to be used from the list 3 Select print settings 1 Click the Main tab 2 Select the original size To select settings on other tabs click the desired tab and then select the settings 3 Click the OK button Help ...

Страница 39: ...also automatically set to Envelope 3 Select Bypass Tray from the Paper Tray 4 Click the Print button Printing begins Set the paper type of the bypass tray to Envelope and load an envelope into the bypass tray When using media such as envelopes that can be loaded only in a specific orientation you can rotate the image 180 degrees For more information see User s Manual Loading envelopes page 24 1 2 ...

Страница 40: ...install the printer driver and configure settings in a Mac OS environment see the Software Setup Guide 1 Select Page Setup from the File menu 2 Select paper settings 1 Make sure that the correct printer is selected 2 Select the paper settings Set the paper size paper orientation and copy ratio 3 Click the OK button 3 Select Print from the File menu SHARP MX xxxx PPD 1 2 3 ...

Страница 41: ... Tray Envelope from the All Page From 4 Select print settings 1 Make sure that the correct printer is selected 2 Select items from the menu and configure the settings as needed 3 Click the Print button Set the paper type of the bypass tray to Envelope and load an envelope into the bypass tray When using media such as envelopes that can be loaded only in a specific orientation you can rotate the im...

Страница 42: ...nal memory device USB If the screen does not appear follow these steps 1 Tap the HDD File retrieve key 2 Tap Select File from USB Memory to Print on the action panel 3 Tap the key of the file that you wish to print and tap Change Setting to Print on the action panel When printing multiple files tap the keys of the files you wish to print and tap Print on the action panel Tap to switch to thumbnail...

Страница 43: ...43 This section explains the basic procedures for using the fax function of the machine SENDING A FAX 44 FAX MODE 46 FACSIMILE ...

Страница 44: ...stination Addresses of the current mode are selected from addresses whose checkboxes were selected when the tapped destination was registered If no addresses were registered with the checkbox selected tap the Yes key in the confirmation screen and select the desired addresses To add another destination tap the key of the destination Operation Guide Enlarge Display Mode Settings Total Count Brightn...

Страница 45: ...E page 46 9 Tap the Start key To check a preview of a document tap to return to the base screen of Easy Fax and tap the Preview key PREVIEW SCREEN page 14 Direct Entry AAA AAA AAA AAA 123456789 CCC CCC EEE EEE FFF FFF BBB BBB DDD DDD Address Sort CA Frequent Use Category All Start Direct Entry AAA AAA CA Start 1 All Destinations Delete Info 1234567890 CA Preview Start Original A4 Address Book Dire...

Страница 46: ...s other than the function keys indicated above FUNCTIONS THAT CAN BE USED ON THE MACHINE page 28 13 Shows the amount of free memory available for fax reception 14 Tap to dial in speaker mode 15 Enter the fax number 16 Displays the functions that can be utilized in the Fax Mode 17 Searches for the address 18 Displays the address book CA Preview Start Original A4 Address Address Book Sending History...

Страница 47: ...ses of the network scanner function and the basic procedure for using scan mode The Internet fax expansion kit is required to use the Internet fax function NETWORK SCANNER FUNCTION 48 SCANNING AN ORIGINAL 49 SCANNER MODE 51 SCANNER ...

Страница 48: ...server use Scan to FTP To send an image to a shared folder on your computer use Scan to Network Folder To process an image in a specific application use Scan to Desktop Use this mode to save an image to USB memory Scan modes USB memory mode Internet fax mode Use this mode to send a fax via the Internet The machine supports Direct SMTP PC scan mode Use this mode to scan a photo while making correct...

Страница 49: ...eckboxes were selected when the tapped destination was registered If no addresses were registered with the checkbox selected tap the Yes key in the confirmation screen and select the desired addresses To add another destination tap the key of the destination Operation Guide Enlarge Display Mode Settings Total Count Brightness Adjustment Easy Fax Easy Scan Easy Copy Job Status CLOUD PORTAL Toner Qu...

Страница 50: ... key and select settings in normal mode SCANNER MODE page 51 Scan to HDD USB CA Address 123 ne jp Sort AAA AAA BBB BBB CCC CCC DDD DDD EEE EEE FFF FFF Frequent Use Category All B W Start Colour Start FFF FFF 1234 xxx Scan to HDD USB Cc To B W Start Colour Start FFF FFF All Destinations 1234 xxx 1 Delete Info CA Address Book Sending History Global Address Search Scan to HDD USB CA Preview Auto Set ...

Страница 51: ...W SCREEN page 14 Address Book Sending History Global Address Search Scan to HDD USB CA Preview Address Detail B W Start Colour Start Auto Set Original A4 Cancel scanning Cancel Scan Operation Guide Enlarge Display Mode Settings Total Count Brightness Adjustment Easy Fax Easy Scan Easy Copy Job Status CLOUD PORTAL 10 15 Toner Quantity Bk C M Y Operation Guide Enlarge Display Mode Settings Total Cou...

Страница 52: ...ng keys that can be used for sending images 13 Displays the list of function keys Frequently used Others can be registered 14 Checking the current settings 15 Displays the list of keys other than the function keys indicated above FUNCTIONS THAT CAN BE USED ON THE MACHINE page 28 16 Transmission will start 17 Displays the functions that can be utilized in the Image Send mode 18 Searches for the add...

Страница 53: ... performing a copy print or other job You can print or perform other operations using the saved file at a later time This section introduces several of the document filing functions USES OF THE DOCUMENT FILING FUNCTION 54 SAVING A DOCUMENT ONLY Scan to HDD 55 PRINTING A SAVED FILE 58 DOCUMENT FILING ...

Страница 54: ...D to store a document on the hard drive without performing printing or transmission Like File a user name file name and folder can be specified You can also download a file stored by Scan to HDD from the Web page Files saved with Quick File are stored in this folder If a folder is not specified when a file is saved with File or Scan to HDD the file is stored in the main folder In addition to the m...

Страница 55: ...an save a file in the main folder or My Folder when user authentication is enabled 1 Press the Home Screen key The Home screen appears 2 Tap the Easy Scan mode icon 3 Place the original Place the original in the document feeder tray of the automatic document feeder or on the document glass PLACING ORIGINALS page 15 4 Tap the Scan to HDD USB key Toner Quantity Bk C M Y Operation Guide Enlarge Displ...

Страница 56: ...a document tap the Preview key PREVIEW SCREEN page 14 CA Preview Auto Set B W Start Colour Start Scan to USB Scan to HDD Scan to HDD USB CA Preview Auto Set Address Main Folder Detail B W Start Colour Start Address Book Sending History Global Address Search Scan to HDD USB Original A4 Cancel scanning Cancel Scan ...

Страница 57: ...an the original using the automatic document feeder this screen does not appear 5 Check the Sending data has been completed message and remove the USB memory device from the machine Toner Quantity Bk C M Y Operation Guide Enlarge Display Mode Settings Total Count Brightness Adjustment Job Status CLOUD PORTAL Easy Fax Print from external memory device USB Scan to External Memory Device Perform Deta...

Страница 58: ...printing tap Delete on the action panel so that appears 3 Tap the Print Now key Operation Guide Enlarge Display Mode Settings Total Count Brightness Adjustment Toner Quantity Program List Image Send Address Control Tray Settings HDD File retrieve 10 15 Job Status M C Bk Y Scan to HDD Scan to External Memory Device Select File from FTP to Print Select File from USB Memory to Print Main Folder AAA B...

Страница 59: ...e operation of the machine to suit the needs of your workplace This section briefly introduces several of the setting mode For detailed explanations of the system settings see SETTING MODE in the User s Manual SETTING MODE 60 SETTING MODE ...

Страница 60: ...tem that you want to set on menu tab a or setting menu b To exit setting mode tap the Cancel key Setting mode when an administrator is logged in page 62 Toner Quantity Bk C M Y Operation Guide Enlarge Display Mode Settings Total Count Brightness Adjustment Job Status Easy Fax Easy Scan Easy Copy CLOUD PORTAL 10 15 Status Home Screen Settings Copy Settings Printer Settings System Settings Sitemap A...

Страница 61: ...the home screen background Copy Settings You can select copy settings Printer Settings You can select print settings Image Send Settings Configure settings for image send such as fax and Scan to E mail Document Filing Settings You can select Document Filing settings Sharp OSA Settings You can select Sharp OSA settings Authentication Settings Configure the user authentication method Alternatively c...

Страница 62: ... For the state of the settings ask the administrator of the machine When you select an item in setting mode that requires administrator login the administrator login screen will appear For the items available in setting mode when an administrator is logged in see SETTING MODE in the User s Manual Cancel Settings Job Status LINE PRINTER Top of Page Administrator Login PIN Code Password Login Cancel...

Страница 63: ...s discovered please contact your dealer or nearest SHARP Service Department Aside from instances provided for by law SHARP is not responsible for failures occurring during the use of the product or its options or failures due to incorrect operation of the product and its options or other failures or for any damage that occurs due to use of the product Warning Reproduction adaptation or translation...

Страница 64: ...2021J EX2 ...

Отзывы: