background image

7

1

BEFORE USING THE MACHINE

This chapter contains basic information that should be read before using the machine.

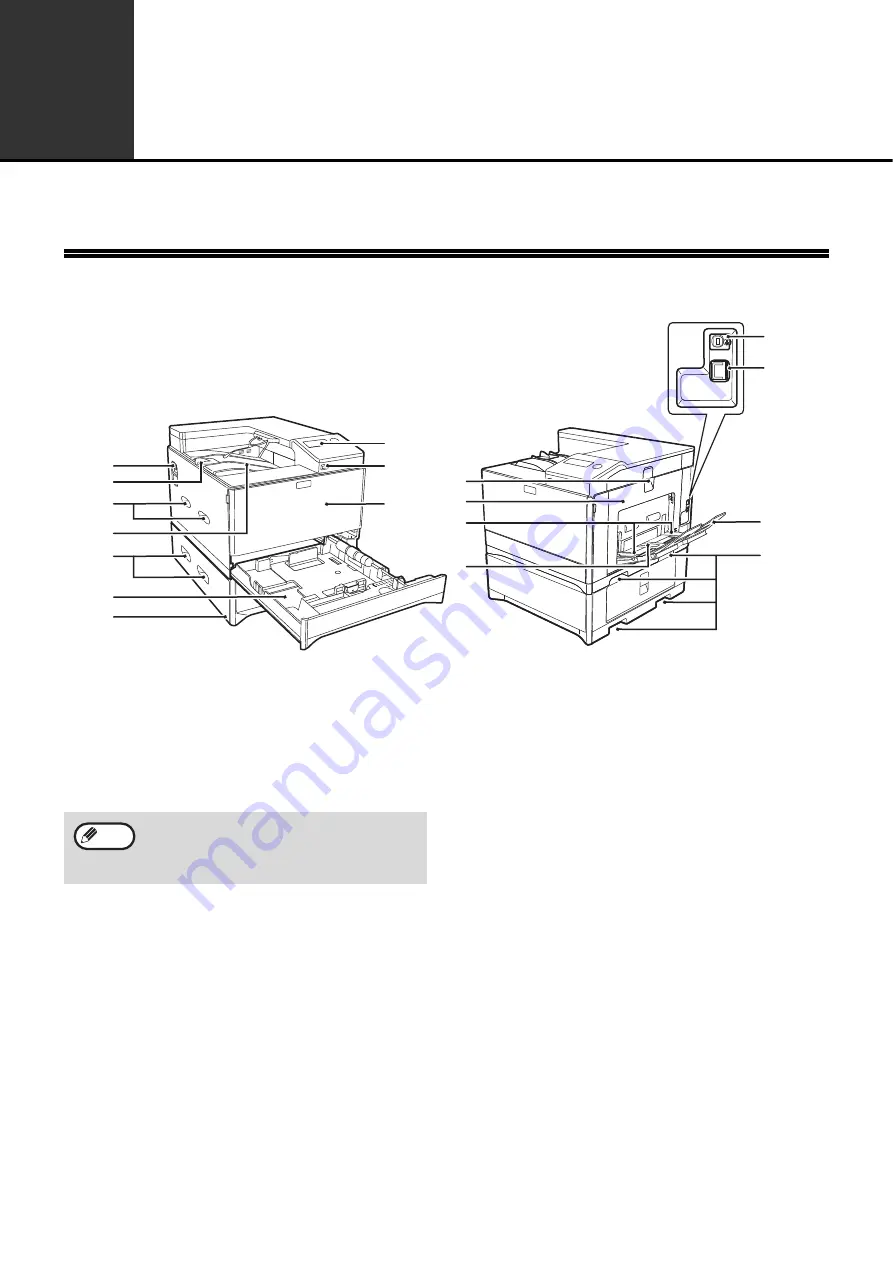
PART NAMES AND FUNCTIONS

(1)

Power switch

Press to turn the machine power on and off.

(2)

Output tray extension

When you eject the paper of 8-1/2" x 11" size or 
larger, you can open to the outside.

(3)

Handles

Use to move the machine. When attaching tray 
2, use the handle at the bottom.

(4)

Output tray

Printed pages are output to this tray.

(5)

Tray 1

Tray 1 can hold approximately 250 sheets of paper 
(21 lbs. (80 

g

/m

2

)). For restrictions on paper types, 

sizes, and weights, refer to "USEABLE PAPER" 
(p.13).

(6)

Tray 2 (Option)

Tray 2 can hold approximately 500 sheets of paper 
(21 lbs. (80 

g

/m

2

)). For restrictions on paper types, 

sizes, and weights, refer to "USEABLE PAPER" 
(p.13).

(7)

Operation panel

Contains operation keys and indicator lights.

(8)

USB 2.0 port (Type A)

This is used to connect a USB device such as 
USB flash memory to the machine.

(9)

Front cover

Open to replace the toner cartridge etc.

(10) Side cover handle

Pull to open the side cover.

(11) Side cover

Open to remove misfed paper.

(12) Bypass tray guides

Adjust to the width of the paper when using the 
bypass tray.

(13) Bypass tray

Special paper (heavy paper or transparency film) 
can be fed from the bypass tray.

(14) USB 2.0 port (Type B)

Connect the USB cable to this connector when 
the machine is used on a USB connection.

(15) LAN connector

Connect the LAN cable to this connector when 
the machine is used on a network.

(16) Bypass tray extension

Open this tray when loading paper in the bypass 
tray.

(14)

(3)

(15)

(16)

(10)

(11)

(4)

(2)

(7)

(

8

)

(1)

(3)

(3)

(9)

(5)

(6)

(12)

(13)

The main unit is extremely heavy, and thus two 
people are required to do the work. When lifting 
the main unit, grasp the handles on each side 
firm.

Note

Содержание MX-C300P

Страница 1: ...MODEL MX C300P MX C300PL DIGITAL FULL COLOR PRINTER OPERATION GUIDE ...

Страница 2: ...mages and procedures that appear in this manual are mainly for Windows 7 With other versions of Windows some screen images may be different from those in this manual For information on using your operating system refer to your operating system s manual or online Help The display screens messages and key names shown in the manual may differ from those on the actual machine due to product improvemen...

Страница 3: ...HELP 27 SAVING FREQUENTLY USED PRINT SETTINGS 28 CHANGING THE PRINTER DRIVER DEFAULT SETTINGS 30 PRINTING FROM A MACINTOSH 31 BASIC PRINTING PROCEDURE 31 PRINTING WHEN THE USER AUTHENTICATION FUNCTION IS ENABLED 34 FREQUENTLY USED FUNCTION 35 SELECTING THE COLOR MODE 35 SELECTING A PRINT MODE SETTING 37 TWO SIDED PRINTING 38 FITTING THE PRINT IMAGE TO THE PAPER 39 PRINTING MULTIPLE PAGES ON ONE PA...

Страница 4: ...M SETTINGS LIST 84 USING THE SYSTEM SETTINGS 87 Change Admin PW 88 Initial Setting 88 Printer 88 Network 88 User Control 90 Device Control 91 Operation Setting 91 Energy Save 92 List Print 92 Color Adjustments 93 Security Settings 94 6 WEB FUNCTIONS IN THE MACHINE ABOUT THE WEB PAGES 95 HOW TO ACCESS THE WEB PAGE 95 ABOUT THE WEB PAGES FOR USERS 96 CONFIGURING THE PRINTER CONDITION SETTINGS 97 HOW...

Страница 5: ...hine in safety Operation Guide on the accessory CD ROM This manual explains How to use the machine and what to do if trouble occurs Software Setup Guide on the accessory CD ROM This manual explains How to install software to operate the machine from your computer CONVENTIONS USED IN THIS MANUAL The icons in the manuals indicate the following types of information Warns the user that injury may resu...

Страница 6: ...erences Both specifications are quoted where applicable For example Page 4 8 1 2 x 11 and 5 1 2 x 8 1 2 A4 and B5 Although inch series size indications are shown on the operation panel of this manual AB series indications are displayed on the AB series machines Model Wireless LAN MX C300P Yes MX C300PL No ...

Страница 7: ... Operation panel Contains operation keys and indicator lights 8 USB 2 0 port Type A This is used to connect a USB device such as USB flash memory to the machine 9 Front cover Open to replace the toner cartridge etc 10 Side cover handle Pull to open the side cover 11 Side cover Open to remove misfed paper 12 Bypass tray guides Adjust to the width of the paper when using the bypass tray 13 Bypass tr...

Страница 8: ...velope from the bypass tray 21 Roller rotating knob Rotate to remove misfed paper 22 Paper tray right side cover Open this to remove misfed paper in trays 23 Duplex conveyor cover Open this cover to remove misfed paper 17 18 23 19 20 21 22 The fusing unit is hot Do not touch the fusing unit when removing misfed paper Doing so may cause a burn or injury When pushing down the levers pinch the levers...

Страница 9: ...to return the display to the previous screen 7 LOGOUT key Press this key to log out after you have logged in and used the machine 8 Numeric keys Enter characters numbers 9 SYMBOL key Press to enter a symbol when entering characters 10 C key Press to clear an enter character of printers 11 HOME key Press to return the display to the home screen p 10 12 STOP key Press this key to stop a print job 13...

Страница 10: ...display Messages are displayed regarding machine status and operation 2 Paper size display The size of paper loaded in each tray is displayed 3 Connection status display Models with the wireless LAN function only Displayed when wireless LAN is on 4 Toner level display The remaining amount of each color of toner is displayed The auto clear time can be changed in the system settings p 91 Note 1 2 4 ...

Страница 11: ...ected setting item Press OK in the setting screen to save your settings Selecting an item with the arrow keys left right The left right arrow keys indicated in this manual by are used to set the numbers in setting screens Press the OK key to save your settings Use the BACK key to return to the previous setting screen The icons appear in the selection screen of settings that use the up down arrow k...

Страница 12: ...the display turns off Normal operation automatically resumes when a key on the operation panel is pressed or a print job is received Auto power shut off mode This function automatically switches the machine to a state that consumes even less power than preheat mode if the duration of time set in the system settings elapses without the machine being used when the power is on During auto power shut ...

Страница 13: ...our dealer or nearest SHARP Service Department for advice on using these types of paper The lbs g m2 units used in these explanations indicate the weight of the paper Paper tray type Paper type Size Weight Capacity 1 Tray 1 Plain paper Recycled paper Color Letter head Pre printed Pre punched 8 1 2 x 11 5 1 2 x 8 1 2 7 1 4 x 10 1 2 A4 B5 A5 16K 16 lbs to 28 lbs 60 g m2 to 105 g m2 250 sheets Tray 2...

Страница 14: ...f the paper type is Pre Punched Letter Head or Pre Printed load the paper with the print side face up Example Placement orientations of punched paper letter head paper and pre printed paper Pre punched Left binding Letter head Pre printed Tray 1 to 2 Load the paper with the print side facing down with the punch holes toward the back Load the paper with the print side facing down with the letter he...

Страница 15: ...ed paper may result in misfeeds or smudges on the output If other than SHARP recommended media must be used feed each sheet one at a time using the bypass tray do not attempt continuous printing There are many varieties of special paper available on the market and some cannot be used with this machine Before using special paper contact your SHARP Service Department Before using other than SHARP re...

Страница 16: ... sure the stack of paper is straight before loading it Place the paper under the roller on the right side of the tray After loading the paper close the guides to the paper width not to leave the gap from the guides 4 Gently push the paper tray into the machine Push the tray in completely Do not load paper higher than the line on the guide up to 250 sheets Do not add paper to the loaded paper It ma...

Страница 17: ...til it locks into place 3 Set the paper guides to the paper width 4 Insert the paper print face down all the way into the bypass tray To prevent a misfeed verify once more that the paper guides are adjusted to the width of the paper After feeding an envelope be sure to press up and return the fusing unit release levers 2 places to their original positions If you loaded paper into the bypass tray p...

Страница 18: ...mudges or unclean images Do not use paper that has already been printed on by a laser printer or plain paper fax machine This may cause smudges or unclean images Important points when using envelopes Envelopes that cannot be used Do not use the following envelopes Envelopes misfeed and smudges may result Envelopes with metal clasps plastic hooks or ribbon hooks Envelopes closed with string Envelop...

Страница 19: ...g can be changed during printing See USEABLE PAPER p 13 for information on the specifications for the types and sizes of paper that can be loaded in the paper trays Press the SPECIAL FUNCTION key and press the or key to select Paper Size Set Press the or key to select the paper tray for which the paper size is being changed Press the key and press the keys to select the paper size Press the OK key...

Страница 20: ...ation mode is turned on the account number entry screen is displayed Enter your account number five digit identification number as explained below before operating the machine 1 Enter your account number five digits with the numeric keys As the account number is entered the hyphens change to asterisks If you enter an incorrect digit press C key and re enter the correct digit 2 When the job is fini...

Страница 21: ...ters entered with each numeric key are shown below Key Characters that can be entered 1 1 Space 2 a b c 2 A B C 3 d e f 3 D E F 4 g h i 4 G H I 5 j k l 5 J K L 6 m n o 6 M N O 7 p q r s 7 P Q R S 8 t u v 8 T U V 9 w x y z 9 W X Y Z 0 0 _ To enter two characters in succession that require the same key press the key to move the cursor after entering the first character Example Entering ab Press the ...

Страница 22: ...iver and configure settings in a Macintosh environment see in the Software Setup Guide Environment Printer driver type Windows PCL6 The machine supports the Hewlett Packard PCL6 printer control languages Windows Macintosh PS This printer driver supports the PostScript 3 page description language developed by Adobe Systems Incorporated and enables the machine to be used as a PostScript 3 compatible...

Страница 23: ...click the icon of the printer driver to be used If the printer drivers appear as a list select the name of the printer driver to be used from the list 2 Click the Preferences button 1 2 The button that is used to open the printer driver properties window usually Properties or Printing Preferences may vary depending on the software application Note ...

Страница 24: ...hen other than Auto Select is selected in Paper Source The specified tray is used for printing regardless of the Paper Size setting When Bypass Tray is selected The Paper Type must also be selected Check the bypass tray and make sure that the desired type of paper is loaded and then select the appropriate Paper Type setting When Auto Select is selected in Paper Type A tray with plain paper of the ...

Страница 25: ... application Page Settings in many applications and then perform the following steps 1 Click the Paper tab 2 Select the envelope size from the Paper Size menu The paper tray and paper type are automatically selected 2 1 It is recommended that you do a test print to check the print result before using an envelope In the case of media that can only be loaded in a certain orientation such as an envel...

Страница 26: ... you do not enter a job name the file name set in the software application will appear 4 Click the OK button 3 Start printing When User Number has been checked on Printing Policy in the Configuration tab you cannot enter the user number Enter the user information in the dialog box whenever you print 3 4 1 2 Note To have a confirmation window appear before printing starts select the Auto Job Contro...

Страница 27: ...derlined text at the top of the Help window Pop up help Help can be displayed for a setting by clicking the setting and pressing the F1 key To view Help for a setting in Windows XP Server 2003 click the button in the upper right hand corner of the printer driver properties window and then click the setting Information icon Some restrictions exist on the combinations of settings that can be selecte...

Страница 28: ... saving allowing you to check the settings as you save them 1 Open the printer driver properties window from the print window of the software application 2 Save the print settings 1 Configure print settings on each tab 2 Click the Save button 3 Check and save the settings 1 Check the displayed settings 2 Enter a name for the settings maximum of 20 characters 3 Click the OK button 4 Click the OK bu...

Страница 29: ...he print window of the software application 2 Select the print settings 1 Select the user settings that you wish to use 2 Click the OK button 3 Start printing Deleting saved settings Select the user settings that you want to delete in 1 of step 2 above and click the Delete button 1 2 ...

Страница 30: ...art button and then click Printers and Faxes In Windows 8 8 1 Server 2012 right click the start screen or swipe up from the bottom edge of the screen and click All apps Control Panel View devices and printers Printer on the taskbar 2 Open the printer properties window 1 Right click the icon of the printer driver of the machine 2 Select Printer properties In Windows XP Server 2003 click the File me...

Страница 31: ...ngs The paper size paper orientation and enlarge reduce can be selected 3 Click the OK button PRINTING 1 Select Print from the File menu of TextEdit 2 Make sure that the correct printer is selected To use the machine for the Macintosh the machine must be connected to a network To install the PPD file and configure printer driver settings see Software Setup Guide Note 1 2 3 The menu used to execute...

Страница 32: ...n also be specified Make sure that the paper type setting for the bypass tray is correct and that the set type of paper is actually loaded in the bypass tray and then select the appropriate bypass tray paper type When a paper type is selected A tray with the specified type of paper and the size specified in Paper Size in the page settings window is used for printing Special media such as envelopes...

Страница 33: ... following steps 1 Select the paper size Select the envelope size from the Paper Size menu on the page setup screen 2 Select the bypass tray 1 Select Paper Feed on the print screen 2 Select Bypass Tray Envelope from the All Pages From menu Set the bypass tray paper type to Envelope in the machine s Paper Type Setup and make sure that an envelope is loaded in the bypass tray In the case of media th...

Страница 34: ... of the operation panel If you do not enter a user name your computer login name will appear Job Name Enter a job name maximum of 30 characters The entered job name will appear at the top of the operation panel as a file name If you do not enter a job name the file name set in the software application will appear 3 Click the Print button The menu used to execute printing may vary depending on the ...

Страница 35: ...ck toner only This is convenient when printing a document that has both color and black and white pages however the printing speed is slower Color All pages are printed in color Both color data and black and white data are printed using Y Yellow M Magenta C Cyan and Bk Black toner Black and White All pages are printed in black and white Color data such as images or materials for a presentation are...

Страница 36: ...eckbox on the Main tab so that a checkmark appears The Black and White Print checkbox on the Main tab and the Color Mode setting on the Color tab are linked When the Black and White Print checkbox is selected on the Main tab Black and White is also selected on the Color tab 1 Select Color 2 Select the Color Mode that you wish to use Macintosh 1 2 ...

Страница 37: ...The Print Mode Settings consist of the following two items Normal This mode is suitable for printing data such as regular text or a table High Quality The print quality of color photos and text is high 1 Click the Advanced tab 2 Select the Print Mode 1 Select Color 2 Select the Print Mode Windows 1 2 Macintosh 1 2 ...

Страница 38: ...yout 2 Select Long edged binding or Short edged binding Paper orientation Print results Vertical Windows Macintosh Windows Macintosh 2 Sided Book Long edged binding Flip on long edge 2 Sided Tablet Short edged binding Flip on short edge Horizontal Windows Macintosh Windows Macintosh 2 Sided Book Short edged binding Flip on short edge 2 Sided Tablet Long edged binding Flip on long edge The pages ar...

Страница 39: ...e following example explains how to print an Invoice size document on Letter size paper 1 Click the Paper tab 2 Select the size of the print image for example Invoice 3 Select Fit To Paper Size 4 Select the actual paper size to be used for printing for example Letter 1 Select Paper Handling 2 Check the size of the print image for example Invoice To change the print image size use the Paper Size me...

Страница 40: ...he following print results will be obtained depending on the order selected N Up Pages per sheet Print results Left To Right Right To Left Top To Bottom When the print orientation is landscape 2 Up 2 pages per sheet N Up Pages per sheet Right and Down Down and Right Left and Down Down and Left 4 Up 4 pages per sheet The page orders for 6 Up 8 Up 9 Up and 16 Up are the same as for 4 Up In a Windows...

Страница 41: ...sh to print borderlines click the Border checkbox so that a checkmark appears 4 Select the order of the pages 1 Select Layout 2 Select the number of pages per sheet 3 Select the order of the pages 4 If you wish to print borderlines select the desired type of borderline Windows 2 3 4 1 Macintosh 1 2 3 4 ...

Страница 42: ... basic procedure for printing and the steps for opening the printer driver properties window see the following section Windows BASIC PRINTING PROCEDURE P 24 Macintosh BASIC PRINTING PROCEDURE P 31 CONVENIENT FUNCTIONS FOR CREATING PAMPHLETS AND POSTERS CREATING A PAMPHLET Pamphlet The pamphlet function prints on the front and back of each sheet of paper so that the sheets can be folded and bound t...

Страница 43: ...aple or punch the output but the binding area overlaps the text 1 Configure the settings on the Main tab 2 Select the Binding Edge 3 Select the Margin Shift Select from the Margin Shift menu If you wish to configure another numeric setting select the setting from the pull down menu and click the Settings button Click the button or directly enter the number 1 Select the Printer Features 2 Select th...

Страница 44: ...a large poster To enable precise alignment of the edges of the sheets during attachment borderlines can be printed and overlapping edges can be created overlap function 1 Click the Paper tab 2 Select the Poster Printing checkbox and click the Poster Settings button 3 Select poster settings Select the number of sheets of paper to be used from the pull down menu If you wish to print borderlines and ...

Страница 45: ...it can be printed correctly on paper that can only be loaded in one orientation such as envelopes or paper with punch holes In Mac OS X a portrait image cannot be rotated 180 degrees 1 Select the setting on the Main tab 2 Select the Rotate 180 degrees checkbox 1 Select Page Setup from the File menu and click the button 2 Click the OK button ABCD ABCD Windows 1 2 Macintosh 1 2 ...

Страница 46: ...inting can be selected from the pull down menu 3 Select the zoom ratio Directly enter a number or click the button to change the ratio in increments of 1 You can also select Upper Left or Center for the base point on the paper REVERSING THE IMAGE Mirror Image The image can be reversed to create a mirror image This function can be used to conveniently print a design for a woodblock print or other p...

Страница 47: ...ment The brightness and contrast can be adjusted in the print settings when printing a photo or other image These settings can be used for simple corrections when you do not have image editing software installed on your computer 1 Click the Color tab 2 Click the Color Adjustment button 3 Adjust the color settings To adjust a setting drag the slide bar or click the or button This function can only ...

Страница 48: ...s bitmap images cannot be adjusted This allows you to bring out color text and lines that are faint and difficult to see when printed in grayscale Text To Black can be selected to print all text other than white text in black Vector To Black can be selected to print all vector graphics other than white lines and areas in black 1 Click the Color tab 2 Select the Text To Black checkbox and or the Ve...

Страница 49: ...s etc Graphics for data with many drawings or illustrations Photo for photo data or data that uses photos CAD for engineering drawing data Scan for data scanned by a scanner Colorimetric Data which needs to be printed in almost the same colors as those on the screen Custom for data to be printed with special settings 3 Select advanced color settings If you wish to select advanced settings click th...

Страница 50: ...checkbox 1 Color management method in a Windows environment ColorSync checkbox Color management method in a Macintosh environment Source Profile Selection of the input color profile used for the printed image Rendering Intent Standard value used when converting the color balance of the image displayed on the computer screen to a color balance that can be printed by the machine Output Profile Selec...

Страница 51: ...ct the watermark settings Select a stored water mark from the pull down menu You can click the Edit button to edit the font color and select other detailed settings 1 Select Watermarks 2 Click the Watermark checkbox and configure watermark settings Detailed watermark settings can be configured such as selection of the text and editing of the font and color Adjust the size and angle of the text by ...

Страница 52: ...can be adjusted This feature can be used to stamp the print data with a frequently used image or an icon of your own creation 1 Click the Watermarks tab 2 Select the image stamp setting If an image stamp has already been stored it can be selected from the pull down menu If you have not stored an image stamp click the Image File select the file you wish to use for the image stamp and click the Add ...

Страница 53: ... Click the Create Overlay button and specify the name and folder to be used for the overlay file that you wish to create The file will be created when the settings are completed and printing is started Printing with an overlay file 1 Click the Advanced tab Configure the printer driver settings from the application from which you wish to print using the overlay file 2 Select the overlay file A prev...

Страница 54: ...3 Select paper insertion settings Click the Cover Page checkbox and select the feeding method and printing method for the insert paper from the respective menus Select the insertion position paper source and printing method from the corresponding menus 1 Select Printer Features 2 Select Different Paper 3 Select cover insertion settings Select the print setting paper tray and paper type for the cov...

Страница 55: ...file from the machine 1 Click the Job Handling tab 2 Select the retention setting Click the Retention checkbox Select the retention method in Retention Settings To enter a password 5 to 8 digit number click the Password checkbox 1 Select Job Handling 2 Select the retention setting Click the Retention checkbox To simplify operation the next time the same password is set click the lock button after ...

Страница 56: ...with the keys 3 Press the OK key 4 Print or delete the print job with the keys Select Print to print the job Select Delete to delete the job without printing it Selecting No Print returns you to step 1 5 Press the OK key The print job is printed or deleted If a password is set the job will be printed or deleted after you enter the password with the numeric keys and press the OK key ...

Страница 57: ...nsion tiff tif jpeg jpg jpe jfif pcl prn txt pdf ps prn Even if the print result is black and white the following types of print jobs will be counted as 4 color Y Yellow M Magenta C Cyan and Bk Black print jobs To be always counted as a black and white job select black and white printing When the data is created as color data When the application treats the data as color data even though the data ...

Страница 58: ...ice the display shows the files to select 2 Select the file that you wish to print with or key A name with to its left is the name of a folder in the USB flash memory To display the files and folders in a folder select the folder and press the OK key 3 Press the OK key 4 Select Print with the or key and then press the OK key When forwarding of the selected file is completed printing starts Print s...

Страница 59: ...orer as shown below Example ftp 192 168 1 28 Drag and drop the file that you wish to print onto the lp folder that appears in your Web browser The file will automatically begin printing CANCELING A PRINT JOB FROM THE MACHINE Press the STOP key on the operation panel CHANGE THE MACHINE TO OFFLINE MODE To change the machine to offline mode follow the steps below 1 Press the SPECIAL FUNCTION key and ...

Страница 60: ...Yes Yes Yes Paper Paper Size Yes Yes Yes Yes Custom Paper 8 size 8 size Yes Yes Paper Selection Yes Yes Yes Yes Convenient printer functions Pamphlet Yes Yes Yes Yes Margin Shift 0 inch to 1 2 inch 0 inch to 1 2 inch Yes Yes Poster Printing Yes Yes No No Rotate 180 degrees Yes Yes Yes Yes 4 Zoom XY Zoom Yes 2 Yes Yes 2 Yes 2 Mirror Image No Yes Yes 5 Yes 6 Special functions Different Paper Yes Yes...

Страница 61: ...tal mode only 6 Cannot be used in Mac OS X v10 4 10 5 Image Quality Print Mode Normal High Quality Normal High Quality Normal High Quality Normal High Quality Graphics Mode Selection Yes No No No Toner Save Yes Yes Yes Yes Font Resident font 80 fonts 136 fonts 136 fonts 136 fonts Selectable download font bitmap TrueType Graphics bitmap TrueType Type1 bitmap TrueType Type1 No Other functions Auto C...

Страница 62: ...r was blinking 65 Printing is slow 65 The printed image is light and uneven 65 The printed image is dirty 66 The printed image is skewed or it runs off the paper or the image is cut off 66 Wrinkles appear in the paper or the image disappears in places 66 INDICATORS AND DISPLAY MESSAGES 67 MISFEED REMOVAL 68 MISFEED IN THE BYPASS TRAY 68 MISFEED IN THE MACHINE 69 MISFEED IN THE PAPER TRAY 1 73 MISF...

Страница 63: ...ore information consult your network administrator Problem Cause and solution Page The machine does not operate The machine is not plugged into a power outlet Plug the machine into a grounded outlet Power switch OFF Turn the power switch ON 12 The machine is warming up The machine requires some time to warm up after the power switch is turned on While the machine is warming up settings can be perf...

Страница 64: ...resses too hard against the paper a misfeed may occur Adjust the guide so that it lightly contacts the paper 17 The bypass tray extension is not pulled out When loading paper open the extension 17 The bypass paper feed roller is dirty Clean the roller 79 Paper size for a paper tray cannot be set Printing is performed Set the paper size after printing is complete 9 The machine has stopped temporari...

Страница 65: ...ed correctly In this case delete the software and then reinstall it The port setting is not correct Printing is not possible if the printer driver port setting is not correct Set the port correctly For more information see the Software Setup Guide Printing is disabled If Disable Print by Inv User is enabled in the system settings printing will not be possible Consult the administrator 90 The machi...

Страница 66: ... activated make sure that the paper size selected from the drop down list is the same as the size of the loaded paper The orientation of document setting is not correct Click the Main tab in the printer driver setup screen and verify if the Image Orientation option is set to your requirements Paper is not loaded properly Make sure the paper is properly loaded 16 You did not correctly specify the m...

Страница 67: ...e toner cartridge has been installed properly Replace waste box Replace the toner collection container as explained in REPLACING THE TONER COLLECTION CONTAINER p 76 Change the toner cartridge Replace the toner cartridge as explained in REPLACING THE TONER CARTRIDGE p 74 Remove paper from the output tray The number of sheets in the output tray has reached the limit Remove the paper Load paper into ...

Страница 68: ...will appear Check the location and remove the misfeed MISFEED IN THE BYPASS TRAY 1 Remove any paper remaining in the bypass tray 2 Gently remove the misfed paper from the bypass tray The paper may tear when you remove a misfeed In this event be sure to remove all torn pieces of paper from the machine Note p 69 p 73 p 73 p 69 p 73 p 68 ...

Страница 69: ...will be possible MISFEED IN THE MACHINE To remove a misfeed from inside the machine open the side cover check whether the misfeed occurred in A B or C below and follow the misfeed removal procedure 1 Open the bypass tray and the side cover 2 Check the misfeed location If you were able to remove the misfed paper 1 2 If you are unable to remove the misfed paper If paper remains in the bypass tray re...

Страница 70: ...g unit release levers to allow easier removal 2 Lower the part with the green label that protrudes from the fusing unit paper guide and open the fusing unit paper guide The fusing unit is hot Do not touch the fusing unit when removing misfed paper Doing so may cause a burn or injury When removing misfed paper do not touch or damage the transfer belt When closing the side cover press on around the ...

Страница 71: ...hem to their operating positions 7 Close the side cover The message Clear paper path will be cleared and printing will be possible The fusing unit is hot Do not touch the fusing unit when removing misfed paper Doing so may cause a burn or injury When removing misfed paper do not touch or damage the transfer belt Be careful about unfixed toner on the misfed paper not to soil your hands or clothes W...

Страница 72: ...x conveyor lever to its original position and close the side cover The message Clear paper path will be cleared and printing will be possible When closing the side cover press on around the handle If the paper was torn make sure that no torn pieces remain in the machine If the message does not clear check again to make sure that no pieces of paper remain Note ...

Страница 73: ...ve the misfed paper Be careful not to tear the misfed paper during removal 3 Close the lower side cover The message Clear paper path will be cleared and printing will be possible 4 If the misfed paper is not seen in step 2 lift and pull out the lower paper tray and remove the misfed paper Be careful not to tear the misfed paper during removal 5 Close the lower paper tray Push the tray in completel...

Страница 74: ...lack and white printing will still be possible Be sure to install 4 toner cartridges Y M C Bk Do not throw the toner cartridge into a fire Toner may splatter and cause burns Store toner cartridges out of the reach of small children After removing the toner cartridge do not shake it or tap on it Doing so may cause toner to leak from the cartridge Put the old cartridge immediately in the box of the ...

Страница 75: ...ng the toner cartridge do not grasp the shutter This may cause toner to leak A toner cartridge of a different color cannot be installed Be sure to install a toner cartridge of the same color Even after a new toner cartridge is installed the message may still appear indicating that printing cannot be resumed toner is not fed sufficiently In this case open and close the front cover The machine will ...

Страница 76: ...lection container Hold the toner collection container with both hands and slowly pull it out 4 Place the toner collection container on a flat surface Spread newspaper on the surface before placing the toner collection container Do not throw the toner collection container into fire Toner may fly out and cause burns Store the toner collection container out of the reach of children When removing the ...

Страница 77: ... Install a new toner collection container Push the toner collection container in completely 6 Close the front cover 7 Replace tray 1 You cannot close the front cover when the toner collection container is not attached Note ...

Страница 78: ...of the settings and information registered in the machine Press the SPECIAL FUNCTION key select List Print User and select a list to print it Each two sided sheet that is output is counted as two pages Blank prints are included in the count If the last page of a two sided printing job is blank it is not included in the count List name Description All Custom Setting List This list shows the hardwar...

Страница 79: ...F THE PHOTOCONDUCTIVE DRUM If black lines or colored lines appear use the charger cleaner to clean the main charger 1 Procedure of REPLACING THE TONER COLLECTION CONTAINER p 76 release the toner collection container 2 Grasp the green knob to release the lock and gently remove the charger cleaner 3 Gently push the charger cleaner all the way in 4 Repeat step 2 and 3 with each of the other main char...

Страница 80: ...on container 3 Take out the cleaning tool for the laser unit The cleaning tool is attached to the front cover Pull the right side of the cleaning instrument and unfasten it from the claw 4 Clean the laser unit 1 Push up and open the laser unit cover gray color 2 Point the cleaner down and gently push the cleaning tool all the way in 3 Gently pull the cleaning tool out If this does not solve the pr...

Страница 81: ...eaning tool 1 Rotate the cleaning tool after putting it on the boss and hook its edge the side that does not have a handle to the claw on the left side Hook the cleaning tool with the clean side face up 2 Place the right hand side of the cleaning tool on the inner side spread across the top of the claw 3 Hook the cleaning tool to the claw 7 Procedure of REPLACING THE TONER COLLECTION CONTAINER p 7...

Страница 82: ... adjusted as explained below 1 Press the SPECIAL FUNCTION key 2 Select Display Contrast with the or key 3 Press the OK key 4 Adjust the contrast with the or key To reset the contrast to the default setting press the C key 5 Press the SPECIAL FUNCTION key You will return to the base screen ...

Страница 83: ... the factory default administrator password 1 Press the SPECIAL FUNCTION key The special function screen will appear 2 Select System Settings with the or key 3 Press the OK key The administrator password entry screen appears 4 Use the numeric keys to enter the five digit administrator password If this is the first time you are programming the administrator password enter the factory default code R...

Страница 84: ... User Count Reset 90 A Warning when Login Fails 90 Disable Print by Inv User 90 Device Control Fusing Control 91 Fusing Cleaning 91 Registration Adjustment 91 Operation Setting Auto Clear 91 Language Setting 91 Message Time 91 Key Touch Sound 91 Key Press Time 91 Disable Auto Key Repeat 92 Disable Paper Size Set 92 Energy Save Auto Power Shut Off 92 Auto Power Shut Off Timer 92 Preheat Mode 92 Ent...

Страница 85: ...eless AP Wired Settings IPv4 Settings IPv6 Settings Wireless Infrastructure Manual Input of SSID Wireless Access Point Setting of SSID Security Settings Device IP Address Settings Channel Settings Sending Output Settings Bandwidth Settings IP Addr Distribution Range User Control User Authentication User Registration Function Limit Setting Account Limit Setting User Count Display User Count Reset A...

Страница 86: ...er Preheat Mode Enter Auto Power Shut Off after the Remote Job Toner Save Mode List Print User Info Print Color Adjustments Easy Calibration Tone Adjustments Return to Default Security Settings IPsec Settings Initialize Private Data and Data in Machine Level 1 Level 2 Level 3 ...

Страница 87: ...etting with the or key 7 Press the OK key and follow the instructions in the setting screen Several settings will have checkboxes in front of them To enable a function make a checkmark appear press the OK key To disable the setting press the OK once again to remove the checkmark To configure a setting that has a checkbox go to step 8 8 To use another setting for the same mode select the desired se...

Страница 88: ...rk use this setting to configure the IP address of the machine The settings are shown below Enable DHCP Use this setting to have the IP address obtained automatically using DHCP Dynamic Host Configuration Protocol When this setting is enabled it is not necessary to manually enter an IP address IPv4 Address Enter the IP address of the machine Subnetmask Enter the Subnetmask Default Gateway Enter th...

Страница 89: ... Select the encryption method based on the Setting of Security Type setting none WEP TKIP AES Security Key Settings Set the security key used for wireless connection Device IP Address Settings Set the IP address of the access point Channel Settings Set the channel used for the access point Sending Output Settings Set the transmission output of the access point Bandwidth Settings Set the frequency ...

Страница 90: ... the or key User Count Reset This setting is used to reset the print page counts of an individual account or all accounts to zero A Warning when Login Fails When this setting is enabled the machine will not allow operation for one minute if an incorrect account number is entered three times in a row During this time This operation is disabled Please contact your administrator will appear in the di...

Страница 91: ...ng screen will appear Select the desired time with the or key If you do not want auto clear to operate select 0 Language Setting This setting is used to select the display language Select Language Setting press the OK key and follow the steps below Message Time This setting is used to set the length of time that messages appear in the display this applies to messages that appear for a certain leng...

Страница 92: ...natural resources and reduce environmental pollution 1 min 3 min 5 min 10 min 15 min 30 min 45 min or 60 min can be selected for the duration of time Select a setting that suits your work conditions Preheat Mode This setting is used to set the duration of time until preheat mode which automatically lowers the fusing unit temperature activates when the operation panel is not used Using this functio...

Страница 93: ...directly in front and select the cell that is closest to the neutral gray Place five sheets of white plain paper under the printed test page so that no background color or pattern shows through the test page 4 Enter the coordinates of the color selected in step 3 in X and Y of the Easy Calibration and press OK key The result of color reproduction depends on paper quality It is recommended to adjus...

Страница 94: ...ialized to the factory default ones by selecting Return to Default in Color Adjustments menu 1 Select Return to Default in Color Adjustments menu and press OK key 2 Confirmation screen appears and select Yes to initialize the value to default or select No to return to Mode Select screen Security Settings The following settings are related to security Select the Security Settings to configure the s...

Страница 95: ...ministrator is allowed to configure these settings HOW TO ACCESS THE WEB PAGE Use the following procedure to access the Web pages 1 Open the Web browser on your computer Supported browsers Internet Explorer 6 0 or higher Windows Netscape Navigator 9 Windows Firefox 2 0 or higher Windows 2 In the Address field of your Web browser enter the IP address that has been configured in the machine When the...

Страница 96: ...nd page counts Out of paper and other warnings appear in red Device Configuration Shows what options are installed Network Status Shows the network status Information on General and TCP IP is shown on the respective pages 3 Data List Print You can print out the various settings that you have selected 4 Condition Settings Configure basic printer settings and printer language settings CONFIGURING TH...

Страница 97: ... the printer condition settings 2 Default Settings PCL PS Select the type of condition settings that you wish to configure 3 Settings The factory default settings are displayed Change the settings as desired by selecting from drop down lists and by directly entering settings For information on the settings see PRINTER CONDITION SETTINGS p 98 4 Submit Click to store the Web page settings in the mac...

Страница 98: ...e is longer in the vertical direction or Landscape when the image is longer in the horizontal direction Default Paper Size Letter Invoice Executive A4 B5 A5 Set the default paper size used for printing Default Paper Type Plain Letter head Pre printed Pre punched Recycled Color Set the type of paper used for printing Default Resolution 600dpi 600dpi High Quality Set the printing resolution Disable ...

Страница 99: ...d from among the internal fonts The factory default setting is 0 Courier Line Feed Code CR CR LF LF FF FF CR CR LF LF LF FF FF CR CR LF CR LF FF CR FF CR CR LF LF CR LF FF CR FF This specifies the line break code by means of a combination of the CR return code LF line break code and FF page break code The factory default setting is printing based on the transmitted code The setting can be changed ...

Страница 100: ...sswords Enter a password that you would like to establish and click the Submit button One password can be established for the administrator and one password can be established for users PROTECTING INFORMATION PROGRAMMED IN THE WEB PAGE Passwords p 102 3 Administrator Settings Setting changes can be prohibited and interface settings can be configured ADMINISTRATOR SETTINGS p 103 4 Status Message Co...

Страница 101: ...nfigured DNS server If you entered a host name in Primary SMTP Server or Secondary SMTP Server of SMTP you must also configure your DNS server settings 1 Click Quick Setup in the menu frame 2 Enter the required information in SMTP and DNS 3 When you have completed all of the entries click Submit The entries will be stored If you need to configure advanced settings for the SMTP and DNS servers foll...

Страница 102: ...n Admin Password When establishing a password for the first time enter admin in Admin Password 3 Enter passwords in User Password and Admin Password A maximum of 7 characters and or numbers can be entered for each password passwords are case sensitive Be sure to enter the same password in Confirm Password as you did in New Password 4 When you have finished entering all items click Submit The enter...

Страница 103: ... the desired setting and make a selection for the setting in the screen that appears See ADMINISTRATOR SETTINGS for descriptions of the settings 3 Click Submit to store the entered information ADMINISTRATOR SETTINGS When YES NO appears in the Settings column YES is selected when a checkmark appears in the checkbox of the item and NO is selected when checkmark does not appear Default settings Fusin...

Страница 104: ...col to send e mail The following procedure is used to set up the e mail environment This must be done by the system administrator or other person familiar with the network 1 Click Services in the menu frame The Services Setup screen will appear 2 Click SMTP 3 Enter the information required to set up the e mail environment 4 Click Submit to store the entered information Item Settings Description I ...

Страница 105: ...r and paper and trouble including paper misfeeds to specified destinations when such problems occur The destinations can be set for administrators and dealers respectively To set up the alert message follow the procedure below 1 Click Alerts Message in the menu frame The Alerts Message Setup screen will appear 2 Enter the destination addresses 3 Click Submit to store the entered information If the...

Страница 106: ...include software components covered by a GNU General Public License hereafter GPL a GNU Lesser General Public License hereafter LGPL or other license agreement Obtaining source code Some of the open source software licensors require the distributor to provide the source code with the executable software components GPL and LGPL include similar requirements For information on obtaining the source co...

Страница 107: ...al Typeface Corporation registered in the United States Patent and Trademark Office and may be registered in certain jurisdictions Clarendon Eurostile Helvetica Optima Palatino Stempel Garamond Times and Univers are trademarks of Heidelberger Druckmaschinen AG which may be registered in certain jurisdictions exclusively licenced through Linotype Library GmbH a wholly owned subsidiary of Heidelberg...

Страница 108: ...OPERATION GUIDE MXC300P US1 ...

Отзывы: