background image

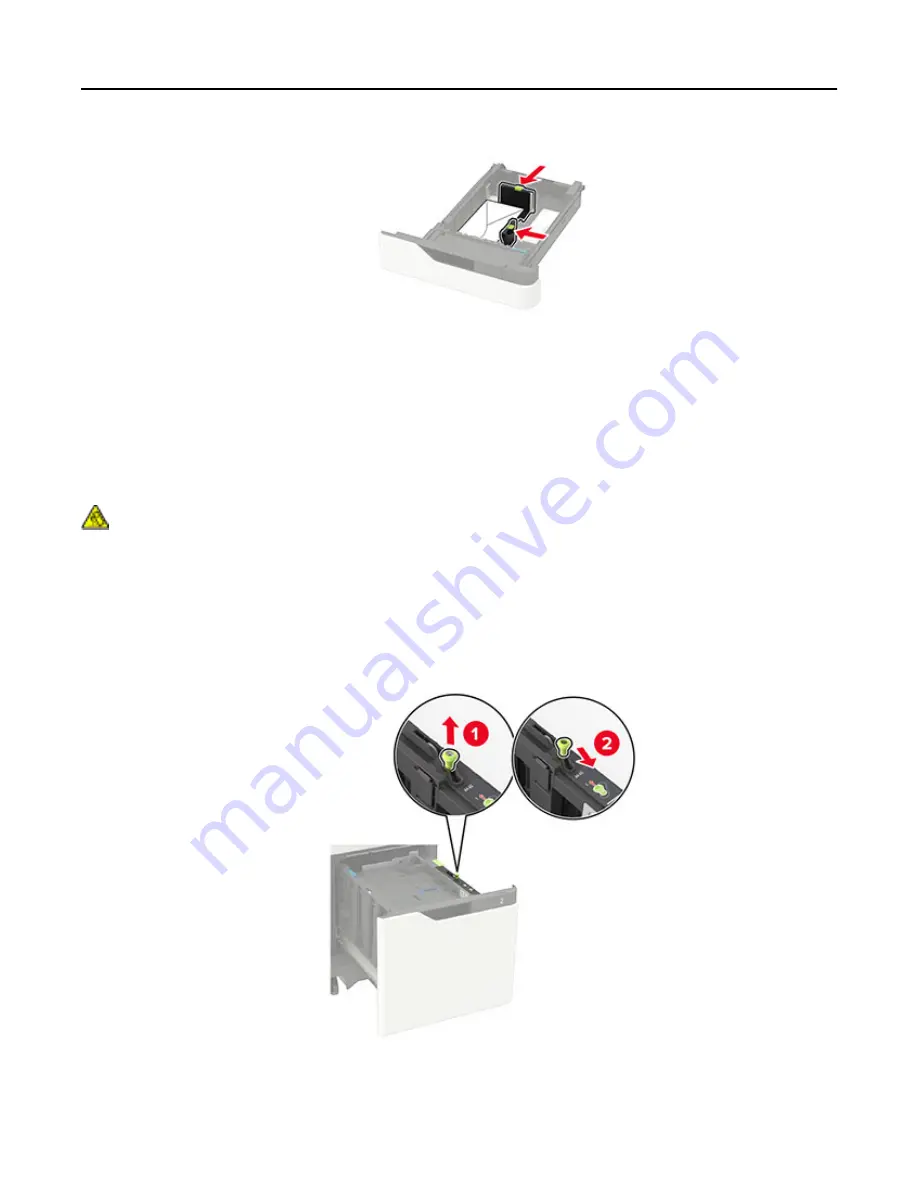
Load envelopes with the flap side up and against the left side of the tray.

Warning—Potential Damage: Do not use envelopes with stamps, clasps, snaps, windows, coated 

linings, or self

stick adhesives.

5

Insert the tray.

6

From the control panel, set the paper size and paper type to match the paper loaded.

Loading the 2100

sheet tray

CAUTION—TIPPING HAZARD: To reduce the risk of equipment instability, load each tray separately. 

Keep all other trays closed until needed.

1

Pull out the tray.

2

Adjust the guides.

Loading A5

size paper

a

Pull up and slide the width guide to the position for A5.


Loading paper and specialty media

22

Содержание MX-B557P

Страница 1: ...LASER PRINTER MX B557P MX B707P User s Guide Machine type s 4064 Models 295 695 ...

Страница 2: ...ight 13 Setting up and using the home screen applications 15 Using the home screen 15 Customizing the home screen 16 Managing bookmarks 16 Managing contacts 17 Loading paper and specialty media 19 Setting the paper size and type 19 Configuring Universal paper settings 19 Loading the 250 or 550 sheet tray 19 Loading the 2100 sheet tray 22 Loading the multipurpose feeder 27 Linking trays 28 Paper su...

Страница 3: ...Security 73 Reports 80 Help 81 Troubleshooting 82 Printing the Menu Settings Page 82 Securing the printer 83 Locating the security slot 83 Erasing printer memory 83 Erasing printer hard disk memory 83 Encrypting the printer hard disk 84 Restoring factory default settings 84 Statement of Volatility 84 Maintaining the printer 86 Adjusting the speaker volume 86 Networking 86 Cleaning the printer 88 O...

Страница 4: ...ty output expander 103 Paper jam in the 4 bin mailbox 104 Paper jam in the staple finisher 105 Paper jam in the staple hole punch finisher 106 Staple jam in the staple finisher 107 Staple jam in the staple hole punch finisher 110 Troubleshooting 113 Configuring the SMTP server 113 Network connection problems 113 Hardware options problems 115 Issues with supplies 116 Paper feed problems 117 Printin...

Страница 5: ...e this product with extension cords multioutlet power strips multioutlet extenders or UPS devices The power capacity of these types of accessories can be easily overloaded by a laser printer and may result in a risk of fire property damage or poor printer performance CAUTION POTENTIAL INJURY Do not use this product with an inline surge protector The use of a surge protection device may result in a...

Страница 6: ...ter has a caster base then carefully roll it to the new location Use caution when passing over thresholds and breaks in flooring If the printer does not have a caster base but is configured with optional trays or output options then remove the output options and lift the printer off the trays Do not try to lift the printer and any options at the same time Always use the handholds on the printer to...

Страница 7: ...rts Refer service or repairs other than those described in the user documentation to a service representative This product uses a printing process that heats the print media and the heat may cause the media to release emissions You must understand the section in your operating instructions that discusses the guidelines for selecting print media to avoid the possibility of harmful emissions This pr...

Страница 8: ...is product near water or wet locations Make sure that airflow in the room meets the latest revision of the ASHRAE 62 standard or the CEN Technical Committee 156 standard Provide a flat sturdy and stable surface Keep the printer Clean dry and free of dust Away from stray staples and paper clips Away from the direct airflow of air conditioners heaters or ventilators Free from direct sunlight and hum...

Страница 9: ...sing possible injury For more information on supported configurations contact the place where you purchased the printer CAUTION TIPPING HAZARD To reduce the risk of equipment instability load each tray separately Keep all other trays closed until needed You can configure your printer by adding optional 250 550 or 2100 sheet trays Basic model 1 Standard 550 sheet tray 2 Multipurpose feeder 3 Contro...

Страница 10: ...ut expander High capacity output 4 bin mailbox Staple finisher The staple hole punch finisher must not be combined with any other output options In a configuration with two or more optional finishers The staple finisher must always be on top The high capacity output expander must always be at the bottom The output expander is the only option that can be placed on top of the high capacity output ex...

Страница 11: ...ng storm CAUTION POTENTIAL INJURY To avoid the risk of fire or electrical shock connect the power cord to an appropriately rated and properly grounded electrical outlet that is near the product and easily accessible CAUTION POTENTIAL INJURY To avoid the risk of fire or electrical shock use only the power cord provided with this product or the manufacturer s authorized replacement Warning Potential...

Страница 12: ...e printer software 1 Obtain a copy of the software installer package From our website From the place where you purchased the printer 2 Run the installer and then follow the instructions Learning about the printer 12 ...

Страница 13: ...e seconds 5 Stop or Cancel button Stop the current printer task 6 Indicator light Check the printer status 7 Volume buttons Adjust the speaker volume 8 Headset or speaker port Attach a headset or speaker Note This feature is available only in some printer units 9 Back button Return to the previous screen Understanding the status of the power button and indicator light Indicator light Printer statu...

Страница 14: ...Power button light Printer status Off The printer is off ready or processing data Solid amber The printer is in Sleep mode Blinking amber The printer is in Hibernate mode Using the control panel 14 ...

Страница 15: ...nd on how to clear it Note You can also access this setting by touching the top section of the home screen 2 Job Queue Show all the current print jobs Note You can also access this setting by touching the top section of the home screen 3 Change Language Change the language on the display 4 Settings Access the printer menus 5 Held Jobs Show the print jobs that are held in the printer memory 6 USB D...

Страница 16: ...myWebsite com sample pdf instead of typing 123 123 123 123 sample pdf Make sure that the host name also matches the Common Name CN value in the server certificate For more information on obtaining the CN value in the server certificate see the help information for your web browser For FTP type the FTP address For example myServer myDirectory Enter the FTP port Port 21 is the default port for sendi...

Страница 17: ...eb page correctly 2 Click Address Book 3 From the Contacts section add a contact Note You can assign the contact to one or more groups 4 If necessary specify a login method to allow application access 5 Apply the changes Adding groups 1 Open a web browser and then type the printer IP address in the address field Notes View the printer IP address on the printer home screen The IP address appears as...

Страница 18: ...it the information 4 Apply the changes Deleting contacts or groups 1 Open a web browser and then type the printer IP address in the address field Notes View the printer IP address on the printer home screen The IP address appears as four sets of numbers separated by periods such as 123 123 123 123 If you are using a proxy server then temporarily disable it to load the web page correctly 2 Click Ad...

Страница 19: ...ia Configuration Universal Setup For non touch screen printer models press to navigate through the settings 2 Configure the settings Loading the 250 or 550 sheet tray CAUTION POTENTIAL INJURY To reduce the risk of equipment instability load each tray separately Keep all other trays closed until needed 1 Remove the tray Note To avoid paper jams do not remove trays while the printer is busy 2 Adjust...

Страница 20: ... fan and align the paper edges before loading 4 Load the paper stack with the printable side facedown and then make sure that the side guides fit snugly against the paper Loading paper and specialty media 20 ...

Страница 21: ...staple finisher is installed or not Without an optional staple finisher With an optional staple finisher One sided printing One sided printing Two sided printing Two sided printing When loading prepunched paper make sure that the holes on the long edge of the paper are against the right side of the tray One sided printing Two sided printing Loading paper and specialty media 21 ...

Страница 22: ...tray 6 From the control panel set the paper size and paper type to match the paper loaded Loading the 2100 sheet tray CAUTION TIPPING HAZARD To reduce the risk of equipment instability load each tray separately Keep all other trays closed until needed 1 Pull out the tray 2 Adjust the guides Loading A5 size paper a Pull up and slide the width guide to the position for A5 Loading paper and specialty...

Страница 23: ...ngth guide to the position for A5 until it clicks into place c Remove the A5 length guide from its holder d Insert the guide into its designated slot and then press until it clicks into place Loading paper and specialty media 23 ...

Страница 24: ...e width guide to the correct position for the size of the paper being loaded b If the A5 length guide is still attached then remove it If the guide is not attached then proceed to step d on page 25 c Place the A5 length guide in its holder Loading paper and specialty media 24 ...

Страница 25: ...align the paper edges before loading 4 Load the paper stack with the printable side facedown Load letterhead depending on whether an optional staple finisher is installed or not Without an optional staple finisher With an optional staple finisher One sided printing One sided printing Loading paper and specialty media 25 ...

Страница 26: ...aper make sure that the holes on the long edge of the paper are against the right side of the tray One sided printing Two sided printing 5 Insert the tray Note Press down the paper stack while inserting the tray 6 From the control panel set the paper size and paper type to match the paper loaded Loading paper and specialty media 26 ...

Страница 27: ...ading 3 Flex fan and align the paper edges before loading 4 Load paper with the printable side faceup Load letterhead depending on whether an optional staple finisher is installed or not Without an optional staple finisher With an optional staple finisher One sided printing One sided printing Loading paper and specialty media 27 ...

Страница 28: ...ress field Notes View the printer IP address on the printer home screen The IP address appears as four sets of numbers separated by periods such as 123 123 123 123 If you are using a proxy server then temporarily disable it to load the web page correctly 2 Click Settings Paper Tray Configuration 3 Set the same paper size and paper type for the trays that you are linking 4 Save the settings 5 Click...

Страница 29: ...5 182 x 257 mm 7 2 x 10 1 in X Oficio Mexico 216 x 340 mm 8 5 x 13 4 in Statement 140 x 216 mm 5 5 x 8 5 in X Executive 184 x 267 mm 7 3 x 10 5 in X Letter 216 x 279 mm 8 5 x 11 in Legal 216 x 356 mm 8 5 x 14 in Folio 216 x 330 mm 8 5 x 13 in Universal 105 x 148 mm 4 1 x 5 8 in to 216 x 356 mm 8 5 x 14 in X 7 3 4 Envelope Monarch 98 x 191 mm 3 9 x 7 5 in X X 1 A5 long edge feed LEF is recommended ...

Страница 30: ... mm 6 9 x 9 8 in X X 1 A5 long edge feed LEF is recommended over A5 short edge feed SEF 2 Envelopes wider than 101 6 mm 4 5 in may crease This paper type must be tested for acceptability Paper sizes supported by the output options or finishers Paper size Output expander or high capacity output expander 4 bin mailbox Staple finisher Staple hole punch finisher Stack Staple Stack Staple Hole punch A4...

Страница 31: ...7 3 x 10 5 in X X X Letter 216 x 279 mm 8 5 x 11 in Legal 216 x 356 mm 8 5 x 14 in X Folio 216 x 330 mm 8 5 x 13 in Universal 105 x 148 mm 4 1 x 5 8 in to 216 x 356 mm 8 5 x 14 in X X X X X 7 3 4 Envelope Monarch 98 x 191 mm 3 9 x 7 5 in X X X X X X 9 Envelope 98 x 225 mm 3 9 x 8 9 in X X X X X X 10 Envelope 105 x 241 mm 4 1 x 9 5 in X X X X X X DL Envelope 110 x 220 mm 4 3 x 8 7 in X X X X X X C5...

Страница 32: ...upported paper types Paper types supported by the printer Paper type Standard 550 sheet tray optional 250 or 550 sheet tray Optional 2100 sheet tray Multipurpose feeder Two sided printing Plain paper Card stock X Transparency1 X X Labels X X Vinyl Labels X X Bond Envelope X X Rough Envelope X X Letterhead Preprinted Colored Paper X Light X Heavy X 1 To prevent transparencies from sticking together...

Страница 33: ...ported by the output options or finishers Paper type Output expander or high capacity output expander 4 bin mailbox Staple finisher Staple hole punch finisher Stack Staple Stack Staple Hole punch Plain paper Card stock X X X X X X Transparencies X X X X Labels X X X X X X Vinyl Labels X X X X X X Bond Envelope X X X X X X Rough Envelope X X X X X X Letterhead Preprinted Colored Paper X X X X X X L...

Страница 34: ... lb bond X Card stock 199 g m grain long 110 lb bond X Card stock 176 g m grain long 65 lb bond X Transparency 138 146 g m grain long 37 39 lb bond X X Paper labels 180 g m 48 lb bond X Integrated forms2 140 175 g m 37 47 lb bond X Integrated forms 75 135 g m 20 36 lb bond X Envelopes3 60 105 g m 16 28 lb bond X 1 Grain short is preferred for paper over 176 g m 47 lb 2Pressure sensitive area must ...

Страница 35: ... X Plain paper or Bond 60 90 g m grain long 16 24 lb bond Card stock 203 g m grain long 125 lb bond X X X X Card stock 199 g m grain long 110 lb bond X X X X Card stock 176 g m grain long 65 lb bond X X X X X X Card stock 163 g m grain long 90 lb bond X X X X Transparency 138 146 g m grain long 37 39 lb bond X X X X Paper labels 180 g m 48 lb bond X X X X X X Integrated forms 140 175 g m 37 47 lb ...

Страница 36: ...d weight Output expander or high capacity output expander 4 bin mailbox Staple finisher Staple hole punch finisher Stack Staple Stack Staple Hole punch Envelopes 60 105 g m 16 28 lb bond X X X X X X Paper support 36 ...

Страница 37: ...o the Google Cloud Print server The Cloud Print plugin is downloaded from the Google PlayTM store and is enabled in the mobile device 1 From your AndroidTM mobile device open a document or select a document from your file manager 2 Tap Print 3 Select a printer and then tap Printing from a mobile device using AirPrint The AirPrint software feature is a mobile printing solution that allows you to pr...

Страница 38: ...lect a printer and then adjust the settings if necessary 4 Print the document Printing from a flash drive 1 Insert the flash drive Notes If you insert the flash drive when an error message appears then the printer ignores the flash drive If you insert the flash drive while the printer is processing other print jobs then Busy appears on the display 2 Select the document that you want to print If ne...

Страница 39: ... support the File Allocation Table FAT system Many flash drives are tested and approved for use with the printer For more information contact the place where you purchased the printer File types Documents PDF version 1 7 or earlier HTML XPS Microsoft file formats doc docx xls xlsx ppt pptx Images dcx gif JPEG or jpg bmp pcx TIFF or tif png Printing 39 ...

Страница 40: ...Note Verify jobs print one copy to check if it is satisfactory before printing the remaining copies Reserve Job Expiration Set the expiration time that the printer stores print jobs Note Reserve held jobs are automatically deleted after printing Require All Jobs to be Held Set the printer to hold all print jobs Printing confidential and other held jobs 1 With a document open click File Print 2 Cli...

Страница 41: ...ting a font sample list 1 From the control panel navigate to Settings Reports Print Print Fonts For non touch screen printer models press to navigate through the settings 2 Select a font sample Printing 41 ...

Страница 42: ...eless Ethernet TCP IP SNMP IPSec 802 1x LPD Configuration HTTP FTP Settings ThinPrint USB Restrict external network access Google Cloud Print Wi Fi Direct Security Login Methods Schedule USB Devices Security Audit Log Login Restrictions Confidential Print Setup Solutions LDAP Settings Disk Encryption Erase Temporary Data Files Miscellaneous Reports Menu Settings Page Device Print Network Help Prin...

Страница 43: ...ally Set Date and Time Date Format MM DD YYYY Time Format 12 hour A M P M Time Zone UTC 5 00 Network Time Protocol Enable NTP On NTP Server Enable Authentication None Configure the printer date and time and network time protocol Paper Sizes U S Metric Specify the unit of measurement for paper sizes Note The country or region selected in the initial setup wizard determines the initial paper size se...

Страница 44: ...ges on one side of a sheet of paper Print Toner Darkness 1 10 8 Determine the lightness or darkness of text images Note An asterisk next to a value indicates the factory default setting Remote Operator Panel Menu item Description External VNC Connection Don t Allow Allow Connect an external Virtual Network Computing VNC client to the remote control panel Authentication Type None Standard Authentic...

Страница 45: ... toner cartridge is low E mail Alerts Setup E mail Setup Primary SMTP Gateway Primary SMTP Gateway Port 25 Secondary SMTP Gateway Secondary SMTP Gateway Port 25 SMTP Timeout 30 seconds Reply Address Always use SMTP default Reply Address Off Use SSL TLS Disabled Require Trusted Certificate On SMTP Server Authentication No authentication required Device Initiated E mail None Use Active Directory Dev...

Страница 46: ...entire page into the memory before printing it Jam Content Recovery Jam Recovery Auto Set the printer to reprint jammed pages Specify how to restart a scan job after resolving a paper jam Note An asterisk next to a value indicates the factory default setting Power Management Menu item Description Sleep Mode Profile Print from Sleep Mode Stay awake after printing Enter Sleep Mode after printing Set...

Страница 47: ... 25 5 seconds 1 Set the initial length of delay before a repeating key starts repeating Note Appears only when a keyboard is attached to the printer Key Repeat Rate 0 5 30 30 Set the number of presses per second for a repeating key Note Appears only when a keyboard is attached to the printer Prolong Screen Timeout Off On Let the user remain in the same location and reset the Screen Timeout timer w...

Страница 48: ...have the same paper type and paper size settings Tray Configuration Show Tray Insert Message Off Only for unknown sizes Always Show the Tray Insert message Tray Configuration A5 Loading Short Edge Long Edge Determine the default loading orientation for the A5 size paper in all paper sources Tray Configuration Paper Prompts Auto Multipurpose Feeder Manual Paper Set the paper source that the user fi...

Страница 49: ...y Page Timeout 0 60 60 Set the page timeout during emulation Printer Emulations Emulator Security Reset Emulator After Job Off On Reset the emulator after a print job Printer Emulations Emulator Security Disable Printer Message Access Off On Disable access to printer message during emulation Print Configuration Font Sharpening 0 150 24 Set a text point size value below which the high frequency scr...

Страница 50: ...rations Automatically Display Error Screens Off On Show existing error messages on the display after the printer remains inactive on the home screen for a length of time equal to the Screen Timeout setting Note An asterisk next to a value indicates the factory default setting Out of Service Erase Menu item Description Out of Service Erase Memory Last Sanitized Hard Disk Last Sanitized Show informa...

Страница 51: ... USB Export the configuration file to a flash drive Export Compressed Logs to USB Export the compressed log files to a flash drive Print Layout Menu item Description Sides 1 Sided 2 Sided Specify whether to print on one side or both sides of the paper Flip Style Long Edge Short Edge Determine which side of the paper is bound when performing two sided printing Blank Pages Print Do Not Print Print b...

Страница 52: ...de Ordering Horizontal Reverse Horizontal Vertical Reverse Vertical Specify the positioning of multiple page images when using the Pages per Side menu Pages per Side Orientation Auto Landscape Portrait Specify the orientation of multiple page images when using the Pages per Side menu Pages per Side Border None Solid Print a border around each page image when using the Pages per Side menu Copies 1 ...

Страница 53: ...termine what the printer does with downloaded resources such as fonts and macros when it receives a job that requires more than the available memory Notes When set to Off the printer retains downloaded resources only until memory is needed Resources associated with the inactive printer language are deleted When set to On the printer preserves all the permanent downloaded resources across all langu...

Страница 54: ...asterisk next to a value indicates the factory default setting Job Accounting Menu item Description Job Accounting Off On Set the printer to create a log of the print jobs that it receives Note This menu item appears only when a flash memory or hard disk is installed Accounting Log Frequency Daily Weekly Monthly Specify how often the printer creates a log file Log Action at End of Frequency None E...

Страница 55: ...er responds when hard disk usage reaches the maximum limit 100MB URL to Post Log Specify where the printer posts job accounting logs E mail Address to Send Logs Specify the e mail address to which the printer sends job accounting logs Log File Prefix Specify the prefix for the log files Note The current host name defined in the TCP IP menu is used as the default log file prefix Note An asterisk ne...

Страница 56: ...minimum stroke width of any job printed in 1200 dpi Lock PS Startup Mode Off On Disable the SysStart file Wait Timeout Off On Enable the printer to wait for more data before canceling a print job Note When enabled the factory default setting is 40 seconds Note An asterisk next to a value indicates the factory default setting PCL Menu item Description Font Source Resident Disk Flash All Choose the ...

Страница 57: ...et the initial minimum stroke width of any job printed in 1200 dpi PCLXL Minimum Line Width 1 30 2 A4 Width 198 mm 203 mm Set the width of the logical page on A4 size paper Note Logical page is the space on the physical page where data is printed Auto CR after LF Off On Set the printer to perform a carriage return after a line feed control command Note Carriage return is a mechanism that commands ...

Страница 58: ... Do Not Print Print Print background information or graphics in HTML documents Note An asterisk next to a value indicates the factory default setting Image Menu item Description Auto Fit On Off Select the best available paper size and orientation setting for an image Note When set to On this menu item overrides the scaling and orientation settings for the image Invert Off On Invert bitonal monochr...

Страница 59: ...aded in each paper source Substitute Size Off Letter A4 All Listed Set the printer to substitute a specified paper size if the requested size is not loaded in any paper source Notes Off prompts the user to load the required paper size All Listed allows all available substitutions Configure MP Cassette Manual First Determine the behavior of the multipurpose feeder Notes Cassette configures the mult...

Страница 60: ...e portrait height of the universal paper Feed Direction Short Edge Long Edge Set the printer to pick paper from the short edge or long edge direction Note Long Edge appears only when the longest edge is shorter than the maximum width supported Note An asterisk next to a value indicates the factory default setting Media Types Menu item Description Plain Card Stock Transparency Recycled Labels Vinyl...

Страница 61: ...rming two sided printing Pages per Side Off 2 pages per side 3 pages per side 4 pages per side 6 pages per side 9 pages per side 12 pages per side 16 pages per side Print multiple page images on one side of a sheet of paper Pages per Side Ordering Horizontal Reverse Horizontal Reverse Vertical Vertical Specify the positioning of multiple page images when using Pages per Side menu Pages per Side Or...

Страница 62: ...s is available only in printers connected to a wireless network Network Status Show the connectivity status of the printer network Display Network Status on Printer Off On Show the network status on the display Speed Duplex Show the speed of the currently active network card IPv4 Show the IPv4 address All IPv6 Addresses Show all IPv6 addresses Reset Print Server Reset all active network connection...

Страница 63: ...frastructure Wireless Security Mode Disabled Configure the wireless connection using the control panel Wi Fi Protected Setup Start Push Button Method Start PIN Method Establish a Wi Fi network and enable network security Enable Wi Fi Direct On Off Enable Wi Fi Direct capable devices to connect to the printer Compatibility 802 11b g n 2 4GHz 802 11a b g n ac 2 4GHz 5GHz 802 11a n ac 5GHz Specify th...

Страница 64: ...automatically to PostScript emulation when a print job requires it regardless of the default printer language Note When this setting is disabled the printer does not examine incoming data and uses the default printer language specified in the Setup menu Job Buffering Off On Temporarily store print jobs on the hard disk before printing Note This menu item appears only when a hard disk is installed ...

Страница 65: ...b requires it regardless of the default printer language Note When this setting is disabled the printer does not examine incoming data and uses the default printer language specified in the Setup menu Job Buffering Off On Temporarily store jobs on the hard disk before printing Note This menu item appears only when a hard disk is installed Mac Binary PS Auto On Off Set the printer to process Macint...

Страница 66: ...ch Order Specify a list of domain names to locate the printer and its resources that reside in different domains on the network Enable DDNS Off On Update the Dynamic DNS settings DDNS TTL Specify the current DDNS settings Default TTL DDNS Refresh Time Enable mDNS Off On Update the multicast DNS settings WINS Server Address Specify a server address for Windows Internet Name Service WINS Enable BOOT...

Страница 67: ...000000 Kilobits second Enable TLSv1 0 Off On Enable the TLSv1 0 protocol Enable TLSv1 1 Off On Enable the TLSv1 1 protocol SSL Cipher List Specify the cipher algorithms to use for the SSL or the TLS connections Note An asterisk next to a value indicates the factory default setting SNMP Note This menu appears only in network printers or printers that are attached to print servers Menu item Descript...

Страница 68: ...only in network printers or printers that are attached to print servers Menu item Description Enable IPSec Off On Enable Internet Protocol Security IPSec Base Configuration Default Compatibility Secure Set the IPSec base configuration DH Diffie Hellman Group Proposal modp2048 14 modp3072 15 modp4096 16 modp6144 17 Set the IPSec base configuration Note This menu item appears only when Base Configur...

Страница 69: ...nter Certificate Authenticated Connections Host x Address subnet Note An asterisk next to a value indicates the factory default setting 802 1x Note This menu appears only in network printers or printers that are attached to print servers Menu item Description Active Off On Let the printer join networks that require authentication before allowing access Note An asterisk next to a value indicates th...

Страница 70: ...iption Enable HTTP Server Off On Access the Embedded Web Server to monitor and manage the printer Enable HTTPS Off On Enable Hypertext Transfer Protocol Secure HTTPS to encrypt data transferring to and from the print server Force HTTPS Connections On Off Force the printer to use HTTPS connections Enable FTP TFTP Off On Send files using FTP TFTP Local Domains Specify domain names for HTTP and FTP s...

Страница 71: ...ecified in the Setup menu PS SmartSwitch Off On Set the printer to switch to PostScript emulation when a print job received through a USB port requires it regardless of the default printer language Note When this setting is disabled the printer does not examine incoming data and uses the default printer language specified in the Setup menu Job Buffering Off On Temporarily store jobs on the hard di...

Страница 72: ... Menu item Description Registration Register Register the printer to the Google Cloud Print server Options Enable Google Cloud Print Off On Print directly from your Google account Options Enable Local Discovery Off On Allow the registered user and other users on the same subnet to send jobs to the printer locally Options Enable SSL Peer Verification Off On Verify authenticity of the peer certifica...

Страница 73: ...pt Push Button Requests Off On Accept requests to connect to the network automatically Note Accepting clients automatically is not secure Note An asterisk next to a value indicates the factory default setting Security Login Methods These menu items appear only in some printer models Manage Permissions Menu item Description Function Access Modify Address Book Create Profiles Manage Bookmarks Flash ...

Страница 74: ...aver Forms and Favorites Control access to printer applications Local Accounts Menu item Description Manage Groups Permissions Show a list of all saved groups in the printer Add User User Name Password User Name Password PIN Create local accounts and specify their access to the printer functions administrative menus printer management options and applications Default Login Methods Note This menu a...

Страница 75: ...n Enable Audit Off On Record the events in the secure audit log and remote syslog Enable Remote Syslog Off On Send audit logs to a remote server Remote Syslog Server Specify the remote syslog server Remote Syslog Port 1 65535 514 Specify the remote syslog port Remote Syslog Method Normal UDP Stunnel Specify a syslog method to transmit logged events to a remote server Note An asterisk next to a val...

Страница 76: ...Use 3 local3 20 Local Use 4 local4 21 Local Use 5 local5 22 Local Use 6 local6 23 Local Use 7 local7 Specify a facility code that the printer uses when sending log events to a remote server Severity of Events to Log 0 Emergency 1 Alert 2 Critical 3 Error 4 Warning 5 Notice 6 Informational 7 Debug Specify the priority level cutoff for logging messages and events Remote Syslog Non Logged Events Off ...

Страница 77: ...strator when the log fills its allotted memory Full Alert Level 1 99 90 E mail Log Exported Alert Off On Send e mail notification to the administrator when a log is exported E mail Log Settings Changed Alert Off On Send e mail notification to the administrator when Enable Audit is set Log Line Endings LF n CR r CRLF r n Specify how the log file terminates the end of each line Digitally Sign Export...

Страница 78: ...it is reached the print jobs for that user name and PIN are deleted Confidential Job Expiration Off 1 Hour 4 Hours 24 Hours 1 Week Set the expiration time for confidential print jobs Notes If this menu item is changed while confidential print jobs reside in the printer memory or hard disk then the expiration time for those print jobs does not change to the new default value If the printer is turne...

Страница 79: ...dicates the factory default setting Disk Encryption Note This menu appears only when a hard disk is installed Menu item Description Status Enabled Disabled Enable disk encryption Start encryption Erase Temporary Data Files Menu item Description Stored in onboard memory Off On Delete all files stored on the printer memory Stored on hard disk 1 Pass Erase 3 Pass Erase 7 Pass Erase Delete all files s...

Страница 80: ...fore printing Default Print Permission Login User Name Password User Name Set the default login for Print Permission Security Reset Jumper Enable Guest access No Effect Specify user access to the printer Notes The jumper is located beside a lock icon on the controller board Enable Guest access provides anyone access to all aspects of the printer No Effect may make access to the printer impossible ...

Страница 81: ...reless settings on the printer Note This menu item appears only in network printers or printers connected to print servers Wi Fi Direct Connected Clients Print a page that shows the list of devices that are connected to the printer using Wi Fi Direct Note This menu item appears only when Enable Wi Fi Direct is set to On Help Menu item Description Print All Guides Prints all the guides Connection G...

Страница 82: ...sample pages to identify and correct print quality defects Printing the Menu Settings Page From the control panel navigate to Settings Reports Menu Settings Page For non touch screen printer models press to navigate through the settings Understanding the printer menus 82 ...

Страница 83: ...te to Settings Device Maintenance Out of Service Erase Sanitize all information on nonvolatile memory For non touch screen printer models press to navigate through the settings 2 Depending on your printer model select ERASE or Continue 3 Follow the instructions on the display Erasing printer hard disk memory 1 From the control panel navigate to Settings Device Maintenance Out of Service Erase Sani...

Страница 84: ...Factory Defaults For non touch screen printer models press to navigate through the settings 2 In the Restore Settings menu select the settings that you want to restore 3 Select RESTORE 4 Follow the instructions on the display Statement of Volatility Type of memory Description Volatile memory The printer uses standard random access memory RAM to buffer temporarily user data during simple print and ...

Страница 85: ...removed from your premises for service The printer is sold to another organization Disposing of a printer hard disk Degaussing Flushes the hard disk with a magnetic field that erases stored data Crushing Physically compresses the hard disk to break component parts and render them unreadable Milling Physically shreds the hard disk into small metal bits Note To guarantee that all data are completely...

Страница 86: ...work Ports Wireless For non touch screen printer models press to navigate through the settings 2 Select Setup On Printer Panel and then follow the instructions on the display Note For Wi Fi network ready printer models a prompt for Wi Fi network setup appears during initial setup Connecting the printer to a wireless network using Wi Fi Protected Setup WPS Before you begin make sure that The access...

Страница 87: ...ght digit PIN and then save the changes Connecting a mobile device to the printer wireless network 1 Enable Wi Fi Direct in the printer From the home screen navigate to Settings Network Ports Wireless Enable Wi Fi Direct For non touch screen printer models press to navigate through the settings Notes The Wi Fi Direct SSID and password are generated automatically To view the Wi Fi Direct SSID and p...

Страница 88: ...to the electrical outlet and then turn on the printer CAUTION POTENTIAL INJURY To avoid the risk of fire or electrical shock connect the power cord to an appropriately rated and properly grounded electrical outlet that is near the product and easily accessible Ordering parts and supplies To order parts and supplies contact the place where you purchased the printer Note All life estimates for print...

Страница 89: ... disable it to load the web page correctly 2 Click Settings Device Notifications 3 From the Supplies menu click Custom Supply Notifications 4 Select a notification for each supply item 5 Apply the changes Replacing parts and supplies Replacing the toner cartridge 1 Open door A Warning Potential Damage To prevent damage from electrostatic discharge touch any exposed metal frame of the printer befor...

Страница 90: ... or the manufacturer s authorized replacement CAUTION POTENTIAL INJURY When moving the printer follow these guidelines to avoid personal injury or printer damage Make sure that all doors and trays are closed Turn off the printer and then unplug the power cord from the electrical outlet Disconnect all cords and cables from the printer If the printer has separate floor standing optional trays or out...

Страница 91: ...When shipping the printer use the original packaging or contact the place where you purchased the printer Saving energy and paper Configuring the power save mode settings Sleep mode 1 From the home screen touch Settings Device Power Management Timeouts Sleep Mode 2 Specify the amount of time that the printer stays idle before it enters Sleep Mode Hibernate mode 1 From the home screen touch Setting...

Страница 92: ...ing is the default setting in the print driver Print multiple pages on a single sheet of paper Use the preview feature to see how the document looks like before printing it Print one copy of the document to check its content and format for accuracy Maintaining the printer 92 ...

Страница 93: ... the printer is printing Load it before printing or wait for a prompt to load it Do not load too much paper Make sure the stack height is below the maximum paper fill indicator Do not slide the paper into the tray Load paper as shown in the illustration Make sure the guides in the tray or the multipurpose feeder are properly positioned and are not pressing tightly against the paper or envelopes Cl...

Страница 94: ...s a jam in the mailbox bin For example if you are printing on a legal size paper and the bin extender is set to letter size then a jam occurs If the bin extender is longer than the size of the paper you are printing on then the edges become uneven and the paper is not stacked properly For example if you are printing on a letter size paper and the bin extender is set to legal size then the paper do...

Страница 95: ... and type are set correctly on the computer or printer control panel Store paper per manufacturer recommendations Identifying jam locations Notes When Jam Assist is set to On the printer flushes blank pages or pages with partial prints after a jammed page has been cleared Check your printed output for blank pages When Jam Recovery is set to On or Auto the printer reprints jammed pages Clearing jam...

Страница 96: ... 1 Finisher or output option bin 2 Standard bin 3 Door A 4 Multipurpose feeder 5 Trays 6 Finisher or output option rear door Door H Door K Door L Door N Door P 7 Door C 8 Stapler door Door F Door G Clearing jams 96 ...

Страница 97: ...hat all paper fragments are removed 3 Insert the tray Paper jam in door A 1 Open door A Warning Potential Damage To prevent damage from electrostatic discharge touch any exposed metal frame of the printer before accessing or touching interior areas of the printer Clearing jams 97 ...

Страница 98: ...l Damage Do not expose the imaging unit to direct light for more than 10 minutes Extended exposure to light may cause print quality problems Warning Potential Damage Do not touch the photoconductor drum Doing so may affect the quality of future print jobs Clearing jams 98 ...

Страница 99: ...4 Pull out the duplex unit 5 Remove the jammed paper Note Make sure that all paper fragments are removed 6 Insert the duplex unit 7 Insert the imaging unit Clearing jams 99 ...

Страница 100: ...from a hot component allow the surface to cool before touching it Warning Potential Damage To prevent damage from electrostatic discharge touch any exposed metal frame of the printer before accessing or touching interior areas of the printer 2 Remove the jammed paper from any of the following areas Note Make sure that all paper fragments are removed Clearing jams 100 ...

Страница 101: ... Fuser area Below the fuser area Duplex area 3 Close the door Paper jam in the standard bin Remove the jammed paper Note Make sure that all paper fragments are removed Clearing jams 101 ...

Страница 102: ...ipurpose feeder 1 Remove paper from the multipurpose feeder 2 Remove the jammed paper Note Make sure that all paper fragments are removed 3 Flex fan and align the paper edges before loading 4 Reload paper Clearing jams 102 ...

Страница 103: ... Remove the jammed paper Note Make sure that all paper fragments are removed 3 Close the door Paper jam in the high capacity output expander 1 Open door L 2 Remove the jammed paper Note Make sure that all paper fragments are removed Clearing jams 103 ...

Страница 104: ...3 Close the door Paper jam in the 4 bin mailbox Paper jam in door N 1 Open door N 2 Remove the jammed paper Note Make sure that all paper fragments are removed Clearing jams 104 ...

Страница 105: ... bin Remove the jammed paper Note Make sure that all paper fragments are removed Paper jam in the staple finisher Paper jam in door H 1 Open door H 2 Remove the jammed paper Note Make sure that all paper fragments are removed Clearing jams 105 ...

Страница 106: ...in Remove the jammed paper Note Make sure that all paper fragments are removed Paper jam in the staple hole punch finisher Paper jam in door P 1 Open door P 2 Remove the jammed paper Note Make sure that all paper fragments are removed Clearing jams 106 ...

Страница 107: ...Close the door Paper jam in the staple hole punch finisher bin Remove the jammed paper Note Make sure that all paper fragments are removed Staple jam in the staple finisher 1 Open door F Clearing jams 107 ...

Страница 108: ...2 Remove the staple cartridge holder 3 Remove the loose staples Clearing jams 108 ...

Страница 109: ... bracket Note If the staples are at the rear of the cartridge then shake the cartridge downward to bring the staples near the metal bracket 5 Insert the staple cartridge holder until it clicks into place 6 Close the door Clearing jams 109 ...

Страница 110: ...Staple jam in the staple hole punch finisher 1 Depending on the staple jam location open either door F or door G 2 Remove the staple cartridge holder Clearing jams 110 ...

Страница 111: ...he loose staples 4 Press the staples against the metal bracket Note If the staples are at the rear of the cartridge then shake the cartridge downward to bring the staples near the metal bracket Clearing jams 111 ...

Страница 112: ...5 Insert the staple cartridge holder until it clicks into place 6 Close the door Clearing jams 112 ...

Страница 113: ...ods such as 123 123 123 123 If you are using a proxy server then temporarily disable it to load the web page correctly 2 Click Settings Device Notifications E mail Alerts Setup 3 From the E mail Setup section configure the settings 4 Click Save Network connection problems Cannot open Embedded Web Server Action Yes No Step 1 Check if the printer is on Is the printer on Go to step 2 Turn on the prin...

Страница 114: ...cable connections secure Go to step 6 Secure the cable connections Step 6 Check if the web proxy servers are disabled Are the web proxy servers disabled Go to step 7 Contact your administrator Step 7 Access the Embedded Web Server Did the Embedded Web Server open The problem is solved Contact your dealer Unable to read flash drive Action Yes No Step 1 Check if the printer is not busy processing an...

Страница 115: ...B Enable USB Port For non touch screen printer models press to navigate through the settings Checking the printer connectivity 1 Print the Network Setup Page From the control panel navigate to Settings Reports Network Network Setup Page For non touch screen printer models press to navigate through the settings 2 Check the first section of the page and confirm that the status is connected If the st...

Страница 116: ...e of the printer and its imaging components All life indicators are designed to function with supplies and parts from the printer manufacturer and may deliver unpredictable results if third party supplies or parts are used Imaging component usage beyond the intended life may damage your printer or associated components Warning Potential Damage Use of third party supplies or parts can affect warran...

Страница 117: ...Does the envelope seal when printing Contact your dealer The problem is solved Collated printing does not work Action Yes No Step 1 a From the control panel navigate to Settings Print Layout Collate On 1 2 1 2 1 2 For non touch screen printer models press to navigate through the settings b Print the document Is the document collated correctly The problem is solved Go to step 2 Step 2 a From the do...

Страница 118: ...ys c Print the document Do the trays link correctly The problem is solved Go to step 3 Step 3 a Make sure that Tray Linking is set to Automatic For more information see Linking trays on page 28 b Print the document Do the trays link correctly The problem is solved Contact your dealer Paper frequently jams Action Yes No Step 1 a Remove the tray b Check if paper is loaded correctly Notes Make sure t...

Страница 119: ...e due to high humidity Store paper in its original wrapper until you are ready to use it b Print the document Do paper jams occur frequently Contact your dealer The problem is solved Jammed pages are not reprinted Action Yes No a From the control panel navigate to Settings Device Notifications Jam Content Recovery For non touch screen printer models press to navigate through the settings b In the ...

Страница 120: ...gate to Settings Troubleshooting Print Quality Test Pages For non touch screen printer models press to navigate through the settings Action Yes No Step 1 a Check if the printer is using a genuine and supported toner cartridge Note If the cartridge is not supported then install a supported one b Print the document Is the print dark Go to step 2 The problem is solved Troubleshooting 120 ...

Страница 121: ...g on the printer control panel Navigate to Settings Paper Tray Configuration Paper Size Type b Print the document Is the print dark Go to step 4 The problem is solved Step 4 Check if the paper has texture or rough finishes Are you printing on textured or rough paper Go to step 5 Go to step 6 Step 5 a Replace textured paper with plain paper b Print the document Is the print dark Go to step 6 The pr...

Страница 122: ...lines not printed correctly Go to step 2 The problem is solved Step 2 a Adjust the print quality settings 1 From the control panel navigate to Settings Print Quality Pixel Boost Fonts 2 Adjust Toner Darkness to 7 From the control panel navigate to Settings Print Quality Toner Darkness b Print the document Are fine lines not printed correctly Contact your dealer The problem is solved Folded or wrin...

Страница 123: ...The problem is solved Step 3 a Depending on your operating system specify the paper type from the Printing Preferences or Print dialog Notes Make sure that the setting matches the paper loaded You can also change the setting on the printer control panel Navigate to Settings Paper Tray Configuration Paper Size Type b Print the document Is the paper folded or wrinkled Contact your dealer The problem...

Страница 124: ...ts Go to step 3 The problem is solved Step 3 a Depending on your operating system specify the paper type from the Printing Preferences or Print dialog Notes Make sure that the setting matches the paper loaded You can also change the setting on the printer control panel Navigate to Settings Paper Tray Configuration Paper Size Type b Print the document Does gray background appear on prints Contact y...

Страница 125: ...gs Paper Tray Configuration Paper Size Type b Print the document Are the margins correct The problem is solved Contact your dealer Light print Note Before solving the problem print the Print Quality Test Pages From the control panel navigate to Settings Troubleshooting Print Quality Test Pages For non touch screen printer models press to navigate through the settings Action Yes No Step 1 a Check i...

Страница 126: ...lso change the setting on the printer control panel Navigate to Settings Paper Tray Configuration Paper Size Type b Print the document Is the print light Go to step 4 The problem is solved Step 4 Check if the print resolution is set to 600 dpi a From the control panel navigate to Settings Print Quality Print Resolution b Print the document Is the print light Go to step 5 The problem is solved Step...

Страница 127: ... b Print the document Is the print mottled Go to step 2 The problem is solved Step 2 Check the printer for leaked toner contamination Is the printer free of leaked toner Go to step 3 Contact your dealer Step 3 Check the status of the imaging unit From the control panel navigate to Status Supplies Supplies Is the imaging unit near end of life Contact your dealer Contact your dealer Paper curl Actio...

Страница 128: ...int on the other side of the paper a Remove paper flip it over and then reload paper b Print the document Is the paper curled Go to step 4 The problem is solved Step 4 a Load paper from a fresh package Note Paper absorbs moisture due to high humidity Store paper in its original wrapper until you are ready to use it b Print the document Is the paper curled Contact your dealer The problem is solved ...

Страница 129: ...dealer The problem is solved Solid black pages Note Before solving the problem print the Print Quality Test Pages From the control panel navigate to Settings Troubleshooting Print Quality Test Pages For non touch screen printer models press to navigate through the settings Action Yes No a Check if the printer is using a genuine and supported toner cartridge Note If the toner cartridge is not suppo...

Страница 130: ... one b Print the document Are text or images cut off Contact your dealer The problem is solved Toner easily rubs off Note Before solving the problem print the Print Quality Test Pages From the control panel navigate to Settings Troubleshooting Print Quality Test Pages For non touch screen printer models press to navigate through the settings Action Yes No Step 1 a Check if the printer is using a g...

Страница 131: ...the Print Quality Test Pages From the control panel navigate to Settings Troubleshooting Print Quality Test Pages For non touch screen printer models press to navigate through the settings Action Yes No Step 1 a Check if the printer is using a genuine and supported toner cartridge Note If the cartridge is not supported then install a supported one b Print the document Do horizontal light bands app...

Страница 132: ...ocument Do vertical light bands appear on prints Contact your dealer The problem is solved Vertical white lines Note Before solving the problem print the Print Quality Test Pages From the control panel navigate to Settings Troubleshooting Print Quality Test Pages For non touch screen printer models press to navigate through the settings Action Yes No Step 1 a Check if the printer is using a genuin...

Страница 133: ...odels press to navigate through the settings Action Yes No a Check if the printer is using a genuine and supported toner cartridge Note If the toner cartridge is not supported then install a supported one b Print the document Do vertical dark bands appear on prints Contact your dealer The problem is solved Vertical dark lines or streaks Note Before solving the problem print the Print Quality Test ...

Страница 134: ...blem is solved Vertical dark streaks with print missing Contact your dealer Repeating defects Contact your dealer Confidential and other held documents do not print Action Yes No Step 1 a From the control panel check if the documents appear in the Held Jobs list Note If the documents are not listed then print the documents using the Print and Hold options b Print the documents Are the documents pr...

Страница 135: ...documents printed The problem is solved Go to step 4 Step 4 a Delete some held jobs to free up printer memory b Print the documents Are the documents printed The problem is solved Contact your dealer Slow printing Action Yes No Step 1 Make sure that the printer cable is securely connected to the printer and to the computer print server option or other network device Is the printer printing slow Go...

Страница 136: ...nt the document Is the printer printing slow Go to step 5 The problem is solved Step 5 a Depending on your operating system specify the paper type from the Printing Preferences or Print dialog Notes Make sure that the setting matches the paper loaded You can also change the setting on the printer control panel Navigate to Settings Paper Tray Configuration Paper Size Type For non touch screen print...

Страница 137: ...e printer is not overheating Notes Allow the printer to cool down after a long print job Observe the recommended ambient temperature for the printer For more information see Selecting a location for the printer on page 8 b Print the document Is the printer printing slow Contact your dealer The problem is solved Print jobs do not print Action Yes No Step 1 a From the document you are trying to prin...

Страница 138: ...esponding Action Yes No Step 1 Check if the power cord is connected to the electrical outlet CAUTION POTENTIAL INJURY To avoid the risk of fire or electrical shock connect the power cord to an appropriately rated and properly grounded electrical outlet that is near the product and easily accessible Is the printer responding The problem is solved Go to step 2 Step 2 Check if the electrical outlet i...

Страница 139: ...then turn on the printer Is the printer responding The problem is solved Contact your dealer Adjusting toner darkness 1 From the control panel navigate to Settings Print Quality Toner Darkness For non touch screen printer models press to navigate through the settings 2 Adjust the setting 3 Apply the changes Job prints from the wrong tray or on the wrong paper Action Yes No Step 1 a Check if you ar...

Страница 140: ...he settings match the paper loaded c Print the document Is the document printed on the correct paper The problem is solved Go to step 3 Step 3 a Check if the trays are linked For more information see Linking trays on page 28 b Print the document Is the document printed from the correct tray The problem is solved Contact your dealer Contacting your dealer Before contacting your dealer make sure to ...

Страница 141: ...l be incorporated in later editions Improvements or changes in the products or the programs described may be made at any time GOVERNMENT END USERS The Software Program and any related documentation are Commercial Items as that term is defined in 48 C F R 2 101 Computer Software and Commercial Computer Software Documentation as such terms are used in 48 C F R 12 212 or 48 C F R 227 7202 as applicab...

Страница 142: ...或元件會發熱 請當心 為避免被發熱表面或元件燙傷的危險 請先讓該表面或元件冷卻之後再觸摸 Hinweis zum GS Zeichen Modell 295 695 Gerätetyp 4064 Noise emission levels The following measurements were made in accordance with ISO 7779 and reported in conformance with ISO 9296 Note Some modes may not apply to your product 1 meter average sound pressure dBA Printing One sided 57 4064 295 58 4064 695 Two sided 56 4064 295 58 4064 695 Ready 14 Waste ...

Страница 143: ...r as normal household waste Consult your local authorities for disposal and recycling options Taiwan waste dry cell batteries recycle logo notice According to Article 15 of the Waste Disposal Act in the announcement of Taiwan EPA the producing or the importing manufacturer is responsible for recycling clearance and disposal of dry cell batteries batteries packaged with products and sold given and ...

Страница 144: ...r the Regulatory information section 單元 Unit 限用物質及其化學符號 Restricted substances and their chemical symbols 鉛 Lead Pb 汞 Mercury Hg 鎘 Cadmium Cd 六價鉻 Hexavalent chromium Cr 6 多溴聯苯 Polybrominated biphenyl PBB 多溴二苯醚 Polybrominated diphenylether PBDE 電路板 Circuit boards 電源供應器 Power supply 電源線 Power cords 連接器 Connectors 機械組件 軸 滾 軸 Mechanical assemblies shafts rollers 機械組件 馬達 Mechanical assemblies motors 機械組...

Страница 145: ...y notice This symbol identifies static sensitive parts Do not touch the areas near these symbols without first touching a metal surface in an area away from the symbol To prevent damage from electrostatic discharge when performing maintenance tasks such as clearing paper jams or replacing supplies touch any exposed metal frame of the printer before accessing or touching interior areas of the print...

Страница 146: ...rgía consumida 4 93 páginas Wh 4064 295 5 06 páginas Wh 4064 695 Laser notice The printer is certified in the U S to conform to the requirements of DHHS 21 CFR Chapter I Subchapter J for Class I 1 laser products and elsewhere is certified as a Class I laser product conforming to the requirements of IEC 60825 1 2014 Class I laser products are not considered to be hazardous The laser system and prin...

Страница 147: ...iods of inactivity The Sleep Mode is automatically engaged after this product is not used for a specified period of time called the Sleep Mode Timeout Factory default Sleep Mode Timeout for this product in minutes 15 By using the configuration menus the Sleep Mode Timeout can be modified between 1 minute and 120 minutes If the print speed is less than or equal to 30 pages per minute then you can s...

Страница 148: ...n recycled paper and thin 64 g m2 paper that meet the standard EN12281 2002 and similar quality standards you can reduce the impact on the environment Saving energy The ENERGY STAR program is a voluntary scheme to promote the development and purchase of energy efficient models which help to minimize environmental impact Products which meet the stringent requirements of the ENERGY STAR program for ...

Страница 149: ...dustrie Canada Pour réduire les interférences radio potentielles auprès d autres utilisateurs le type d antenne et son gain doivent être choisis de telle sorte que la puissance isotrope rayonnée équivalente PIRE ne soit pas supérieure à ce qui est nécessaire pour assurer la réussite de la communication Cet appareil est conforme aux normes RSS exemptes de licence d Industrie Canada Son fonctionneme...

Страница 150: ... products and their components are per the symbol shown here unless otherwise marked Certain components may have a different EFUP and so are marked to reflect such The Environmentally Friendly Use Period is valid only when the product is operated under the conditions defined in the product manual European Community EC directives conformity This product is in conformity with the protection requirem...

Страница 151: ...ion FCC compliance information statement This product has been tested and found to comply with the limits for a Class A digital device pursuant to Part 15 of the FCC Rules Operation is subject to the following two conditions 1 this device may not cause harmful interference and 2 this device must accept any interference received including interference that may cause undesired operation The FCC Clas...

Страница 152: ...ns Any questions regarding this compliance information statement should be directed to Director of Lexmark Technology Services Lexmark International Inc 740 West New Circle Road Lexington KY 40550 Telephone 859 232 2000 E mail regulatory lexmark com BSMI EMC notice Warning to user This is a Class A ITE In a residential area this product may cause radio interference in which case the user may be re...

Страница 153: ...the approximation and harmonization of the laws of the Member States relating to electromagnetic compatibility safety of electrical equipment designed for use within certain voltage limits and on the restrictions of use of certain hazardous substances in electrical and electronic equipment A declaration of conformity to the requirements of the Directives is available upon request from Lexmark Inte...

Страница 154: ...A limits and immunity requirements of EN55024 This product is not intended to be used in residential domestic environments This is a Class A product In a domestic environment this product may cause radio interference in which case the user may be required to take adequate measures Notices 154 ...

Страница 155: ...r 113 configuring Universal paper 19 connecting the mobile device to the printer wireless network 87 connecting the printer to a wireless network 86 connecting to a wireless network using PIN method 86 using Push Button method 86 conserving supplies 92 contacting your dealer 140 contacts adding 17 deleting 18 editing 17 creating bookmarks 16 creating folders for bookmarks 16 crooked print 128 D de...

Страница 156: ... PCL 56 PDF 56 PostScript 56 Power Management 46 Preferences 43 Print 81 Quality 53 Remote Operator Panel 44 Restore Factory Defaults 47 Restrict external network access 72 Schedule USB Devices 75 Security Audit Log 75 Setup 53 SNMP 67 Solutions LDAP Settings 80 TCP IP 65 ThinPrint 71 Tray Configuration 59 Troubleshooting 82 Universal Setup 60 USB 71 Visible Home Screen Icons 51 Wireless 63 Wi Fi ...

Страница 157: ...ace cartridge printer region mismatch 116 Unformatted flash detected 116 printer ports 11 printer settings restoring factory default 84 printer software installing 12 printer status 13 printer wireless network connecting the mobile device to 87 printing font sample list 41 from a computer 37 from a flash drive 38 from a mobile device 37 38 from an Android device 37 Menu Settings Page 82 using Goog...

Страница 158: ... wrinkled paper 122 gray background on prints 123 horizontal light bands 131 light print 125 mottled print and dots 126 paper curl 127 repeating defects 134 solid black pages 129 text or images cut off 130 toner easily rubs off 130 vertical dark bands 133 vertical dark lines or streaks 133 vertical dark streaks with print missing 134 vertical light bands 132 vertical white lines 132 white pages 12...

Отзывы: