84
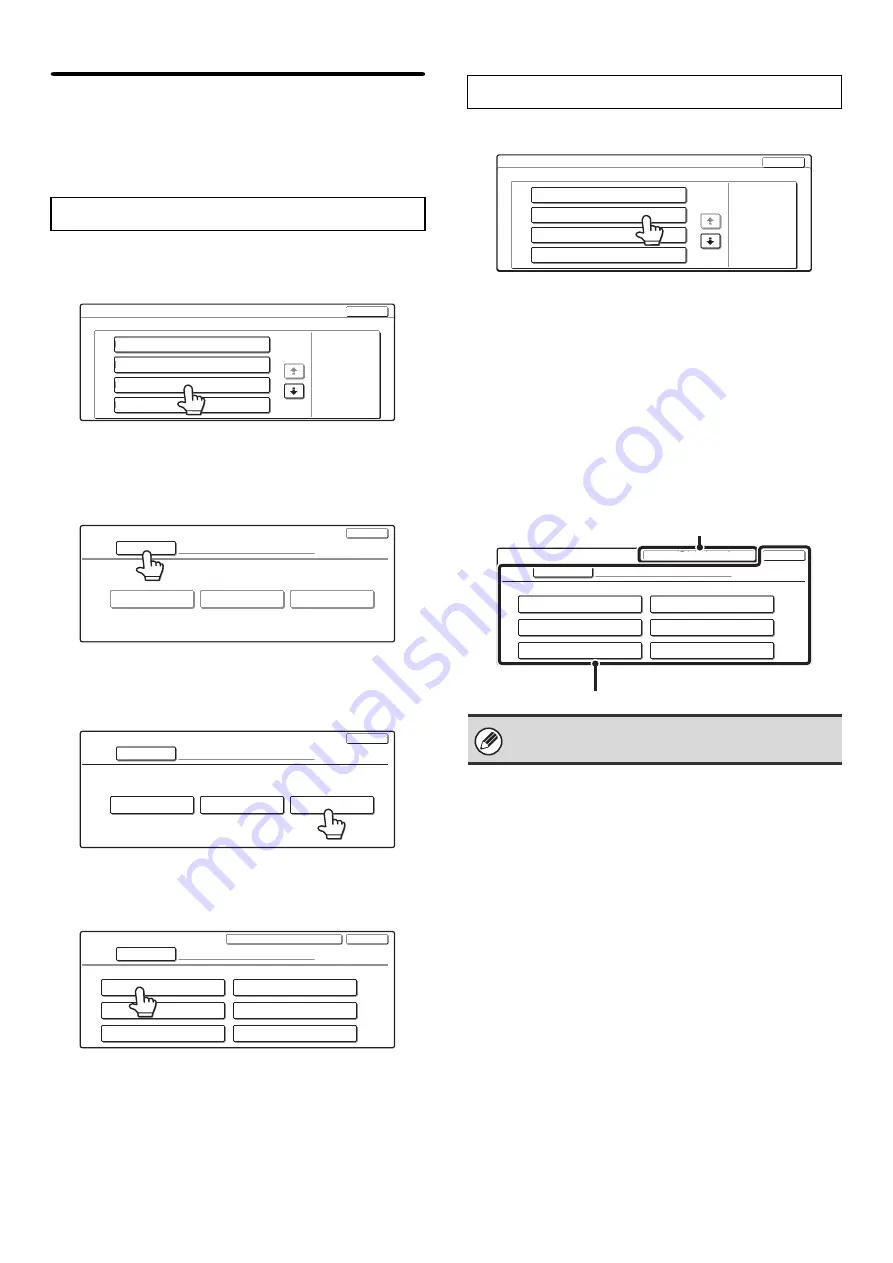
Authority Group Registration
Use this to store groups of user authority settings. The
authority of each user is specified by selecting one of
these stored groups when the user is stored.
Up to 8 groups can be stored.
1
Select a group that is blank.
2
Touch the [Group Name] key and enter a
group name.
Up to 32 characters can be entered for the name. After
you have entered the name, touch the [OK] key.
3
Touch the authority group key that you
wish to use as a template for the new
group.
4
Touch the items and specify the settings.
For more information on the settings, see "
and factory default settings of template groups
5
Touch the [OK] key.
1
Select a stored group.
2
Edit or delete the group.
To edit
(A) Touch the desired items and edit them in the same
way as they were stored. When finished, touch the
[OK] key.
To delete
(B) Touch the [Return to the Defaults] key. The template
selection screen will appear. Touch one of the keys. A
message will appear. Touch the [Yes] key. The
authority group setting of users that specified this
group will change to the selected factory-stored
authority group.
Storing groups
Authority Group / Register/Clear
Select the authority group to be registered/cleared.
No.01 ABC Group
No.02 DEF Group
No.03
No.04
1/2
OK
Authority Group Registration
Select the authority group to be the registration model.
Admin
User
Guest
Group Name
No.03
Cancel
Authority Group Registration
Select the authority group to be the registration model.
GHI Group
Admin
User
Guest
Group Name
No.03
Cancel
Authority Group Registration
Select a function setting up authority.
GHI Group
Copy
Image Send
Common Functions
Printer
Document Filing
System Settings
Group Name
No.03
OK
Return to the Defaults
Edit or delete the group.
For the procedure for entering text, see "6.
ENTERING TEXT" in the User's Guide.
Authority Group / Register/Clear
Select the authority group to be registered/cleared.
No.01 ABC Group
No.02 DEF Group
No.03
No.04
1/2
OK
Authority Group Registration
Select a function setting up authority.
DEF Group
Copy
Image Send
Common Functions
Printer
Document Filing
System Settings
Group Name
No.02
Return to the Defaults
OK
(B)
(A)
Содержание MX 3501N - Color Laser - Copier
Страница 1: ...User s Guide MX 3500N MX 3501N MX 4500N MX 4501N MX 2300N MX 2700N MODEL ...
Страница 2: ...System Settings Guide MX 3500N MX 3501N MX 4500N MX 4501N MX 2300N MX 2700N MODEL ...
Страница 127: ...MX4500 US SYS Z2 System Settings Guide MX 3500N MX 3501N MX 4500N MX 4501N MX 2300N MX 2700N MODEL ...
Страница 173: ... mx4500_us_ins book 44 ページ 2005年10月31日 月曜日 午前11時57分 ...
Страница 174: ... mx4500_us_ins book 45 ページ 2005年10月31日 月曜日 午前11時57分 ...
Страница 176: ...Document Filing Guide MX 3500N MX 3501N MX 4500N MX 4501N MX 2300N MX 2700N MODEL ...
Страница 222: ...MX4500 US FIL Z1 Document Filing Guide MX 3500N MX 3501N MX 4500N MX 4501N MX 2300N MX 2700N MODEL ...
Страница 223: ...Scanner Guide MX 3500N MX 3501N MX 4500N MX 4501N MX 2300N MX 2700N MODEL ...
Страница 354: ...MX4500 US SCN Z2 Scanner Guide MX 3500N MX 3501N MX 4500N MX 4501N MX 2300N MX 2700N MODEL ...
Страница 355: ...Printer Guide MX 3500N MX 3501N MX 4500N MX 4501N MX 2300N MX 2700N MODEL ...
Страница 370: ...15 2 Select 2 sided printing 1 Select 2 Sided Book or 2 Sided Tablet 2 Click the OK button 3 Start printing 2 1 ...
Страница 415: ...MX4500 US PRT Z2 Printer Guide MX 3500N MX 3501N MX 4500N MX 4501N MX 2300N MX 2700N MODEL ...
Страница 416: ...Facsimile Guide MX FXX1 MODEL ...
Страница 605: ...MX FXX1 MODEL MX4500 US FAX Z2 Facsimile Guide ...
Страница 606: ...Copier Guide MX 3500N MX 3501N MX 4500N MX 4501N MX 2300N MX 2700N MODEL ...
Страница 775: ...MX4500 US CPY Z1 Copier Guide MX 3500N MX 3501N MX 4500N MX 4501N MX 2300N MX 2700N MODEL ...
Страница 843: ...MX4500 US USR Z1 User s Guide MX 3500N MX 3501N MX 4500N MX 4501N MX 2300N MX 2700N MODEL ...


