11
BASE SCREENS
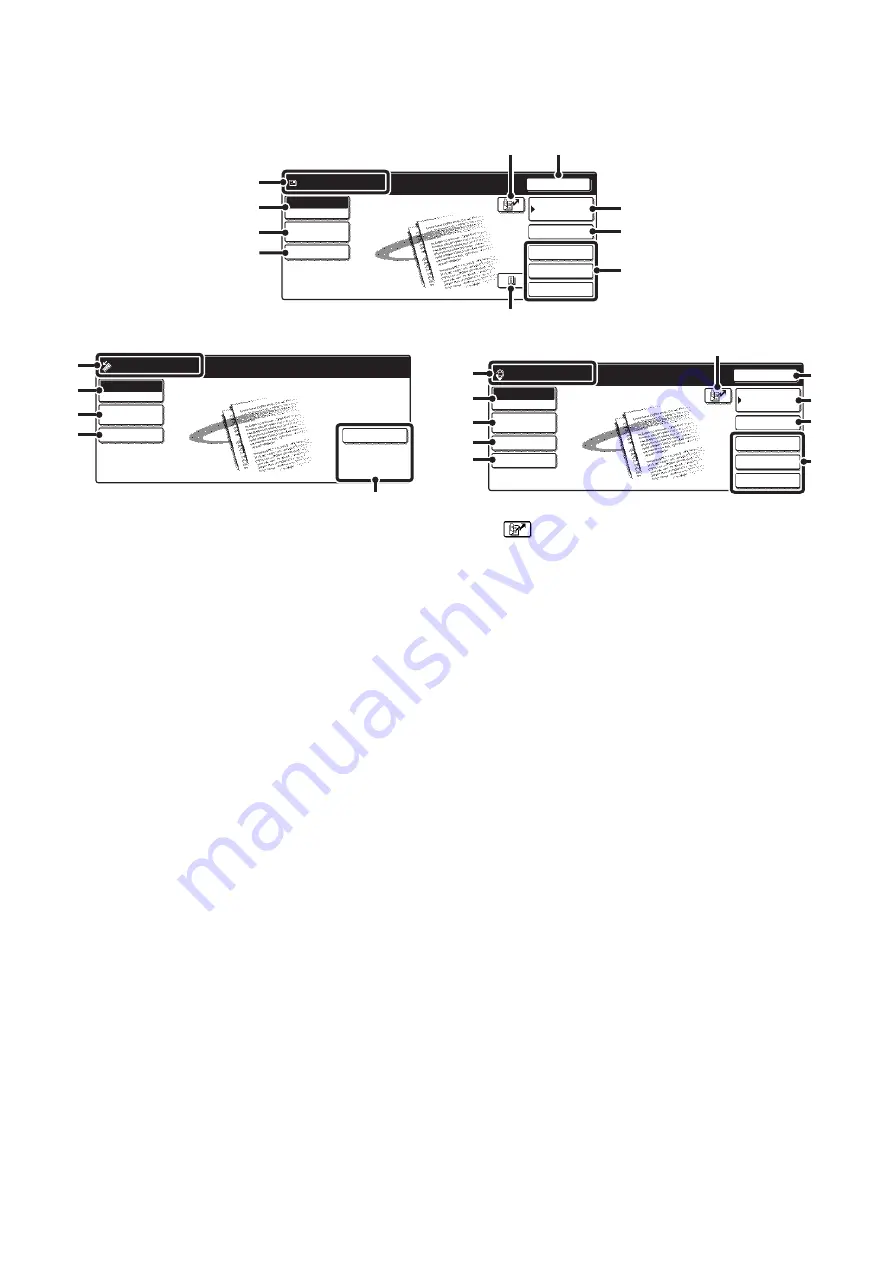
Settings are selected in the base screen of each mode.
(1)
Various messages are displayed here.
The icon of the selected mode appears on the left.
(2)
[Mode Switch] key
Use this key to change the mode of the image send
function.
☞
(page 10)
(3)
[Image Settings] key
Touch this key to select scan settings (exposure,
resolution, original size, color mode, format, special
modes).
☞
(page 13)
(4)
[Send Settings] key
Touch this key to change the subject, file name, reply-to,
or message text, which have been previously stored in
the Web page.
☞
Scan mode:
CHANGING THE SUBJECT,
FILE NAME, REPLY-TO, AND
MESSAGE
(page 42)
Internet fax mode:
CHANGING THE SUBJECT, FILE
NAME, AND MESSAGE
(5)
key
Touch this key to search for a destination using a search
number.
*
* 3-digit number assigned to a destination when it is stored.
☞
USING A SEARCH NUMBER TO SPECIFY A
DESTINATION
(page 22)
(6)
[Resend] key / [Next Address] key
The destinations of the most recent eight transmissions
by Scan to E-mail, fax and/or Internet fax are stored. To
select one of these destinations, touch the desired
destination. After a destination is selected, this key
changes to the [Next Address] key.
☞
☞
(page 20)
(7)
[Address Book] key
Touch this key to use a one-touch key or a group key.
When the key is touched, the Address Book screen
appears.
☞
SPECIFYING DESTINATIONS IN THE ADDRESS
BOOK
(page 19)
(8)
[Address Entry] key
Touch this key to manually enter an destination address
instead of using a one-touch key.
☞
Quick File
File
Special Modes
Address Entry
Resend
Address Book
Scan
Mode Switch
Send Settings
Ready to send.
Image
Settings
(1)
(2)
(3)
(4)
(8)
(7)
(9)
(10)
(5)
(6)
Special Modes
USB Mem. Scan
Mode Switch
File Name
Ready to send.
Image
Settings
(1)
(2)
(3)
(11)
(9)
Quick File
File
Special Modes
Address Entry
Resend
Address Book
Internet Fax
Mode Switch
Image
Settings
Send Settings
Manual RX
Ready to send.
(1)
(2)
(3)
(6)
(5)
(7)
(8)
(4)
(12)
(9)
Base screen of scan mode
Base screen of USB memory mode
Base screen of Internet fax mode
Содержание MX 3501N - Color Laser - Copier
Страница 1: ...User s Guide MX 3500N MX 3501N MX 4500N MX 4501N MX 2300N MX 2700N MODEL ...
Страница 2: ...System Settings Guide MX 3500N MX 3501N MX 4500N MX 4501N MX 2300N MX 2700N MODEL ...
Страница 127: ...MX4500 US SYS Z2 System Settings Guide MX 3500N MX 3501N MX 4500N MX 4501N MX 2300N MX 2700N MODEL ...
Страница 173: ... mx4500_us_ins book 44 ページ 2005年10月31日 月曜日 午前11時57分 ...
Страница 174: ... mx4500_us_ins book 45 ページ 2005年10月31日 月曜日 午前11時57分 ...
Страница 176: ...Document Filing Guide MX 3500N MX 3501N MX 4500N MX 4501N MX 2300N MX 2700N MODEL ...
Страница 222: ...MX4500 US FIL Z1 Document Filing Guide MX 3500N MX 3501N MX 4500N MX 4501N MX 2300N MX 2700N MODEL ...
Страница 223: ...Scanner Guide MX 3500N MX 3501N MX 4500N MX 4501N MX 2300N MX 2700N MODEL ...
Страница 354: ...MX4500 US SCN Z2 Scanner Guide MX 3500N MX 3501N MX 4500N MX 4501N MX 2300N MX 2700N MODEL ...
Страница 355: ...Printer Guide MX 3500N MX 3501N MX 4500N MX 4501N MX 2300N MX 2700N MODEL ...
Страница 370: ...15 2 Select 2 sided printing 1 Select 2 Sided Book or 2 Sided Tablet 2 Click the OK button 3 Start printing 2 1 ...
Страница 415: ...MX4500 US PRT Z2 Printer Guide MX 3500N MX 3501N MX 4500N MX 4501N MX 2300N MX 2700N MODEL ...
Страница 416: ...Facsimile Guide MX FXX1 MODEL ...
Страница 605: ...MX FXX1 MODEL MX4500 US FAX Z2 Facsimile Guide ...
Страница 606: ...Copier Guide MX 3500N MX 3501N MX 4500N MX 4501N MX 2300N MX 2700N MODEL ...
Страница 775: ...MX4500 US CPY Z1 Copier Guide MX 3500N MX 3501N MX 4500N MX 4501N MX 2300N MX 2700N MODEL ...
Страница 843: ...MX4500 US USR Z1 User s Guide MX 3500N MX 3501N MX 4500N MX 4501N MX 2300N MX 2700N MODEL ...


