background image

MX-3114N  Transit, Installation (using) environment, Note   - i

MX-3114N

6HUYLFH0DQXDO

Transit, Installation (using) environment, Note

1. Installing (use) conditions

Before  installing  the  machine,  check  that  the  following  installing
(use) conditions are satisfied.

If the installing (use) conditions are not satisfied, the machine may
not  display  full  performances,  resulting  in  troubles.  It  may  also
cause safety problems. Therefore, be sure to arrange the installing
(use) conditions before setting up the machine.

A. Transportation space

For installation of a large size machine, be sure to check that the
door size is wide enough before bringing in.

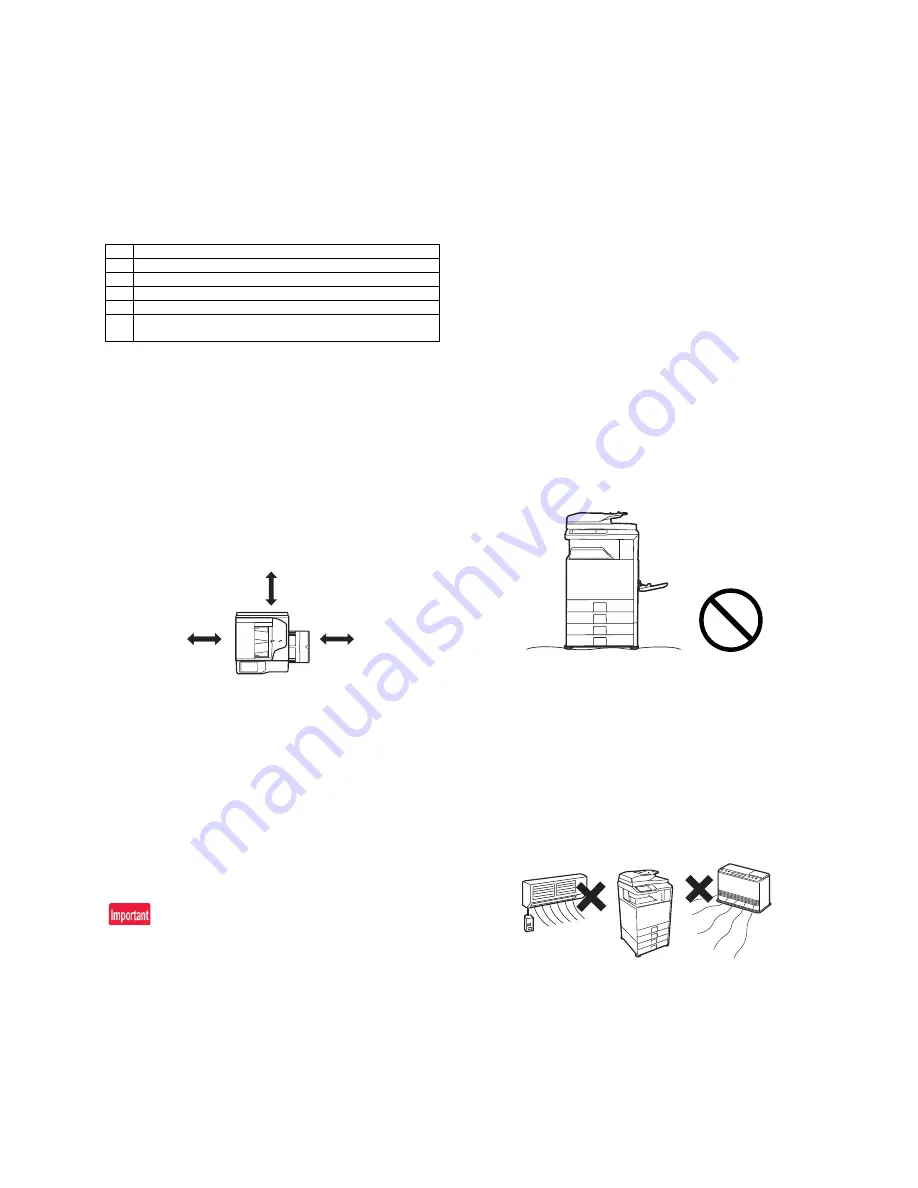
B. Installing space

The following space must be provided around the machine in order
to assure machine performances and proper operations.

If any option is installed, provide the additional space for installing
it.

Adequate  space  must  be  provide  behind  the  machine  for  proper
ventilation  heat  and  dust.  If  not,  the  machine  cannot  exhibit  func-
tions against heat and dust, causing some troubles.

C. Power source (Capacity, voltage, frequency, 

safety, plug)

If  the  power  specifications  are  not  satisfied,  the  machine  cannot
exhibit full performances and may cause safety trouble.

Strictly observe the following specifications.

(1)

Power capacity

Check that the following power capacity is satisfied. If not, addition-
ally provide a power source.

Current capacity

Japan: 20A or more

EX 100V: 15A or more

EX 200V: 10A or more

Check the shape of the power plug of the machine, and insert it into
a power outlet of the acceptable shape.

(2)

Power voltage

Measure the voltage during copying to check that the voltage is in
the range of the specified voltage 

r

10%.

If the voltage is outside the specified range, please have a certified
electrician upgrade the outlet.

(An electrical work is required.)

Use  of  a  step-up  transformer  is  also  available.  In  this  case,  the
capacity must be great enough for the max. power consumption of
the machine.

(3)

Power frequency, waveform

The frequency must be within the range of the specified frequency

r

2%. If power waveform is deformed, a trouble may occur.

(4)

Safety

Be sure to properly ground the machine.

Grounding  (earth  connection)  must  be  performed  before  inserting
the power plug into the power outlet.

When  disconnecting  the  earth  connection,  be  sure  to  disconnect
the power plug from the power outlet in advance.

(5)

Power plug

Check the shape of the power plug of the machine, and insert it into
a power outlet of the acceptable shape.
Power plug stated in power capacity.

D. Floor strength and level

This machine is considerably heavy and becomes heavier with an
option installed.

The floor must be strong enough to safely support the weight of the
machine as well as any installed options.

If the unit is not horizontally installed, the toner density control is not
performed normally, degrading the copy quality.

If not, color shift or image distortion may occur.
To assure proper Image quality, make sure the machine is setting
level.

E. Direct rays of the sun, dust, temperature, 

humidity, gasses, chemicals, vibration

(1)

Temperature and humidity (Environmental 
conditions)

This  machine  is  designed  to  perform  properly  under  the  specified
temperature and humidity. If the temperature and humidity exceeds
the specified range, the machine may not operate properly and or
cause equipment failure.

Especially when the humidity is too high, paper absorbs humidity to
cause a paper jam or dirty copy.

Do not install the machine near a heater, a cooler, or a humidifier.

Condensation may form inside the machine causing multiple trou-
bles. Use enough care for ventilation.

No.

Content

1

Transportation space

2

Installing space

3

Power source (Capacity, fluctuation, safety)

4

Floor strength

5

Direct rays of the sun, dust, temperature, humidity, gases, 
chemicals

11-13/16"
(30cm)

11-13/16"
(30cm)

17-23/32"
(45cm)

Содержание MX-2314N

Страница 1: ... these parts with specified ones for maintaining the safety and performance of the set SHARP CORPORATION This document has been published to be used for after sales service only The contents are subject to change without notice TopPage DIGITAL FULL COLOR MULTIFUNCTIONAL SYSTEM MX 2314N MX 2614N MX 3114N MODEL ...

Страница 2: ...of a step up transformer is also available In this case the capacity must be great enough for the max power consumption of the machine 3 Power frequency waveform The frequency must be within the range of the specified frequency r2 If power waveform is deformed a trouble may occur 4 Safety Be sure to properly ground the machine Grounding earth connection must be performed before inserting the power...

Страница 3: ...ium gas Copy quality may be adversely affected and a trouble may be caused 5 Vibration Avoid installation near a machine which produces vibrations If vibrations are applied to the copier machine copy images may be deflected and a trouble may be caused F Note for handling PWB and electronic parts When handling the PWB and the electronic parts be sure to observe the following precautions in order to...

Страница 4: ...external heating belt Do not leave the fusing roller in contact state for a long time If these items are neglected a trouble may be generated in the copy and print image quality 2 Transit and delivery A Implements facility and manpower It is recommendable to use a forklift for bringing in the machine for safety If no forklift is available man power of two persons is required The machine is conside...

Страница 5: ... country D Lock release 1 Tray rotation plate lock release 1 Pull out the tray Turn the fixing material and remove it Remove the caution label Attach the removed fixing material to the position shown in the figure for future use Close the tray which was pulled out 2 Scanner 2 3 mirror unit lock release 1 Remove the optical unit fixing screw and remove the note label No Name Quantity 1 Developer 4 ...

Страница 6: ...reful not to leave fingerprints or oily dirt on the DV roller sur face 1 Open the front cabinet Slide the lock to release and remove the waste toner box 2 Turn the drum cover securing locks 2 to release and then raise the drum positioning cover 3 While pressing the lever pull out the developing unit to remove 4 Open the cover to remove 5 Loading developer to the developing units Be sure to shake t...

Страница 7: ... There is too much developer The stirring screw cannot be seen Be sure to keep the developing unit level while supplying the developer 9 Insert the developing unit so as not to give a strong shock to the main unit gently Slide the developing unit horizontally into the machine in the direction of the arrow until developing unit locks into place Do not push the unit diagonally as contact with the dr...

Страница 8: ...d the power switch on the operation panel 3 Enter the SIM25 2 mode 4 After entering the simulation close the front cabinet 5 Select K C M Y and then press the EXECUTE button The system then performs the simulation samples the toner den sity control sensor value and sets stores in memory the average sensor detection level as the control level for the ref erence toner density Operating times approx ...

Страница 9: ...s depending on the toner quantity in the toner cartridge uneven distribution of toner and the inside state of the toner cartridge Do not perform operations which interrupt the above operation such as opening the front cover entering the SIM mode and turning OFF ON the power If this precaution is ignored an error of F2 40 43 or F2 64 67 may occur or an overtoner may be caused C Cleaning 1 Cleaning ...

Страница 10: ...paper tray Gently pull the tray out until it stops If paper remains in the tray remove it 2 Adjust the guide plates A and B by squeezing their lock levers and sliding them to match the vertical and horizontal dimen sions of the paper to be loaded The guide plates A and B are slidable Slide each guide plate while squeezing its lock lever Item Description Type Select the type of paper that is loaded...

Страница 11: ... the total counter and the maintenance counter 18 Used to set YES NO of the toner save mode Only in UK and Japan versions For other destination versions this setup is made by the user program 52 Used to set YES NO of counting when non print paper is passed through each counter 53 Used to set YES NO of user calibration permission 65 Used to set the limit number of sheets for stapling No Item SIM 1 ...

Страница 12: ...ous time Display Item Content Display Default NOTE MAIN F C Registration adjustment value main scanning direction Cyan laser writing position F side 1 0 199 0 100 M Registration adjustment value main scanning direction Magenta laser writing position F side 1 0 199 0 100 Y Registration adjustment value main scanning direction Yellow laser writing position F side 1 0 199 0 100 MAIN R C Registration ...

Страница 13: ...sity check in the color copy mode To check the copy color balance and density use the gray test chart UKOG 0162FCZZ and the servicing color test chart UKOG 0326FCZZ UKOG 0326FC11 Set the copy density level to 3 in the Text Printed Photo mode Manual and make a copy At that time all the color balance adjustments in the user adjust ment mode must be set to the default center In addition be sure to us...

Страница 14: ...alance adjustment for each dither Automatic adjustment 4 The color difference in gray balance between the F and th sides is not so great Main machine S M ADJ22 A Sim61 11 ADJ9 B Sim46 74Copy Printer color balance and density adjustment Automatic adjustment Basic adjustment 5 There are no white and black streaks Clean the mirror of the LSU Clean the Main ChargerClean the mirror of the scanner 6 Col...

Страница 15: ...erence in gray balance between the F and th sides is not so great Main machine S M ADJ22 A Sim61 11 ADJ9 B Sim46 74Copy Printer color balance and density adjustment Automatic adjustment Basic adjustment 4 There are no white and black streaks Clean the mirror of the LSU Clean the Main ChargerClean the mirror of the scanner 5 The background density is not so light Main machine S M ADJ9 D16 Sim46 54C...

Страница 16: ...sity changing direction must not be reversed The density level of each color must be almost at the same level Method 2 Use SIM 67 25 to print the color balance adjustment sheet and compare each process CMY black patch color balance and the black patch to check the color balance The print density must be changed gradually from the lighter level to the darker level The density changing direction mus...

Страница 17: ...ding to the user s request and the color balance is registered with SIM63 7 as the service target if the color balance is required to be adjusted select the SERVICE target The copy color balance adjustment is automatically executed and prints the color balance check patch image If there is any streak or unclear print on the printed check pat tern check the print engine for any problems 5 Press EXE...

Страница 18: ...step 1 is automatically performed and the color balance check patch image is printed out If there is any streak or unclear print on the printed check pat tern check the print engine for any problems 8 The initial setting menu of the half tone image correction is dis played Press OK key The initial setting of the half tone image correction is per formed 9 Wait until EXECUTE key is displayed When it...

Страница 19: ...btained perform the manual color balance adjustment ADJ 10C 2 12 Check the printer color balance and density Refer to the item of the printer color balance and density check When satisfactory color balance and density are not obtained from the automatic adjustment by selecting the factory target in procedure 7 change the factory color balance target with SIM 67 26 and repeat the procedures from 1 ...

Отзывы: