


26
REDUCTION/ENLARGEMENT/ZOOM
AUTOMATIC RATIO SELECTION (Auto Image)
This section explains the automatic ratio selection function (Auto Image), which automatically selects the ratio to match
the paper size.
The reduction or enlargement ratio is selected automatically based on the original size and the selected paper size.
1
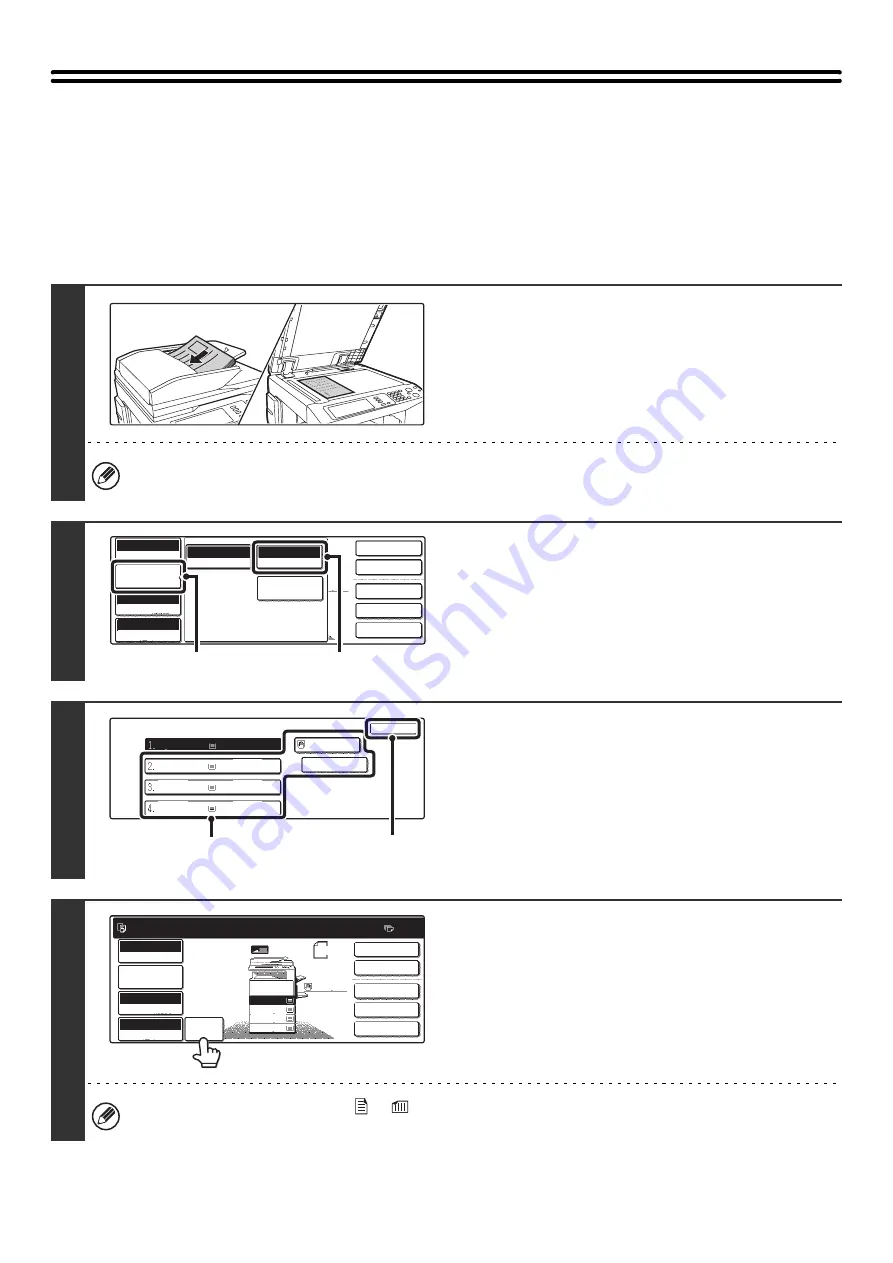
Place the original.
Place the original face up in the document feeder tray, or face
down on the document glass.
Automatic ratio selection cannot be used if the original size or paper size is a non-standard size. If the original size is
a non-standard size, automatic ratio selection cannot be used unless the original size is entered manually.
2
Open the paper settings screen.
(1) Touch the [Job Detail Settings] key.
(2) Touch the [Paper Select] key.
3
Set the paper size.
(1) Touch the tray that has the desired paper
size.
(2) Touch the [OK] key.
When the [OK] key is touched, you will return to the job
detail setting screen. Touch the [Job Detail Setting] key to
return to the base screen of copy mode.
4
Touch the [Auto Image] key.
A suitable ratio for the original size and the selected paper size
will be selected. (The selected ratio will appear in the ratio
display.)
If the message "Rotate original from
to
" is displayed, change the orientation of the original as indicated in the
message.
1
1
2-Sided Copy
Output
Special Modes
File
Quick File
Full Color
Color Mode
Auto
Exposure
100%
Copy Ratio
Job Detail
Settings
8 x18
Plain
Auto
Original
Auto 8 x11
Paper Select
Special Modes
1
/
2
(2)
(1)
Paper Select
OK
Plain
Plain
Plain
Plain
Plain
8 x11
1
/
2
8 x11
1
/
2
8 x11R
1
/
2
8 x14
1
/
2
11x17
(2)
(1)
Ready to scan for copy.
2-Sided Copy
0
Output
Special Modes
File
Quick File
Full Color
Color Mode
Auto
Exposure
100%
Copy Ratio
Original
Auto
Image
8 x11
1
/
2
2.
3.
4.
1.
8 x11R
8 x14
11x17
8 x11
Job Detail
Settings
1
/
2
1
/
2
1
/
2
8 x11
Plain
1
/
2
Содержание MX-2300N Guide
Страница 1: ...User s Guide MX 2300N MX 2700N MODEL ...
Страница 67: ...System Settings Guide MX 2300N MX 2700N MODEL ...
Страница 192: ...Copier Guide MX 2300N MX 2700N MODEL ...
Страница 361: ...Printer Guide MX 2300N MX 2700N MODEL ...
Страница 376: ...15 2 Select 2 sided printing 1 Select 2 Sided Book or 2 Sided Tablet 2 Click the OK button 3 Start printing 2 1 ...
Страница 421: ...Scanner Guide MX 2300N MX 2700N MODEL ...
Страница 552: ...Facsimile Guide MX FXX1 MODEL ...
Страница 741: ...Document Filing Guide MX 2300N MX 2700N MODEL ...