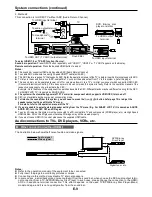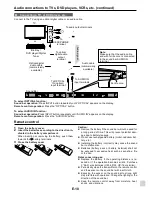
background image

E-11

Remote control (continued)


„

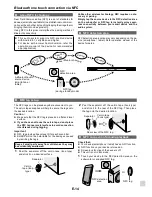
Test of the remote control

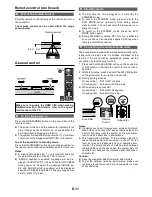
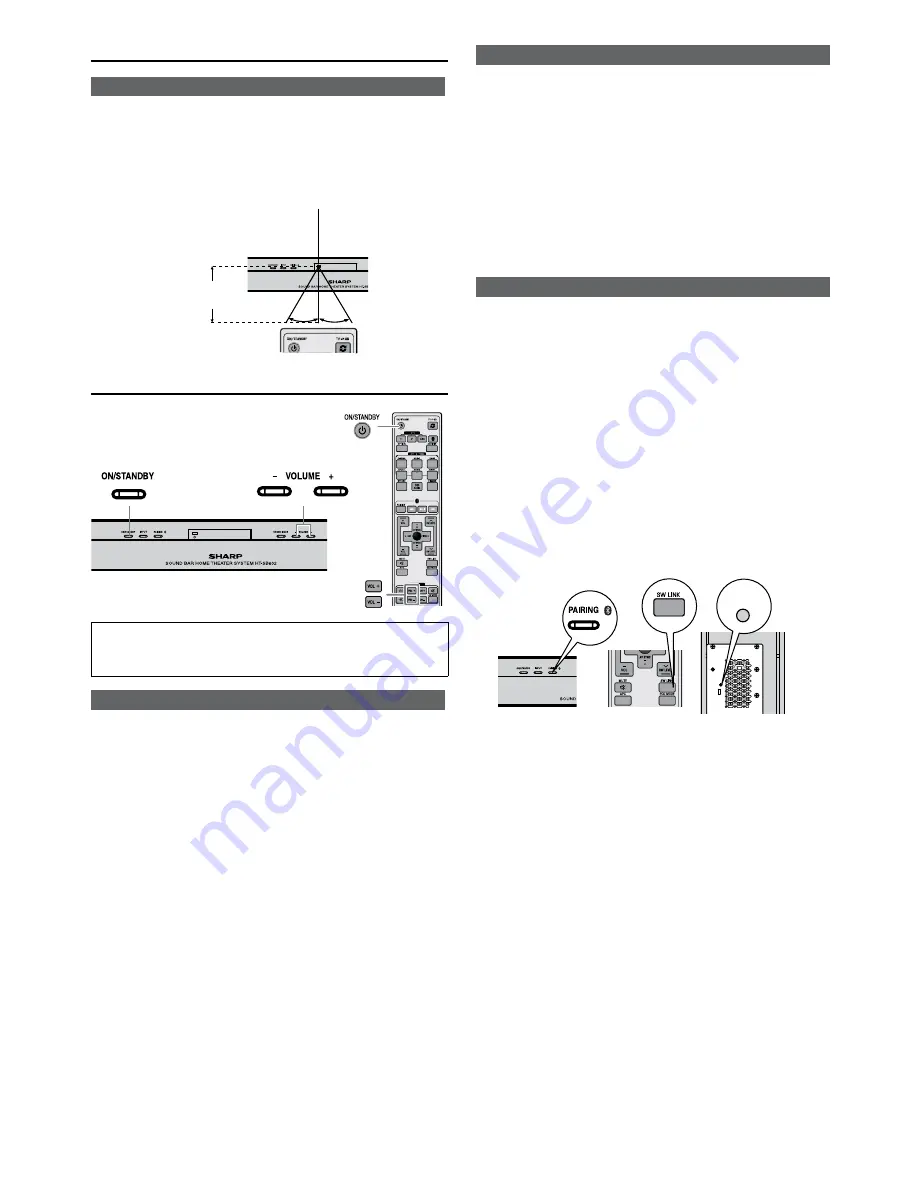
Point the remote control directly at the remote sensor on 

the sound bar.

The remote control can be used within the range 

shown below:

15°

15°

Remote sensor

0.2 m - 6 m

General control

Make sure to enable the HDMI CEC when making 

HDMI connection. For details, refer to the opera-

tion manual of the TV.


„

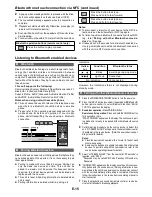
To turn the power on

Press the ON/STANDBY button on the sound bar or the 

remote control.


z

The power turns on and the subwoofer indicator turns 

blue. If the power does not turn on, check whether the 

AC power lead is plugged in properly.


z

The system will automatically power on if TV or similar 

component which supports HDMI CEC, is turned on.

To set the sound bar to standby mode:

Press the ON/STANDBY button again on the sound bar or 

the remote control and the subwoofer indicator turns red.

Notes:


z

A  slight  audio  delay  after  TV  is  turned  ON  does  not 

mean that the system is faulty. This is normal.


z

“AQUOS  speaker  is  enabled”  message  will  be  dis

-

played if SHARP LCD TV does not detect HT-SB602 

during power on. However the message “AQUOS au

-

dio  with  AQUOS  LINK  is  enabled”  will  be  displayed 

soon as HT-SB602 is detected. These messages may 

vary for other TV model.


„

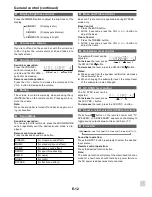
Standby mode


z

The  first  time  the  unit  is  plugged  in,  it  will  enter  the 

STANDBY mode.


z

To  cancel  the  STANDBY  mode,  press  and  hold  the 

ECO  MODE  button  (remote  control)  during  power 

standby mode. The unit will enter the low power con-

sumption mode.


z

To  return  to  the  STANDBY  mode,  press  the  ECO 

MODE button again.


z

During STANDBY condition, NFC function is activated 

once your device touches the supplied NFC tag when 

there is no HDMI connection.


„

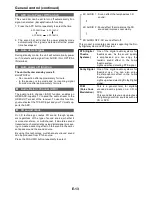
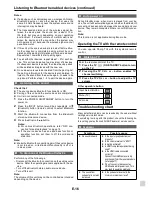
Connecting the wireless Subwoofer

The sound bar and subwoofer will link automatically (wire-

lessly) when turned on as it is already pre-linked at the 

factory. If the link cannot be established, please set the 

connection by the following method.
1.  Press and hold the PAIRING button on the sound bar 

or  SW  LINK  on  the  remote  control  for  more  than  3 

seconds.

2. 

Within 2 minutes, press and hold the SW LINK button 

on the subwoofer for more than 3 seconds.


z

During pairing process:

On sound bar:  “SW LINK” will blink.

On subwoofer:  indicator will blink in blue.


z

When pairing is successful:

On sound bar:  “SW LINK” disappears.

On subwoofer:  indicator turns blue.

SW LINK

SW LINK

Subwoofer

Sound Bar

Remote 

Control

Notes:


z

If a device such as microwave oven, wireless LAN card, 

Bluetooth

 device or any other device that uses the same 

2.4GHz frequency near the system, some sound inter-

ruption may be heard due to interference.


z

The transmission distance of the wireless signal be-

tween the subwoofer and sound bar is about 10m (32 

feet), but may vary depending on your operating envi-

ronment. If a steel-concrete or metallic wall is between 

the subwoofer and the sound bar, the system may not 

operate at all, because the wireless signal cannot pen-

etrate metal.

Caution:


z

Keep the subwoofer away from water and moisture.


z

To get the optimum listening performance, make sure 

the area around the sound bar and subwoofer is clear 

of any obstacles.

Содержание HT-SB602

Страница 1: ...KINA DOMOWEGO TYPU SOUND BAR REPRODUKTOR SOUND BAR PRO SYSTÉM DOMÁCÍHO KINA SOUND BAR NAMŲ KINO SISTEMA SOUND BAR HOME THEATRE SYSTEM DEUTSCH PORTUGUÊS FRANÇAIS ESPAÑOL SVENSKA ITALIANO NEDERLANDS SUOMI POLSKI Siehe Seiten i bis x und D 1 bis D 18 Se reporter aux pages i à x et F 1 à F 18 Consulte las páginas i a x y S 1 a S 18 Hänvisa till sidorna i till x och V 1 till V 18 Leggere le pagine i a ...

Страница 2: ...kevien direktiivin muiden ehtojen mukainen Vakuutus on nähtävissä osoitteessa http www sharp de doc HT SB602 pdf Firma SHARP Electronics oświadcza niniejszym że urządzenie ZESTAW KINA DOMOWEGO TYPU SOUND BAR SHARP HT SB602 jest zgodne z kluczowymi wymogami oraz innymi postanowieniami wynikającymi z Dyrektywy Directive 1999 5 KE Deklarcję zgodności można znaleźć pod adresem http www sharp de doc HT...

Страница 3: ...kkovirrasta ennen huoltotoimenpiteitä ja jos laite on pitkään käyttämättä Gdy urządzenie znajduje się w trybie czuwania jego wewnętrzne elementy są pod napięciem Gdy urządzenie znajduje się w trybie czuwania może zostać włączone przy pomocy zegara lub pilota Ostrzeżenie Wewnątrz urządzenia nie ma żadnych elementów wymagających obsługi użytkownika Obudowa może być zdejmowana wyłącznie przez wykwali...

Страница 4: ...ed with liquids such as vases shall be placed on the apparatus Advarsel Tilatforbyggeildogstřdrisiko ladvaeremedatundsaette denne indretning for drypning eller overstaenkning Der må ikke anbringes nogen genstande fyldt med vand som for eksempel vaser på dette apparat Advarsel For å unngå brann eller kortslutning utsett ikke produktet for vann eller fuktighet Gjenstander som inneholder vaeske feks ...

Страница 5: ...TS Digital Surround is a trademark of DTS Inc DTS Inc All Rights Reserved Hergestellt und in Lizenz von Dolby Laboratories Dolby und das Doppel D Symbol sindWarenzeichen der Dolby Laboratories Fabriqué sous licence de Dolby Laboratories Dolby et le symbole du double D sont des marques de commerce de Dolby Laboratories Fabricado bajo licencia de DolbyLaboratories Dolby y el símbolo Doble D son marc...

Страница 6: ...les enregistrées par Bluetooth SIG Inc et toute utilisation de ces marques par SHARP est faite sous licence Les autres marques et noms commerciaux appartiennent à leurs propriétaires respectifs La marca denominativa y los logotipos Bluetooth son marcas comerciales registradas propiedad de Bluetooth SIG Inc y cualquier uso de dichas marcas por SHARP es bajo licencia El resto de marcas registradas y...

Страница 7: ...rk of geregistreerd handelsmerk van NFC Forum Inc In de Verenigde Staten en in andere landen A N Mark é uma marca ou uma marca registada do NFC Forum Inc nos Estados Unidos e noutros países N Mark on NFC Forum Inc yhtiön tavaramerkki tai rekisteröimä merkki Yhdysvalloissa ja muissa maissa Oznaczenie N jest znakiem handlowym lub zarejestrowanym znakiem handlowym firmy NFC Forum Inc w Stanach Zjedno...

Страница 8: ...ions de reprise du produit Les frais de reprise et de recyclage pourront vous être facturés Les produits de petite taille et en petites quantités pourront être repris par vos organisations de collecte locales Espagne veuillez contacter l organisation de collecte existante ou votre administration locale pour les modalités de reprise de vos produits usagés 2 Pays hors de l Union européenne Si vous s...

Страница 9: ... recycling moet betalen Kleine producten en kleine hoeveelheden kunnen door de lokale inzamelingsinrichtingen worden verwerkt Voor Spanje Neem contact op met de inzamelingsinrichting of de lokale autoriteiten voor de terugname van uw afgedankte producten 2 In andere landen buiten de Europese Unie Als u dit product wilt weggooien neem dan contact op met de plaatselijke autoriteiten voor informatie ...

Страница 10: ...u Malé produkty a malá množství mohou být přijaty vašimi místními sběrnými místy Pro Španělsko Kontaktujte prosím zřízený sběrný systém nebo vaše místní orgány pro vrácení vašich použitých produktů 2 V jiných krajinách mimo EU Pokud chcete tento produkt zlikvidovat kontaktujte prosím své místní orgány a informujte se na správný způsob likvidace Netinkamo eksploatuoti gaminio pašalinimas Dėmesio Jū...

Страница 11: ... te laten Gelieve de locale autoriteiten te contacteren voor de details van ophaling en recyclage Voor Zwitserland De gebruikte batterij moet bij hetverkooppunt teruggebracht worden Voor andere niet EU landen Gelieve contact op te nemen met uw locale autoriteiten voor de correcte methode van verwerking van de gebruikte batterijen Informaçăo sobre Eliminaçăo de Pilhas A bateria fornecida com este p...

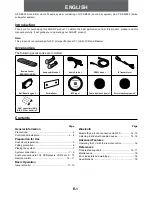
Страница 12: ...1 IR Transmitter x 1 Wall Mount Angle x 2 Pattern Paper NFC tag x 1 Velcro tape hook type x 1 Velcro tape loop type x 2 AAA size battery UM 4 R03 HP 16 or similar x 2 Contents Page General Information Precautions 2 Controls and indicators 2 4 Preparation for Use Sound bar preparation 5 Falling prevention 6 Placing the system 7 System connections 7 9 Audio connections to TVs DVD players VCRs etc 9 ...

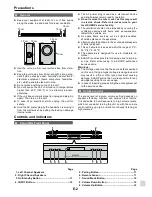
Страница 13: ...ch as newspapers tablecloths curtains etc z z No naked flame sources such as lighted candles should be placed on the apparatus z z Attention should be drawn to the environmental aspects of battery disposal z z This unit should only be used within the range of 5 C 35 C 41 F 95 F z z The apparatus is designed for use in moderate cli mates z z SHARP is not responsible for damage due to improp er use ...

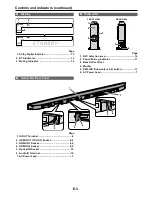
Страница 14: ...6 1 FRONT VIEW REAR VIEW Page 1 NFC detection area 14 2 Power Pairing Indicator 11 3 Bass Reflect Duct 4 Woofer 5 SW LINK Subwoofer Link button 11 6 AC Power Lead 7 Sound Bar Rear Panel 7 6 5 4 3 2 1 Page 1 IR OUT Terminal 8 2 HDMI OUT TV ARC Socket 8 9 3 HDMI IN 1 Socket 8 9 4 HDMI IN 2 Socket 8 9 5 Optical IN Socket 10 6 Audio IN Terminal 10 7 AC Power Lead 7 ...

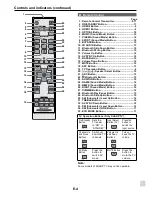
Страница 15: ...tton 12 21 ARC Button 13 22 Bluetooth Button 15 23 AUDIO IN Button 10 24 GAME Sound Mode Button 12 25 NEWS Sound Mode Button 12 26 NIGHT Sound Mode Button 12 27 DIMMER Button 12 28 Bluetooth Play Pause Button 15 29 Bluetooth Skip Up Button 15 30 SW Subwoofer Level Up Button 12 31 TREBLE Button 12 32 AV SYNC Down Button 12 33 SW Subwoofer Level Down Button 12 34 SW Subwoofer LINK Button 11 35 ECO M...

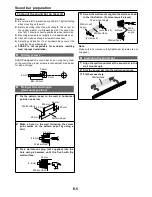
Страница 16: ...low for size and type 3 2 mm 5 mm Min 22 mm 9 mm Fixing wall mount angle Horizontal position 1 Fix the pattern paper to the wall in horizontal position as below Wall surface Pattern paper 44 mm 44 mm 29 mm 29 mm 926 mm 2 Make a hole on the wall following the screw point marks on the pattern paper by using a drill Wall surface 32 mm 8 9 mm 3 Fix a wall mount plug not supplied into the hole using a ...

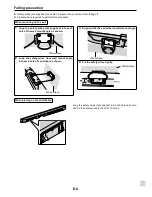
Страница 17: ...ot supplied into each hole of the wall mount angle as shown Wall surface 2 Loop the safety wires from wall mount angle into each hole of sound bar as shown Wall surface 3 Align and fix the sound bar to wall mount angle Wall surface 4 Tie the safety wires tightly Wall surface When placing on the shelf table Loop the safety wires not supplied into each hole as shown and tie the safety wires to the L...

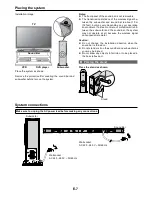
Страница 18: ...steel concrete or metallic wall is be tween the subwoofer and the sound bar the system may not operate at all because the wireless signal cannot penetrate metal Caution z z Do not change the installation direction when the sound bar is turned on z z Do not stand or sit on the sound bar and subwoofer as you may be injured z z Do not allow any objects to fall into or to be placed in the bass reflex ...

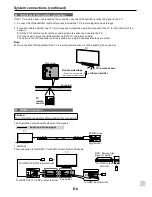
Страница 19: ...cure the IR transmitter onto the sound bar using the double sided tape provided Note z z Do not use the IR transmitter if the TV s remote control sensor is not blocked by the sound bar TV remote sensor Infrared emitter TV remote control Double sided tape Peel off the double sided tape separator before fixing Rear view TV HDMI Connection Caution Turn off all other equipment before making this conne...

Страница 20: ...ystem will automatically power off if TV or similar component which supports HDMI CEC is turned off z z CEC is not available during Low power consumption mode z z To listen to the sound from this system you will need to press the button refer page 12 or adjust the speaker output settings within the TV menu For details refer to the operation manual of the TV z z If you are unable to select external...

Страница 21: ...artment When inserting or removing the battery push them towards the battery terminals 3 Close the battery cover Caution z z Remove the battery if the sound bar will not be used for a long period of time This will prevent potential dam age due to battery leakage z z Do not use rechargeable battery nickel cadmium bat tery etc z z Installing the battery incorrectly may cause the sound bar to malfunc...

Страница 22: ... con sumption mode z z To return to the STANDBY mode press the ECO MODE button again z z During STANDBY condition NFC function is activated once your device touches the supplied NFC tag when there is no HDMI connection Connecting the wireless Subwoofer The sound bar and subwoofer will link automatically wire lessly when turned on as it is already pre linked at the factory If the link cannot be est...

Страница 23: ...ight BYPASS for flat sound effect Bass and Treble Control Bass and Treble control is applicable during BYPASS mode only Bass Control 1 Press the BASS button 2 Within 5 seconds press the VOL or button to adjust the bass Treble Control 1 Press the TREBLE button 2 Within 5 seconds press the VOL or button to adjust the treble Subwoofer level control The subwoofer level can be adjusted To increase the ...

Страница 24: ...ak ers regardless of the type of sound source whether it is monaural stereo or multichannel It simulates sound transmission characteristics using digital signal process ing to create a widening effect on the sound in the ambi ent space around the sound source By using this technology multichannel surround sound can be produced from 2 1ch source Press the 3D AUDIO button repeatedly to select 3D AUD...

Страница 25: ...detection area NFC tag during standby mode Or NFC tag set up The NFC tags can be placed anywhere convenient to you The velcro tapes supplied will help to secure the tags onto the desired location Caution z z Make sure that the NFC tag is placed on a flat and level surface z z If you choose not to use the velcro tape do not place the NFC tag near metal surface to avoid connection interference durin...

Страница 26: ...y paired first before they can exchange data Once paired it is not necessary to pair them again unless z z Pairing is made with more than 8 devices Pairing can only be made one device at a time This unit can be paired to a maximum of 8 devices If subsequent device is paired the oldest device paired will be deleted and replaced with the new one z z This unit is reset All pairing information is dele...

Страница 27: ... an extra bass function or equalizer function set them to off to avoid sound distortion Note z z Make the Bluetooth connection again if the source device is not turned on or its Bluetooth functionality is off or is in sleep mode To disconnect the Bluetooth device Perform any of the followings Disconnect the Bluetooth connection on the audio source device Refer the operating manual supplied with th...

Страница 28: ...n obstacle between the unit and the Bluetooth stereo audio source device z z NFC enabled device cannot connect to Bluetooth via NFC tag z z Sound bar is not in Bluetooth pairing mode Perform NFC connection for audio playback Refer page 14 Remote control Symptom Possible cause z z The remote control does not operate properly z z Is the battery polarity correct z z Is the battery dead z z Is the dis...

Страница 29: ...e specification figures indicated are nominal values of production unit There maybe some deviations from these values in individual unit Sound Bar Power source AC 220 240 V 50 60 Hz Power consumption Power on 38 W Power standby 0 4 W 1 Power standby 6 W 2 Dimension Width 1386 mm Height 74 mm Depth 68 mm Weight 3 7 kg Output power RMS Total 160 watts RMS 160 W 80 W 80 W 10 T H D RMS 120 W 60 W 60 W...

Страница 30: ...6AWZZ TINSZB426AWZZ70 14F R AS 2 TINSZB709AWZZ odesoft www barcodesoft com eSymbology Code93 FontFacename Code93MHr oEncode TINSZB709AWZZ ize8 TINSZB709AWZZV5 ize10 TINSZB709AWZZV5 12E R AS 3 TINSZB426AWZZ TINSZB426AWZZ70 ...

Страница 31: ...HT SB602 SOUND BAR HOME THEATRE SYSTEM U P DOWN ...

Отзывы: