background image

25

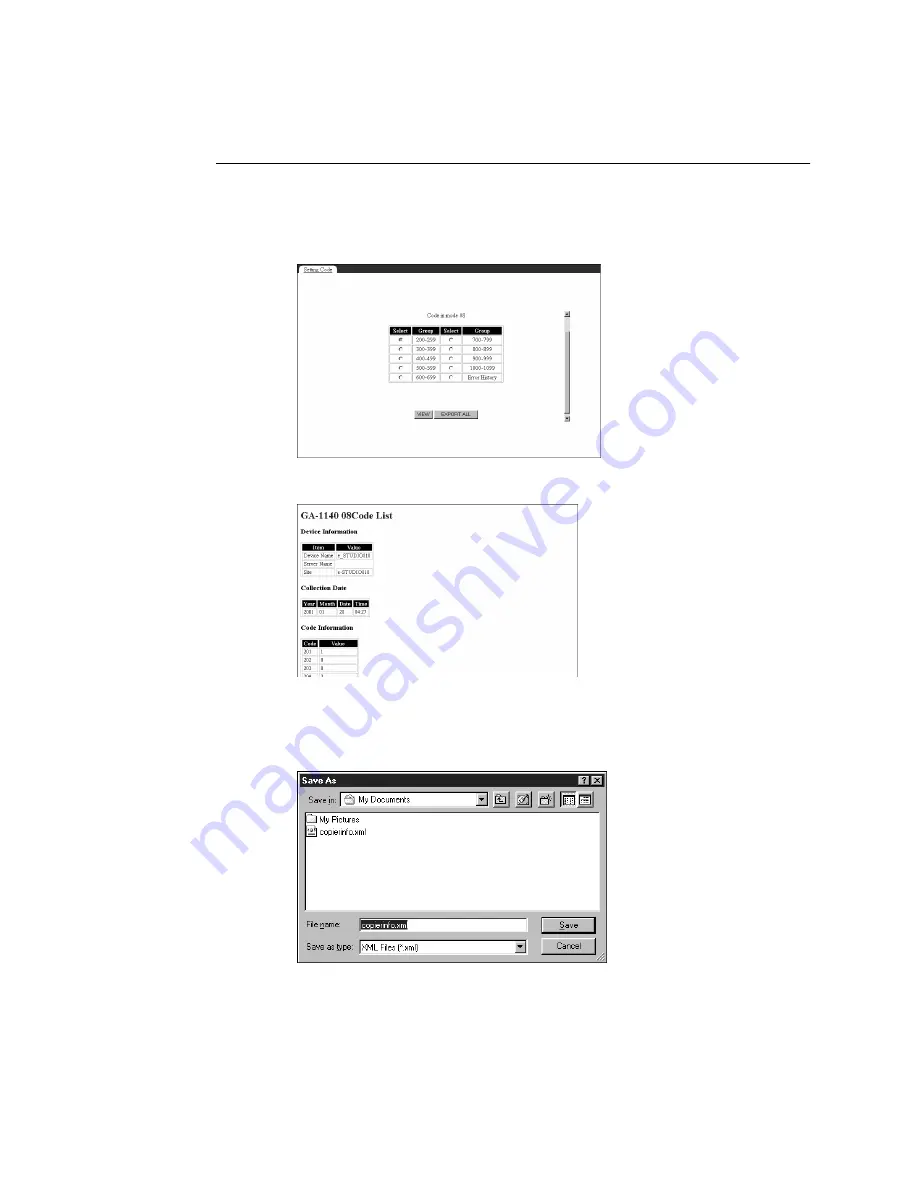
Using TopAccess to view and export the Setting Code

T

O


EXPORT


THE

 S

ETTING

 C

ODE


AS


AN

 XML 

FILE

1.

Access the URL of the AR-P15 (see “To access the URL for Maintenance” on page 23).

2.

At the Setting Code screen, click EXPORT ALL.

The Setting Code List for the AR-P15 is displayed.

3.

Go to the File menu of the TopAccess Bar and click Save As. 

4.

Select a location and enter a file name (with .xml as the extension). Select XML from the 
Save as type menu and click Save.

Содержание AR-P15

Страница 1: ...S HA R P AR P 1 5 for the AR 651 810 se r i e s S ER V ICE GUID E A guide for ser vice technicians Part Number 4502XXXX ...

Страница 2: ......

Страница 3: ...or modifications to this equipment not expressly approved by the manufacturer could void the user s authority to operate this equipment Class A Compliance This equipment has been tested and found to comply with the limits for a Class A digital device pursuant to Part 15 of the FCC Rules These limits are designed to provide reasonable protection against harmful interference when the equipment is op...

Страница 4: ...SS FOR A PARTICULAR PURPOSE OR NONINFRINGEMENT OF THIRD PARTY RIGHTS Limitation of Liability TO THE MAXIMUM EXTENT PERMITTED BY LAW EFI AND ITS SUPPLIERS SHALL NOT BE LIABLE FOR ANY DAMAGES INCLUDING LOSS OF DATA LOST PROFITS COST OF COVER OR OTHER SPECIAL INCIDENTAL CONSEQUENTIAL OR INDIRECT DAMAGES ARISING FROMTHE SALE INSTALLATION MAINTENANCE USE PERFORMANCE OR FAILURE OF THE SOFTWARE HOWEVER C...

Страница 5: ...rk 15 Verifying the parallel port connection 16 System Software 18 System Software installation reminders 18 Installing System Software 19 Using TopAccess to view and export the Setting Code 22 Requirements 22 Specifications 26 Hardware features 26 Networking and connectivity 26 User software 26 Safety and emissions compliance 26 The troubleshooting process 27 Where problems occur 28 Before you go...

Страница 6: ......

Страница 7: ... motherboard socket U800 Hard disk drive HDD option HDD key chip for motherboard socket U800 HDD and HDD ribbon cable for motherboard connector J207 Memory option one additional 128MB DIMM for motherboard socket J48 This guide describes how to service the AR P15 including how to reinstall system software if necessary Generally the AR P15 does not require regular maintenance Use the procedures in t...

Страница 8: ...ript option or HDD option U800 4 CPU cooling assembly 5 DIMM 6 DIMM sockets 7 Socketed BIOS chip U202 8 Optional HDD cable for HDD option 9 Optional HDD 10 Optional key chip 11 Network activity LEDs 12 RJ 45 network connector 13 Parallel port connector 14 AR P15 chassis with faceplate 9 7 11 8 6 5 4 3 2 1 12 14 13 10 ...

Страница 9: ...off and unplug the copier and then remove the AR P15 See AR P15 installation instructions not provided in this guide FIGURE B AR P15 installed in the copier Network activity LEDs 2 Copier side panel 10BaseT 100BaseTX connector for twisted pair Ethernet Parallel port connector AR P15 ...

Страница 10: ...07 If a ribbon cable is suspect substitute it with a tested cable The cable is keyed to fit the AR P15 connector in only one way the non gray line on the ribbon cable to Pin 1 on the AR P15 board silkscreen 3 Make sure that any AR P15 cables DIMMs or other socketed components are properly aligned and well seated on their connectors Check the AR P15 motherboard connection to the copier This connect...

Страница 11: ...The AR P15 has two DIMM sockets one 128MB DIMM in J49 and optionally another 128MB DIMM in J48 see Figure A on page 2 and also Replacing or adding a DIMM on page 7 When the AR P15 is installed inside the copier the connectors for external devices are easily accessible at the faceplate see Figure G on page 15 Wear an ESD grounding wrist strap and follow standard ESD electrostatic discharge precauti...

Страница 12: ...Optional DIMM in J48 Optional HDD if present Optional key chip in U800 if present see Figure C on page 5 for location Instructions for removing optional components are not provided in this guide 7 Unpack the new motherboard 8 Install the standard components you removed earlier onto the new motherboard To reinstall memory see page 7 9 Install any optional components you removed earlier onto the new...

Страница 13: ...ee Figure D FIGURE D Releasing a DIMM 2 Pull the DIMM straight out of the socket to avoid damaging it or the socket and set the DIMM aside 3 To install a DIMM insert it straight into the socket Push the DIMM into the socket until the levers snap into place The DIMM fits the socket only one way The two notches on the bottom of the DIMM should line up with the notches in the socket Make sure the lev...

Страница 14: ...the AR P15 you loosened or removed during inspection or service 2 Install the AR P15 in the copier and reassemble the copier as described in the AR P15 installation instructions not provided in this guide 3 If you replaced the optional HDD reinstall system software according to the procedure in System Software on page 18 4 Before you leave the customer site verify AR P15 operation as described in ...

Страница 15: ...nel to check AR P15 status and perform AR P15 functions such as print test pages The PRINTER NETWORK button accesses AR P15 LCD screens FIGURE F Control Panel with LCD touch panel display HELP TIMER INTERRUPT STOP START FC FUNCTIONCLEAR ENERGYSAVER JOB STATUS COPY PRINTER NETWORK DATA ERROR 1 2 3 4 5 6 7 8 9 0 C Location of copier power switch ...

Страница 16: ...n disappears Online Offline To use the Control Panel LCD for certain AR P15 functions such as printing test pages you must take the AR P15 offline before you perform the function and then put the AR P15 back online when you are done When the AR P15 is online it can receive data over the network from a networked computer When the AR P15 is offline it cannot receive data over the network from a netw...

Страница 17: ...work button on the Control Panel and then touch the ON OFF tab 2 Touch the OFF LINE icon When the AR P15 is offline the following screen is displayed To return to the main copier screen press the COPY button on the Control Panel or allow Printer Network mode to time out PRIVATE ...

Страница 18: ...ork button on the Control Panel and then touch the ON OFF tab 2 Touch the ON LINE icon 3 When the AR P15 is online the following screen is displayed To return to the main copier screen press the COPY button on the Control Panel or allow Printer Network mode to time out PRIVATE ...

Страница 19: ...configuration if necessary After the connection to the network is made the network administrator can customize AR P15 settings according to the network and user environment Using the Setting List as a guide can help speed up this process For more information on setting up the AR P15 see the Administrator s Guide Printing the PCL and PS Test pages Before connecting the AR P15 to the network print t...

Страница 20: ... Page prints you know the AR P15 print engine is functional and the connection between the AR P15 and the copier is operating properly When you examine the PS Test Page keep in mind that All swatches should be visible even though they may be very faint in the lowest ranges Swatches should show uniform gradation as the tone lightens Poor image quality may indicate a need to calibrate the system or ...

Страница 21: ...he AR P15 to the network and print test documents in order to verify the connection Only Category 3 or Category 5 shielded twisted pair STP network cable can be used for 10BaseT Only Category 5 STP cable can be used for 100BaseTX FIGURE G AR P15 network and parallel port connectors 10BaseT 100BaseTX connector for twisted pair Ethernet Parallel port connector Network activity LEDs 2 ...

Страница 22: ...omputer For more information on setting up the AR P15 see the Administrator s Guide NOTE After entering the IP address manually make sure to reset the AR P15 using either the LCD or TopAccess To reset the AR P15 using the Control Panel LCD touch the UTILITY tab Functions icon Reset icon See page 14 for the location of the UTILITY tab 5 After configuring AR P15 settings verify the network connectio...

Страница 23: ...onment Automatic IP addressing is a default network setting If the IP address is not set it will be listed in the Setting List as 0 0 0 0 and the network administrator may need to configure the IP address of the AR P15 manually through the Control Panel LCD After the network address of the AR P15 is configured either automatically or manually the AR P15 can be set up using TopAccess on a remote co...

Страница 24: ...rms NT 2000 XP ReadMe txt notes on the EFI Embedded Printer Download Utility communication log an internally generated log of activity associated with the EFI Embedded Printer Download Utility System Software installation reminders Keep in mind the following when installing system software Fonts Only resident fonts will be restored during system software installation If the HDD option is installed...

Страница 25: ... the factory configuration when system software is installed 2 Print the Fonts List The Fonts List details what fonts are resident on the AR P15 Along with the fonts that are provided on the System Software CD the customer may have installed additional fonts that will be deleted after system software installation 3 With the Windows PC and the copier both powered off connect a short IEEE 1284 cable...

Страница 26: ...ut a hard disk drive open the file arp15_diskless dle For an AR P15 with a hard disk drive open the file arp15_disk dle NOTE To confirm whether the AR P15 is with or without an HDD i e disk or diskless print the Setting List and check under Options Printer HDD 7 At the next screen click Start 8 At the message Please switch on the printer and press OK to continue power on the copier and then click ...

Страница 27: ...o configure the IP address of the AR P15 manually through the Control Panel LCD After the network address of the AR P15 is configured either automatically or manually the AR P15 can be set up using TopAccess on a remote computer For more information on setting up the AR P15 see the Administrator s Guide NOTE After entering the IP address manually make sure to reset the AR P15 using either the LCD ...

Страница 28: ...sure the AR P15 is connected to the network and has a valid IP address see page 16 Also make sure the PC meets the following additional requirements Web browser either Netscape Communicator v4 5 or later with Java enabled or Microsoft Internet Explorer v4 0 1 with SP1 or later with Java enabled NOTE Use the specified versions for best results Web browsers offer frequent updates therefore support f...

Страница 29: ... the web browser 2 In the Address bar enter http IP address srv IP address Enter the IP address or the DNS name that is valid for the AR P15 The password screen is displayed 3 In the Maintenance Password field of the Password screen enter 33455 and click OK The Setting Code screen will be displayed ...

Страница 30: ...f the AR P15 see To access the URL for Maintenance on page 23 2 At the Setting Code screen click the radio button of the group that you wish to view and then click View The Setting Codes of the selected group is displayed Use the scroll bar to view the entire Setting Code List for the selected group ...

Страница 31: ...5 see To access the URL for Maintenance on page 23 2 At the Setting Code screen click EXPORT ALL The Setting Code List for the AR P15 is displayed 3 Go to the File menu of the TopAccess Bar and click Save As 4 Select a location and enter a file name with xml as the extension Select XML from the Save as type menu and click Save ...

Страница 32: ...ltaneously RJ 45 port for twisted pair 10BaseT 100BaseTX network connection User software The latest user software must be installed onto all computers that print to the AR P15 Using incompatible versions of the system and user software may result in system problems For information on GA 1140 user software see the User s Guide Safety and emissions compliance The AR P15 has been certified to meet o...

Страница 33: ... Checking connections on page 30 for descriptions of AR P15 parts and connections Try a phone check before you go to the customer site Before you go to the customer site on page 29 suggests areas you should check out before making a service call to the customer site With a phone call you can find out if the problem is a simple operating failure or a failure caused by a network or configuration cha...

Страница 34: ...and computers that print to it FIGURE H AR P15 functional diagram This chapter does not attempt to provide troubleshooting information for attached computers such as PCs copiers or extensive networks Refer problems in these areas to the appropriate service departments and network administrators Board Power supply External devices Copier AR P15 Assembly 5VDC 3 3VDC CPU Network interface PCI Memory ...

Страница 35: ... appear in the list of printers If the answer to any of these questions is yes refer the customer to user documentation If the customer has followed the corrective actions in the user documentation and has failed to solve the problem be prepared to make a service call Keep a log of the failures the customer has observed 3 Has the customer made any network changes If network changes have occurred r...

Страница 36: ...anel of the copier FIGURE I External connectors at the faceplate Make sure the power cable is plugged into the wall outlet and that the copier is powered on Verify the following internal connections AR P15 connection to the copier at J924 DIMMs J49 and J48 with upgrade Optional key chip in motherboard socket U800 the PS key chip and HDD key chip are not the same chip Optional HDD cable connection ...

Страница 37: ...cables DIMMs or other socketed components are properly aligned and well seated on their connectors Check the AR P15 motherboard connection to the copier This connection is for the printer interface and the Control Panel interface and for receiving power from the copier power supply Check the connection for each DIMM installed one if standard two if upgraded See page 7 Inspect for bent or broken pi...

Страница 38: ...cific printing errors caused by missing or incorrectly installed printer description files Printing to the AR P15 If the customer can print an AR P15 test page but cannot print a job from a computer on the network you may have to make a service call However first make sure the network administrator has done the following Checked all components of the network including cables connectors terminators...

Страница 39: ...ected Make sure the printer interface connector is properly connected to the copier Is the copier online Bring it online by touching the ON LINE icon Is the specified paper loaded Load the specified paper in any of the input trays Can you print a Setting List page If you cannot check the AR P15 connection to the copier Can you print a Test Page from the printer driver If you cannot the copier may ...

Страница 40: ...ettings Use the recommended paper Avoid using curled folded wrinkled perforated or glossy paper It takes a long time for the copier to start printing Make sure the copier is not in energy saver mode Press START on the Control Panel It takes too long to complete the print job The data is so large or complex that it takes additional time to process If the Data indicator is blinking data is being pro...

Страница 41: ...ovals 26 ESD precautions 4 5 6 31 F font module 4 Fonts List page 13 19 H HDD 4 I IEEE 1284 16 J J207 4 J213 4 J48 4 7 J49 4 7 J924 4 K key chip 4 L LEDs 5 N network connections checking 32 twisted pair 10 100BaseT 16 networks connecting to 15 supported 26 O on board DIMMs 2 7 P parallel port connection 16 PC connecting 16 PCL Test page 13 precautions 4 5 6 31 printing problems 32 test print pages...

Страница 42: ......

Отзывы: