background image

PART NAMES AND FUNCTIONS

1-14

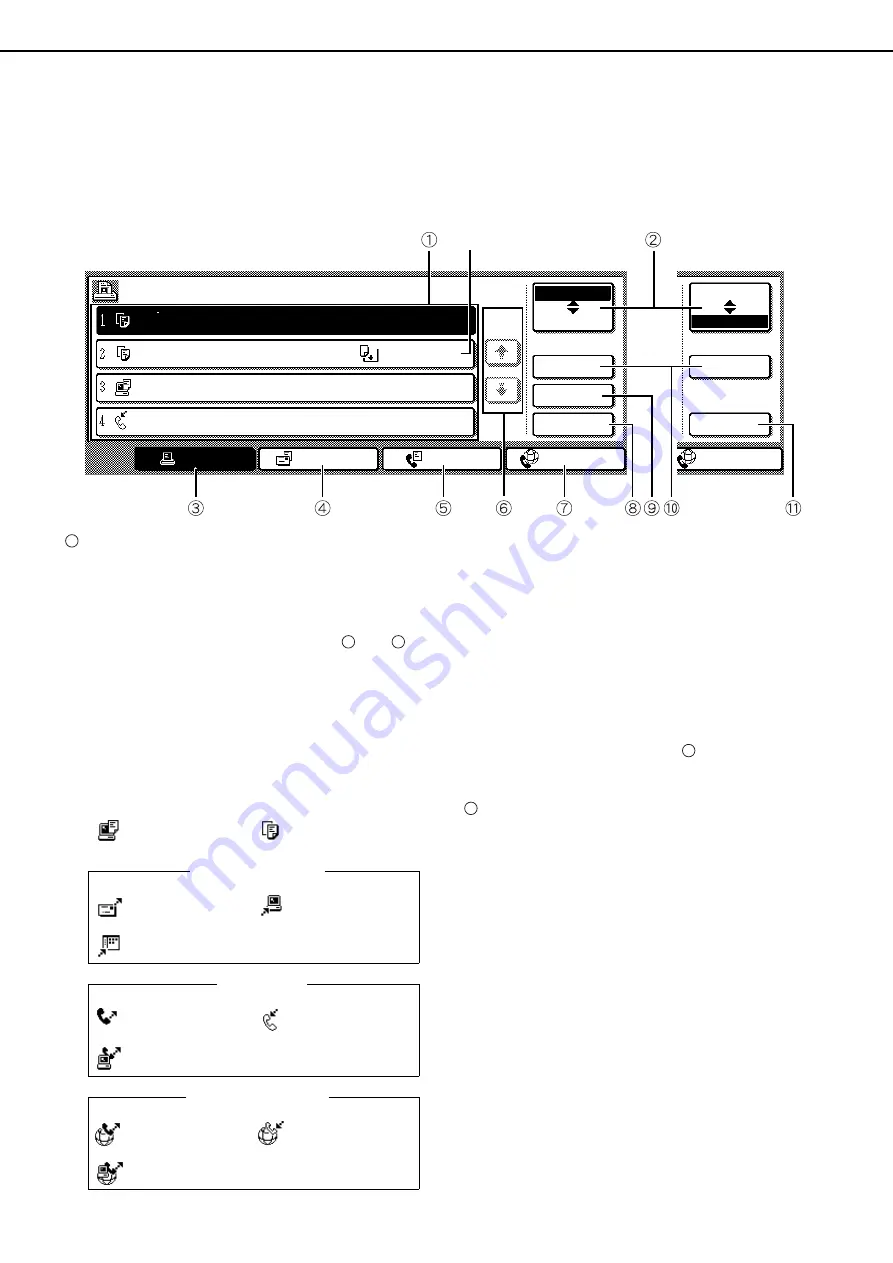
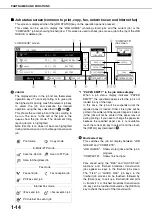
Job status screen (common to print, copy, fax, network scan and Internet fax)

This screen is displayed when the [JOB STATUS] key on the operation panel is pressed.
This screen can be used to display the "JOB QUEUE" (showing stored jobs and the current job) or the
"COMPLETE" job list (showing finished jobs). This screen is used to check jobs, move a job to the top of the JOB
QUEUE, or delete a job.

Job list

The displayed jobs in the job list are themselves
operation keys. To cancel printing or to give a job
the highest print priority, touch the relevant job key
to select the job and execute the desired
operation using the keys described in


 and 

.

This shows the current job and the jobs waiting to
be run. The icons to the left of the jobs in the
queue show the job mode. The document filing
reprint job icon is highlighted.
Note that the icon does not become highlighted
during retransmission of a fax/image transmission
job.

*1 "PAPER EMPTY" in the job status display

When a job status display indicates "PAPER
EMPTY", the specified paper size for the job is not
loaded in any of the trays. 
In this case, the job will be suspended until the
required paper is loaded. Other stored jobs will be
printed (if possible) until the required paper is loaded.
(Other jobs will not be printed if the paper runs out
during printing.) If you need to change the paper size
because the specified paper size is not available,
touch the current job key to select it and then touch
the [DETAIL] key described in 

 .

Mode select key

This switches the job list display between "JOB
QUEUE" and "COMPLETE".

"JOB QUEUE": Shows stored jobs and the job in

progress.

"COMPLETE":

Shows finished jobs.

Files saved using the "FILE" and "QUICK FILE"
functions and finished broadcast transmission
jobs appear as keys in the finished job screen.
The "FILE" or "QUICK FILE" job keys in the
finished job screen can be touched, followed by
the [CALL] key, to call up a finished job and print
or transmit it. A finished broadcast transmission
job key can be touched followed by the [DETAIL]
key to check the result of the transmission.

JOB QUEUE

COPY

COPY

Suzuki

066211221

STATUS

020 / 001

020 / 000

020 / 000

002 / 000

PRINT JOB

E-MAIL/FTP

FAX JOB

INTERNET-FAX

INTERNET-FAX

JOB QUEUE

COMPLETE

JOB QUEUE

COMPLETE

DETAIL

PRIORITY

STOP/DELETE

DETAIL

CALL

PAPER EMPTY

WAITING

WAITING

1/1

SETS / PROGRESS

COPYING

"JOB QUEUE" screen

"COMPLETE" 
job screen

*1

1

8

9

Print mode

Copy mode

Scan to e-mail job

Scan to FTP job

Scan to Sharpdesk job

Fax send job

Fax reception job

PC-Fax send job

i-Fax send job

i-Fax reception job

PC-Internet Fax send job

Internet Fax mode

E-MAIL/FTP mode

Fax mode

10

2

Содержание AR M550N - B/W Laser - Copier

Страница 1: ...e Inserter Large capacity tray MODEL AR M550U AR M620U AR M700U AR M550N AR M620N AR M700N DIGITAL LASER COPIER PRINTER DIGITAL MULTIFUNCTIONAL SYSTEM Be sure to become thoroughly familiar with this manual to gain the maximum benefit from the product Before installing this product be sure to read the installation requirements and cautions sections Be sure to keep all operation manuals handy for re...

Страница 2: ... M700U J AR M700N J Declaration of Conformity This device complies with Part 15 of the FCC rules Operation is subject to the following two conditions 1 This device may not cause harmful interference and 2 this device must accept any interference received including interference that may cause undersired operation Responsible Party SHARP ELECTRONICS CORPORATION Sharp Plaza Mahwah New Jersey 07430 21...

Страница 3: ...Part 1 General Information ...

Страница 4: ......

Страница 5: ... manual for printer This manual explains the procedures for using the machine as a printer Operation manual for network scanner This manual explains the procedures for using the machine as a network scanner when connected to a computer To use the network scanner function the machine must be configured for use as a network printer and the AR NS3 network scanner expansion kit must be installed The O...

Страница 6: ...mp humid or very dusty exposed to direct sunlight poorly ventilated subject to extreme temperature or humidity changes e g near an air conditioner or heater 4 Be sure to allow the required space around the machine for servicing and proper ventilation A small amount of ozone is produced within the printer during operation The emission level is insufficient to cause any health hazard NOTE The presen...

Страница 7: ...his connector A is only intended for service purposes Any connection to this terminal may cause malfunctions of the machine Instruction for service technician The cable length for the service terminal has to be less than 118 3m The machine includes the document filing function which stores document image data on the machine s hard disk Stored documents can be called up and printed or transmitted a...

Страница 8: ...HEN OPEN INTERLOCKS DEFEATED AVOID EXPOSURE TO BEAM VORSICHT UNSICHTBARE LASERSTRAHLUNG WENN ABDECKUNG GEÖFFNET UND SICHERHEITSVERRIEGELUNG ÜBERBRÜCKT NICHT DEM STRAHL AUSSETZEN ADVARSEL USYNLIG LASERSTRÅLNING VED ÅBNING NÅR SIKKERHEDSBRYDERE ER UDE AF FUNKTION UNDGÅ UDSAETTELSE FOR STRÅLNING VAROITUS LAITTEEN KÄYTTÄMINEN MUULLA KUIN TÄSSÄ KÄYTTÖOHJEESSA MAINITULLA TAVALLA SAATTAA ALTISTAA KÄYTTÄJ...

Страница 9: ...transport area fusing area and exit area 2 19 Misfeed in the duplex unit 2 20 Misfeed in the paper feed area 2 21 REMOVING AN ORIGINAL MISFEED 2 25 Removing a misfed original from the automatic document feeder 2 25 TROUBLESHOOTING 2 26 CHAPTER 3 PERIPHERAL DEVICES FINISHER AND SADDLE STITCH FINISHER 3 2 Part names 3 2 Specifications 3 2 Finishing methods 3 4 Finishing modes and finisher functions ...

Страница 10: ...INE MAINTENANCE FOR COPYING USER MAINTENANCE 6 2 Cleaning the document glass and the automatic document feeder 6 2 TROUBLESHOOTING 6 3 CHAPTER 7 DOCUMENT FILING FUNCTION OVERVIEW 7 2 Document filing function 7 2 TO USE THE DOCUMENT FILING FUNCTION 7 4 A look at the operation panel 7 4 Saving files 7 4 Main screen of document filing 7 5 Document filing icons 7 5 SAVING A DOCUMENT IMAGE FILE 7 6 Qui...

Страница 11: ... should be read before using the product Page INTRODUCTION 1 2 MAIN FEATURES 1 3 PART NAMES AND FUNCTIONS 1 9 Exterior 1 9 Interior 1 10 Operation panel 1 12 Touch panel 1 13 Turning the power ON and OFF 1 16 AUDITING MODE 1 17 Using the machine when the auditing mode is enabled 1 17 ...

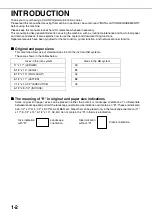
Страница 12: ...ows use of standard sizes in both the inch and AB systems These are shown in the tables below The meaning of R in original and paper size indications Some original and paper sizes can be placed in either the portrait or landscape orientations To differentiate between landscape and portrait the landscape orientation size indication will contain an R These are indicated as 8 1 2 x 11 R 5 1 2 x 8 1 2...

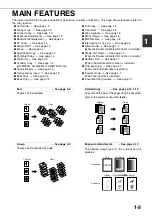
Страница 13: ...e See page 1 6 B W Reverse See page 1 6 Interrupting a copy run See page 1 6 Offset mode See page 1 7 When the Finisher or Saddle stitch finisher is installed Staple sort mode See page 1 7 When the Finisher or Saddle stitch finisher is installed Saddle stitch See page 1 7 When the Saddle stitch finisher is installed Hole punching See page 1 7 When the Punch Module is installed Inserter mode See pa...

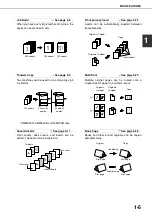
Страница 14: ...pages of a book can be successively copied onto separate sheets Pamphlet Copy See page 5 6 One sided or two sided pamphlet style copies can be made Original Enlargement Reduction Copy Original Copy Image shifted to the right Image shifted to the left Margin Margin One sided copying Original Two sided copying Original Image shifted to the right Margin Image shifted to the left Margin Or Original Co...

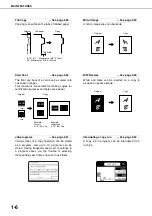
Страница 15: ...ally inserted between transparencies Multi Shot See page 5 23 Multiple original pages can be copied onto a single sheet of paper in a uniform layout Book Copy See page 5 25 Books and other bound originals can be copied pamphlet style 150 sheets 300 sheets 150 sheets 100 sheets 50 sets of copies 50 sets of copies AR M550N AR M620N or AR M700N only Front cover Back cover Originals Insert sheets Inse...

Страница 16: ...u the trouble of selecting those settings each time you wish to use them Mirror Image See page 5 30 A mirror image copy can be made B W Reverse See page 5 30 White and black can be inverted on a copy to produce a negative image Interrupting a copy run See page 5 33 A copy job in progress can be interrupted for a rush job Original Tab paper Copy INDEX INDEX Tab width A4 Maximum of 51 64 20mm 8 1 2 ...

Страница 17: ... of paper can be added as a cover or an insert without being printed on The inserter can be used to feed heavy sheets of paper that cannot be fed from other trays Document filing function See chap 7 A document image can be stored on the hard disk A stored file can easily be called up and printed or transmitted Offset mode Non Offset mode When the Finisher or Saddle stitch finisher is installed Ori...

Страница 18: ... power is shut off to the fusing unit and the touch panel In this state more energy is saved than in the preheat mode but the time to recover to the ready condition will be longer The preset time to enter this mode can be set by a key operator program When this product is used as a printer and either of the above modes is active the mode will be deactivated automatically by an incoming job and the...

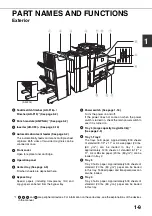
Страница 19: ...come on when the power switch is turned on check the main power switch to see if it is turned on Tray 5 Large capacity tray AR LC6 1 See page 2 5 Tray 1 Tray 2 The trays hold paper Approximately 800 sheets of standard 8 1 2 x 11 or A4 size paper 20 lbs 80 g m2 can be loaded in tray 1 and approximately 1200 sheets of standard 8 1 2 x 11 A4 or B5 size paper 20 lbs 80 g m2 can be loaded in tray 2 Tra...

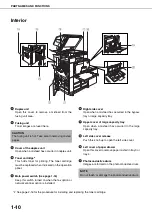
Страница 20: ... is installed Right side cover Open when a misfeed has occurred in the bypass tray or large capacity tray Upper cover of large capacity tray Open when a misfeed has occurred in the large capacity tray Left side cover release Push this knob up to open the left side cover Left cover of paper drawer Open this cover to remove paper misfed in tray 3 or tray 4 Photoconductive drum Images are formed on t...

Страница 21: ...d disk and memory immediately after a document is printed or transmitted PS3 expansion kit AR PK5 This kit provides compatibility of PostScript level 3 to the printer Facsimile expansion kit AR FX8 This kit is required to add fax function Additional fax memory 8 MB AR MM9 Network scanner expansion kit AR NS3 This kit is required to add the network scanning feature The printer function is required ...

Страница 22: ...OB STATUS key Press to display the current job status See page 1 14 CUSTOM SETTINGS key This is used to store edit and delete user names and folder names for the document filing function and to configure the key operator programs and printer configuration settings See page 7 21 Numeric keys Use to enter numeric values for various settings key ACC C key This key is used in copy mode document filing...

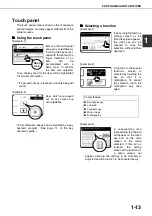
Страница 23: ...time the screen appears the OK key can be pressed to store the selection without further operation Example 2 A function in the special functions screen is selected by touching the key so that it is highlighted To cancel the selection touch the highlighted key once again Example 3 A corresponding icon representing the feature will appear on the touch key and on the main screen of the mode selected ...

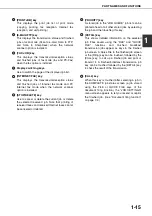
Страница 24: ...ed if possible until the required paper is loaded Other jobs will not be printed if the paper runs out during printing If you need to change the paper size because the specified paper size is not available touch the current job key to select it and then touch the DETAIL key described in Mode select key This switches the job list display between JOB QUEUE and COMPLETE JOB QUEUE Shows stored jobs an...

Страница 25: ...te that printing of received faxes and received Internet faxes cannot be canceled or deleted PRIORITY key A stored job in the JOB QUEUE job list can be printed ahead of all other stored jobs by selecting the job and then touching this key DETAIL key This shows detailed information on the selected job Files saved using the FILE and QUICK FILE functions and finished broadcast transmission jobs appea...

Страница 26: ...annot be used Power switch Main power switch OFF position ON position CAUTION Before turning off the main power switch make sure that the communication and data lights are not blinking on the operation panel Turning off the main power switch or unplugging the power cord while the lights are blinking may damage the hard disk and cause the data being stored or received to be lost Main power switch O...

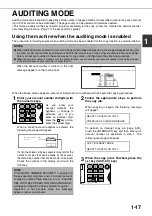
Страница 27: ...displayed Check the number in the display and touch the OK key 2 Follow the appropriate steps to perform the copy job When copying is begun the following message will appear To perform an interrupt copy job page 5 33 touch the INTERRUPT key and then enter your account number as explained in step 1 The following message will appear 3 When the copy job is finished press the key ACC C key NOTES When ...

Страница 28: ......

Страница 29: ... tray 2 5 Loading paper in the bypass tray 2 6 Specifications of paper trays Types and sizes of paper that can be used in the trays 2 8 Setting the paper type and paper size 2 10 Setting the paper size when a special size is loaded 2 12 CUSTOM SETTINGS 2 13 General procedure for custom settings 2 13 About the settings 2 15 REPLACING THE TONER CARTRIDGES 2 16 STORAGE OF SUPPLIES 2 17 MISFEED REMOVA...

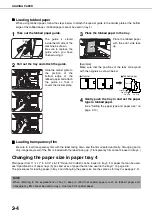
Страница 30: ...n tray 1 1 Approximately 800 sheets of SHARP standard paper 20lbs 80g m2 can be loaded Be sure to return the paper guide to its original position after loading the paper Load paper in tray 2 1 Approximately 1200 sheets of SHARP standard paper 20lbs 80g m2 can be loaded 1 The paper stack must not be higher than the indicator line Tray 1 This is the left large capacity tray Tray 3 Tray 4 Tray 2 This...

Страница 31: ...To change the paper size see Changing the paper size in paper tray 3 below 3 Gently push tray 3 into the machine Push the tray firmly all the way into the machine 4 Set the paper type If the paper size was changed from an inch size to an AB size or from an AB size to an inch size or if the paper type was changed be sure to change the appropriate settings as explained in Setting the paper type and ...

Страница 32: ...to tabbed paper See Setting the paper type and paper size on page 2 10 Loading transparency film Be sure to load transparency film with the label facing down and the film oriented vertically Smudging and a dirty image may result if the film is loaded with the label facing up Transparency film cannot be used in tray 4 Changing the paper size in paper tray 4 Plain paper from 11 x 17 to 5 1 2 x 8 1 2...

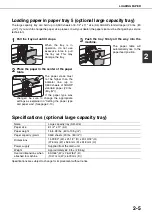
Страница 33: ...andard paper 20 lbs 80 g m2 If the paper type was changed be sure to change the appropriate settings as explained in Setting the paper type and paper size See page 2 10 3 Push the tray firmly all the way into the machine The paper table will automatically rise to the paper feed position Specifications optional large capacity tray Specifications are subject to change for improvement without notice ...

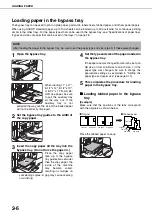
Страница 34: ...ypass tray Do not force the paper in Place the copy paper face up If the bypass tray guides are set wider than the copy paper the inside of the machine may become soiled resulting in smudges on succeeding copies A gap may cause skewing or wrinkling 4 Set the type and size of the paper loaded in the bypass tray If the paper size was changed from an inch size to an AB size or from an AB size to an i...

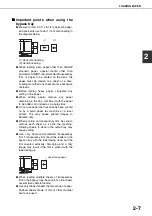
Страница 35: ...o be added and reload as a single stack Do not use paper that has already been printed on by a plain paper fax machine or a laser printer This may cause printed images to become dirty When printing on transparency film be sure to remove each sheet as it exits the machine Allowing sheets to stack in the output tray may cause curling Use only Sharp recommended transparency film Transparency film sho...

Страница 36: ... the paper type and paper size page 2 10 the following paper sizes can be automatically detected 8 1 2 x 11 8 1 2 x 11 R only 8 1 2 x 11 for tabbed paper When AUTO AB is selected in Setting the paper type and paper size page 2 10 the following paper sizes can be automatically detected A4 A4R B5 B5R only A4 for tabbed paper Non standard sizes smaller than 8 1 2 x 11 or A4 40 sheets of transparency ...

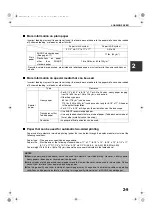
Страница 37: ... paper 16 to 28 lbs or 60 to 105g m2 Recycled colored pre punched pre printed and letterhead papers must conform to the same conditions as above Type Remarks Special paper Heavy paper For 5 1 2 x 8 1 2 to 8 1 2 x 11 or A5 to A4 sizes heavy paper ranging from 16 to 34 lbs or 106 to 128 g m2 can be used Other heavy papers 65 lbs 176 g m2 can be used 110 lbs 200 to 205 g m2 can be used but only for 8...

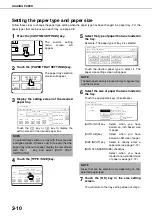
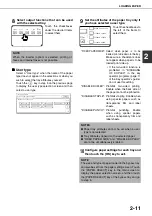
Страница 38: ...runs out of paper display the last screen with the key and select AUTO TRAY SWITCHING PAPER TRAY SETTINGS TA ORWARD RINT PRINTER CONDITION 1 8 PLAIN 8 x11 OK PRINT PAPER TRAY SETTINGS TYPE SIZE CUSTOM SETTINGS TRAY 1 FAX I FAX COPY DOC FILING FIXED PAPER SIDE DISABLE DUPLEX DISABLE STAPLE DISABLE PUNCH 1 2 TYPE SIZE TRAY 3 PER TRAY SETTINGS PRINT COPY I FAX DOC FILING FAX PLAIN 8 x11 1 2 NOTE Tabb...

Страница 39: ...elect when paper is to be loaded print side down in the tray Make sure a checkmark does not appear when paper is to be loaded print side up If the two sided function is prohibited in DISABLING OF DUPLEX in the key operator programs page 11 of the Key operator s guide do not use this setting DISABLE DUPLEX Prohibits two sided printing Enable when the back side of the paper cannot be printed on DISA...

Страница 40: ...pears 3 Select the desired paper size There are separate screens for inch based paper selection and AB paper selection Touch the key or the key to switch between the screens 4 Touch the OK key You will return to the size setting screen of step 2 5 Perform steps 7 through 10 of Setting the paper type and paper size pages 2 10 to 2 11 NOTE Special sizes of paper cannot be loaded in trays 1 2 4 and 5...

Страница 41: ...or of the machine to configure machine settings A key appears for these settings in the custom settings menu screen For information on these settings see the key operator s guide 1 List print can be used in a system where the facsimile printer and network scanner function can be used 2 These settings can be configured in a system where the facsimile or network scanner function is available 3 These...

Страница 42: ...2003 10 20 MON 14 27 DD MM YYYY ME ON OK T 12 HOUR CUSTOM SETTINGS LIST PRINT FAX DATA RECEIVE FORWARD PAPER TRAY SETTINGS EXIT DEFAULT SETTINGS SENDER CONTROL KEY OPERATOR PROGRAMS ADDRESS CONTROL TOTAL COUNT DOCUMENT FILING CONTROL PRINTER CONDITION More information on setting procedures In the following type of screen a setting is selected by touching the key so that a checkmark appears The set...

Страница 43: ...ion Keyboard 2 AZERTY configuration Keyboard 3 ABCDEF configuration The default setting is Keyboard 1 Example Character entry screen when Keyboard 3 is selected List print This is used to print lists of machine settings and a test page to check resident fonts The following lists and pages are available All custom setting list Shows the hardware status software status printer configuration settings...

Страница 44: ...in place 6 Close the front cover NOTE To view the approximate amount of toner remaining hold down the operation guide key or the COPY key during printing or when the machine is on standby The percentage of toner remaining will appear in the display while you hold down the key When the percentage falls to 20 0 obtain a new toner cartridge and keep it ready for replacement NOTE Shake the toner cartr...

Страница 45: ...fter shaking the cartridge vigorously and will remain inside the cartridge without flowing out For best copying results be sure to use only Sharp Genuine Supplies which are designed engineered and tested to maximize the life and performance of Sharp products Look for the Genuine Supplies label on the toner package GENUINE SUPPLIES Supply and Consumables The supply of spare parts for a repair of th...

Страница 46: ... the following diagrams Fourth diagram in step 3 on page 1 21 Diagram in step 6 on page 2 22 Diagram in step 8 on page 2 24 Misfeed in the bypass tray See page 2 23 Misfeed in the finisher See page 3 11 Misfeed in the saddle stitch finisher See page 3 11 Misfeed in the inserter See page 3 17 Misfeed in the tray 3 See page 2 22 Misfeed in the tray 4 See page 2 22 Misfeed in tray 1 tray 2 See page 2...

Страница 47: ...ve the misfed paper Misfed in the exit area Be careful not to tear the misfed paper during removal 3 Gently close the duplex unit After closing confirm that the misfeed message has been cleared and the normal display appears CAUTION The fusing unit is hot Take care in removing paper Do not touch the metal parts NOTES Do not touch or damage the transfer roller Do not touch or damage the photoconduc...

Страница 48: ... the misfed paper Misfeed in upper part of unit Be careful not to tear the misfed paper during removal Misfeed in lower part of unit Be careful not to tear the misfed paper during removal 4 Close the cover of the duplex unit 5 Gently close the duplex unit After closing the duplex unit confirm that the misfeed message has been cleared and the normal display appears ...

Страница 49: ... When using tray 2 check the paper transfer unit inside the tray and remove any misfed paper 4 Gently close paper tray 1 tray 2 Push the tray all the way back in Make sure that the misfeed message no longer appears the normal message display should appear 5 Gently close the duplex unit After closing confirm that the misfeed message has been cleared and the normal display appears NOTE Be sure to fo...

Страница 50: ...e machine 6 If misfed paper is not found in step 3 pull out paper tray 3 and remove the misfed paper Pull the tray all the way out until it stops Check the paper transfer unit inside the tray Be careful not to tear the misfed paper during removal 7 Gently close paper tray 3 Push the tray all the way back in 8 Gently close the duplex unit After closing confirm that the misfeed message has been clea...

Страница 51: ... and gently open the unit Pull the tray all the way out until it stops 5 Remove the misfed paper Check the paper transfer unit inside the tray and remove any misfed paper 6 Gently close paper tray 1 tray 2 Push the tray all the way back in Make sure that the misfeed message no longer appears the normal message display should appear NOTE If a misfeed occurs during printing from the bypass tray whil...

Страница 52: ...he finger hold and gently open the unit Pull the tray all the way out until it stops 8 Remove the misfed paper Check the paper transfer unit inside the tray and remove any misfed paper 9 Gently close paper tray 1 tray 2 Push the tray all the way back in Make sure that the misfeed message no longer appears the normal message display should appear NOTE If a misfeed occurs in the following situation ...

Страница 53: ...fed original Misfeed in the document exit unit Open the document transfer cover Rotate the transfer roller in the direction of the arrow and gently remove the original without tearing it 2 Open and close the document feeder cover Opening and closing the cover clears the misfeed display Copying cannot be resumed until this step is performed However this step is not necessary after a misfeed is remo...

Страница 54: ...lem Check Solution or cause The machine does not operate Machine plugged in Plug the machine into a grounded outlet The main power switch and power switch are not turned on Turn on the main power switch and the power switch Page 1 16 READY indicator off The printer is warming up Warm up time is approximately 120 seconds Wait until the READY indicator lights up Message indicating need to load paper...

Страница 55: ...m settings When using a special size of paper set the correct paper size as explained in Setting the paper type and paper size on page 2 10 If the paper size setting is not correct part of the image may be cut off or the image may not print When printing on a special size of paper using the bypass tray part of the printed image is missing The paper size is not set correctly in the special size set...

Страница 56: ...es place on the wrong side of the paper The paper is loaded in the tray with the print side face down Face up if the paper type is PRE PRINTED or LETTER HEAD Load paper in the tray with the print side face up However if the paper type is PRE PRINTED or LETTER HEAD load the paper with the print side face down If the two sided function has been prohibited using DISABLING OF DUPLEX in the key operato...

Страница 57: ...2 Specifications 3 2 Finishing methods 3 4 Finishing modes and finisher functions 3 6 Staple cartridge replacement and staple jam removal 3 7 Removing a misfeed 3 11 Troubleshooting finisher saddle stitch finisher problems 3 13 INSERTER 3 14 Part names 3 14 Specifications 3 14 Loading paper 3 15 Manual operation of the inserter 3 15 Misfeed removal 3 17 Troubleshooting inserter problems 3 18 ...

Страница 58: ...heets of paper or total aggregate thickness is within 5 1 2 140mm Sizes other than the above Stapling 100 sets or 750 pages of 8 1 2 x 11 A4 or B5 paper 100 sets or 500 pages of other sizes of paper Upper paper tray Middle paper tray Non stapling 2000 sheets of paper or total aggregate thickness is within 9 53 64 250mm 8 1 2 x 11 5 1 2 x 8 1 2 R A4 B5 or A5R 20 lbs 80 g m2 1000 sheets of paper or ...

Страница 59: ... 2 x 11 R A3 B4 A4 A4R B5 Upper paper tray Middle paper tray 11 x 17 8 1 2 x 14 8 1 2 x 13 8 1 2 x 11 8 1 2 x 11 R A3 B4 A4 A4R B5 Lower tray 11 x 17 8 1 2 x 11 R A3 B4 A4R Maximum number of sheets for stapling See Staple sort mode on 3 4 page Stapling positions 1 place at back 1 place at back diagonal one place at front diagonal 2 places Paper conveying Center reference Power supply Supplied from...

Страница 60: ...titch function of 68 lbs 256 g m2 paper can be included as covers in the page stapling limit in the table below Original Printouts Original Printouts Offset mode Non offset mode Saddle stitch on centerfold line only when using the saddle stitch finisher Stapling positions Top left corner of printouts Lower left corner of printouts Center left two positions of printouts Portrait orientation Landsca...

Страница 61: ...s installed holes can be punched in printed pages When using the saddle stitch finisher pamphlet style stapling and the punch function cannot be used together When using the punch function automatic rotation of the original image does not operate For the allowed paper sizes for punching see the specifications on page 3 3 When using the punch function in copy mode place the original with the top to...

Страница 62: ...4 The offset function operates when a checkmark appears in this key The offset checkmark is automatically cleared when the staple sort function is enabled CENTER TRAY key If the center tray is selected output paper will be delivered to the exit tray located above the main unit OK key Touch to close the OUTPUT screen and return to the main screen SADDLE STITCH key See page 3 5 This is displayed whe...

Страница 63: ...nd slide out the staple cartridge 3 Pull the empty staple case straight up and out of the cartridge 4 Insert a new staple case into the cartridge Push the staple case all the way in until it clicks into place Do not remove the seal holding the staples until the staple case is set in the cartridge 5 Pull the seal that holds the staples straight out 6 Insert the cartridge all the way in until it cli...

Страница 64: ...on of the arrow rotate to the right 4 Remove the empty staple case and set a new one Replace both staple cases with new ones Remove the cover from the staple cartridge and then install the cartridge 5 Return the saddle stitch holder and the saddle stitch unit to their respective original positions 6 Make sure that the finisher is firmly attached to the machine and that 11 x 17 8 1 2 x 11 R or 8 1 ...

Страница 65: ...on page 3 7 2 Holding the knob lower part A 3 Remove any jammed staples 4 Holding the knob return part A to its original position 5 Return the staple case to its original position Insert the cartridge all the way in until it clicks into place 6 Close the front cover of the finisher NOTE Do not touch the stapling area The stapler could injure you A Stapling area A ...

Страница 66: ...irmly attached to the machine and that 11 x 17 8 1 2 x 11 R or 8 1 2 x 14 A3 A4R or B4 size paper is loaded If one of the above paper sizes is not set test stapling cannot be performed 8 Close the lower cover of the finisher Test stapling is automatically performed on a blank sheet This operation is carried out to avoid blank stapling Disposal of hole punch scrap when the punch module is installed...

Страница 67: ...over of the finisher saddle stitch finisher When an inserter is installed lift the tray of the inserter 4 Lift knob A See the step 3 figure then remove any misfed paper Be careful not to tear the misfed paper during removal 5 Lift knob B see the illustration in step 4 and remove any misfed paper Be careful not to tear the misfed paper during removal 6 Remove any misfed paper from the paper exit ar...

Страница 68: ...r of the saddle stitch unit and remove any misfed paper Be careful not to tear the misfed paper during removal 16Close the exit cover of the saddle stitch unit 17Close the lower cover of the saddle stitch finisher 18Close the front cover of the inserter only when an inserter is installed When a punch module is installed 19Open the cover of the hole punch module 20Rotate the green knob until the ar...

Страница 69: ...d See pages 3 7 and 3 8 Different sizes of paper mixed together Stapling cannot be performed on mixed paper sizes The paper is badly curled The quality and type of some papers may cause bad curling that prevents stapling Take the paper out of the tray or bypass tray turn it around and reload it so that the top and bottom edges are reversed Saddle stitch cannot be selected The paper type of the sel...

Страница 70: ...without notice Paper tray Place blank or printed paper here to be inserted Paper guide When loading paper adjust this guide to the width of the paper Top cover Open for misfeed removal Inserter operation panel Stapling and punching can be performed directly from the inserter operation panel without using the machine operation panel Paper guide lever Release the paper guide lock to remove misfed pa...

Страница 71: ...each set of output is stapled and delivered to the finisher or saddle stitch finisher tray Note that the sets are not offset Press this key until the icon light of the desired staple position lights up pamphlet stapling can only be selected when a saddle stitch finisher is installed START key indicator After selecting punch or staple settings with key or key place the paper to be punched or staple...

Страница 72: ...E indicator START indicator Cause Solution Any one of the indicators is solidly lit Blinks red A paper size that cannot be fed has been loaded Use paper that is a suitable size for punching stapling or saddle stitching page 3 3 Solidly lit Blinks red The paper type of the inserter is set to heavy paper Heavy paper cannot be used Blinking Blinks red The finisher or saddle stitch finisher tray is fu...

Страница 73: ...the top cover 4 Remove the misfed paper Be careful not to tear the misfed paper during removal 5 If a misfeed was not found in step 4 raise the paper guide lever 6 Remove the misfed paper Be careful not to tear the misfed paper during removal 7 If a misfeed was not found in step 6 remove the misfed paper from under the paper guide Be careful not to tear the misfed paper during removal 8 Return the...

Страница 74: ... 16 The inserter does not operate Are any inserter covers open Close all covers Disabling of inserter is enabled in the key operator programs Check the key operator programs and disable Disabling of inserter A paper misfeed message appears Remove the misfed paper page 3 17 The START key light is not illuminated Make sure that the punch or staple key has been selected on the operation panel of the ...

Страница 75: ...Part 2 Copier Operation ...

Страница 76: ......

Страница 77: ...STORING DELETING AND USING ORIGINAL SIZES 4 6 Storing or deleting an original size 4 6 NORMAL COPYING 4 7 Making copies with the automatic document feeding function 4 7 Automatic two sided copying using the automatic document feeding function 4 10 Copying from the document glass 4 11 Automatic two sided copying from the document glass 4 13 ADJUSTING THE EXPOSURE 4 14 REDUCTION ENLARGEMENT ZOOM 4 1...

Страница 78: ...the document feeder tray be sure to remove any staples or paper clips If originals have damp spots from correction fluid ink or glue from pasteups be sure they are dried before they are fed If not the interior of the document feeder or the document glass may be soiled Do not use the following originals These originals may cause incorrect original size detection original misfeeds and smudges on cop...

Страница 79: ... size as shown above NOTE Do not place any objects under the original size detector because they may damage it or the original size may not be detected properly 8 x11 or A4 8 x14 or B4 11x17 or A3 8 x11 or A4 Document glass scale mark Document glass scale mark NOTE Original size detection function One of the four groups of standard original sizes shown below can be selected for detection by the or...

Страница 80: ...l be automatically rotated 90 and copied When an image is rotated a message will be displayed If a function is selected that is not suitable for rotation such as enlarging the copy to greater than 8 1 2 x 11 A4 size or staple sorting with the saddle stitch finisher rotation will not be possible Example This function operates in both the auto paper select or auto image mode Rotation copy setting ca...

Страница 81: ...nal is placed in the document feeder or on the document glass touch the SIZE INPUT tab and then enter the X width and Y length dimensions of the original X is initially selected Enter the X dimension width and then touch the Y key and enter the Y dimension length X can be from 2 1 2 to 17 inch and Y can be from 2 1 2 to 11 5 8 inch If you frequently use originals that are the same non standard siz...

Страница 82: ...s X width is initially selected Enter X and then touch the key to enter Y A width of 2 1 2 to 17 inches can be entered in X and a length of 2 1 2 to 11 5 8 inches can be entered in Y 6 Touch the OK key The original size entered in step 5 is stored in the key selected in step 4 To exit touch the ORIGINAL key 7 When you touch a key that shows an original size in step 4 a message screen appears that ...

Страница 83: ...er tray with paper of the required size Even if the message above appears copying can be performed onto the currently selected paper The following requirements must be satisfied Originals of a standard size 11 x 17 8 1 2 x 14 8 1 2 x 11 8 1 2 x 11 R or 5 1 2 x 8 1 2R A3 B4 A4 A4R B5 B5R or A5 are set and the auto paper select function is enabled If originals of a size other than the sizes above ar...

Страница 84: ...key can be selected When you touch the QUICK FILE key a message asking you to confirm the save will appear Touch the OK key in the message screen and go to the next step If you wish to cancel the save touch the QUICK FILE key after touching the OK key so that the QUICK FILE key is no longer highlighted 10Press the START key If the C key is pressed while originals are being scanned scanning will st...

Страница 85: ...n a saddle stitch finisher is installed The screen that appears when a finisher is installed is slightly different SPECIAL MODES 2 SIDED COPY OUTPUT OUTPUT SORT GROUP Original Press the START key Set the number of copies 5 Touch the OUTPUT key Touch the SORT key Five sets of copies When using the automatic document feeding function sorting is automatically selected when the original is placed in t...

Страница 86: ...4 6 2 Touch the 2 SIDED COPY key 3 Select the desired copy mode The display will vary depending on the equipment installed When making automatic two sided copies of a one sided 11 x 17 A3 or 8 1 2 x 14 B4 size portrait original or when you wish to invert the top and bottom of the back side of a two sided original touch the BINDING CHANGE key 4 Touch the OK key Perform steps 6 through 10 on pages 4...

Страница 87: ...s load paper in a paper tray with paper of the required size Even if the message above is displayed copying can be performed onto the currently selected paper The following requirements must be satisfied Originals of a standard size 11 x 17 8 1 2 x 14 8 1 2 x 11 8 1 2 x 11 R or 5 1 2 x 8 1 2 R A3 B4 A4 A4R B5 B5R or A5 are set and the auto paper select function is enabled If originals of a size ot...

Страница 88: ...pter 7 If the FILE key is grayed out only the QUICK FILE key can be selected When you touch the QUICK FILE key a message asking you to confirm the save will appear Touch the OK key in the message screen and go to the next step If you wish to cancel the save touch the QUICK FILE key after touching the OK key so that the QUICK FILE key is no longer highlighted 7 Press the START key Replace the origi...

Страница 89: ...ze as shown above 2 Touch the 2 SIDED COPY key 3 Touch the 1 sided to 2 sided copy key When making automatic two sided copies of a one sided 11 x 17 A3 or 8 1 2 x 14 B4 size portrait original or when you wish to invert the top and bottom of the back side of a two sided original touch the BINDING CHANGE key 4 Touch the OK key Perform steps 3 to 8 on pages 4 11 and 4 12 Original Copy 8 x11 or A4 8 x...

Страница 90: ...um background TEXT PHOTO This provides the best balance for copying an original which contains both text and photos This mode is also useful for copying printed photographs PHOTO This mode provides the best copies of photographs with fine details AUTO AUTO 8 x11 ORIGINAL PAPER SELE T EXPOSURE 1 2 ORIGINAL IMAGE TYPE TEXT AUTO MANUAL 5 3 1 OK TEXT PHOTO PHOTO AUTO AUTO 8 x11 100 ORIGINAL PAPER SELE...

Страница 91: ...ouch the QUICK FILE key a message asking you to confirm the save will appear Touch the OK key in the message screen and go to the next step If you wish to cancel the save touch the QUICK FILE key after touching the OK key so that the QUICK FILE key is no longer highlighted 6 Press the START key If you placed the original on the document glass set the output mode to Sort and pressed the START key y...

Страница 92: ...ratios Any ratio from 25 to 400 can be set in 1 increments Touch the key to increase the ratio or the key to decrease the ratio If you continue to touch the key the ratio will change automatically After 3 seconds the ratio will change rapidly 5 Touch the OK key NOTE When the original is placed in the document feeder the ratio can be set from 25 to 200 UTO 100 8 X11 2 PAPER SELECT COPY RATIO AUTO A...

Страница 93: ...en you touch the QUICK FILE key a message asking you to confirm the save will appear Touch the OK key in the message screen and go to the next step If you wish to cancel the save touch the QUICK FILE key after touching the OK key so that the QUICK FILE key is no longer highlighted 9 Press the START key If you placed the original on the document glass set the output to Sort and pressed the START ke...

Страница 94: ...ot become highlighted when touched Zoom ratios Any ratio from 25 to 400 can be set in 1 increments Touch the key to increase the ratio or the key to decrease the ratio If you continue to touch the key the ratio will change automatically After 3 seconds the ratio will change rapidly 6 Touch the Y key Original Copy NOTE When the original is placed in the document feeder the ratio can be set from 25 ...

Страница 95: ...and select the paper size If the AUTO PAPER SELECT mode is on the appropriate copy paper size will have been automatically selected based on the original size and selected copy ratios 10Select any desired copy settings such as the exposure or number of copies and then press the START key ZOOM 50 50 70 Y X 64 77 XY ZOOM CANCEL ZOOM 50 77 Y A OK PA 400 200 100 129 AUTO AUTO X 50 Y 70 ORIGINAL PAPER ...

Страница 96: ... X key before touching the Y key When loading paper if you changed the paper size from an AB size to an inch size or from an inch size to an AB size or if you changed the paper type be sure to change the paper type and size settings as explained in steps 5 to 7 on page 2 10 and steps 8 to 10 on page 2 11 5 Select the bypass tray 6 Select any desired copy settings such as the exposure or number of ...

Страница 97: ...r using special functions 5 2 Margin shift 5 3 Erase 5 4 Dual page copy 5 5 Pamphlet copy 5 6 Job build 5 8 Tandem copy 5 9 Covers inserts 5 11 Transparency film with insert sheets 5 22 Multi shot 5 23 Book copy 5 25 Tab copy 5 26 Card shot 5 28 Mirror image 5 30 B W reverse 5 30 STORING USING AND DELETING JOB PROGRAMS 5 31 Storing a job program 5 31 Calling up a job program 5 32 Deleting a stored...

Страница 98: ...ed in the 3rd screen 3 3 Mirror image page 5 30 B W reverse page 5 30 General procedure for using special functions 1 Touch the SPECIAL MODES key 2 Touch the key for the desired special mode Example Selecting the margin shift function To select a special function in one of the other two screens use the keys to change the screen SPECIAL MODES MARGIN SHIFT PAMPHLET COPY ERASE OK 1 3 DUAL PAGE COPY J...

Страница 99: ...al modes screen You will return to the main screen of copy mode NOTE The initial setting for the margin width can be changed in the key operator programs to any value from 0 to 1 0 to 20 mm Page 14 of the Key operator s guide Image shifted to the right Image shifted to the left Margin Margin Original Two sided copying Image shifted to the right Margin Image shifted to the left Margin Or One sided ...

Страница 100: ...djust the amount of erase and touch the OK key Use the and keys to set the erase width to any value from 0 to 1 in increments of 1 8 0 to 10 mm in 1 mm 4 Touch the OK key on the special modes screen You will return to the main screen of copy mode NOTE The initial setting for the erasure width can be changed in the key operator programs to any value from 0 to 1 0 to 20 mm Page 14 of the Key operato...

Страница 101: ...nsure that 8 1 2 x 11 A4 size paper is selected If 8 1 2 x 11 A4 size paper is not selected touch the PAPER SELECT key to select 8 1 2 x 11 A4 size paper The dual page copy function can be used only when copying from the document glass The automatic document feeder cannot be used with this function Only 8 1 2 x 11 A4 paper can be used Book original Dual page copy To display the special modes scree...

Страница 102: ... will also appear in the upper left corner of the screen to indicate that the function is turned on 2 Designate the type of originals to be copied 1 sided or 2 sided Select the 2 SIDED key if you wish to scan a two sided original using the automatic document feeding function 3 Select the binding position left binding or right binding If you wish to insert a different type of paper for use as a cov...

Страница 103: ...e been scanned The next step is not needed When using the document glass Replace the original with the next original and press the START key Repeat this operation until all originals have been scanned and then touch the READ END key NOTES When the cover paper is fed from the inserter the cover cannot be copied on Two sided copying is not possible on label sheets transparency film and tabbed paper ...

Страница 104: ...and press the START key Scanning of originals will start After scanning of the first set of originals A in the example above is completed remove the scanned originals place the next set of originals set B in the example and press the START key Repeat this operation until all sets of originals have been scanned 5 Touch the READ END key Originals Divide the originals into sets of 150 pages each Scan...

Страница 105: ...nge it The tandem settings should be configured by your network administrator If the server and client machines will alternate server and client roles the IP address of the server machine must also be entered in the client machine The same port number can be set in both machines 1 Touch the TANDEM COPY key on the special modes screen The TANDEM COPY key will be highlighted to indicate that the fun...

Страница 106: ... set to 999 and Non staple is selected tandem copying will take place 2 If tandem copying is executed for a two sided copy job with the number of copies set to 999 and Staple is selected tandem copying will not take place because the client machine does not have a finisher After the START key is pressed if the client machine cannot print because it is out of paper or other reason the server machin...

Страница 107: ...s Load the cover insert paper in the tray before using the cover insert function Use the same size of paper for the covers inserts as for the copies For the procedures for loading paper see pages 2 2 to 2 12 Before selecting the cover insert function place the originals in the document feeder select one sided or two sided copying and select the number of copies and any other desired copy settings ...

Страница 108: ...selected the selection only applies to the back cover paper The Z key shows the tray selected for the front cover paper in step 3 and the paper size and type 6 Touch the OK key in the screen of step 5 You will return to the screen of step 2 When you return to the screen of step 2 the FRONT COVER key will be highlighted 7 To insert back cover paper repeat steps 2 through 6 using the BACK COVER key ...

Страница 109: ...e only applies to insertion type A paper When insertion type B is selected the selection only applies to insertion type B paper The Z key shows the tray selected for insertion type A in step 3 and the paper size and type If a paper tray with tabbed paper is selected in the screen of step 3 you can touch the TAB COPY key This allows you to select the tab width Two sided copying is not possible on t...

Страница 110: ... screen of step 9 You will return to the screen of step 2 When you return to the screen of step 2 the INSERTION TYPE A SETTING key will be highlighted 11If you wish to insert a different paper with the INSERTION TYPE B SETTING key repeat steps 2 through 6 Use the INSERTION TYPE B SETTING key instead of the INSERTION TYPE A SETTING key and the INSERTION TYPE B key instead of the INSERTION TYPE A ke...

Страница 111: ...ed insert at page To edit or delete an inserted page touch the key of the page you wish to edit or delete in the page layout screen When the key is touched the CANCEL DELETE and AMEND keys appear To cancel touch the CANCEL key To delete an inserted page touch the DELETE key To edit an inserted page touch the AMEND key The screen of step 5 on page 5 12 or the screen of step 5 on page 5 13 appears E...

Страница 112: ...originals and copies and will vary depending on the settings Type Symbol Meaning Icon appearing in display Type Symbol Meaning Icon appearing in display Front cover Front cover when not copied on Inserts Insert when not copied on Front cover after one sided copying Insert after one sided copying Front cover after two sided copying One page is not copied on Insert after one sided copying One page i...

Страница 113: ...ing copies Front cover Back cover No copying No copying One sided copying No copying Two sided copying No copying No copying One sided copying No copying Two sided copying One sided copying One sided copying One sided copying Two sided copying Two sided copying One sided copying Two sided copying Two sided copying 1 2 3 4 5 6 1 2 3 4 5 6 1 2 3 4 5 6 1 2 3 4 5 6 1 2 3 4 6 5 1 2 3 4 5 6 1 2 3 4 6 5 ...

Страница 114: ...ng copies Front cover Back cover No copying No copying One sided copying No copying Two sided copying No copying No copying One sided copying No copying Two sided copying One sided copying One sided copying One sided copying Two sided copying Two sided copying One sided copying Two sided copying Two sided copying 1 2 3 4 5 6 1 2 3 4 5 6 1 2 3 4 5 6 1 2 3 4 5 6 1 2 3 4 6 5 1 2 3 4 5 6 1 2 3 4 6 5 1...

Страница 115: ...nt cover Back cover No copying No copying One sided copying No copying Two sided copying No copying No copying One sided copying No copying Two sided copying One sided copying One sided copying One sided copying Two sided copying Two sided copying One sided copying Two sided copying Two sided copying 1 2 3 4 5 6 1 2 3 4 5 6 1 2 3 4 5 6 1 2 3 4 5 6 1 2 3 4 6 5 1 2 3 4 5 6 1 2 3 4 6 5 1 2 3 4 5 6 1 ...

Страница 116: ...s Front cover Back cover No copying No copying One sided copying No copying Two sided copying No copying No copying One sided copying No copying Two sided copying One sided copying One sided copying One sided copying Two sided copying Two sided copying One sided copying Two sided copying Two sided copying 1 2 3 4 5 6 1 3 4 5 6 1 2 3 4 5 6 1 2 3 4 6 1 2 3 4 6 5 1 3 4 6 1 3 4 6 5 1 2 3 4 6 1 2 3 4 6...

Страница 117: ...inals 1st page 2nd page 3rd page 4th page 5th page 6th page 1 2 3 4 5 6 Copying on insert Resulting copies one sided copying Resulting copies two sided copying No copying One sided copying Two sided copying 1 2 3 4 5 6 1 2 3 4 5 6 1 2 3 4 5 6 1 2 3 4 5 6 1 2 3 4 5 6 1 2 3 4 5 6 1st page 2nd page 3rd page 1 2 3 4 5 6 Copying on insert Resulting copies one sided copying Resulting copies two sided co...

Страница 118: ... size or from an inch size to an AB size be sure to set the paper type and size as explained on steps 5 to 7 on page 2 10 and steps 8 to 10 on page 2 11 5 Select the bypass tray 6 Touch the TRANSPARENCY INSERTS key in the special modes screen 2nd screen The Transparency inserts setting screen will appear The transparency inserts icon etc will also appear in the upper left corner of the screen to i...

Страница 119: ...g the multi shot function place the originals select the desired paper size and select the copying mode before selecting the multi shot function on the special modes screen When using the multi shot function the appropriate copy ratio will be automatically set based on the original size paper size and the number of originals to be copied onto one sheet The minimum reduction ratio is 25 The origina...

Страница 120: ...ions in which the images are arranged 4 Touch the OK key inside OK key on the multi shot setting screen You will return to the special modes screen 5 Touch the OK key in the special modes screen You will return to the main screen of copy mode To display the special modes screen See General procedure for using special functions on page 5 2 TRANSPARENCY INSERTS MULTI SHOT CARD SHOT TAB COPY SPECIAL ...

Страница 121: ...ing screen You will return to the special modes screen 3 Select any desired cover settings If you wish to use a different type of paper for the cover perform steps 4 to 12 on pages 5 6 to 5 7 If you do not wish to use a different type of paper continue from step 4 4 Touch the OK key in the special modes screen You will return to the main screen of copy mode 5 Place the originals on the document gl...

Страница 122: ... bottom Right binding Inverted top bottom Right binding Inverted top bottom Originals Prepare these originals Originals placed face up in the document feeder Originals placed on the document glass Tabbed paper Load tabbed paper in the bypass tray or tray 3 Result Normal orderA E Normal orderA E Reverse orderE A Leading edge of original Normal orderA E Leading edge of original Normal orderA E Leadi...

Страница 123: ...lect TAB PAPER for the paper type setting The paper type setting is explained in Setting the paper type and paper size page 2 10 If you are using tray 3 see Setting the paper size when a special size is loaded page 2 12 To display the special modes screen See General procedure for using special functions on page 5 2 NOTE The width of the tabbed paper can be up to 8 1 2 x 11 width 8 1 2 5 8 or A4 w...

Страница 124: ...touch the Y key to enter Y To return the X and Y values to the initial settings configured in the key operator programs touch the SIZE RESET key CARD SHOT SETTINGS on page 14 of the key operator s guide To have the images enlarged or reduced by a suitable ratio based on the entered original size so that the front and back sides fit into the selected paper size touch the FIT TO PAGE key Original Ex...

Страница 125: ...ress the START key The front side of the card is scanned 8 Place the back side of the original face down on the document glass see step 5 9 Press the START key The back side of the card is scanned 10Touch the READ END key SIZE RESET CANCEL OK OK FIT TO PAGE NOTE The original must be placed on the document glass The document feeder automatic document feeding function cannot be used To cancel the ca...

Страница 126: ...Copy To display the special modes screen See General procedure for using special functions on page 5 2 ECIAL MODES MIRROR IMAGE B W REVERSE About the steps that follow If an automatic document feeder is being used see pages 4 7 through 4 10 If the document glass is being used see pages 4 11 through 4 13 To cancel the mirror image function touch the MIRROR IMAGE key in the special modes screen the ...

Страница 127: ...am Number keys in which job programs are already stored are highlighted 4 Select the copy settings that you wish to store in the job program The number of copies cannot be stored 5 Touch the OK key The selected settings will be stored in the number key selected in step 3 If a number key is selected in step 3 that has already been programmed A setting confirmation screen will appear To replace the ...

Страница 128: ...as been stored is selected the screen will change to the screen of step 4 on the previous page for storing a job program 4 Touch the DELETE key The selected program is deleted and you return to the screen of step 3 To return to the screen of step 3 without deleting the job program touch the CANCEL key In both cases touch the EXIT key on the screen displayed in the screen of step 3 to exit the job ...

Страница 129: ... needed and then press the START key 4 The previous copy job automatically resumes after the interrupt job finishes NOTES If you touch the INTERRUPT key when auditing mode is enabled the display will prompt you to enter your account number Enter your account number with the numeric keys The copies you make will be added to the count of the entered account number If a copy is being printed when the...

Страница 130: ......

Страница 131: ...HINE MAINTENANCE FOR COPYING This chapter explains procedures for cleaning the machine and troubleshooting Page USER MAINTENANCE 6 2 Cleaning the document glass and the automatic document feeder 6 2 TROUBLESHOOTING 6 3 ...

Страница 132: ...soft cloth If necessary moisten the cloth with water or a small amount of neutral detergent When finished wipe dry with a clean cloth If black or white stripes appear on printed images of originals that were fed through the automatic document feeder wipe the long narrow glasses in the scanning unit and in the illustration CAUTION Do not use flammable spray to clean the machine If gas from the spra...

Страница 133: ...is not clear on a copy An appropriate exposure mode for the original has not been selected Change the exposure mode to TEXT See page 4 14 Smudges appear on copies Document glass or document cover dirty Clean regularly See page 6 2 Black lines appear on copies when the automatic document feeding function is used Clean the original scanning area See page 6 2 Original smudged or blotchy Use a clean o...

Страница 134: ......

Страница 135: ...reen of document filing 7 5 Document filing icons 7 5 SAVING A DOCUMENT IMAGE FILE 7 6 Quick File 7 6 Filing 7 7 Print jobs 7 9 Scan Save 7 10 CALLING UP AND USING A FILE 7 13 Searching for and calling up a saved file 7 13 Calling up and using a saved file 7 15 CUSTOM SETTINGS 7 21 Creating editing and deleting user names and folders 7 21 ENTERING CHARACTERS 7 26 TROUBLESHOOTING 7 28 ...

Страница 136: ...U AR M550N Copier printer model Images can be saved to the Quick File folder the main folder or the custom folder When the optional facsimile expansion kit or network scanner expansion kit is installed images transmitted with those functions can be saved AR M620N AR M700N File 1 File 2 QUICK FILE FOLDER File 1 File 2 MAIN FOLDER CUSTOM FOLDER Copier model only A password can be set Copier printer ...

Страница 137: ...available for saved files SHARING PROTECT and CONFIDENTIAL When saved with the SHARING attribute a file is not protected When saved with the PROTECT or CONFIDENTIAL attribute a file is protected Files saved to the Quick File folder are all SHARING When saving a file to the main folder or a custom folder SHARING or CONFIDENTIAL can be selected A SHARING file can be changed to a PROTECT or CONFIDENT...

Страница 138: ...umeric keys Use these keys to enter a password or a numeric value for a setting C key clear key Use this key if you make a mistake when entering a password or numeric setting This key is also used to cancel scanning of a document CA key Use this key to cancel a setting procedure and return to the main screen The key is also used to cancel a special function CUSTOM SETTINGS key Use this key to stor...

Страница 139: ...in folder or the folders in the custom folder appear QUICK FILE FOLDER key Touch to call up a file from the Quick File folder When the key is touched the files in the Quick File folder appear If the machine does not have the printer function the following screen will appear Document filing icons The following icons may appear added to a main icon or alone HDD STATUS SEARCH SCAN TO HDD FILE FOLDER ...

Страница 140: ...l the save touch the QUICK FILE key after touching the OK key so that the QUICK FILE key is no longer highlighted 3 Press the START key on the operation panel To prevent accidental saving of the document the warning THE SCANNED DATA IS STORED IN THE QUICK FILE FOLDER appears for 6 seconds after the START key is pressed When copying begins the image is saved 4 The saved image can be called up from ...

Страница 141: ...appears Enter a file name maximum of 30 characters See page 7 26 to enter characters 7 Touch the STORED TO key 8 Touch the desired folder name in the list of folder names that appears Folder names must be previously stored Creating a custom folder on page 7 24 If a password has been set for the folder a password entry screen will appear Enter the 5 digit password for the folder To use filing the m...

Страница 142: ...urn to the screen of step 4 The set password is displayed with 15Touch the OK key You will return to the main screen 16Press the START key on the operation panel When copying begins the image is saved 17The saved image can be called up using the file name folder name or user name or from the filing folder To call up the image by entering the file name folder name or user name see Searching for and...

Страница 143: ...r go to step 3 If you touched the QUICK FILE FOLDER key the files in the Quick File folder appear Go to step 4 3 Touch the key of the folder that contains the desired file If a password is set for the selected folder a password entry screen will appear Enter the 5 digit password with the numeric keys 4 Touch the printer icon tab and then touch the key of the desired file The following screen appea...

Страница 144: ...al size perform steps 7 to 10 To set the resolution perform steps 11 to 13 on page 7 11 To select the exposure perform steps 14 to 16 on page 7 11 If you no not wish to select any of the above settings go to step 17 on page 7 11 7 Touch the ORIGINAL key 8 To set the original size see Manually setting the scanning size on page 4 5 9 If the original is two sided touch the 2 SIDED BOOKLET key or the ...

Страница 145: ...ou are using the document glass touch the READ END key after all pages have been scanned 18The saved image can be called up using the file name folder name or user name or from the filing folder To call up the image by entering the file name folder name or user name see Searching for and calling up a saved file on page 7 13 To call up the image from the filing folder see Calling up and using a sav...

Страница 146: ...in the fax and network scanner manuals It is also equivalent to the Multi shot function in copy mode however only 2in1 is possible for scan save This function reduces two original pages and arranges the images on a single page in a uniform layout JOB BUILD key see page 5 8 When you have more pages than can be placed in the document feeder at once this function allows you to scan the pages in sets ...

Страница 147: ...To search by user name follow steps 3 to 6 To search by file name or folder name perform step 8 To stop searching touch the CANCEL key Searching by user name 3 Touch the USER NAME key 4 Touch the one touch key of the user name that you wish to use to search for the file If you wish to directly enter the user name touch the DIRECT ENTRY key The selected user name is highlighted If you select the wr...

Страница 148: ...f the file name or folder name the full name will appear when you return to the screen of step 4 9 Touch the SEARCH START key 10The results of the file or folder name search appear Touch the desired file name or folder name See page 7 5 for a list of the document filing icons When a file name is touched the operation selection screen appears To perform an operation using the file go to step 5 on p...

Страница 149: ...e desired file is saved in the main folder go to step 4 If the desired file is saved in a custom folder go to step 3 If you touched the QUICK FILE FOLDER key the files in the Quick File folder appear Go to step 4 3 Touch the key of the folder that contains the desired file If there are more custom folder keys than can appear in one screen touch the or keys to change screens If a password is set fo...

Страница 150: ...have the front and back images oriented opposite to each other touch the 2 SIDED TABLET key Note that the size and orientation of the saved image may cause these keys to have the opposite effect If neither key is selected one sided printing will take place TANDEM PRINT key If the conditions for tandem printing are met page 5 9 touch this key to enable tandem printing See page 5 9 for more informat...

Страница 151: ...n screen ADDRESS BOOK key Touch this key to display the destinations stored in the directory ADDRESS REVIEW key Touch this key to display the destinations SPECIAL MODES key Touch this key to display the special function menu The functions that can be selected vary depending on the transmission mode Scan to E mail FTP TIMER The transmission time can be specified FAX TIMER The transmission time can ...

Страница 152: ...bute A file that is set to SHARING can be changed to PROTECT or CONFIDENTIAL However a SHARING file that is saved in the Quick File folder can only be changed to PROTECT A file that is set to PROTECT can be changed to SHARING or CONFIDENTIAL However a PROTECT file that is saved in the Quick File folder can only be changed to SHARING A file that is saved in the Quick File folder cannot be changed t...

Страница 153: ...operation is used to delete the selected file Touch the DELETE key in the operation select screen A message asking you to confirm the deletion will appear Touch the YES key to delete the file Only SHARING or CONFIDENTIAL files can be deleted A PROTECT file can be deleted by first using PROPERTY CHANGE to change the attribute to SHARING Detail This operation is used to show detailed information on ...

Страница 154: ...To view information on the file touch the DETAIL key Use the keys to change screens When you are finished touch the OK key to return to the screen of step 3 5 Touch the CALL key The operation selection screen appears Select and perform the desired operation as explained in Calling up and using a saved file page 7 15 JOB QUEUE DETAIL 1 8 COMPLETE JOBS COMPLETED Suzuki7890123456 14 09 12 09 00 COPY ...

Страница 155: ...to the page indicated below for the selected operation 1 USER NAME REGISTRATION key Program a user name See the next page 2 AMEND DELETE USER NAME key Edit or delete a user name See page 7 23 3 CUSTOM FOLDER REGISTRATION key Create a custom folder See page 7 24 4 AMEND DELETE CUSTOM FOLDER key Edit or delete a custom folder See page 7 25 The steps from here to page 7 25 can only be performed if th...

Страница 156: ...h to create a new folder or if no folders have been created touch the ADD NEW key If you touched the ADD NEW key program a name for the folder as explained on page 7 24 The user name programmed in step 1 is selected as the user name of the folder 8 Touch the EXIT key You will return to the USER NAME REGISTRATION screen REGISTRATION IS COMPLETED will appear highlighted next to No 9 To exit touch th...

Страница 157: ...f step 2 Deleting 6 Touch the DELETE key 7 Touch the YES key You will return to the screen of step 2 To delete another user name repeat steps 2 3 5 and 6 To exit touch the EXIT key in the screen of step 2 OK AMEND DELETE USER NAME AMEND DELETE CUSTOM FOLDER USER NAME AMEND DELETE SELECT USER NAME TO AMEND DELETE Suzuki Ono Hasegawa Sasaki EXIT UVWXYZ OPQRST JKLMN EFGHI ABCD ALL USERS Yamada Nakata...

Страница 158: ...in step 1 5 Touch the OK key 6 Touch the USER NAME key You will select a user name that will be associated with the folder name you are programming Selection of a user name cannot be omitted 7 The programmed user names appear Touch the desired user name If you do not wish to use any of the user names that appear touch the ADD NEW key to program a new user name When you touch a user name a password...

Страница 159: ...ted to the right of No To stop using a password touch the PASSWORD key and then touch the OK key without entering anything for the password will appear and the password will be canceled 5 When you have finished editing the items touch the EXIT key To edit another folder repeat steps 2 to 5 Deleting 6 Touch the DELETE key 7 Touch the YES key You will return to the screen of step 2 To delete another...

Страница 160: ...er You can also press the AB ab 12 key during entry to enter a number or symbol 4 Touch the SPACE key The cursor moves forward and a space is entered 5 Touch the ÃÄÂ ãäâ key 6 Touch the ä key To switch between upper case and lower case touch the ÃÄÂ ãäâ key When ãäâ is highlighted lower case letters are entered 7 Touch the ÃÄÂ ãäâ key 8 Touch the Ä key You can press the ABC abc key during entry to...

Страница 161: ...he cursor back one space and then enter the correct character You can continue touching keys to enter characters You can also touch another character type selection key ÃÄÂ ãäâ key or AB ab 12 key to enter characters other than numbers and symbols 3 When you have finished entering characters touch the OK key You will exit the character entry screen and return to the programming screen If you touch...

Страница 162: ... to CONFIDENTIAL use PROPERTY CHANGE page 7 18 to change the attribute to PROTECT A name in the Quick File folder is cut off Was the name programmed in the advanced transmission settings If the name was programmed in the advanced transmission settings before the file was saved in the Quick File folder that name will be used However if the name is longer than the maximum name length of the Quick Fi...

Страница 163: ...8 1 CHAPTER 8 SPECIFICATIONS This chapter contains useful information about the machine Page SPECIFICATIONS 8 2 INDEX 8 4 ...

Страница 164: ...is fed horizontally from tray1 Copy ratio Variable 25 to 400 in 1 increments total 376 steps Fixed presets 25 64 77 100 121 129 200 and 400 for inch system 25 50 70 81 86 100 115 122 141 200 and 400 for AB system Continuous copy 999 copies Dimensions including automatic document feeder 28 43 64 W x 26 47 64 D x 46 15 16 H 728 mm W x 679 mm D x 1192 mm H Weight main unit only Approx 408 lbs Approx ...

Страница 165: ... 48 copies min Center tray specifications Output method Face down output Maximum number of sheets 20lbs 80g m2 recommended paper 250 sheets Paper type Plain paper and special paper The maximum number of pages that can be held varies depending on ambient conditions in the installation location the type of paper and the storage conditions of the paper 85 Humidity Operating conditions Temperature 60 ...

Страница 166: ...ling up and using a file 7 13 Calling up and using a saved file 7 15 Delete 7 19 Detail 7 19 Move 7 19 Print 7 16 Property change 7 18 Send 7 17 Card shot 1 6 5 2 5 28 7 12 Center erase 5 4 Center tray 1 9 4 9 CENTER TRAY key 3 6 Changing the paper size in paper tray 2 3 2 4 Clear all key 1 12 7 4 Clear key 1 12 7 4 Clock 2 13 Confidential 7 3 Contents 0 5 to 0 6 Continuous copying speed 8 3 COPY ...

Страница 167: ...t 2 15 Loading paper 2 2 bypass tray 2 6 tray 1 tray 2 2 2 tray 3 2 3 tray 5 2 5 Lower cover 3 2 M Main features 1 3 to 1 7 Main folder 7 3 Main power switch 1 10 1 16 Main screen 5 2 Manual exposure adjustment 4 14 Manual selection 4 16 Margin Shift 1 4 5 2 5 3 Meaning of R 1 2 Mirror image 1 6 5 2 5 30 Misfeed 2 18 to 2 25 3 11 to 3 12 3 18 Misfeed in the paper feed area 2 21 to 2 24 Misfeed ori...

Страница 168: ... a function 1 13 Selecting the exposure level 4 14 Selecting the exposure mode 4 14 Selecting the output tray 4 9 Sender control 2 13 Sender control list 2 15 Sending address list 2 15 Setting the paper size 2 10 to 2 12 Setting the paper type 2 10 to 2 11 Sharing 7 3 Sort 1 3 3 4 4 9 SORT key 3 6 Special modes Copier operation 5 2 Special modes Document filing function 7 12 Special paper 2 8 to 2...

Страница 169: ...addle stitch finisher 3 13 General information 2 26 to 2 28 Inserter 3 18 Types and sizes of paper 2 8 to 2 9 Types and sizes of paper that can be used 2 8 U Upper cover of large capacity tray 1 10 User maintenance 6 2 User name 7 21 to 7 23 W Warming up 2 26 X XY Zoom 1 4 4 18 Z Zoom 4 16 ...

Страница 170: ......
Страница 171: ...CT Sharp is not responsible for any damages or loss either direct incidental or consequential which you the end user may experience as a result of your purchase or use of the hardware software or firmware embodied in or used in conjunction with this Product Your sole remedy in the event that you encounter any difficulties with this Product is against the authorized dealer from which you purchased ...

Страница 172: ...ion and copier operation PRINTED IN JAPAN 2004B DSC1 CINSE2473FC52 SHARP ELECTRONICS CORPORATION Sharp Plaza Mahwah New Jersey 07430 1163 www sharpusa com SHARP ELECTRONICS OF CANADA LTD 335 Britannia Road East Mississauga Ontario L4Z 1W9 ...

Отзывы: