background image

AH-A07BE-C/09BE-C
AH-A07BE/09BE/12BE
AY-A07BE-C/09BE-C
AY-A07BE/09BE/12BE

33

DISASSEMBLING PROCEDURE

FOR INDOOR UNIT

CAUTION : DISCONNECT THE UNIT FROM THE POWER SUPPLY BEFORE ANY 

SERVICING

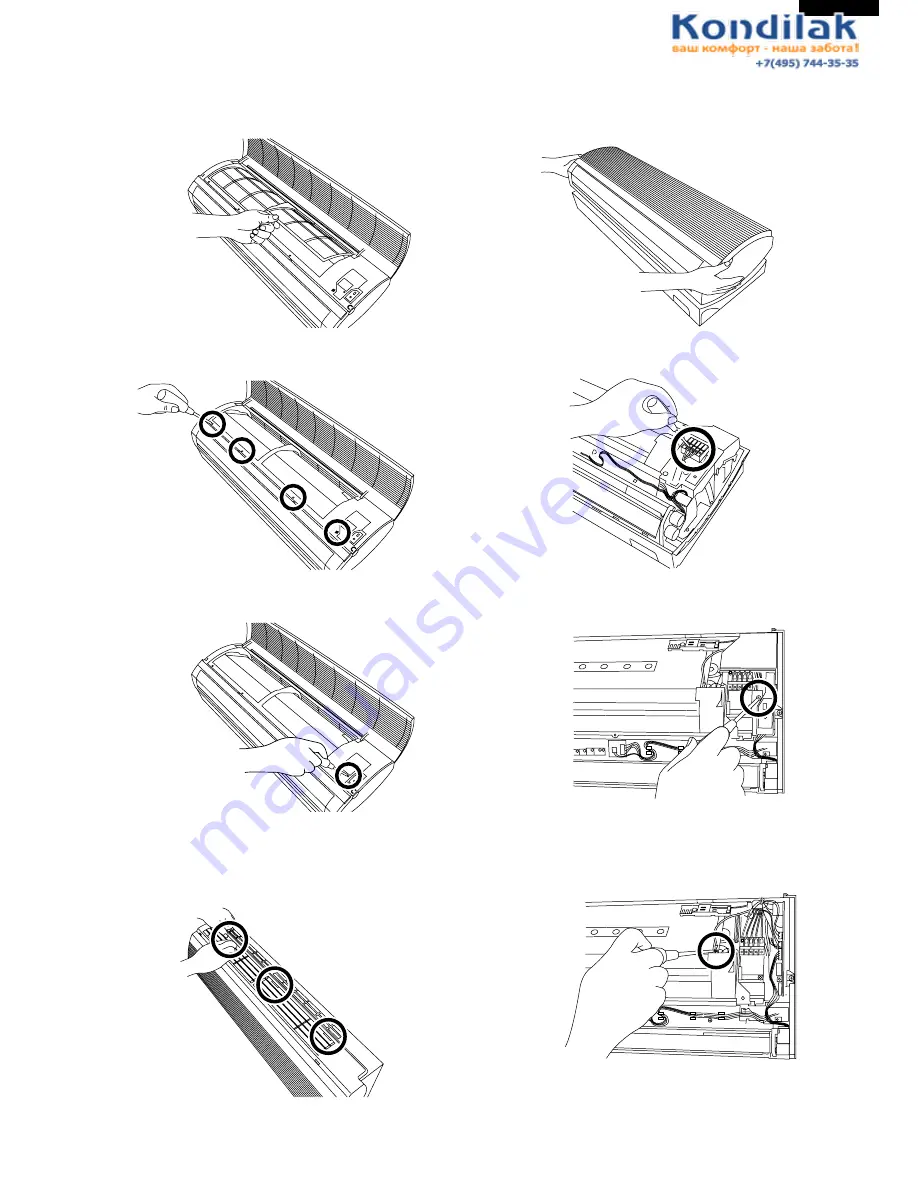
1. Open the opne panel, and remove 2 air filters.

2. Remove 4 screws fixing the front panel.

3. Remove the screw fixing the cord clamp.

Note: During reassembly, install the holder after

installing the front panel. THis will make it
easier to assemble the front pane.

4. Close the open panel. Pushing the nail of the front

pane.

5. Pull the front panel up.

6. Remove the unit-to-unit wiring from the terminal

board.

7. Remove a screw fixing the control box cover, and

remove it.

8. Remove a screw fixing the ground wire.

Note: During reassembly, take care for the

direction of the lead wire.

Содержание AE-A07BE

Страница 1: ...TERNAL DIMENSIONS 4 WIRING DIAGRAMS 6 ELECTRICAL PARTS 9 MICROCOMPUTER CONTROL SYSTEM 13 FUNCTIONS 17 TROUBLESHOOTING OF THE CONTROL CIRCUIT 24 REFRIGERATION CYCLE 29 PERFORMANCE CURVE 31 DISASSEMBLING PROCEDURE 33 REPLACEMENT PARTS LIST 41 SERVICE MANUAL S4216AYA09BE SPLIT SYSTEM ROOM AIR CONDITIONERS In the interests of user safety Required by safety regulations in some countries the set should ...

Страница 2: ... type Condenser Corrugate fin and Grooved tube type Control Capillary tube Refrigerant volume 700g 650g De Ice system Micro computercontroled reverse systyem Noise level High dB A 33 43 33 43 at cooling Med dB A 29 29 Low dB A 27 27 Fan system Drive Direct drive Air flow quantity High m3 min 7 2 21 7 2 21 Med m3 min 6 0 6 0 Low m3 min 4 8 4 8 Fan Cross flow fan Propeller fan Cross flow fan Propell...

Страница 3: ... and Grooved tube type Condenser Corrugate fin and Grooved tube type Control Capillary tube Refrigerant volume 740g 690g 970g De Ice system Micro computercontroled reverse systyem Noise level High dB A 36 43 36 43 38 48 at cooling Med dB A 32 32 33 Low dB A 27 27 29 Fan system Drive Direct drive Air flow quantity High m3 min 8 6 28 8 6 28 9 3 30 Med m3 min 6 8 6 8 8 4 Low m3 min 5 3 5 3 7 4 Fan Cr...

Страница 4: ... fin and Bare tube type Control Capillary tube Refrigerant volume 480g 470g Noise level High dB A 33 43 33 43 at cooling Med dB A 29 29 Low dB A 27 27 Fan system Drive Direct drive Air flow quantity High m3 min 7 2 20 7 2 20 Med m3 min 6 0 6 0 Low m3 min 4 8 4 8 Fan Cross flow fan Propeller fan Cross flow fan Propeller fan Connections Refrigerant coupling Flare type Refrigerant tube size Gas Liqui...

Страница 5: ...er fin and Grooved tube type Control Capillary tube Refrigerant volume 550g 560g 870g Noise level High dB A 36 43 36 43 38 48 at cooling Med dB A 32 32 33 Low dB A 27 27 29 Fan system Drive Direct drive Air flow quantity High m3 min 8 6 28 8 6 28 9 3 30 0 Med m3 min 6 8 6 8 8 4 Low m3 min 5 3 5 3 7 4 Fan Cross flow fan Propeller fan Cross flow fan Propeller fan Cross flow fan Propeller fan Connect...

Страница 6: ...7BE 09BE 12BE EXTERNAL DIMENSIONS Figure E 1 INDOOR UNIT Figure E 2 OUTDOOR UNIT FOR AE A07BE AE A07BE C AND AU A07BE AU A07BE C Length unit mm 815 278 198 1100 Remote controller 58 18 5 22 140 INVERTER AIR CONDITIONER 430 720 775 143 55 245 535 278 236 228 20 58 ...

Страница 7: ...BE C AH A07BE 09BE 12BE AY A07BE C 09BE C AY A07BE 09BE 12BE 7 Figure E 3 OUTDOOR UNIT FOR AE A09BE AE A09BE C A12BE AND AU A09BE AU A09BE C A12BE 269 179 5 182 5 136 81 780 70 540 310 335 540 12 37 5 4 5 58 158 16 ...

Страница 8: ... 250V INDOOR UNIT BK BL BL BL G Y G Y TERMINAL BOARD 1 TERMINAL BOARD 2 POWER SUPPLY R P M SIGNAL 1 1 1 N 400 430 V 2µF INTERNAL THERMAL FUSE MOTOR PROTECTOR OUTDOOR UNIT TERMINAL BOARD RUNNING CAPACITOR 370V 25µF FAN MOTOR FAN MOTOR CAPACITOR 400 450 V 1 5µF COMPRESSOR MOTOR C BK BL BK R S W R R BL CONTROL BOX BK BL UNIT TO UNIT CORD BK BR R BL BLACK BROWN RED BLUE W G Y WHITE GREEN YELLOW 1 1 IN...

Страница 9: ...ER SUPPLY 1 INTERNAL THERMAL FUSE INTERNAL MOTOR PROTECTOR OUTDOOR UNIT TERMINAL BOARD RUNNING CAPACITOR 400V 25µF FAN MOTOR FAN MOTOR CAPACITOR 400 450 V 1 5µF COMPRESSOR MOTOR C BL BK R S W R R BL CONTROL BOX BK BL UNIT TO UNIT CORD BK BR R BL BLACK BROWN RED BLUE W G Y WHITE GREEN YELLOW 1 1 INDOOR UNIT TERMINAL BOARD 1 BR BL G Y BR BL G Y G Y TERMINAL BOARD 2 POWER SUPPLY 1 INTERNAL THERMAL FU...

Страница 10: ... BL O G Y G Y TERMINAL BOARD 1 TERMINAL BOARD 2 POWER SUPPLY R P M SIGNAL 1 2 3 1 2 3 1 A B N 400 430 V 2µF INTERNAL THERMAL FUSE MOTOR PROTECTOR OUTDOOR UNIT TERMINAL BOARD RUNNING CAPACITOR 370V 25µF FAN MOTOR VALVE COIL FAN MOTOR CAPACITOR 400 450 V 1 5µF COMPRESSOR MOTOR C BK BK BL R S W R R BL CONTROL BOX BK BK BK BL UNIT TO UNIT CORD BK BR R BL BLACK BROWN RED BLUE W G Y WHITE GREEN YELLOW 1...

Страница 11: ...NTERNAL THERMAL FUSE INTERNAL MOTOR PROTECTOR OUTDOOR UNIT TERMINAL BOARD RUNNING CAPACITOR 400V 25µF FAN MOTOR VALVE COIL FAN MOTOR CAPACITOR 400 450 V 1 5µF COMPRESSOR MOTOR C BK BK BL R S W R R BL CONTROL BOX BK BK BL UNIT TO UNIT CORD BK BR R BL BLACK BROWN RED BLUE W G Y WHITE GREEN YELLOW CB572 1 2 1 2 3 INDOOR UNIT TERMINAL BOARD 1 POWER SUPPLY BL BR BL BR G Y G Y G Y TERMINAL BOARD 2 3 1 I...

Страница 12: ...RKS SITE Compressor QK164PA13A 220 240V 50Hz 780W AE AU A09BE Compressor RH165VHET 220 240V 50Hz 800W AE A09BE Compressor RH154VHST 220 240V 50Hz 750W AU A09BE Indoor fan motor ML A915 220 240V 50Hz AY AH Outdoor fan motor ML A916 220 240V 50Hz 220 230V 60Hz AE AU Indoor fan motor capacitor 400V 2µF AY AH Outdoor fan motor capacitor 400V 1 5µF AE AU Running capacitor 400V 30µF AE AU A09BE Running ...

Страница 13: ... JP2 NONE NONE NONE P45 REHEAT JP3 NONE NONE NONE P41 H C JP4 NONE NONE NONE P40 CAP3 JP5 P37 CAP2 JP6 NONE P36 CAP1 JP7 NONE P34 PIPE 2 JP8 P33 PIPE 1 JP9 NONE NONE NONE P32 D FAN JP10 NONE NONE NONE P31 DEICE 2 JP11 NONE NONE P30 DEICE 1 JP12 NONE NONE P27 EUROPE ASIA JP13 NONE NONE NONE P44 OUT FAN P63 WIRELESS JP15 JP14 P64 POWER ON JP16 NONE NONE NONE P01 SWEAT JP23 NONE NONE NONE AN5 FAN L R...

Страница 14: ... JP2 NONE NONE NONE P45 REHEAT JP3 NONE NONE NONE P41 H C JP4 P40 CAP3 JP5 P37 CAP2 JP6 NONE P36 CAP1 JP7 NONE P34 PIPE 2 JP8 P33 PIPE 1 JP9 NONE NONE NONE P32 D FAN JP10 NONE NONE NONE P31 DEICE 2 JP11 NONE NONE P30 DEICE 1 JP12 NONE NONE NONE NONE P27 EUROPE ASIA JP13 NONE NONE NONE NONE NONE NONE P44 OUT FAN P63 WIRELESS JP15 JP14 P64 POWER ON JP16 NONE NONE NONE P01 SWEAT JP23 NONE NONE NONE A...

Страница 15: ...rinted Wiring Diagram for AY A07BE A07BE C A09BE A09BE C A12BE FROM TERMINAL BOARD POWER 1 FROM TERMINAL BOARD UNIT 1 FROM TERMINAL BOARD UNIT N FROM TERMINAL BOARD 2 FROM TERMINAL BOARD 3 FROM THERMISTOR FROM LOUVER UPPER FROM LOUVER LOWER INDOOR FAN MOTOR R P M SIGNAL INDOOR FAN MOTOR ...

Страница 16: ...BE 09BE 12BE Fig L 4 Printed Wiring Diagram for AH A07BE A07BE C A09BE A09BE C A12BE FROM TERMINAL BOARD POWER 1 FROM TERMINAL BOARD UNIT 1 FROM TERMINAL BOARD UNIT N FROM THERMISTOR FROM LOUVER UPPER FROM LOUVER LOWER INDOOR FAN MOTOR R P M SIGNAL INDOOR FAN MOTOR ...

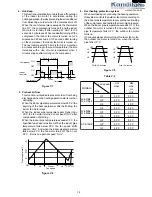
Страница 17: ...stat circuit is controlled by three thermostat lines D1 thru D3 Figure Y 3 2 Operation modes 2 1 COOL operation The compressor turns on or off at the thermostat lines C3 and C4 The outdoor fan motor is also controlled with the compressor Figure Y 4 Figure Y 2 Room temperature Preset temperature Room temperature transition C3 C4 States 1 3 Compressor ON State 2 Compressor OFF 1 2 3 18 32 C1 C2 C3 C...

Страница 18: ...D1 States 1 5 Cooling zone States 2 4 Dehumidifying zone States 3 Circulating zone 3 4 5 1 2 Room temperature Preset temperature Room temperature transition States 1 3 Compressor ON States 2 Compressor OFF ON Hot keep function H1 H2 3 1 2 Compressor Cooling zone Dehumidifying zone Circulating zone Fan speed ON DH DL DL or OFF ON OFF Table Y 1 2 3 Heat operation The compressor turns on or off at St...

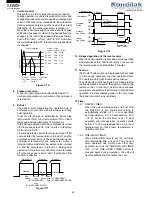
Страница 19: ...an motor is turned off after rotating at HUL for 30 seconds 3minutesand10secondsafterturningoffthe compressor the indoor fan motor is turned on for 3 minutes and 20 seconds At 10 seconds after turning on the compressor the indoor fan motor is turned on The next compressor OFF time is for 3 8 or more than 8 minutes according to the room temperature the time increases with a rise of room temperature...

Страница 20: ...eat operation is shut down or the operating mode is switched from heat to cool or dry or vice versa the reverse valve is switched after 3 minutes 11 Test run If the AUX button on the unit is pressed for 5 seconds or more during operation cool test operation starts The operation LED red flickers during test run To put the system in the heating test run mode start the cooling operation and select th...

Страница 21: ...d by turning on a circuit breaker the air conditioner automatically starts of operation in AUTO Refer to Figure L 2 Printed Wiring Board 17 AUTO RESTART Power failure occurs during operation the unit will retart in the same operation mode as before after power recovery Refer to Figure L 2 Printed Wiring Board 18 Test mode Keep pushing the AUX buttons and supply the power the system will go to the ...

Страница 22: ...pe temperature is open or short state the operation LED turns on or off syncrnoously with the timing of the timer LED by pushing continously for more than 5 seconds AUX button during suspension of operation Timing chart of Timer LED and Operation LED of DIAGNOSIS PROCEDURE When OI button the remote controller or AUX button in the unit is pushed the unit is free from DIAGNOSIS PROCEDURE Indoor fan ...

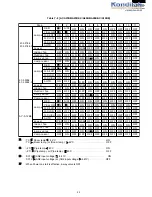
Страница 23: ...F OFF OFF OFF OFF OFF OFF ON ON OFF OFF OFF OFF ON ON OFF OFF ON OFF ON OFF OFF OFF OFF ON ON OFF OFF ON OFF ON OFF OFF OFF OFF OFF OFF OFF OFF OFF OFF OFF OFF ON OFF OFF OFF OFF OFF OFF OFF OFF OFF OFF ON OFF OFF OFF OFF OFF ON OFF ON ON FLICK ON ON ON OPEN OFF ON OFF OFF RED YELLOW FAN SOFT FAN LOW Lamps Louver Indoor fan Outdoor fan 4 way valve Compressor FAN HIGH AUTO RED YELLOW Lamps Louver I...

Страница 24: ... OFF ON OFF ON OFF OFF ON ON OFF OFF ON OFF ON OFF OFF OFF ON ON OFF OFF ON OFF ON OFF OFF OFF OFF OFF OFF OFF OFF ON OFF OFF OFF ON ON OFF OFF ON OFF ON OFF OFF ON ON OFF OFF OFF ON ON OFF OFF OFF OFF OFF OFF OFF OFF OFF OFF OFF OFF OFF OFF OFF OFF OFF OFF OFF OFF OFF OFF OFF ON ON FLICK ON ON ON OPEN OFF OFF RED YELLOW Lamps Louver Indoor fan Compressor AUTO RED YELLOW Lamps Louver Indoor fan Co...

Страница 25: ...mer YES NO YES NO The machine does not function at all with remote controller and switches on the indoor unit Using a tester measure the voltage between anodes of D1 and D2 on PWB ass y Is the measured value approx 17 0 Vac Replace the PWB with a new one Is the 3 0A fuse down Replace the fuse and varistor with new ones Replace the ftransformer with a new one ...

Страница 26: ... Replace the PWB with a new one Does beep sound from the indoor unit Using a tester measure the voltage between terminals of resistor R11 on the PWB ass y Push the button OI Are batteries of the wireless remote controller proper Replace the batteries with new ones Replace the wireless remote controller When the signal is received does the voltage change Replace the PWB with a new one PWB is normal...

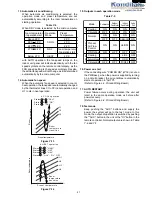
Страница 27: ... terminal board the power supply voltage Are the resistances conformed Fig 1 Replace the thermistor ass y with a new one NO YES YES NO Replace the PWB ass y with a new one Fig 1 Using a tester measure voltage at the terminals on the terminal board 100 80 60 40 20 0 10 0 10 20 30 40 Resistance Thermistor Room temperature Heat exchange Color Yellow Orange To measure the resistance first remove the c...

Страница 28: ...defective The thermistor may be defective Is the voltage between terminal N and 1 of the terminal board the power supply voltage NO Replace the PWB ass y with a new one Push the button of TEST RUN on the indoor unit and wait 3 minutes Using a tester measure voltages at the terminals on the terminal board Select HEAT MODE with remote controller And then start operation Is the voltage between termin...

Страница 29: ...ssor Flare coupling Flare coupling Silencer 4 3 way valve 2 way valve Accumulator s 1 4 C 2 Capillary tube A Capillary tube B Capillary tube C 2 pieces Accumulator 3 Strainer Heating Cooling Outdoor unit Condenser Evaporator Indoor unit Reverse valve Comp ressor Flare coupling Flare coupling 3 way valve 2 way valve Silencer Coil s 1 4 C 2 Capillary tube A Capillary tube B Accumulator 3 Strainer He...

Страница 30: ...umidity 20 Heating Outdoor side Dry bulb Temp C Relative Humidity 7 87 27 Cooling 47 35 40 AY A07BE AY A07BE C AY A09BE AY A09BE C AY A12BE Temperature at each part and pressure in 3 way valve NO Condition Cooling Heating Cooling Heating Cooling Heating Model 1 2 3 4 3 way valve pressure MPaG 0 54 1 51 0 52 1 54 0 52 1 62 41 C 70 C 12 C 7 C 74 C 3 C 32 C 3 C 75 C 43 C 13 C 8 C 74 C 2 C 32 C 3 C 41...

Страница 31: ...city kW Outside air temp C Input W Outlet air temp C PERFORMANCE CURVES NOTE 1 Indoor fan speed Hi 2 Vertical adjustment louver 45 Horizontal adjustment louver front 3 Indoor air temp Cooling 27 C Heating 20 C 4 Power source 220V 50Hz Figure P 1 At Cooling for AH A07BE A07BE C Figure P 2 At Cooling for AH A09BE A09BE C Figure P 3 At Cooling for AH A12BE Figure P 4 At Cooling for AY A07BE A07BE C F...

Страница 32: ...ing for AY A12BE 5 0 7 5 10 1 5 2 0 2 5 3 0 35 30 40 400 500 600 700 Heating capacity kW Outside air temp C Input W Outlet air temp C 5 0 5 7 10 2 5 2 0 3 0 3 5 35 40 45 600 700 800 900 Heating capacity kW Outside air temp C Input W Outlet air temp C 5 0 5 7 10 2 5 3 0 3 5 4 0 4 5 5 0 35 40 45 800 900 1000 1100 1200 Heating capacity kW Outside air temp C Input W Outlet air temp C ...

Страница 33: ... 3 Remove the screw fixing the cord clamp Note During reassembly install the holder after installing the front panel THis will make it easier to assemble the front pane 4 Close the open panel Pushing the nail of the front pane 5 Pull the front panel up 6 Remove the unit to unit wiring from the terminal board 7 Remove a screw fixing the control box cover and remove it 8 Remove a screw fixing the gr...

Страница 34: ...ator 10 Remove 4 connectors 11 Remove the thermistor holder from the evaporator 12 Remove the display from the drain pan 13 Remove the screw fixing the pipe holder 14 Remove 3 screws fixing the control box and remove the control box 15 Remove a screw fixing the drain pan 16 Pull drain pan toward you CN1 CN6 CN3 CN2 ...

Страница 35: ...e the evaporator from the cabinet 20 Remove 2 screws fixing the motor cover and pull up the fan 21 Loose a screw fixing fan Cautionary points for assembling the fan a When inseting the motor shaft into the metal fan boss take care to prevent injuring the inner surface of the metal fan boss b Before fastening the motor shaft and fan insert the motor shaft into contact with the bottom of the metal f...

Страница 36: ...gh 3 hooks on the front panel along the guide from the center of the front panel 2 After the left half is inseted completely press the display cover and snap in the 3 hooks on the right How to remove the control box 1 Remove the photo detector unit Press and spread the upper hook and the photo detector unit will be ready for removal 2 Remove the screw fixing the terminal board 3 Remove a screw fix...

Страница 37: ...it from the drain pan During installation turn the drain hose to the state of the engagement position After reinstallation verify that it is securely fastened How to remove the horizontal louver Slightly pull down the hinge area defelect thge louver and unhook it from the hinge Remove the shaft from each of the left and right sides Drain pan Drain Hose Groove Projection To disconned To reconnect ...

Страница 38: ...ew fixing the side cover 2 Loose a screw fixing the cord clamp 3 Loose the unit to unit cord 4 Loose 4 screws fixing the top panel 5 Loose 5 screws fixing the front panel 6 Cut 3 nylon bands Right side view Left side view Front view 7 Remove 5 terminals AE A09BE A09BE C A12BE Remove 3 terminals AU A09BE A09BE C A12BE AE A09BEA09BE C A12BE AU A09BEA09BE C A12BE Fan motor 3 3 Reverse valve 2 0 Right...

Страница 39: ...AY A07BE 09BE 12BE 39 8 Remove the terminal cover 9 Remove 3 terminals 10 Loose 4 screws fixing the control box 11 Take out the control box DISASSEMBLING PROCEDURE OF THE FAN 1 Loose the fan nut and fan can take out 2 Fan motor is secured by 4 screws Loose ...

Страница 40: ...TDOOR UNIT MODEL AE A07BE A07BE C AND AU A07BE A07BE C CAUTION DISCONNECT THE UNIT FROM THE POWER SUPPLY BEFORE ANY SERVICING 1 Remove the four 4 screws holding the terminal cover and right side cover Then take them out 2 Remove the three 3 screws holding the left side cover and take it out 3 Remove the another screws holding the cabinet and take it out NOTE Number as shown in following figure is ...

Страница 41: ...E 1 AC 1 28 TSPC E053JBRA Name label AY A07BE C 1 AC 1 28 TSPC D658JBRA Name label AY A09BE 1 AC 1 28 TSPC E054JBRA Name label AY A09BE C 1 AD 1 28 TSPC D664JBRA Name label AY A12BE 1 AC 1 29 PFPFPB901JBEZ Cabinet insulator except for AY A12BE AH A12BE 1 AH 1 30 QW VZE013JBZZ Lead wire upper 1 AG 1 31 GWAK A257JBFA Front panel 1 AX 1 32 PCOV A614JBFZ Drain cover 1 AG 1 33 TLABCB408JBRZ Wiring diag...

Страница 42: ...e union 1 2 AH A12BE AY A12BE 1 AK 3 6 DEVA A121JBKZ Evaporator assembly AH A09BE A09BE C AY A09BE A09BE C 1 BS 3 6 DEVA A122JBKZ Evaporator assembly AH A12BE AY A12BE 1 BT 3 6 DEVA A123JBKZ Evaporator assembly AH A07BE A07BE C AY A07BE A07BE C 1 BR ACCESSORY PARTS 4 1 CRMC A530JBEZ Remote controller AY A07BE A07BE C A09BE A09BE C A12BE 1 AZ 4 1 CRMC A531JBEZ Remote controller AH A07BE A07BE C A09...

Страница 43: ... 23 1 44 3 6 1 39 1 41 1 40 1 42 1 18 1 5 1 4 1 29 1 3 1 26 4 7 2 11 1 22 1 1 1 12 1 32 1 2 2 1 3 1 2 4 2 5 3 2 3 5 3 3 3 4 2 1 5 1 1 7 2 13 2 2 2 15 2 14 1 21 4 3 4 4 2 6 2 7 1 16 1 30 1 19 1 19 1 13 1 20 1 14 1 13 1 11 1 17 1 10 1 6 1 27 1 24 1 25 1 31 1 37 1 38 1 28 1 36 1 37 1 25 2 3 2 16 2 12 2 10 4 9 4 11 4 8 4 12 4 5 4 10 4 43 2 9 1 15 1 34 1 8 1 8 2 8 1 9 1 9 6 1 6 2 1 33 1 41 INVERTER AIR...

Страница 44: ...r 1 AC CONTROL BOX PARTS 2 1 RHOG A186JBZZ Protector AU A07BE 1 AT 2 2 LBNDKA062JBW0 Capacitor clamp 1 AD 2 3 QW IZA014JBZZ Compressor cord AU A07BE 1 AN 2 3 QW IZA028JBZZ Compressor cord AU A07BE C 1 AP 2 4 RC HZA316JBE0 Running capacitor AU A07BE 1 AY 2 4 RC HZA301JBE0 Running capacitor AU A07BE C 1 AX 2 5 RC HZA419JBZZ Fan motor capacitor 1 AP 2 6 QTANZA002JBZZ Terminal board 1 AN 2 7 LHLD 0261...

Страница 45: ...E0 Wire fixing band AU A07BE C 2 AE SCREWS NUT AND WASHER 4 1 LX WZA019JBE0 Special washer 1 AD 4 2 LX BZA078JBE0 Special screw 4 AB 4 3 LX BZA075JBE0 Special screw 1 AA 4 4 LX WZA019JBE0 Special washer 1 AB 4 5 LX NZA030JBE0 Special nut 1 AB 4 6 LX CZA038WRE0 Special screw 2 AA 4 7 LX BZA076JBE0 Special screw 6 AA 4 8 XCPSD40P20000 Tapping screw 1 AA PACKING PARTS 5 1 CPADBA231YDK0 Bottom pad ass...

Страница 46: ... A07BE C 1 6 3 2 1 27 3 1 6 3 1 3 3 1 4 3 1 2 2 1 3 1 1 3 11 2 3 1 16 1 19 AU A07BE C 3 13 3 14 3 10 3 13 3 11 3 10 3 6 1 18 1 4 1 18 1 3 4 5 4 6 1 2 4 1 1 9 1 13 1 28 1 15 1 10 1 11 1 5 1 17 3 1 5 3 12 1 1 1 12 3 8 3 4 3 3 4 2 4 2 4 2 4 2 3 5 3 5 3 9 3 7 4 7 2 2 6 7 2 4 2 5 1 8 4 8 2 6 4 3 1 22 1 20 1 21 1 26 1 25 1 24 1 23 1 7 5 1 5 2 Front side 3 1 1 3 14 ...

Страница 47: ...ZZ Protector 1 AT 2 2 LBNDKA062JBW0 Capacitor clamp 1 AD 2 3 QW IZA014JBZZ Compressor cord AE A07BE 1 AN 2 3 QW IZA028JBZZ Compressor cord AE A07BE C 1 AP 2 4 RC HZA316JBE0 Running capacitor AE A07BE 1 AY 2 4 RC HZA301JBE0 Running capacitor AE A07BE C 1 AX 2 5 RC HZA419JBZZ Fan motor capacitor 1 AP 2 6 QTANZA003JBZZ Terminal board 1 AR 2 7 LHLD 0261JBM0 Cord holder 1 AB CYCLE PARTS 3 1 FCMPRA106JB...

Страница 48: ...A030JBE0 Reverse valve 1 BC 3 16 LX NZA026JBE0 Special nut 3 AC 3 17 PGUMSA033JBE0 Damper rubber 1 AH SCREWS NUT AND WASHER 4 1 LX WZA019JBE0 Special washer 1 AB 4 2 LX BZA078JBE0 Special screw 4 AB 4 3 LX BZA075JBE0 Special screw 1 AA 4 4 LX BZA127JBE0 Special screw 1 AC 4 5 LX NZA030JBE0 Special nut 1 AB 4 6 LX CZA038WRE0 Special screw 2 AA 4 7 LX BZA076JBE0 Special screw 6 AA 4 8 XCPSD40P20000 ...

Страница 49: ...1 1 2 1 9 1 1 1 15 1 10 1 11 1 20 1 5 1 17 3 1 5 3 1 1 3 16 1 12 3 15 3 17 3 11 3 12 3 14 3 10 3 6 6 4 3 8 3 4 3 3 4 2 4 2 4 2 4 2 3 5 3 5 3 9 3 7 2 7 4 7 2 2 4 7 2 4 2 5 1 8 4 8 2 6 4 3 1 22 1 13 1 21 1 26 1 25 1 24 1 23 1 7 5 1 5 2 Front side 1 27 4 6 1 28 4 7 A B C D E F G H A 1 2 3 4 5 6 1 2 3 4 5 6 B C D E F G H OUTDOOR UNIT FOR AE A07BE A07BE C ...

Страница 50: ...ass y AU A09BE C 1 AY 1 19 DCAB A100JBKZ Top cover ass y AU A12BE 1 AX 1 19 DCAB A097JBKZ Top cover ass y AE A09BE 1 AX 1 19 DCAB A117JBKZ Top cover ass y AE A09BE C 1 AY 1 19 DCAB A098JBKZ Top cover ass y AE A12BE 1 AX 1 20 FFTA A014JBKZ Side cover ass y 1 AT 1 21 CCHS A747JBTA Base pan ass y AU A09BE AE A09BE 1 BC 1 21 CCHS A748JBTA Base pan ass y AU A09BE C AE A09BE C AU A12BE AE A12BE 1 BD 1 2...

Страница 51: ...2 PCON A455JBPZ Condenser AE A09BE A09BE C 1 BT 3 2 PCON A459JBPZ Condenser AU A12BE 1 BU 3 2 PCON A451JBPZ Condenser AU A09BE A09BE C 1 BS 3 3 DVLV A461JBKZ 3way valve unit AU A09BE A09BE C AE A09BE A09BE C 1 AY 3 3 DVLV A466JBKZ 3way valve unit AU A12BE AE A12BE 1 BA 3 4 DVLV A462JBKZ 2way valve tube assy 1 AW 3 5 PSEN A004JBK0 Flare nut ass y 1 AE 3 6 PSEN A005JBK0 Flare nut ass y AU A09BE A09B...

Страница 52: ... 3 1 7 3 2 1 25 1 26 1 23 1 24 4 4 1 34 1 31 1 32 1 35 1 33 2 1 3 1 3 3 1 2 3 1 4 2 10 2 10 3 1 6 3 1 3 3 1 2 3 1 6 3 1 4 1 21 1 16 1 9 1 17 4 2 4 2 1 12 3 6 3 5 3 10 3 9 3 10 2 9 3 4 3 12 3 3 1 28 1 11 2 6 1 19 4 2 1 29 4 5 4 5 4 2 4 5 4 5 4 5 4 6 4 5 1 14 3 1 Front side A B C D E F G H A 1 2 3 4 5 6 1 2 3 4 5 6 B C D E F G H OUTDOOR UNIT FOR AU A09BE A09BE C A12BE AE A09BE A09BE C A12BE 02 SHARP...

Отзывы: