10
20A1-RU
21A1-RU
21A2-RU
10-2
10-1
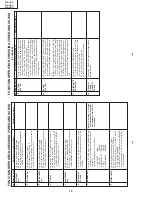
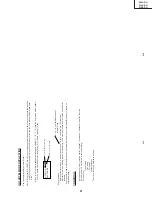
FUNCTION OPERA
TION CHECKING (VIDEO
AND
AUDIO)
(Continued)
No.
Adjusting point
Adjusting procedure/conditions
W
aveform and others
COLOUR
SYSTEM
1.
Receive the "P
AL
COLOUR BAR" signal, press
the COLOUR SYSTEM key to select modes ex-
cept P
AL, check the COLOUR is not working prop-
erly
.
Then, select the "P
AL" mode. Check again
its colour so that it is working properly
.
2.
Receive "NTSC 4.43/3.58 COLOUR BAR" signal
thru
A
V
, press COLOUR SYSTEM key to select
modes except N4.43/3.58, check the COLOUR
is not working properly
.
Then, select the "NTSC
4.43/3.58" mode. Check again its colour so that it
is working properly
.
9
SOUND
SYSTEM
10
1
.
Receive "P
AL-D/K" signal, press the "SOUND
SYSTEM" to select B/G, I. Check the sound out-
put is not working properly
. Select D/K and check
the sound output to make sure it is working prop-
erly
.
2.
Receive "P
AL-I" signal, press the "SOUND SYS-
TEM" to select B/G, D/K. Check the sound output
is not working properly
. Select I and check the
sound output to make sure it is working properly
.
3
.
Receive "P
AL-B/G" signal, press the "SOUND
SYSTEM"
to select I, D/K. Check the sound out-
put is not working properly
. Select B/G and check
the sound output to make sure it is working prop-
erly
.
1.
Receive "P
AL
COLOUR BAR" signal.
2.
T
urn up the volume control to maximum, make
sure the sound is heard from the speakers.
Then
put the unit in no signal state.
3.
Check the sound mute is ef
fective.
4.
Finally turn sound level of CTV to minimum.
NOISE MUTE
CHECKING
11
OSD LAN-
GUAGE
QUANTITY
CHECK
Check OSD LANGUAGE quantity and type as Eng-
lish and Russian.
12
FUNCTION OPERA
TION CHECKING (VIDEO
AND
AUDIO)
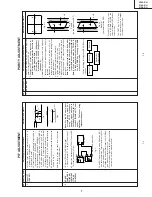
No.
Adjusting point
Adjusting procedure/conditions
W
aveform and others
CONTRAST
key
1.
Receive "Monoscope Pattern" signal.
2.
Set P-Mode to select CONTRAST
.
3.
Press V
olume Up/Down key to check whether the
CONTRAST
ef
fect is OK or not.
1
1.
Receive "Color Bar" signal.
2.
Set P-Mode to select COLOUR.
3.
Press V
olume Up/Down key to check whether
the COLOUR ef
fect is OK or not.
2
COLOUR key
BRIGHTNESS
key
1.
Receive "Monoscope Pattern" signal.
2.
Set P-Mode to select BRIGHTNESS.
3.
Press V
olume Up/Down key to check whether
the BRIGHTNESS ef
fect is OK or not.
3
TINT key
1.
Receive the "NTSC Colour Bar" signal thru
A
V
in.
2.
Set P-Mode to select
TINT
.
3.
Press V
olume Up/Down key to check
TINT
, UP
for GREEN direction and DOWN for PURPLE di-
rection whether is OK or not.
4
SHARPNESS
Key
1.
Receive "Monoscope Pattern" signal.
2.
Set P-mode to select SHARPNESS.
3.
Press V
olume Up/Down key to check whether
the SHARPNESS ef
fect is OK or not.
5
WHITE TEMP
1.
Receive "Monoscope Pattern" signal.
2.
Set FUNCTION to select WHITE
TEMP
.
3
.
Press V
olume Up/Down key to check WHITE
TEMP
Option, ST
ANDARD:
NORMAL
SETTING, W
ARM for more REDDISH
direction changing, COOL for more BLUISH di-
rection changing.
8
NORMAL Key
7
1.
Once in PICTURE Mode, and theNORMAL key
is pressed, all the settings will be present to nor-
mal setting.
(Normal setting value for every mode).
»
CONTRAST
: MAX
»
COLOUR
: CENTER
»
BRIGHTNESS
: CENTER
»
TINT
: CENTER
»
SHARPNESS
: CENTER
Notes:If nothing is display
mean contrast, colour
, bright,
tint, sharpness are all in nor-
mal setting.
CH DISPLA
Y
COLOUR
1.
All Ch (1~99) will have an OSD display of the
channel number in green colour under
AFT
ON
condition.
6
Содержание 20A1-RU
Страница 23: ...23 20A1 RU 21A1 RU 21A2 RU 23 2 23 1 WAVEFORMS ...
Страница 24: ......
Страница 25: ......
Страница 28: ...29 28 20A1 RU 21A1 RU 21A2 RU 4 5 6 7 8 9 10 11 12 13 14 15 16 17 18 19 C DIAGRAM MODEL 20A1 RU MAIN Unit ...
Страница 29: ...31 30 20A1 RU 21A1 RU 21A2 RU 4 5 6 7 8 9 10 11 12 13 14 15 16 17 18 19 C DIAGRAM MODEL 21A1 RU MAIN Unit ...
Страница 30: ...33 32 20A1 RU 21A1 RU 21A2 RU 4 5 6 7 8 9 10 11 12 13 14 15 16 17 18 19 C DIAGRAM MODEL 21A2 RU MAIN Unit ...
Страница 33: ...38 20A1 RU 21A1 RU 21A2 RU 1 2 3 4 5 6 7 8 9 10 A B C D E F G H I J BLOCK DIAGRAM 3 3 CRT Unit PWB B CRT Unit ...
Страница 35: ...41 40 20A1 RU 21A1 RU 21A2 RU 4 5 6 7 8 9 10 11 12 13 14 15 16 17 18 19 nit Wiring Side ...
Страница 36: ...43 42 20A1 RU 21A1 RU 21A2 RU 4 5 6 7 8 9 10 11 12 13 14 15 16 17 18 19 nit Component Side ...


