background image


20 


3.1.9 Image attribute 

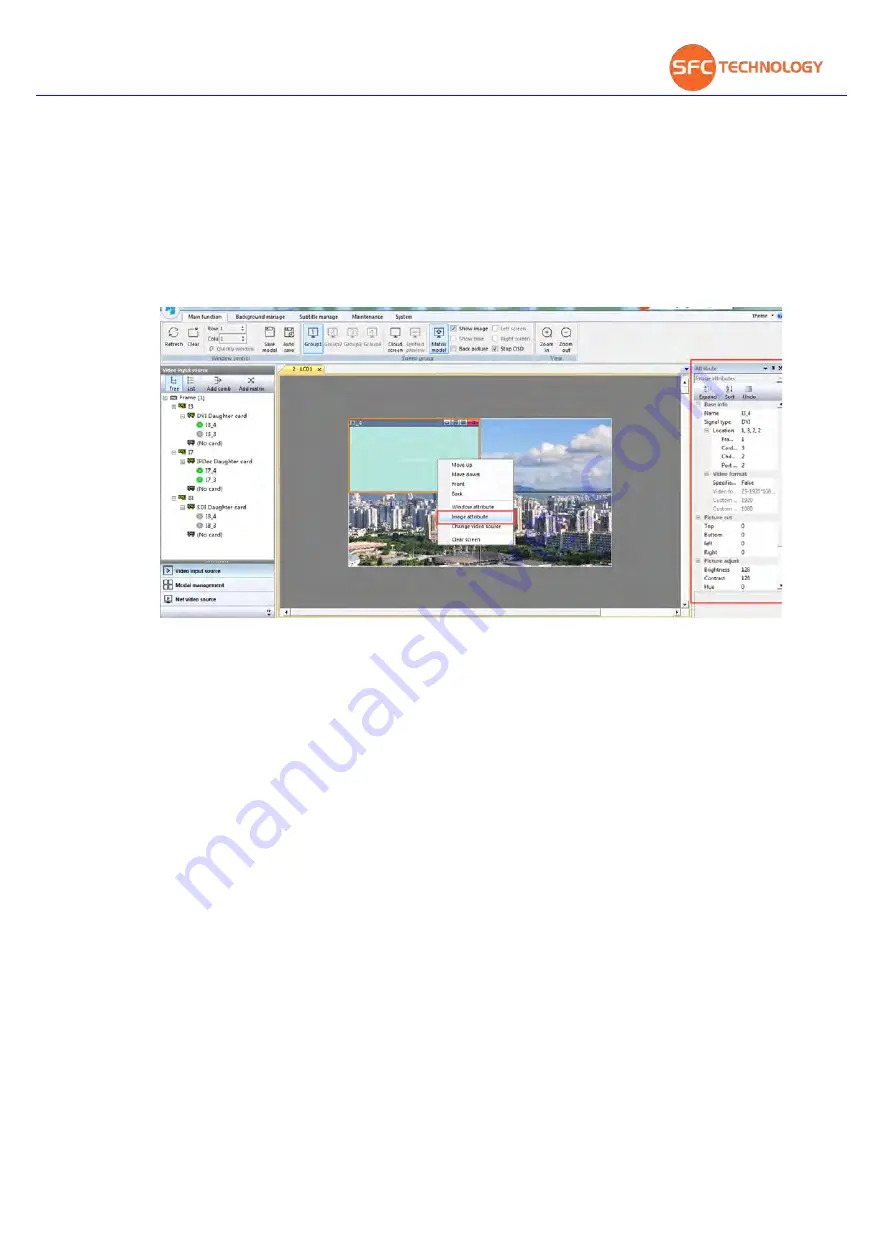
The image properties include the basic information of the input video source, image cropping, and video adjustment. The basic 

information includes the name, type, interface location, and video format of the signal source. View and adjust the image properties as follows: 

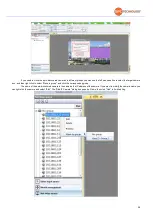
In the video input source, select the video signal whose image properties need to be adjusted, right-click, and select "Image 

Properties". The image property box will pop up on the right side of the processor control software interface. You can view and adjust the 
video signal in the image property box Image attributes, when you need to adjust the image attributes of other video signals, just click the 
other video signal icon with the left mouse button, and the image attribute box will be automatically updated to the attributes of the video 
signal. To close the image property box, click the close button in the upper right corner of the image property box. 


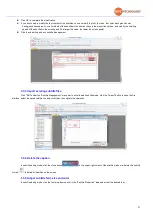
3.1.9.1 Video source naming and display 

You can name each video source in the processor control software, and you can control the video source name to be displayed in 

the upper left corner of the video source window. 

Modify the video source name: Right-click the video source in the video input source list, select the image attribute, and pop up the 

image attribute box on the right side of the main view, and modify the video source name in the name column, such as the signal source 
name Modify it to "Computer 1", the software will automatically save the modified name, as shown below. 


Содержание SFCR-MD

Страница 1: ...9 40 Layer Videowall Controller Operation manual SFCR MH SFCR MD ...

Страница 2: ...8 Close the source 18 3 1 9 Image attribute 20 3 1 10 Group management 23 3 1 11 Net video source 25 3 2 Background manage 29 3 2 1 Background picture 29 3 3 Subtitle manage 30 3 3 1 New Caption 30 3 3 2 Modify caption content 30 3 3 3 Import existing subtitle files 31 3 3 4 Delete the caption 31 3 3 5 Adjust subtitle font size and color 31 3 3 6 Adjust the scroll direction of the subtitles 32 3 3...

Страница 3: ......

Страница 4: ... under circumstances where the limits exceed the maximum specified temperature humidity or power supply specifications Contents in this manual may be different from the edition that you are using Should any unsolved problem occur given that the product is used according to this manual please contact our technical support department or your product suppliers This manual content will be updated unsc...

Страница 5: ...ng contents match the packing list on receiving the products The packing list is as below Part Quantity DTMH DTMD 04 4H4H 1 Mounting kit 1 Quick Start Guide 1 CD 1 Contact your local supplier if anything is missing in your package ...

Страница 6: ...h as Dahua Haikang video decoding on the wall Video wall functions 12 Achieve display functions of multiple signal sources on the wall splicing roaming cross screen zoom in picture in picture picture out picture screen overlay etc 13 Support all signals in the full screen range to open window roaming superimposing zooming no window position size scale restrictions 14 Support single screen multi wi...

Страница 7: ...ing settings are completed in the control software which greatly simplifies the installation process and shortens the installation time 24 Support secondary development and provide third party user control protocols and interfaces 25 Independent intellectual property rights adaptive de interlacing scaling and OSD technology the picture is smooth and clear 26 Encryption function can control the tim...

Страница 8: ...ack the box to check the goods Take out all goods which needed for installation from the box Connect related cables according to actual need Power line network line etc Connect the power supply Please read the Note carefully any question you should contrast us without hesitation Note When open the box please check all of parts carefully confirm the parts in the box as same as packing list Please r...

Страница 9: ...ill automatically identify the signal source if It is a decoding card you need to insert a network cable into the network port on the decoding card to access the router or switch 3 The number 3 marked in the figure is the main control card of the processor You need to insert a network cable into the network port on the main control card to connect to the switch or router or you can directly connec...

Страница 10: ...ere I introduce the PC software control steps double click the controller PC software WTRemote_V1 0 X X_setup exe then the below picture will pop out click Next then the below picture will pop out click Next if you would like to select a different folder click Browse and then click Next Then select the start menu folder and then click Next ...

Страница 11: ...icon and then click Next And click Install to install the software on your computer Please wait the install the install processing After the installation completed you can click launch WTRemote to operate the software and then click Finish ...

Страница 12: ...oftware icon and the IP setting tool SearchNvsDemo exe will on the computer automatically the icons as following picture shows At the same time you will get the PC software login interface as following picture shows ...

Страница 13: ...f the processor is admin the password is empty if a different user and password are set you need to log in according to the actual user name and password Follow the steps indicated by the numbers in the below picture After login you will get a interface as below Click the menu Maintenance then click Screen Setting to pop up the screen setting window As shown below ...

Страница 14: ...port numbers as follow And the software will pop up the following window according to the card number and port number displayed on the screen find the corresponding card number and port number in the list on the left hold down the right mouse button and drag to the corresponding box on the right After all the settings are completed click the Ok to complete the screen stitching settings 00 Port0 02...

Страница 15: ...ut source part select a screen on the right virtual screen so that the screen has an orange border then double click a signal source with the left button of the mouse the signal source will display a window on the virtual screen and the video will displaying on the screen as the same time you can drag zoom in zoom out or close a window on the virtual screen please refer to the below picture 3 1 Ma...

Страница 16: ... 1 Select the No 1 screen group 2 If have screen group 3 screen group 4 you can select corresponding 2 Click No 2 Enable screen group 3 If you edit the group name as you need in the No 3 4 Other setting same as 2 3 2 and 2 3 3 After complete the group screen setting on the Main function part to click Group 2 and also you can see the group 3 and group 4 virtual frame Select Group 2 and drag it to t...

Страница 17: ...input source refers to the signal source connected to the controller through the network cable In the video input source part there are tree list add dome add matrix four different content add demo means combine multiple different sources into one signal usually used in conjunction with multi screen graphics cards using multiple input ports to capture 4K 8K and other ultra high definition signals ...

Страница 18: ...urce List Click the List it will show all the input sources 3 1 3 3 Add combine Add combine refers to the combination of multiple different signal sources into one signal usually used in conjunction with multi screen graphics cards using multiple input ports to collect 4K 8K and other ultra high definition signals The specific operation method is as follows Add combine Click Add combination in the...

Страница 19: ...o source and double click the left mouse button this signal source can be transferred to the corresponding display unit to get a full screen display the local video source in the tree and list can be directly displayed the network video source must be in the list or network Double click the signal source icon in the video source tab to open the window At this time the orange frame on the virtual s...

Страница 20: ... split window Method 1 in the part of Window control select the number of rows and columns that need to be split for a single screen split the single screen into multiple logical screens and then select the logical screen to open the sources Method 2 In the main view select the screen that needs to use the single screen split quick template right click the right mouse button as shown below ...

Страница 21: ...ine screen sixteen screen sixty screen Click the select template to pop up the Select Video Source dialog box as shown below select the source to be displayed and import it to the right of the dialog box and then click OK to complete the single screen split window operation ...

Страница 22: ...oint on the video wall to any point The operation method is as follows In the main view use the left mouse button to select the window to be moved hold down the left button move the mouse and the dotted frame moves in synchronization with the mouse as shown in the figure below When the window reaches the target position release the left button and the window completes the movement 3 1 6 Adjust the...

Страница 23: ...ck one of them with the left mouse button to directly put this source on top Method 2 When multiple sources are stacked right click on a source and select the corresponding operation to complete the move down move up top and bottom operations as follows 3 1 8 Close the source Single source close select the source move the mouse to the upper left corner of the window left click to close Right click...

Страница 24: ...19 Click clear to clear all sources on the screen ...

Страница 25: ...ideo signals just click the other video signal icon with the left mouse button and the image attribute box will be automatically updated to the attributes of the video signal To close the image property box click the close button in the upper right corner of the image property box 3 1 9 1 Video source naming and display You can name each video source in the processor control software and you can c...

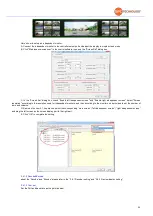
Страница 26: ...lay on the left up corner click to switch the name display or not For this function you have to focus on the screen to test the software source name won t disappear Click to adjust the source name font size color and typeface 3 1 9 2 Picture cut ...

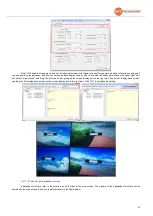
Страница 27: ...luding brightness contrast hue and saturation as shown in the figure below VGA format video signal can adjust the brightness sampling phase horizontal offset and vertical offset of the image When the VGA video signal is noisy the image will shake up and down during the window display Adjusting the value of the sampling phase can solve the problem when the VGA signal is opened and the window shows ...

Страница 28: ... 10 2 Add group The plan grouping function can divide the plan into different groups and different plan groups can be displayed and switched at regular intervals Specific steps are as follows 1 Click Add group in the plan management tab to open the plan group properties dialog box 2 Enter the name of the plan group in the Planning Group Name field and give the plan group a name 3 Set the playback ...

Страница 29: ...an manually switch to play or play at the set time 3 1 10 3 Group save automatically Click the Auto Save button on the main function interface to make the background color of the button blue As long as there is any change in the current plan the prerequisite is to save at least one plan the content of the plan is automatically saved as the current content After each restart of the processor the pr...

Страница 30: ...second Click to start click again to stop 3 1 11 Net video source Network signals are divided into two categories IP camera signals and PC network signals Only suitable for FDMD models PC network signals include network desktop signals network picture signals streaming video signals and background window signals The network signal is decoded and displayed on the screen by the built in IP decoder o...

Страница 31: ...eds to be set manually You can manually set the IP address for each encoding card on the right side of the dialog box the display modes are divided into synchronous echo cloud screen signal preview disable select synchronous echo After the IP address is set click OK to complete the setting see the figure below Enter the Main Function tab click to check Show image double click to open the signal so...

Страница 32: ...roup Edit dialog box 3 Enter the group name in the pop up IPCAM Group Edit dialog box 4 Click Add Group then you can see the added group name in the blank space on the right side of the dialog box If you need to delete a group you can use the left mouse button to click the group name Then click delete group click OK after all groups are added exit the dialog box 5 Exit the IPCAM group editing dial...

Страница 33: ...era icon and then right click to select Move to group and click the corresponding group The name of the auto discovered camera is the same as the IP address of the camera If you want to modify the camera name you can right click the camera and select Edit The Add IP Camera dialog box pops up Name then click Add to finish editing ...

Страница 34: ...the authentication mode and fill in the user name and password if there is no account password then the authentication mode Select anonymous access in one item see the figure below Click Add to add the IP camera to the list of network video sources Click Close to exit the dialog box when you need to add multiple cameras you can modify the camera information directly in the dialog box without click...

Страница 35: ...tle management to enter the subtitle editing interface Click the start editing button to enter the subtitle editing After entering the subtitle management mode press and hold the left mouse button to pull and use the gray box drawn by the mouse to select the display unit that needs to display subtitles Release the left mouse button to pop up the edit box for editing the subtitle content edit the c...

Страница 36: ...t subtitle management 3 3 3 Import existing subtitle files Click Edit under the Subtitle Management menu bar to enter the edit subtitle mode click the Import button to open the file interface select the saved subtitle file and click Open to complete the operation 3 3 4 Delete the caption In subtitle editing mode click the close button in the upper right corner of the subtitle window to delete this...

Страница 37: ...part is mainly designed to set the screens ports screen source display name remote control the screen power on off by the RS232 and the controller operating state 3 4 1 Maintenance set About the Screen set please refer to the begin of PC control software operation introduction it mainly introduced the screen group setting 3 4 1 1 Screen set 3 4 1 1 1 Back display screen The back display screen ref...

Страница 38: ... screen and drag the left main screen group as the screen display port to the right part then select display back screen and drag the left display back screen as the screen display port to the right part Click OK to complete the setting 3 4 1 1 2 Left and right independent screen Independent monitors refer to the monitors on both sides of the main screen The signals of the independent monitors can...

Страница 39: ...solution according to the resolution used for independent monitors and then according to the monitors on both sides to set the number of rows and columns D Same as the item 5 1 2 operation select the corresponding main screen left independent screen right independent screen and drag the left screen as the screen display port to the right part E Click OK to complete the setting 3 4 1 2 Decode Encod...

Страница 40: ...p 1 Scr One byte ranging from 1 to 4 specifying the sequence number of the screen packet DATA None For example Call the screen group 1 11 Call the screen group 2 12 Call the screen group 3 13 Call the screen group 4 14 Device response Switch the group Central command Op 3 Scr One byte ranging from 1 to 4 specifying the sequence number of the screen packet DATA Group mane UTF8format For example Swi...

Страница 41: ...left independent screen 3 means right independent screen Number It s show on the picture below video source number According to the Frame number f Card number c Child card number s and Port number p to calculate please refer to the picture below Calculate method video source number c 256 p For example Replace the video source 259 to Number 1 on the main screen 51 0 1 259 Replace the video source 5...

Страница 42: ...ses click Show switch to select display or don t display the source name on the screen and users can set the source name format colors etc Source name edit methods Select the source you want to edit the name under the tree list right click to select image attribute then the image attribute information box will show on the right edit the source as you want refer to the below picture Op 6 DATA Ok or...

Страница 43: ...r working states and by click Modify EDID can set the screens drive board resolution 3 5 System 3 5 1 System connect Users click Connect or Disconnect to connect the processor and the connected machines and the power control button support PC software power on of the processor remotely 3 5 2 System firmware license When users have to expand the output ports or change the output resolutions users h...

Страница 44: ...39 3 5 3 System user Set the user name and user permissions according to the user s need also can change the PC software language ...

Страница 45: ...can directly see the picture of the signal source on the APP through the preview and echo function The virtual screen picture on the APP is synchronized with the big screen picture see the figure below Select the group you want to display Display the source screen in real time select the source and drag it to the virtual screen Clear signal on virtual screen with one click Turn on or off the echo ...

Страница 46: ...41 Note Only FDMD support the source preview and screen sync display in the software and need additional input card ...

Страница 47: ... the IP setting tool icon double click to operate it then the below window will pop up click Search device Then the connected process IP address will display selected you wanted modify one click Parameter setting Input the new address after input the net mask and gateway click Change is ok ...

Страница 48: ... when installing using and maintaining When installing the device make sure that the ground wire in the power cable is well grounded Do not use two core power plugs and sockets Make sure that the input power of the device is 110V 240V 50 60Hz AC Do not place the device in a place that is too hot or too cold Maintain good ventilation in the working environment so that the heat emitted by the equipm...

Отзывы: