6
Startup
Startup with MOVI-PLC®
Operating Instructions – CMP ELVCD
47
4. Select menu item [Network Scan].
ð
The controller that is present in the supply system appears.
5. Configure the device by dragging and dropping the device icon into the configura-
tion window. An offline data set is created.
6.5.3
Startup procedure with MOVI-PLC
®
ü
The current version of MultiMotion is installed on the engineering PC. The version
information can be found under menu item [Help] > [Installed Components] >
[Add-Ins] of MOVITOOLS
®
MotionStudio.
1. Right-click the MOVI-PLC
®
icon.
2. In the [Programming] context menu, select [Create new PLC Editor project].
3. Select
one
of
the
templates
"AxisControl_MultiMotion"
or
"AxisCon-
trol_MultiMotion_Framework".
4. Enter the name of the new PLC Editor project.
5. Click the [OK] button to open the PLC Editor.
6. To set the "Task configuration", switch to the "Resources" tab.
7. In the "TaskPriority" folder, set the TaskPriority cycle time to a value of 10 ms.
8. Add
MC_CommunicationTask_CAN ();
to the last line of the TaskPriority.
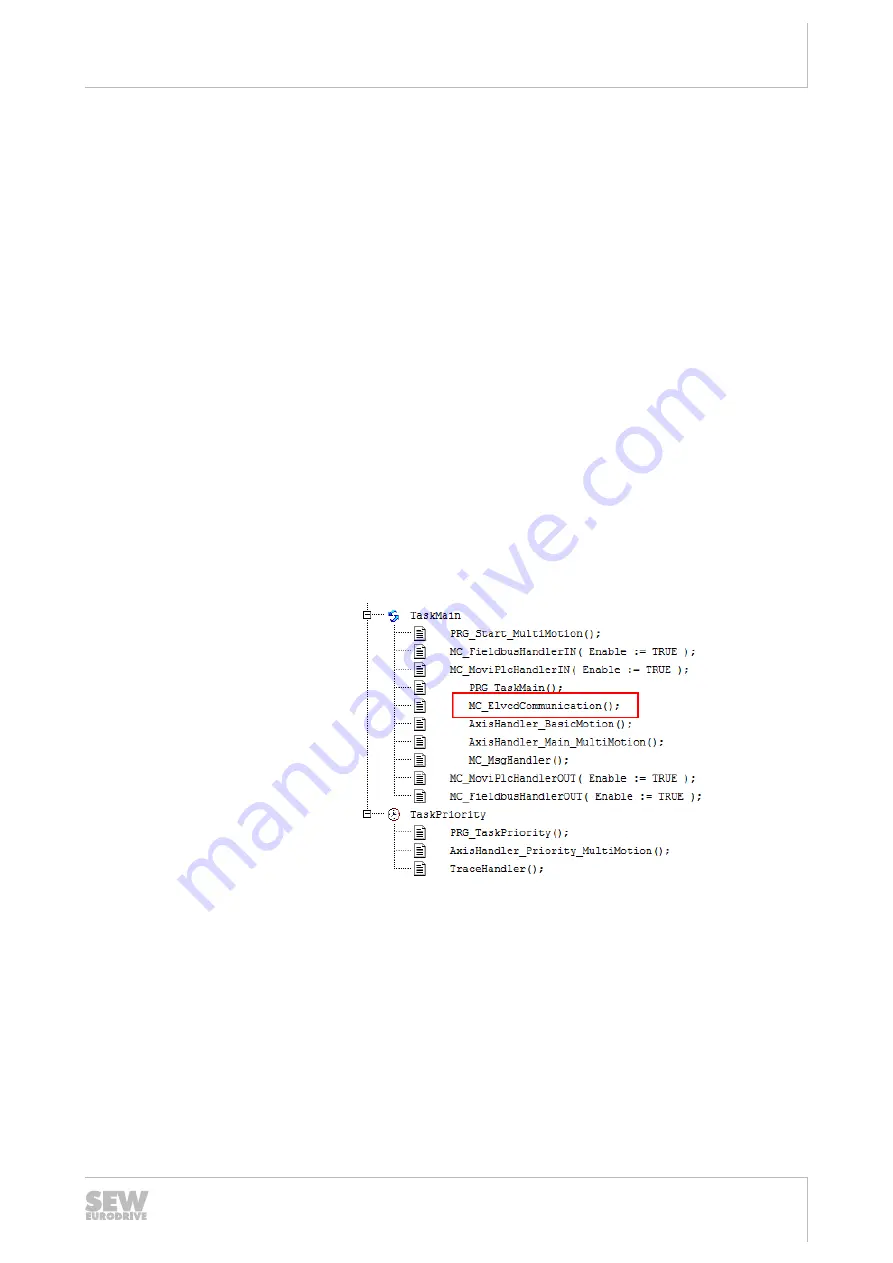
9. Under "TaskMain", insert entry
MC_ElvcdCommunication();
before the line
"AxisHandler_BasicMotion();", as shown in the following figure.
14462643979
10. Set the used CAN node to "enabled".
11. If necessary, remove the existing drives of SEW‑EURODRIVE.
12. In the "Module parameter" tab, set the transmission rate of the relevant CAN bus
(CAN 1 or CAN 2) of the MOVI-PLC
®
to 500 kBaud. The ELVCD drive only sup-
ports 500 kBaud. Changes via the parameter tree are not possible. The parameter
tree requires correct settings.
13. Compile the project by pressing the <F11> key.
14. Log in by clicking on menu item [Online] > [Log in]. Confirm the load request by
clicking on the [OK] button.
15. Load the PLC project as a boot project by clicking on the [Online] > [Generate boot
project] menu item.
22759468/EN – 11/2017


