


VOL
VOL
VOL
VOL
VOL
VOL
VOL
VOL
-30-
7.
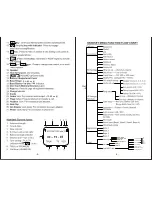
The machine announces “Set month”. The LED display indicates
the month, for example “12”. Press “ ” or “ ” key to increase
or decrease the month setting and press “TIME ” key to confirm;
8. The machine then announces “Set day”. The LED display
indicates
the day so press “ ” or “ ” key again to increase or
decrease the day setting and press “TIME ” key again to confirm;
9
. The machine finally announces “Set hour”. The LED display now
indicates the hour. Press “ ” or “ ” key to scroll the correct
hour setting and press “TIME ” key again to confirm. Note: The
hour setting is in 24hour format. Example: If it is 5 in the afternoon,
place the hour to 17, the machine will be announcing it as 5 P.M.;
10
.The machine will then announce “Set minute”. The LED display this
time indicates the minute. Press “ ” or “ ” key to scroll the
correct minute then press “TIME ” key to confirm;
11.After the minute confirmation, the machine will instantly announce
the new day and time. i.e. “Tuesday, Five P.M.”. Please note that
the voice DTS will not prompt the year and month.
12.If no key input within eight seconds, the set up procedure will be
abandoned.
13.In standby mode, press “TIME ” key once to play DTS, the machine
will play the entered day and time
Ring setup
1. This setting allows you to input the desired number of rings before
the machine will receive the call, the procedure is as follows:
2. There are 2 to 9 rings and a Toll saver (“SA”) mode to select from.
3. Press and hold “ ” key for 3 seconds to set ringer mode. The
machine announces the initial setting; i.e. “Nine”. (This means,
it will receive the call after nine rings.) The LED display also
indicates “09”.
4. Press “ ” or “ ” key to select the desired number of rings or
toll saver mode.
VOL
VOL
-31-
Press “ ” key again to confirm setup. The machine will
immediately announce the new entered Ring setup and returns
to standby mode.
5.
6.
At standby mode, press and hold “ ”key for 3 seconds .The
machine will say “Calls will be answered after nine rings”.
7.
When Ring setup selected is “Toll saver”, it performs these
functions. (see explanation below)
Toll Saver
Volume increasing/decreasing
Press “ ” /
“ ”keys to increase/decrease speaker volume.
>>
These keys can also be used to scroll the desired settings for time,
>>
pin code and message play back
VOL
VOL
1.if the unit has new message,calls will be answered after 3 rings.
2.if
So if user want to review family machine's messages from outside telephone
byremote mode,he can choose to range up telephone after 3 rings if no new
message.
the unit has not new message,calls will be answered after 7 rings.
when toll saver mode is selected,at standby mode,press andhold ” ” key
for 3 seconds.the machine will announce "time saver", wait a monent ,it
continuously announce "ring delay is set to time saver"
If is selected
"TOLL SAVER"
Remote Operation
Enter remote operation
>> Call the DAM.-wait for ogm to be played or when memory is full,
finishplaying the voice prompt:“hello,your call can not be taken
at this moment,please call again later”then enter the 4 digit
securitycode that you have set for the answering machine.
>> If the security code you entered is incorrect,themachine will
announce“security code is incorrect,please enter your security
code”.you are allowedThree times to re-enter your security code.
if the third try is incorrect,the machineWill hang up the line.
>> Once you entered the correct security code,you are in the remote
controloperation mode.if you have no new messages,the machine
will be playingthe following voice prompts.
Содержание centralalert CA-CX
Страница 7: ... 10 11 CL 60 ...
Страница 9: ...PAGE 14 and 15 PAGE PAGE to confirm Input PIN to confirm to confirm name FL DEL first to confirm A ...
Страница 10: ... 16 Factory default is tone dialing 17 Talking feature is for CL 60 only ...
Страница 11: ... 18 then press It display NEW PIN 19 ...
Страница 12: ... 20 21 ...
Страница 13: ... 22 23 ...
Страница 14: ... 24 PAGE indicating 25 PAGE ...
Страница 20: ... 36 37 ...