background image

7

Putting the system into operation

Fitting the device feet

You can set up the device on an even surface or mount it into a 19” rack.

Note:

Do not fit the rubber feet when rack mounting the device.

Setting up the device

To ensure that the device cannot slip on the surface on which it is placed, fix
the supplied four self-adhesive soft rubber feet to the base of the device.

Ensure that the base of the device is clean and free from grease before fit-
ting the rubber feet.

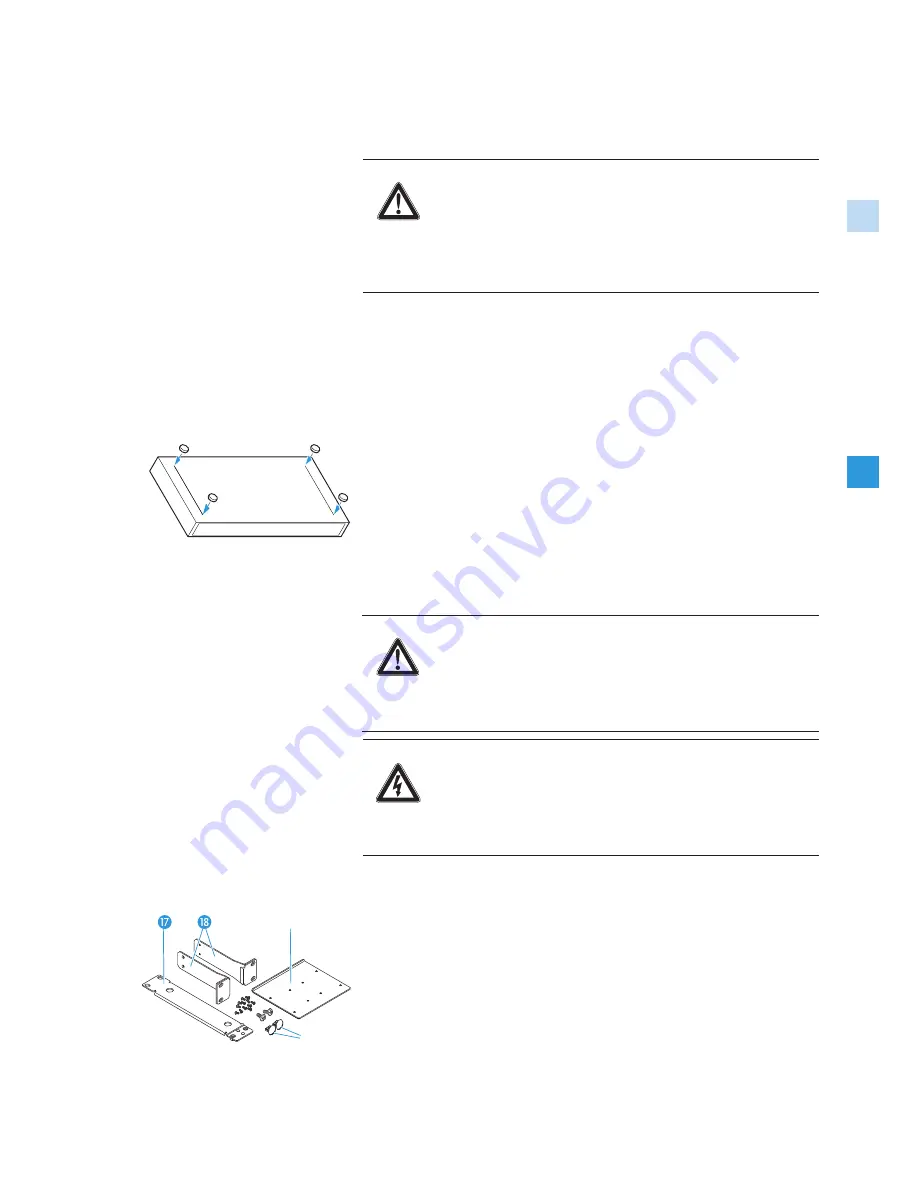
Fix the rubber feet to the base of the device by peeling off the backing
paper and fitting them as shown.

Rack mounting

For mounting two central units into a 19” rack, you require the GA 2 rack
adapter. The GA 2 rack adapter consists of:

y

1 blanking plate

y

2 rack mount “ears”

y

1 jointing plate

y

2 blanking plugs


for closing off unused BNC holes 

y

12 recessed head screws M 3x6

y

2 recessed head screws M 6x10

Risk of staining of furniture surfaces!

Some furniture surfaces have been treated with varnish, polish
or synthetics which might cause stains when they come into
contact with other synthetics. Despite a thorough testing of
the synthetics used by us, we cannot rule out the possibility of
staining. 

Do not place the central unit on delicate furniture surfaces.

CAUTION!

Danger of heat damage!

When installing the device in a closed or multi-rack assembly,
please consider that, during operation, the temperature within
the rack may rise significantly.

Make sure not to affect the ventilation required for safe
operation or provide additional ventilation.

Danger of electric shock!

When installing the device in a closed or multi-rack assembly,
please note that intrinsically harmless leakage currents of the
individual devices may accumulate, thereby exceeding the
allowable limit value. 

Ground the rack via an additional ground connection. 

CAUTION!

CAUTION!

Содержание IAS-MO 2000 SET - 08-08

Страница 1: ...MO 2000 Set Instruction manual LEVEL OVERLOAD 0 0 40 20 15dB dB GAIN ...

Страница 2: ......

Страница 3: ...t 7 Setting up the device 7 Rack mounting 7 Connecting the mains unit 8 Connecting the amplifier 8 Connecting the optical microphone 9 Switching the central unit on off 9 Adjusting the sensitivity 9 Overload indication 9 Care and maintenance 10 Accessories 10 Specifications 11 Connector assignment 12 Frequency response curve 12 Manufacturer Declarations 13 ...

Страница 4: ...ent heat accumulation Use of the MO 2000 CU central unit The MO 2000 CU central unit has been designed for use with the MO 2000 H optical microphone Rack mounting When installing the device in a closed or multi rack assembly please consider that during operation the ambient temperature within the rack may signi ficantly rise above room temperature However the ambient temperature within the rack mu...

Страница 5: ...ses or coffee cups are placed on the device Do not use the device near water or liquids Should a spillage occur unplug the device and have it checked by a techni cian Service No user serviceable parts inside Do not attempt to service devices yourself as opening or removing covers may expose dangerous voltage or other hazards If devices are opened by customers in breach of this instruction the warr...

Страница 6: ... for picking up air borne sound The components of the MO 2000 H microphone head outside dimensions 1 2 inch are made of plastic suitable for permanent stationary use in areas where aggressive substances gases salts moisture or radia tion are present All components of the MO 2000 H microphone head are metal free including the fiber optic cable feed The main areas of application of the optical micro...

Страница 7: ...rophone with 3 m fiber optic cable y 1 MO 2000 CU central unit y 1 mains unit with different country adapters y 1 carrying case y 1 instruction manual LEVEL OVERLOAD 0 0 40 20 15dB dB GAIN Fiber optic cable Mains unit MO 2000 CU Optical microphone ...

Страница 8: ...or connection of power supply unit DC IN Audio output AF OUT BAL XLR 3M balanced Audio output AF OUT UNBAL BNC socket unbalanced Type plate SC duplex optical connection for microphone Optical microphone SC duplex connector Mains unit US adapter UK adapter EU adapter preassembled LEVEL OVERLOAD 0 0 40 20 15dB dB GAIN OPTICAL MIC INPUT AF OUT BAL UNBAL DC IN 12V 150mA LEV 6dBu MAX 쐋 ...

Страница 9: ...les y 12 recessed head screws M 3x6 y 2 recessed head screws M 6x10 Risk of staining of furniture surfaces Some furniture surfaces have been treated with varnish polish or synthetics which might cause stains when they come into contact with other synthetics Despite a thorough testing of the synthetics used by us we cannot rule out the possibility of staining 왘 Do not place the central unit on deli...

Страница 10: ... two of the supplied recessed head screws M 6x10 왘 If you are not front mounting the BNC output connector insert the two blanking plugs into the holes of the blanking plate 왘 Slide the central unit into the 19 rack 왘 Secure the rack mount ears to the rack Connecting the mains unit 왘 Connect the supplied mains unit to the socket DC IN Use the cable grip to secure the power supply DC cable 왘 Connect...

Страница 11: ...pted for several seconds e g due to a power failure the device switches on automatically even if it was switched off before Adjusting the sensitivity With the microphone connected and both the gain switch and the level control set to 0 dB the specified sensitivity mV Pa is obtained 왘 Use the gain switch to increase the output voltage level by 20 dB tenfold increase or 40 dB hundredfold increase 왘 ...

Страница 12: ...2000 H optical microphone 525701 MO 2000 CU central unit 067510 Mains unit 502186 MZQ 2000 microphone clamp 511999 Carrying case 516503 Instruction manual Liquids can damage the electronics of the MO 2000 CU central unit Liquids entering the housing of the device can cause a short circuit and damage the electronics 왘 Keep all liquids far away from the device 왘 Before cleaning disconnect all device...

Страница 13: ...U 1 5 W at 12 V DC Current consumption 120 mA Gain steplessly adjustable between 15 dB three settings 0 dB 20 dB 40 dB AF output level 15 mV Pa level control set to central position gain switch set to 0 dB Output impedance approx 330 Ω unbalanced 660 Ω balanced Max output level 1 55 V Operating temperature range 0 C to 40 C Storage temperature range 20 C to 70 C MO 2000 H optical microphone Design...

Страница 14: ...transducer optional Interface socket socket Design type SC Coupling losses 5 6 dB per coupling pair AF cable Design balanced microphone cable with shielding Connector assignment Frequency response curve 2 1 3 DC connector for mains unit XLR 3F connector balanced 20 50 100 200 500 1k 2k 5k 10k 20k 50k Hz 30 25 20 15 10 5 0 5 10 15 20 dB ...

Страница 15: ...s of Directives 2004 108 EC and 2006 95 EC Statements regarding FCC and industry Canada This device complies with Part 15 of the FCC Rules and with RSS 210 of Industry Canada Operation is subject to the following two conditions 1 this device may not cause harmful interference and 2 this device must accept any interference received including interference that may cause undesired operation Changes o...

Страница 16: ...14 ...

Страница 17: ......

Страница 18: ...Sennheiser electronic GmbH Co KG Am Labor 1 30900 Wedemark Germany Phone 49 5130 600 0 Printed in Germany Fax 49 5130 600 300 Publ 08 08 www sennheiser com 524194 A01 ...

Отзывы: