background image

23

Using the headset system

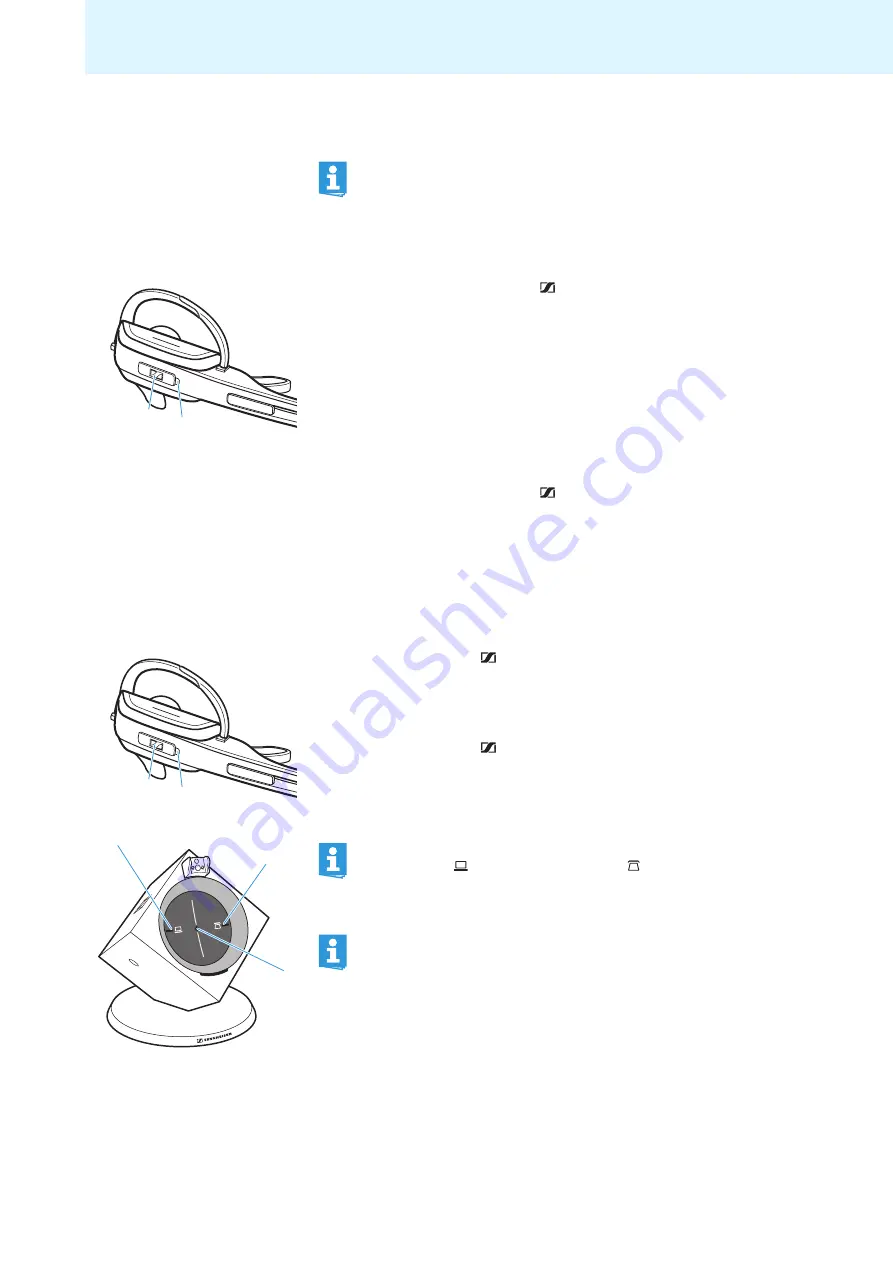
Switching the headset on/off

Switching the headset on

Press and hold the LINK button 


 for 5 seconds.

The HEADSET LED 

 flashes blue 3 times and the wireless link to the 

base station is established (where required). An ascending 
confirmation beep is heard in the headset.

Switching the headset off

Press and hold the LINK button 


 for 5 seconds.

The HEADSET LED 

 flashes red 3 times. 

Establishing a wireless link between headset and 
base station

To establish a wireless link between headset and base station:

Press the LINK button 


 on the headset. 

The link is established. The LINK LED 

 lights up blue and the 

HEADSET LED 


flashes blue.

To disconnect a wireless link between headset and base station:

Press the LINK button 


 on the headset. 

The link is disconnected. The LINK LED 

 and the HEADSET LED 

 go 

off.

If you place the headset into the base station, the headset 
automatically switches to standby mode. In standby mode, the 
power consumption is very low and the radiated power is reduced 
to a minimum. The HEADSET LED 


lights up blue during charging.

4

3

4

3

You can also establish or disconnect the wireless link by pressing 
the PC button 


 or the PHONE button   

 on the base station 

(depending on the selected mode (

PC

 or 

Phone

), see page 28).

If your telephone has a built-in electronic hook switch supporting 
the MSH standard (see page 13), you can only disconnect the 
wireless link between headset and base station by placing the 
headset into the base station. The control signals (“accept a call”, 
“end a call”) of the headset are still transmitted to the electronic 
hook switch without any restrictions.

Содержание Comfort calls

Страница 1: ...OfficeRunner Instruction manual DECT Comfort calls...

Страница 2: ...rging the headset s rechargeable battery 22 Switching the headset on off 23 Establishing a wireless link between headset and base station 23 Putting the headset on and adjusting it 24 Calling via the...

Страница 3: ...g the DECT transmission range This equipment generates uses and can radiate radio frequency energy and if not used in accordance with the instructions may cause harmful interference to radio communica...

Страница 4: ...argeable batteries may leak In extreme cases rechargeable batteries may even present Please understand that Sennheiser Communications does not accept liability for damage arising from abuse or misuse...

Страница 5: ...thout annoying background noise Permits conference calls with up to 4 headsets Quick and easy pairing of a new headset Long battery operating time up to 12 hours of talk time in narrowband mode up to...

Страница 6: ...2 earloops size S and L 1 headband 1 name plate with cheek spacer pre installed 1 name plate 1 power supply unit 1 telephone cable 1 USB cable 1 safety guide booklet with important safety information...

Страница 7: ...cts PHONE button with LED LINK LED CHARGE STATUS LED ABC switch Microphone volume control Phone socket Handset socket ACC socket DIP switch row 1 to 6 DC IN socket PC socket USB Cover with overview of...

Страница 8: ...9 2 4 5 3 E B D C 6 8 Microphone Name plate with cheek spacer HEADSET LED LINK button AUDIO button Earloop Charging contacts Earloop slot Battery compartment cover Earpiece Name plate Headband Chargi...

Страница 9: ...ction Button Functions Page Press the LINK button Establishes disconnects the link between headset and base station 23 Accepts ends a call with electronic call control handset lifter or depending on t...

Страница 10: ...tched off not powered CHARGE STATUS LED LED segment Battery charge Required charging time 1 0 25 approx 10 min 2 25 50 approx 10 min 3 50 75 approx 20 min 4 75 100 approx 20 min When the LED segment 1...

Страница 11: ...hone mode and or your PC PC mode The base station controls the wireless communication between the products Removing attaching the cover To remove the cover Remove the cover by inserting a finger into...

Страница 12: ...roceed as described under or on the following pages The base station is ready for operation as soon as it is connected to the mains power supply When using the headset system only in PC mode the power...

Страница 13: ...connect the Phone socket to the handset socket on the telephone Set the DIP switch 1 and 2 to the upper position Use the telephone cable to connect the Phone socket to the headset socket on the telep...

Страница 14: ...corresponding connection cables Other hook switch standards require suitable adapter cables which convert the control signals to the DHSG standard see Accessories and spare parts on page 36 If your t...

Страница 15: ...te at www senncom com headsetselector Setting up the base station Place the base station at a minimum distance of 15 to 20 cm from the fixed line phone Connecting the base station to a PC You can conn...

Страница 16: ...the software To install the HeadSetup software Run the HeadSetup USB version X X exe file in the HeadSetup folder on the enclosed CD ROM Follow the instructions of the install program Additional info...

Страница 17: ...Select the bendable earloop or a non bendable earloop size S or L Insert the earloop into the earloop slot Attaching the headband If necessary remove the earloop by carefully pulling it upwards Repla...

Страница 18: ...of the AUDIO button Simultaneously press and hold the headset s LINK button and AUDIO button for 5 seconds The HEADSET LED flashes blue red Push the AUDIO button in the direction in which you want to...

Страница 19: ...cannot hear you well adjust the microphone sensitivity see below Adjusting the audio signal dial tone Set the ABC switch to A default setting B or C so that you can hear a clear dial tone in the heads...

Страница 20: ...e LINK LED lights up blue and the HEADSET LED flashes blue Use your softphone to make a call to someone who will help you adjust the correct microphone sensitivity for PC mode see below The system is...

Страница 21: ...switch 1 and 2 Adjusting the radio range DIP switch 3 If many DECT systems are operated in a confined space interference can occur In this case you should change the radio range Switch position Funct...

Страница 22: ...king the headset out of the base station a wireless link is automatically established between headset and base station Auto Link Switch position Function Wideband mode Automatic frequency adjustment o...

Страница 23: ...the charging process the HEADSET LED goes off To stop the charging process Take the headset out of the base station The CHARGE STATUS LED indicates the remaining battery charge of the headset When the...

Страница 24: ...base station Press the LINK button on the headset The link is disconnected The LINK LED and the HEADSET LED go off If you place the headset into the base station the headset automatically switches to...

Страница 25: ...one towards your mouth If you are using the bendable earloop Place the earloop behind your ear so that it follows the contour of your ear Bend the earloop so that the headset fits comfortably and secu...

Страница 26: ...your fixed line phone Making a call If you are using a handset lifter electronic hook switch Dial the desired number Put on the headset and establish a wireless link between headset and base station...

Страница 27: ...pports this function If a wireless link is established see page 23 Speak into the headset If no wireless link is established see page 23 Speak into the handset Calling via the PC using the headset Acc...

Страница 28: ...support call control End the call using your softphone Reproducing PC audio via the headset The HeadSetup software allows you to listen to all PC audio via the headset To activate deactivate the repr...

Страница 29: ...the selected mode Holding a conference call The OfficeRunner headset system allows you to hold a conference call with up to 4 OfficeRunner headsets The master headset is used to control the conferenc...

Страница 30: ...t headset To end the conference call Use the master headset to end the conference call The wireless links to all other headsets participating in the conference call are disconnected Adjusting the volu...

Страница 31: ...d base station see page 23 In both cases the muting is canceled and the LINK LED lights up blue again or goes off Using the advanced functions Pairing additional headsets for shared use You can use on...

Страница 32: ...headset b in the base station while you are using your headset headset a Make sure that a wireless link is established between headset a and base station the LINK LED on the base station lights up bl...

Страница 33: ...product Clean the charging contacts of the base station and the charging contacts or of the headset from time to time using e g a cotton swab CAUTION Damage to the product due to liquids Liquids ente...

Страница 34: ...pads are available from your Sennheiser partner Remove the old ear pad Attach the new ear pad by placing the fastening tab B of the ear pad over the notch A of the headband see diagram Turn the ear p...

Страница 35: ...refully loosen the connector plug of the battery cable Insert the connector plug of the new rechargeable battery into the connection socket Observe correct orientation of the connector plug Replace th...

Страница 36: ...r perhaps the beard Use the name plate with cheek spacer Distance between base station and fixed line phone is so small that interference occurs Increase the distance between base station and fixed li...

Страница 37: ...nic hook switch cable for e g Siemens Aastra etc MSH cable electronic hook switch cable for e g Alcatel etc Adapter cables for manufacturer specific standards available for Cisco Avaya Polycom etc Spa...

Страница 38: ...narrowband up to 12 hours wideband up to 8 hours Charging time of rechargeable battery 50 approx 20 min 100 approx 1 hour Range environment dependent up to 180 m in free line of sight up to 55 m in of...

Страница 39: ...V Nominal output current max 850 mA Operating temperature range 5 C to 45 C 41 F to 113 F Storage temperature range 20 C to 70 C 4 F to 158 F Relative humidity operation 20 to 85 storage 20 to 95 Weig...

Страница 40: ...ve country specific regulations Statements regarding FCC and Industry Canada This equipment complies with Part 15 of the FCC Rules and with RSS 213 of Industry Canada Operation is subject to the follo...

Страница 41: ...xpressly approved by Sennheiser electronic Corp may void the FCC authorization to operate this equipment Before putting the equipment into operation please observe the respective country specific regu...

Страница 42: ...ection to an optional elec tronic hook switch 13 connection to the mains power supply 11 putting into operation 10 removing attaching the cover 10 setting up 14 Buttons base station 8 headset 8 overvi...

Страница 43: ...conference call 28 Microphone sensitivity adjustment for Phone mode 18 Microphone volume control setting 18 MSH connection to an optional elec tronic hook switch 13 Muting 30 N Name plate 17 P PC conn...

Страница 44: ...43 Index W Wideband and narrowband mode switching between wideband and narrowband mode 21 Wireless link establishingautomatically Auto Link 21...

Страница 45: ...Sennheiser Communications A S Langager 6 2680 Solr d Strand Denmark www senncom com Printed in China Publ 06 10 A01...

Отзывы: