9
Selectronic Australia
Rev 41 - Dec 2022
Installation
Installing SPMC Models
1
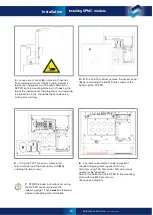
– Unpack the SP PRO onto a flat surface. When removing the SP PRO from
its packaging, carefully inspect for any damage that may have occurred in
transit. Damage must be reported to the supplier immediately.
2
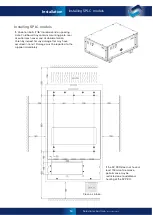
– Choose a suitable weight-bearing and temperature-resistant surface to mount the SP PRO. Mounting
must
be to solid timber studs, solid timber, brick, masonry or other load-bearing wall.
Do not
mount directly to
plaster. Max temperature is a30°C, max weight is 45kg. The display of the SP PRO should be at eye
level. There should be no obstructions to the clear passage of air. Use the six M8 holes to mount the bracket.
Any wiring via the rear gland plate (attached to mounting bracket) can be wired in before mounting
the SP PRO. Ensure all cable entries are completely sealed.
Installing SPMC models
If the SP PRO does not have
at least 150mm of clearance,
performance may be
restricted due to additional
heating of the SP PRO.
Clean air intake.
Содержание SPPRO 2i Series
Страница 1: ......
Страница 2: ...Selectronic Australia 2023 ...
Страница 51: ...47 Selectronic Australia Rev 41 Dec 2022 Operation SP PRO Operation ...
Страница 64: ...Contents Doc O10003 Part 004122 Rev 41 Dec 2022 ...


