9
delay
(
1000
);
MotorDirectionSet
(
0b0101
);
//0b0101 Rotating in the opposite direction
delay
(
500
);
}
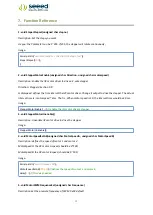
In this program, Arduino first set the speed of the 2 DC motors with the
MotorSpeedSetAB()
command,
and then set the DC motors work directions with
MotorDirectionSet()
command. Please refer to
for details, you can download all the demo code in the
6.3
How to driver a stepper using I2C motor driver V1.3
As the upgraded version of
, You can drive stepper via 2 methods for I2C motor driver
V1.3.
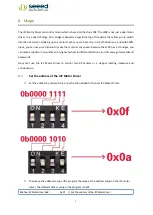
1. Control the stepper directly by Arduino
The I2C motor Driver can also be used to drive a 4-wire stepper. Connect your stepper to the output pins
of I2C motor driver, and then connect motor driver to your Arduino/Seeeduino with I2C bus. Program your
Arduino as below:
#include <Wire.h>
.......
.......
<
Driver functions
>
.......
.......
void
setup
()
{
Wire
.
begin
();
// join i2c bus (address optional for master)
delayMicroseconds
(
10000
);
//wait for motor driver to initialization
}
void
loop
()
{
while
(
1
)
{
MotorSpeedSetAB
(
100
,
100
);
//when driving a stepper, the speed should be set to 100;
delay
(
10
);
MotorDirectionSet
(
0b0001
);
delay
(
4
);
MotorDirectionSet
(
0b0011
);
delay
(
4
);
MotorDirectionSet
(
0b0010
);
delay
(
4
);
MotorDirectionSet
(
0b0110
);
delay
(
4
);
MotorDirectionSet
(
0b0100
);
delay
(
4
);
Содержание Grove I2C Motor Driver
Страница 2: ...2 Document Revision History Revision Date Author Description 1 0 Sep 21 2015 Victor He Create file ...
Страница 9: ...6 5 Application ideas Robots Homebuilt RC cars Case fans High power LED illumination ...
Страница 20: ...17 10 Support If you have questions or other better design ideas you can go to our forum or wish to discuss ...


