


2
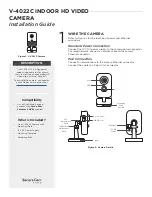
V‑4022C INSTALLATION GUIDE | DIGITAL MONITORING PRODUCTS
MOUNT THE CAMERA
2
The V‑4022C is suitable for stand, wall, and ceiling mounting applications. Refer to Figure 2 and Figure 3
during mounting and camera adjustment.
Wall or Ceiling Mount
Ceiling mounting will be covered as an example in this section. However, the same steps may be referenced for
wall mounting.
1. Using the included template, mark and drill the screw holes for the mounting plate.
2. Press the Release button to release the mounting plate from the camera.
3. Install the mounting plate with the supplied mounting screws.
4. Fasten the camera base to the mounting plate.
Adjust the Camera Angle
1. Loosen the pan adjustment knob.
2. Adjust the pan angle as needed, then re‑tighten the knob.
3. Loosen the tilt/rotation adjustment knob.
4. Adjust the tilt and camera rotation angles, then re‑tighten the adjustment knob.
Figure 3: Mounting and Adjusting the Camera
Tilt
0° - 90°
Rotate
0˚ - 360˚
Pan
0° - 360°
Mounting Plate
Top
latch
Mounting
hole
Top
latch
Mounting
hole
Bottom
catch
Camera Base
Top
catch
Top
catch
Bottom
latch