background image

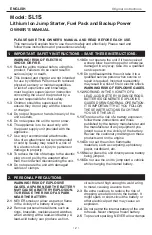
• 4 •

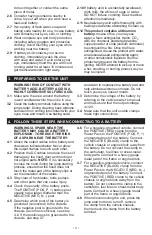
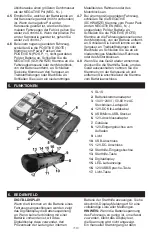
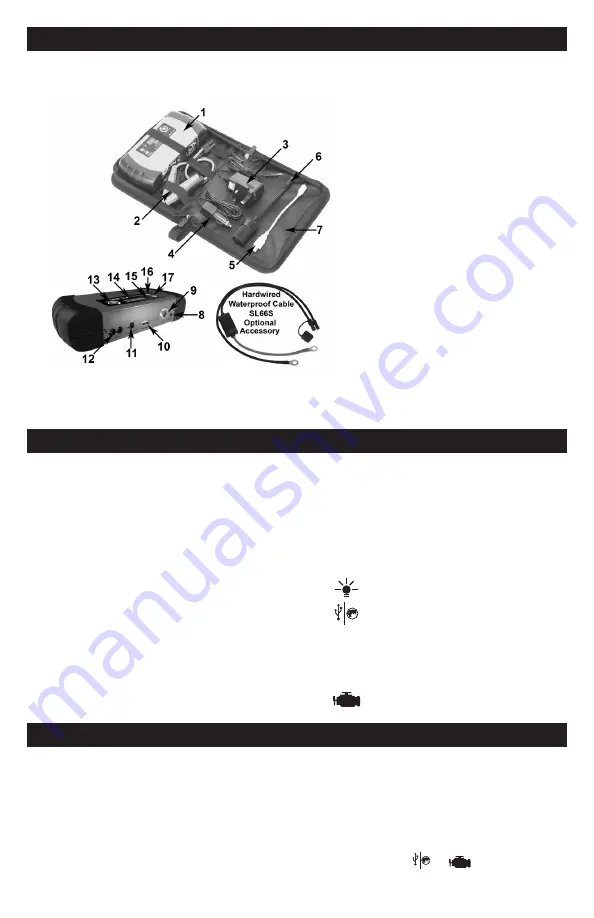
5.  FEATURES

6.  CONTROL PANEL

DIGITAL DISPLAY

When the clamps are connected to a 

vehicle’s battery, the digital display indicates 

the battery’s voltage. When not connected 

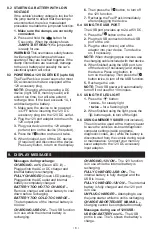
to a battery, the digital display is used to 

indicate the percent of charge of the jump 

starter’s internal battery. See 

Display 

Messages

 for a complete list of messages. 

NOTE: 

If the vehicle’s battery voltage is 

too low to detect, the display will remain 

blank; the voltage will not display. A manual 

start procedure is required to enable 

the jump start function. See Section 8.2, 

Starting a Battery with Low Voltage

.

NOTE: 

During charging, the display will 

go into sleep mode and will not display 

any messages. To turn the display back 

on, press any button.

LED INDICATOR

• 

Green LED solid –

 The internal battery 

is charging.

• Green LED flashing – 

Charging has 

aborted.

• 

Green LED pulsing – 

The internal 

battery is fully charged.

FUNCTION BUTTONS
 

  LIGHT – 

Operates the LED light


12V/USB/LANGUAGE –


Enables the 12V DC port and the  


USB port


Press button for 5 seconds to select  


the language on the display:  


EN → DE → FR → NL → ES

  JUMP START – 

Enables the jump  


start function

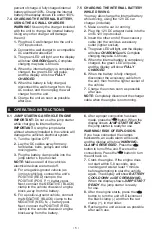
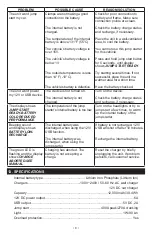
7.  CHARGING THE INTERNAL BATTERY

IMPORTANT! CHARGE IMMEDIATELY 

AFTER PURCHASE, AFTER EACH USE 

AND EVERY 3-6 MONTHS, TO KEEP THE 

INTERNAL BATTERY FULLY CHARGED 

AND PROLONG BATTERY LIFE. 

7.1 

To reduce the risk of electric shock, 

unplug the unit’s wall charger from the 

outlet before attempting any maintenance 

or cleaning. Simply turning off the controls 

will not reduce this risk.

7.2 

When charging the internal battery, work 

in a well ventilated area and do not restrict 

the ventilation in any way.

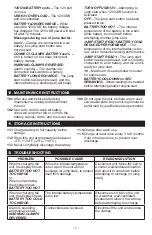
7.3  CHECKING THE LEVEL OF THE 

INTERNAL BATTERY

To check the internal battery’s charge 

level, make sure the unit is turned OFF,  

then press the 


or 

 button. The 

digital display will show the battery’s 

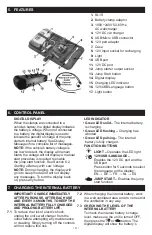
1. 

SL1S 

2. 

Battery clamp adaptor

3. 

100V~240V 50-60 Hz.  

AC wall charger

4. 

12V DC car charger

5. 

USB/Micro USB connector

6. 

12V port adaptor

7. 

Case

8. 

12V Input socket for recharging

9. 

Light

10. 

USB port

11. 

12V DC port

12. 

Jump starter output socket

13. 

Jump Start button

14. 

Digital display

15. 

Charging LED indicator

16. 

12V/USB/Language button

17. 

Light button

C PLUG

G PLUG

I PLUG

Plug  

types

11

12

13

14

15

16

17 18

19 20

1

3

4

5

6

8

7

9

10

2

Содержание SL1S

Страница 1: ...SL1S English Page 02 Deutsch Seite 11 Español Página 20 Français Page 28 Italiano Pagina 36 Nederlands Pagina 44 Svenska Sidan 52 ...

Страница 2: ...y take it to a qualified service person 1 11 Do not disassemble the unit take it to a qualified service person when service or repair is required Incorrect reassembly may result in a risk of fire or electric shock WARNING RISK OF EXPLOSIVE GASES 1 12 WORKING IN THE VICINITY OF A LEAD ACID BATTERY IS DANGEROUS BATTERIES GENERATE EXPLOSIVE GASES DURING NORMAL OPERATION IT IS IMPORTANT THAT YOU FOLLO...

Страница 3: ...f the battery by referring to the vehicle owner s manual and make sure that the output voltage is 12V 3 4 Make sure that the unit s cable clamps make tight connections 4 FOLLOW THESE STEPS WHEN CONNECTING TO A BATTERY WARNING A SPARK NEAR THE BATTERY MAY CAUSE A BATTERY EXPLOSION TO REDUCE THE RISK OF A SPARK NEAR THE BATTERY 4 1 Attach the output cables to the battery and chassis as indicated bel...

Страница 4: ... select the language on the display EN DE FR NL ES JUMP START Enables the jump start function 7 CHARGING THE INTERNAL BATTERY IMPORTANT CHARGE IMMEDIATELY AFTER PURCHASE AFTER EACH USE AND EVERY 3 6 MONTHS TO KEEP THE INTERNAL BATTERY FULLY CHARGED AND PROLONG BATTERY LIFE 7 1 To reduce the risk of electric shock unplug the unit s wall charger from the outlet before attempting any maintenance or c...

Страница 5: ...er cable when the engine is not running 8 OPERATING INSTRUCTIONS 8 1 JUMP STARTING A VEHICLE ENGINE IMPORTANT Do not use the jump starter while charging its internal battery IMPORTANT Using the jump starter without a battery installed in the vehicle will damage the vehicle s electrical system 1 Turn the ignition OFF 2 Lay the DC cables away from any fan blades belts pulleys and other moving parts ...

Страница 6: ... on if necessary NOTE When charging Apple devices use the charging cable included with that device 4 When finished using the USB port turn off the device if necessary and unplug the device Press any button to turn on the display Then press the button twice to turn off the USB function 5 Recharge the unit NOTE The USB power will automatically turn off if not used for 10 minutes 8 5 USING THE LED LI...

Страница 7: ...er engine start 10 MAINTENANCE INSTRUCTIONS 10 1 After use and before performing maintenance unplug and disconnect the unit 10 2 Use a dry cloth to wipe all battery corrosion and other dirt or oil from the battery clamps cords and the outer case 10 3 Do not open the unit as there are no user serviceable parts any servicing should be performed by qualified service personnel 11 STORAGE INSTRUCTIONS ...

Страница 8: ...l battery is not charged Turn on the device Check the battery charge status and recharge if necessary The display shows JUMP START READY BATTERY COLD REDUCED PERFORMANCE The temperature of the jump starter s internal battery is too low Turn on the headlights or try to jump start a few times to warm up the internal battery of the jump starter Beeping sound and display shows BATTERY LOW RECHARGE The...

Страница 9: ...ving the battery The battery must be disposed of safely Under the Waste Batteries and Accumulators Regulations 2009 Jack Sealey Ltd are required to inform potential purchasers of products containing batteries as defined within these regulations that they are registered with Valpak s registered compliance scheme Jack Sealey Ltd s Batteries Producer Registration Number BPRN is BPRN00705 ...

Страница 10: ...er required it must be disposed of in an environmentally protective way Contact your local solid waste authority for recycling information Parts support is available for this product To obtain a parts listing and or diagram please log on to www sealey co uk email sales sealey co uk or telephone 01284 757500 NOTE It is our policy to improve products continually and as such we reserve the right to a...

Страница 11: ...bel wenn Sie das Gerät vom Stromnetz trennen 1 9 Betreiben Sie das Gerät nicht mit beschädigten Kabeln oder Klemmen 1 10 Betreiben Sie das Gerät nicht nach einem schweren Schlag wenn es heruntergefallen ist oder anderweitig beschädigt wurde bringen Sie es in einen solchen Fall zu einem qualifizierten Servicetechniker 1 11 Zerlegen Sie das Gerät nicht bringen Sie es zu einem qualifizierten Servicet...

Страница 12: ...öscht ist gießen Sie Wasser ein Löschmittel auf Wasserbasis oder andere nichtalkoholische Flüssigkeiten auf das Produkt um es zu kühlen und zu verhindern dass der Akkumulator erneut Feuer fängt Versuchen Sie NIEMALS das Produkt in heißem qualmendem oder brennendem Zustand aufzuheben oder zu bewegen da Verletzungsgefahr besteht 3 VORBEREITUNG FÜR DIE VERWENDUNG DES GERÄTS WARNUNG GEFAHR DES KONTAKT...

Страница 13: ...ine Klemme an den Vergaser an Treibstoffleitungen oder Blechteile an Schließen Sie sie an ein niederohmiges Metallteil des Rahmens oder des Motorblocks an 4 8 Wenn Sie das Gerät wieder abnehmen drücken Sie die Starthilfe Taste um das Gerät auszuschalten nehmen Sie die Klemmen von der Karosserie ab und entfernen Sie anschließend die Klemme vom Batterieanschluss 5 FUNKTIONEN 6 BEDIENFELD DIGITALDISP...

Страница 14: ...e interne Batterie auf wenn das Display weniger als 100 anzeigt 7 4 LADEN DER INTERNEN BATTERIE ÜBER DAS AC LADEGERÄT WARNUNG Verwenden Sie das Ladegerät das mit dem Gerät geliefert wurde nur um die interne Batterie aufzuladen Die Verwendung eines anderen Ladegeräts kann das Gerät beschädigen 1 Stecken Sie das AC Ladegerät in die 12V Eingangsbuchse des Geräts 2 Stecken Sie das Ladegerät in eine ko...

Страница 15: ...LT AB xx SEK VERBLEIBEN Wenn das Display STARTHILFE BEREIT anzeigt ist die Starthilfe einsatzbereit 8 Wenn der Motor gestartet wurde drücken Sie die Taste um das Gerät auszuschalten Trennen Sie die schwarze Klemme und dann die rote Klemme in dieser Reihenfolge 9 Laden Sie das Gerät so schnell wie möglich nach jeder Verwendung wieder auf 8 2 EINE BATTERIE MIT NIEDRIGER SPANNUNG STARTEN Wenn die Bat...

Страница 16: ... eingesteckt und die interne Batterie wird aufgeladen VOLL GELADEN Grüne LED pulsiert In die AC Ausgangsbuchse oder den DC Fahrzeugadapter eingesteckt und die interne Batterie ist vollständig aufgeladen BATTERIE ZU HEISS ZUM LADEN Ladegerät entfernen und die Batterie abkühlen lassen bevor ein neuer Ladevorgang begonnen wird BATTERIE ZU KALT ZUM LADEN Die Temperatur der internen Batterie ist zu nie...

Страница 17: ...on qualifizierten Technikern durchzuführen 11 ANWEISUNGEN FÜR DIE LAGERUNG 11 1 Laden Sie die Batterie vollständig auf bevor Sie sie einlagern 11 2 Lagern Sie das Gerät bei Temperaturen zwischen 20 C 40 C 4 F 104 F 11 3 Lassen Sie die Batterie niemals vollständig entladen 11 4 Laden Sie die Batterie nach jeder Verwendung 11 5 Laden Sie sie mindestens einmal alle 3 bis 6 Monate wenn sie nicht regel...

Страница 18: ...chaltet Die interne Batterie ist nicht geladen Das Gerät einschalten Den Ladezustand der Batterie prüfen und gegebenenfalls aufladen Das Display zeigt STARTHILFE BEREIT BATTERIE KALT WENIGER LEISTUNG Die Temperatur der internen Batterie ist zu niedrig Die Scheinwerfer einschalten oder die Starthilfe einige Male versuchen um die interne Batterie aufzuwärmen Ein Piepton erklingt und das Display zeig...

Страница 19: ... 1 Interne Batterie Die Batterie muss aus dem Gerät entfernt werden bevor es verschrottet wird Das Gerät muss vom Versorgungsnetz getrennt werden bevor die Batterie entfernt werden Die Batterie muss sicher entsorgt werden ...

Страница 20: ...ayó o si sufrió daños de cualquier otra forma hágalo revisar por una persona capacitada que efectúe reparaciones 1 11 No desarme la unidad hágalo revisar por una persona capacitada que efectúe reparaciones cuando necesite servicio de mantenimiento o una reparación Volver a ensamblar la unidad en forma incorrecta puede provocar riesgo de incendio o descarga eléctrica ADVERTENCIA RIESGO DE GASES EXP...

Страница 21: ...VO 3 1 Asegúrese de que el área alrededor de la batería esté bien ventilada mientras la unidad está en uso 3 2 Limpie los terminales de la batería antes de usar el arrancador Durante la limpieza evite que la corrosión producida por aire tenga contacto con sus ojos nariz y boca Utilice bicarbonato de sodio y agua para neutralizar el ácido de la batería y ayudar a eliminar la corrosión producida por...

Страница 22: ...oltaje de la batería del vehículo es demasiado baja para detectar la pantalla permanecerá en blanco la tensión no se vea Se requiere un procedimiento de arranque manual para activar la función de salto de inicio Vea la sección 8 2 Para Iniciar una Batería con Baja Tensión NOTA Durante la carga la pantalla pasará al modo de reposo y no mostrará ningún mensaje Para encender la pantalla de nuevo puls...

Страница 23: ...RAS SE CONDUCE UN AUTOMÓVIL También puede cargar la batería interna durante la conducción utilizando el cargador para automóvil de 12V DC incluido 1 Asegúrese de que el vehículo esté en marcha 2 Enchufe el cable del adaptador de 12V DC en la toma de entrada de 12 V de la unidad 3 Inserte el otro extremo del cable accesorio en accesorio de salida de vehículo toma del encendedor 4 El LED verde se il...

Страница 24: ... una fuente de poder para la mayoría de los accesorios de 12V de corriente directa que estén equipados con enchufe de 12V NOTA La carga mientras opera un dispositivo DC luz USB protector de la memoria se extenderá el tiempo de ejecución pero también se extenderá el tiempo de recarga Si la carga supera 1A ésta se descargará la batería 1 Asegúrese de que el dispositivo sea accionado está apagada ant...

Страница 25: ... en uso USB 12V SOBRECARGA El puerto 12V USB está sobrecargado BATERÍA BAJA CARGAR Durante el uso de la 12V USB el voltaje de la batería ha caído Potencia 12V USB se apagará después de 10 minutos Mensajes durante la utilización del arrancador xx xV Pinzas están conectados a una batería de coche pero botón de arranque no se ha presionado CONECTAR LAS PINZAS BATERÍA xx La unidad está encendida pero ...

Страница 26: ...ás cálido con buena ventilación y deje que se caliente antes de intentar recargarlo La alarma está sonando y la pantalla muestra ATENCIÓN PINZAS INVERSAS Las conexiones se invertido Desconecte la unidad y revertir las pinzas La unidad no poner en marcha el coche Las pinzas no hacen buena conexión a la batería La batería interna no está cargada La temperatura de la batería interna está por encima d...

Страница 27: ...o se recarga 12V USB se apagará después de 10 minutos Recargue la batería interna El LED verde parpadea y la pantalla muestra CARGA DETENIDA La carga ha abortado La batería no está aceptando un cargo Desconecte brevemente la unidad a reajustar el cargador Si el problema persiste llame al servicio al cliente 13 ESPECIFICACIONES Tipo de la batería interna Litio fosfato de hierro Ion de litio Cargado...

Страница 28: ...us débranchez l unité 1 9 Ne pas utiliser l appareil avec des câbles ou des pinces endommagées 1 10 Ne pas faire fonctionner l unité s il a reçu un choc violent est tombé par terre ou a été endommagé d une autre façon apportez le à un technicien qualifié 1 11 Ne pas démonter l unité apportez le chez un technicien qualifié quand vous devez l entretenir ou le réparer Un mauvais remontage pourrait ca...

Страница 29: ... et éviter la reprise du feu N essayez JAMAIS de ramasser ou de déplacer un produit chaud fumant ou brûlant Vous risqueriez de vous blesser 3 PRÉPARATION UTILISER L APPAREIL AVERTISSEMENT LE RISQUE DE CONTACT AVEC L ACIDE DE BATTERIE L ACIDE DE BATTERIE EST UN ACIDE SULFURIQUE EXTRÊMEMENT CORROSIF 3 1 Assurez vous que la zone autour de la batterie est bien ventilée lorsque l appareil est en cours ...

Страница 30: ...e numérique indique la tension de la batterie Lorsqu il n est pas connecte à une batterie l affichage numérique est utilisé pour indiquer le pourcentage de charge de la batterie interne du démarreur de saut Voir Messages d Affichage pour une liste complète des messages REMARQUE si la tension de la batterie du véhicule est trop faible pour détecter l affichage reste vide la tension ne sera pas affi...

Страница 31: ...ra lentement et l écran affiche CHARGE COMPLETE 5 Lorsque la batterie est complètement chargée débranchez le chargeur de mur de la prise secteur puis débranchez le chargeur mural de l unité 6 Rechargez l unité dès que possible après l avoir utilisé 7 5 CHARGE DE LA BATTERIE INTERNE PENDANT LA CONDUITE Vous pouvez également charger la batterie interne pendant la conduite en utilisant le chargeur de...

Страница 32: ... est une source d énergie pour la plupart des accessoires CC qui sont équipés d une prise accessoire 12V NOTE Charge pendant le fonctionnement sur l appareil CC lumière USB garde de mémoire va étendre moment de l exécution mais aussi prolonger le temps de recharge Si la charge dépasse 1A la batterie se décharge 1 Assurez vous que le dispositif a alimenter est éteint avant d insérer la fiche de l a...

Страница 33: ... au bout de 10 minutes Messages lors de l utilisation de démarreur de saut xx xV Pinces sont reliés à une batterie de voiture mais le bouton de démarrage de saut n a pas été actionnée CONNECTER LES PINCES BATTERIE A xx Appareil est sous tension mais ne détecte pas pinces de la batterie ATTENTION PINCES INVERSEES Alarme sonore Les pinces sont reliées à une batterie vers l arrière BATTERIE FAIBLE RE...

Страница 34: ...icheur indique ATTENTION PINCES INVERSEES Les connexions sont inversées Débranchez l unité et inversez les pinces L unité ne démarre pas ma voiture Les pinces n offrent pas une bonne connexion à la batterie La batterie Interne n est pas chargée La température de la batterie interne est au dessus de 55 C 131 F La tension de la batterie du véhicule est supérieure à 15V La tension de la batterie du v...

Страница 35: ...te clignote et l affichage indique CHARGE STOPPEE Le chargement est interrompu La batterie n est pas d accepter une charge Réinitialiser le chargeur en débranchant brièvement l unité Si le problème persiste appelez le service à la clientèle 13 SPÉCIFICATIONS Type de batterie interne Lithium Iron Phosphate Lithium Ion Chargeurs 100V 120V CA chargeur mural Chargeur de voiture 12V CC Capacité 12 000 ...

Страница 36: ...izzare l unità in caso di cavi o morsetti danneggiati 1 10 Non utilizzare l apparecchio se ha ricevuto un forte colpo è caduto o si è danneggiato in qualsivoglia modo portarlo presso un tecnico qualificato 1 11 Non smontare l apparecchio portarlo presso un tecnico qualificato quando risultano necessarie manutenzione o riparazione Un riassemblaggio non corretto può provocare un rischio di incendio ...

Страница 37: ...IO RISCHIO DI CONTATTO CON L ACIDO DELLE BATTERIE L ACIDO DELLA BATTERIA È ACIDO SOLFORICO ALTAMENTE CORROSIVO 3 1 Assicurarsi che l area circostante la batteria sia ben ventilata mentre l unità è in uso 3 2 Pulire i terminali della batteria prima di usare l apparecchio Durante la pulizia evitare che la corrosione in sospensione nell aria entri in contatto con occhi naso e bocca Usare bicarbonato ...

Страница 38: ...i messaggi NOTA Se la tensione della batteria del veicolo è troppo bassa per essere rilevata lo schermo rimane in bianco la tensione non viene visualizzata Un procedura di avvio manuale è necessaria per consentire la funzione di avvio d emergenza Vedere la Sezione 8 2 Avviare una Batteria a Basso Voltaggio NOTA Durante il caricamento lo schermo entrerà in modalità di stand by e non visualizzerà al...

Страница 39: ...sibile dopo l uso 7 5 RICARICARE LA BATTERIA INTERNA MENTRE SI GUIDA È anche possibile caricare le batteria interna mentre si guida utilizzando il caricabatterie per auto a 12V CC incluso 1 Assicurarsi che il veicolo sia in marcia 2 Collegare il caricabatterie per auto a 12V CC nel connettore di input a 12V dell unità 3 Inserire l altra estremità del cavo dell accessorio nell uscita dell accessori...

Страница 40: ...dispositivo CC mentre sta funzionando una lampada l USB il Memory Saver permetterà di estenderne il periodo di funzionamento ma allungherà anche il tempo di ricarica Se il carico supera 1A esso scaricherà la batteria 1 Assicurarsi che il dispositivo da alimentare sia SPENTO prima di inserire la spina dell accessorio a 12V CC nella presa a 12V CC 2 Collegare l adattatore per la porta a 12V nella po...

Страница 41: ...collegati alla batteria di un autoveicolo ma non è stato premuto il pulsante avvio d emergenza CONNECT CLAMPS BATTERY xxx L unità è accesa ma non rileva i morsetti della batteria WARNING CLAMPS REVERSED allarme sonoro I morsetti sono collegati alla batteria al rovescio BATTERY LOW RECHARGE Il pulsante avvio d emergenza è stato premuto e la batteria interna e scarica emetterà un segnale sonoro TURN...

Страница 42: ... unità Spostare l unità in un posto più caldo e ben ventilato e lasciarla riscaldare prima di riprovare a ricaricare L allarme sta suonando e lo schermo WARNING CLAMPS REVERSED I collegamenti sono invertiti Scollegare l unità e invertire i morsetti L avviatore non riesce ad avviare l autovettura I morsetti non sono ben collegati alla batteria La batteria interna non è carica La temperatura della b...

Страница 43: ...tteria non è carica la 12V USB sarà interrotta dopo 10 minuti Ricaricare la batteria interna Il LED verde lampeggia e lo schermo visualizza CHARGE ABORTED SEE MANUAL La ricarica si è interrotta La batteria non permette una ricarica Resettare il caricabatterie semplicemente staccando la spina dell unità Se il problema persiste contattare il servizio clienti 13 DATI TECNICI Tipo batteria interna Lit...

Страница 44: ...kabel beschadigd is Laat het beschadigde onderdeel meteen door een gekwalificeerde onderhoudsmonteur vervangen 1 10 Bedien de booster niet als deze een harde klap heeft gekregen op de grond is gevallen of anderzijds beschadigd is breng de booster naar een gekwalificeerde onderhoudsmonteur 1 11 Haal de booster niet zelf uit elkaar maar breng de booster zo nodig naar een gekwalificeerde onderhoudsmo...

Страница 45: ...ndend product op te tillen of te verplaatsen aangezien u zo verwond kan raken 3 VOORBEREIDING VOOR GEBRUIK WAARSCHUWING RISICO OP CONTACT MET ACCUZUUR ACCUZUUR IS EEN STERK BIJTEND ZWAVELZUUR 3 1 Gebruik de booster enkel in een goed geventileerde ruimte 3 2 Reinig de accupolen voordat u de booster gebruikt Voorkom dat tijdens het reinigen bijtende luchtdeeltjes in contact met uw ogen neus en mond ...

Страница 46: ... Als de klemmen zijn aangesloten op de accu van het voertuig dan wordt op het digitale scherm de accuspanning aangegeven Als de accu niet is aangesloten dan wordt het digitale scherm gebruikt om het laadpercentage van de interne accu van de jumpstarter aan te geven Zie Display Weergave voor een complete lijst OPMERKING Als de accuspanning van het voertuig te laag is om gedetecteerd te kunnen worde...

Страница 47: ...eladen is koppel dan eerst de lader van de netstroom en vervolgens van de SL1S af 6 Laadt het apparaat zo snel mogelijk na gebruik 7 5 LADEN VAN DE INTERNE ACCU TIJDENS HET RIJDEN U kan het apparaat ook laden tijdens het rijden door middel van de bijgeleverde 12v laadplug 1 Zorg ervoor dat de motor van het voertuig draait 2 Sluit de 12v laadplug aan op de 12v ingang van de SL1S 3 Sluit de 12v laad...

Страница 48: ...lektrische installatie van het voertuig 8 3 EEN 12V APPARAAT VAN STROOM VOORZIEN TOT 6A De Fuel Pack is een stroombron voor alle 12v toepassingen die voorzien zijn van een 12v plug OPMERKING Indien u 12v apparaten lamp USB uitgang memory saver gebruikt tijdens het laden van de interne accu zal de oplaadtijd verlengt worden Als het verbruik meer is dan 1A zal de interne accu ontladen worden 1 Zorg ...

Страница 49: ...op is nog niet ingedrukt KLEMMEN AANSLUITEN BATTERIJ xx de starthulp is ingeschakeld maar herkent de accu niet OPGELET POLARITEITINVERSIE Alarm Geluidssignaal de klemmen zijn verkeerd aangesloten op de voertuigaccu ompoling LAGE BATTERIJ OPLADEN de startknop is ingedrukt en de interne accu is ontladen pieptoon USB 12V STOPPEN proberen starten terwijl de USB 12V functie ingeschakeld is OFF er is tw...

Страница 50: ...lemmen maken geen goed contact De interne accu is niet geladen De temperatuur van de interne accu is hoger dan 55ºC Het voltage van de voertuigaccu is hoger dan 15V Het voltage van de voertuigaccu is lager dan 1V De omgevingstemperatuur ligt beneden 10ºC De voertuigaccu is defect Controleer de verbinding tussen het apparaat en het voertuig Controleer de accustatus en laad de accu op indien nodig P...

Страница 51: ...e lader af om te resetten Indien het probleem zich blijft voordoen neem contact op met de klantendienst 13 SPECIFICATIES Interne accu type Lithium Ijzer Fosfaat Lithium Ion Laders 100V 240v 50 60 Hz AC lader 12v DC autolader Capaciteit 12 000 mAh 38 4 Wh 12v DC uitgangsstroom 6A USB uitgang 5v DC 2A Startcapaciteit 400A piekstroom 270A Lamp 1W 90 Lm Beschermd tegen overbelasting Ja 14 INFORMATIE O...

Страница 52: ...erad servicetekniker 1 11 Demontera inte apparaten Ta enheten till en kvalificerad servicetekniker när underhåll eller reparation krävs Felaktig montering kan resultera i risk för brand och elchock VARNING RISK FÖR EXPLOSIVA GASER 1 12 DET ÄR FARLIGT ATT ARBETA I NÄRHETEN AV BLYSYRABATTERIER BATTERIER GENERERAR EXPLOSIVA GASER UNDER NORMAL ANVÄNDNING AV BATTERIET AV DENNA ANLEDNING ÄR DET YTTERST ...

Страница 53: ... att läsa i ägarhandboken för fordonet och kontrollera att boosterns utspänning är 12 volt 3 4 Kontrollera att boosterns kabelklämmor sitter ordentligt fast 4 FÖLJ DESSA STEG FÖR ATT ANSLUTA TILL ETT BATTERI VARNING EN GNISTA INTILL BATTERIET KAN LEDA TILL BATTERIEXPLOSION MINSKA RISKEN FÖR GNISTA INTILL ETT BATTERI ENLIGT FÖLJANDE 4 1 Sätt fast utgångskablarna på batteriet och chassit enligt besk...

Страница 54: ...ljuset 12V USB SPRÅK Aktiverar 12V DC porten USB porten och sparande i minnet Tryck på knappen i 5 sekunder för att välja språk på displayen EN DE FR NL ES HJÄLPSTART Aktiverar hjälpstartsfunktionen 7 LADDNING AV INBYGGDA BATTERI VIKTIGT LADDA OMEDELBART EFTER KÖP EFTER VARJE ANVÄNDNING OCH VAR 3 E TILL 6 E MÅNAD FÖR ATT HÅLLA DET INBYGGDA BATTERIET FULLADDAT OCH FÖRLÄNGA BATTERILIVET 7 1 För att ...

Страница 55: ... DRIFTSANVISNINGAR 8 1 HJÄLPSTARTA MOTORN I ETT FORDON VIKTIGT Använd inte hjälpstartaren samtidigt som det inbyggda batteriet laddas VIKTIGT Om hjälpstartaren användes utan att ett batteri är installerat i fordonet skadar fordonets elektriska system 1 Vrid AV tändningen 2 Lägg DC kablarna på avstånd från fläktblad remmar drivskivor och andra rörliga delar 3 Anslut batteriklämkabeln till hjälpstar...

Страница 56: ... Koppla adapterns andra mikro ände i din enhet Starta enheten om så behövs OBS Vid laddning av Apple enhet använd den laddningskabel som kom med din enhet 4 När du har använt klart USB porten stäng av enheten om så behövs och koppla bort enheten Tryck på valfri knapp för att starta displayen Tryck på knappen två gånger för att stänga av USB funktionen 5 Ladda om enheten OBS USB strömmen kommer aut...

Страница 57: ... krävs innan ännu en motorstart kan genomföras 10 UNDERHÅLLSANVISNINGAR 10 1 Efter användning och före underhåll koppla ur och bort enheten 10 2 Använd en torr trasa för att torka bort all batterikorrosion och annan smuts och olja från batteriklämmorna sladdarna och boosterns hölje 10 3 Öppna inte enheten eftersom det inte finns några delar i den som användaren själv kan serva all service ska utfö...

Страница 58: ...påslagen Det inbyggda batteriet är inte laddat Starta enheten Kontrollera batteristatusen och ladda om vid behov Displayen visar JUMP START READY BATTERY COLD REDUCED PERFORMANCE Temperaturen på hjälpstartarens inbyggda batteri är för låg Tänd strålkastarna eller försök att hjälpstarta några gånger för att värma upp hjälpstartarens inbyggda batteri Pipande ljud och display visar BATTERY LOW RECHAR...

Страница 59: ...BORTSKAFFANDE 14 1 Inbyggt batteri Batteriet måste tas bort från apparaten innan den skrotas Apparaten måste kopplas bort från elnätet innan du tar bort batteriet Batteriet måste tas om hand på ett säkert sätt ...

Отзывы: