Thank you for purchasing a Sealey Product. Manufactured to a high standard this product will, if used according to these instructions
and properly maintained, give you years of trouble free performance.
IMPORTANT:
PLEASE READ THESE INSTRUCTIONS CAREFULLY. NOTE THE SAFE OPERATIONAL REQUIREMENTS,
WARNINGS AND CAUTIONS. USE THIS PRODUCT CORRECTLY AND WITH CARE FOR THE PURPOSE FOR WHICH
IT IS INTENDED. FAILURE TO DO SO MAY CAUSE DAMAGE AND/OR PERSONAL INJURY AND WILL INVALIDATE
THE WARRANTY. PLEASE KEEP INSTRUCTIONS SAFE FOR FUTURE USE.
1.
SAFETY INSTRUCTIONS
!
WARNING!
Ensure Health & Safety, local authority, and general workshop practice regulations are adhered to
when using this equipment.
!
WARNING!
Disconnect from air supply before changing accessories or servicing.
"
Maintain the sander in good condition (use an authorised service agent).
"
Replace or repair damaged parts.
Use genuine parts only. Unauthorised parts may be dangerous and
will invalidate the warranty.
"
Use in suitable clean and tidy working area, free from unrelated materials and ensure there is adequate lighting.
"
Before each use check abrasive belt for condition. If worn or damaged replace immediately.
"
Use only the correct size and type of sanding belt with this sander.
"
Ensure there are no flammable or combustible materials near the work area.
!
WARNING!
Always wear approved eye or face and hand protection when operating the sander.
"
Use face, dust, or respiratory protection in accordance with COSHH regulations.
"
Depending on the task, sander noise level may exceed 85dB, in which case wear safety ear defenders.
"
Remove ill fitting clothing. Remove ties, watches, rings, other loose jewellery and contain and/or tie back long hair.
"
Wear appropriate protective clothing and keep hands and body clear of working parts.
"
Maintain correct balance and footing. Ensure the floor is not slippery and wear non-slip shoes.
"
Keep children and unauthorised persons away from the work area.
"
Check moving parts alignment on a regular basis.
"
Ensure workpiece is secure before operating the sander. Never hold a workpiece by hand.
"
Check the workpiece to ensure there are no protruding screws, bolts, nuts, nails, rivets, etc.
"
Avoid unintentional starting.
!
WARNING!
Ensure correct air pressure is maintained and not exceeded. Recommended pressure 70-90psi.
"
Keep air hose away from heat, oil and sharp edges. Check air hose for wear before each use and ensure
that all connections are secure.
"
Prolonged exposure to vibration from this sander poses a health risk. It is the owner’s responsibility to correctly
assess the potential hazard and issue guidelines for safe periods of use and offer suitable protective equipment.
#
DO NOT use the sander for a task it is not designed to perform.
#
DO NOT operate sander if any parts are damaged or missing as this may cause failure and/or personal injury.
!
WARNING!
DO NOT sand any materials containing asbestos.
#
DO NOT carry the sander by the hose, or yank the hose from the air supply.
#
DO NOT force, or apply heavy pressure to, the sander, let the sander do the work.
#
DO NOT switch the sander on whilst the belt is in contact with the workpiece.
#
DO NOT operate sander when you are tired or under the influence of alcohol, drugs or intoxicating medication.
#
DO NOT use sander where there are flammable liquids, solids or gases such as paint solvents and including
waste wiping or cleaning rags etc.
#
DO NOT carry the sander with your finger on the power lever.
#
DO NOT direct air from the air hose at yourself or others.
"
When not in use disconnect from air supply and store in a safe, dry, childproof location.
INSTRUCTIONS FOR
AIR OPERATED 10mm BELT
SANDER
Model:
SA35.V2
AIR OPERATED 10mm BELT SANDER
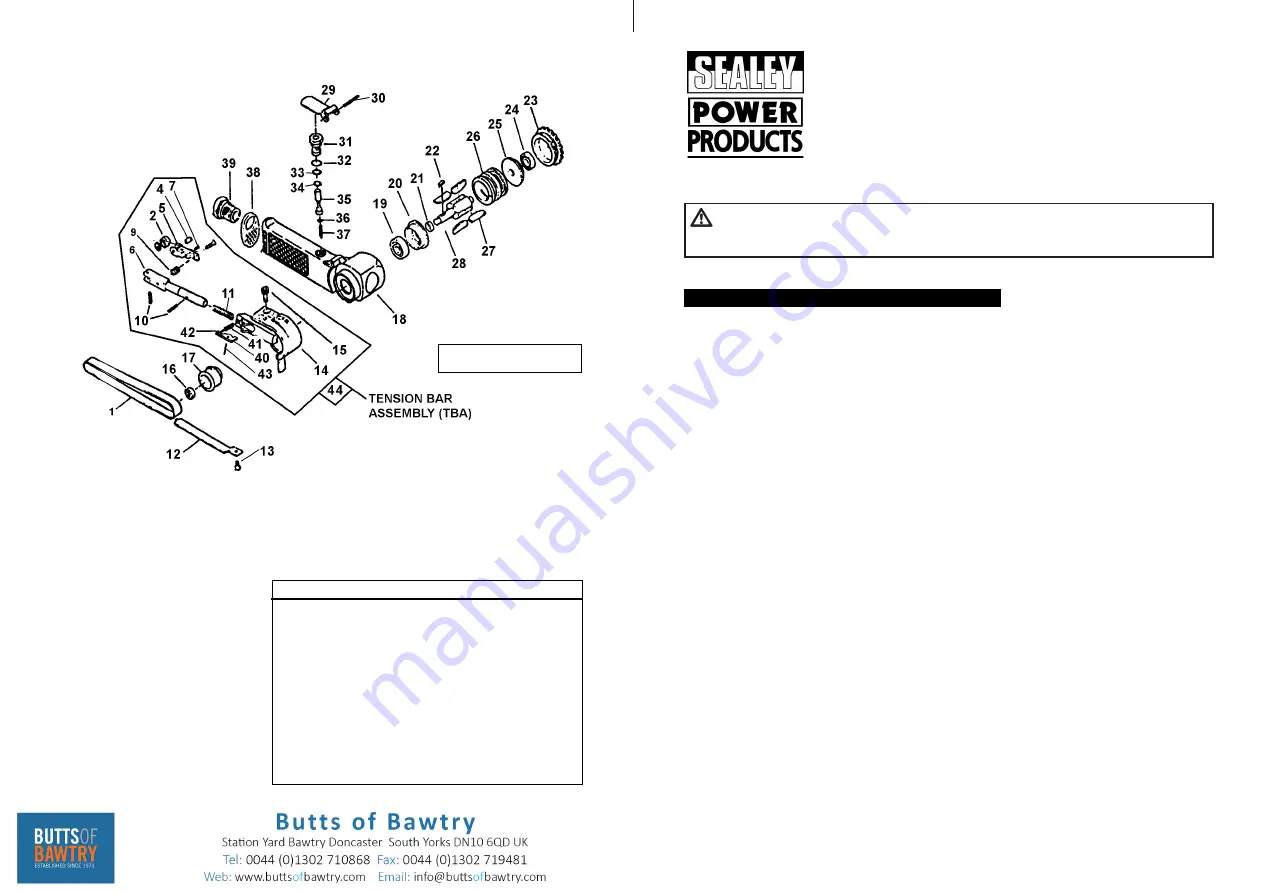
PARTS INFORMATION FOR:
MODEL:
SA35.V2
SA35 - 2 - 06/04/06
44
SA35/06-TBA
TENSION BAR ASS'Y
2
SA35/93/06/02
IDLE PULLEY COMPLETE
4
SA35.V2-04A
IDLE PULLEY SHAFT
5
SA35.V2-05A
BRACKET
6
SA35/93/06/06
TENSION BAR
7
SA35/93/06/07
HEX SOCKET SCREW
8
SA35/93/06/08
USE SA35/06-TBA TENSION BAR ASSY
9
SA35/93/06/09
SPRING
10
SA35/93/06/10
SPRING PIN
11
SA35/93/06/11
SPRING
14
SA35/93/06/14
GUARD SUB ASS'Y
15
SA35/93/06/15
HEX HEAD BOLT
40
SA35/93/06/40
TENSION BAR
41
SA35/93/06/41
SPRING
42
SA35/93/06/42
LEVER PIN
43
SA35/93/06/43
LEVER PIN
Item Part No.
Description
36
SA35/93/36
O-RING (SO)
37
SA35/93/37
VALVE SPRING
38
SA35/93/38
AIR DEFLECTOR
39
SA35/93/39
AIR INLET
45
AK93-1.5
1.5mm HEX WRENCH
46
AK93-4
4mm HEX WRENCH
Item Part No.
Description
1
SA35/B60G
BELT 60G PACK OF 5
1
SA35/B80G
BELT 80G PACK OF 5
1
SA35/B100G
BELT 100G PACK OF 5
1
SA35/B120G
BELT 120G PACK OF 5
12
SA35/93/12
SHOE
13
SA35/93/13
SLOT HEAD SCREW
14
SA35/93/06/14
GUARD SUB ASS'Y
15
SA35/93/06/15
HEX HEAD BOLT
16
SA35/93/16
HEX NUT
17
SA35/93/17
DRIVE PULLEY
18
SA35/93/18
HOUSING
19
B/628ZZ
BEARING, 628ZZ
20
SA35/93/20
END PLATE
21
SA35/93/21
SPACER
22
SA35/93/22
SUNK KEY
23
SA35/93/23
CAP
24
B/607ZZ
BEARING, 607ZZ
25
SA35/93/25
END PLATE
26
SA35/93/26
CYLINDER
27
SA35/93/27
ROTOR VANE
28
SA35/93/28
ROTOR
29
SA35/93/29
THROTTLE LEVER
30
SA35/93/30
LEVER PIN
31
SA35/93/31
VALVE BODY
32
SA35/93/32
O-RING
33
SA35/93/33
O-RING
34
SA35/93/34
O-RING
35
SA35/93/35
VALVE STEM
ISSUE N0: . . . . . . . . . . . .2
ISSUE DATE . . . .24/04/06
Содержание SA35.V2
Страница 3: ......


