9
IV. LED indicator and button functions
This series of models is equipped with 2 sets of gear drive motors that can handle 300 printers. It
has one button and one indicator that can display three colors. Pressing the button in conjunction
with different colors or collaborating with the power switch will enable the printer to start multiple
functions, such as: feeding paper, pausing the printer, calibrating the label, printing the self-test
value, initializing the printer, etc., Details are described as follows.
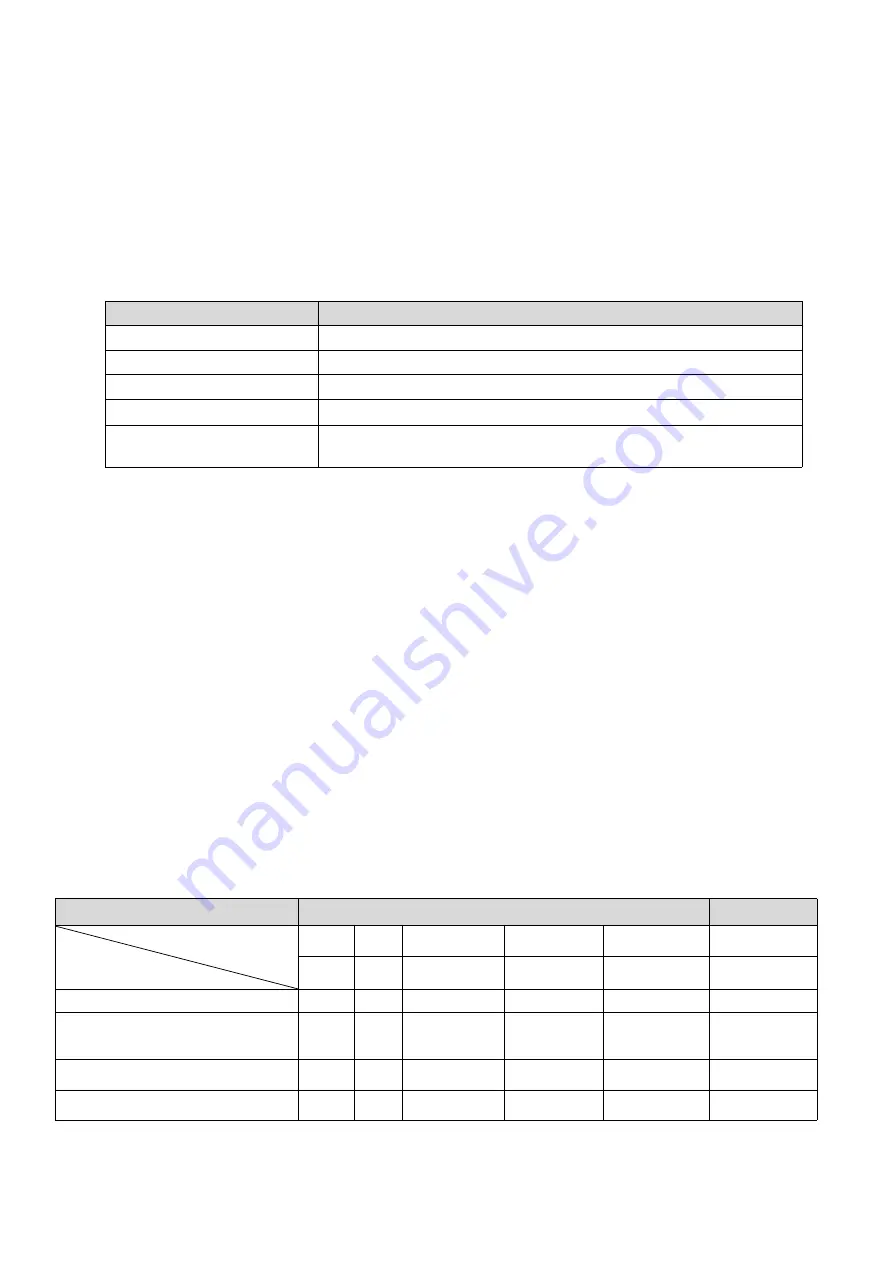
4.1
LED indicator
LED
indicator color
Description
Blue (fixed)
Power on, printer standby to print
Blue (flashing)
The printer is downloading data or the printer is paused
Purple
The printer is clearing data
Red (fixed)
The printer cover is opened
Red (flashing)
Printing errors occur, such as: out of paper, paper jam, or
memory error, etc.
4.2
General button functions
1. Paper feeding
When the printer is ready (LED blue fixed), click the button and the roll label will advance to
the front of the next label paper.
2. Pausing of printing operation
While the printer is printing, clicking the button will pause the operation. At this point, the
power indicator light flashes blue. Click the button again to resume the printing.
4.3
Boot function
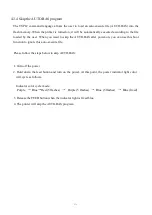
This printer has four boot functions that can be used to set or test the printer's hardware. These
functions can be activated by holding down the button and releasing it with the light signal when
the machine is started.
Please follow the steps below to start the boot function:
1. Turn off the printer.
2. Turn on the printer while holding down the button.
3. Release the button with the light signal indicating the required function, as listed in the table
below.
Boot function
Indicator color cycle mode:
Indicator light signal
Function
Purple
Blue
Red
Purple
Blue
Blue
(Flashing 5 times)
(Flashing 5 times)
(Flashing 5 times)
(Fixed blue)
1. Gap/black mark sensor detection
Release the button
2. Gap/black mark sensor detection,
printing self-test value and entering the
debugging mode
Release the button
3. Printer initialization (restore factory
defaults)
Release the button
4. Skip the
AUTO
.
BAS
program
Release the button


