background image

Section 01

ENGINE

Subsection 01

(MAGNETO SYSTEM)

01-01-1

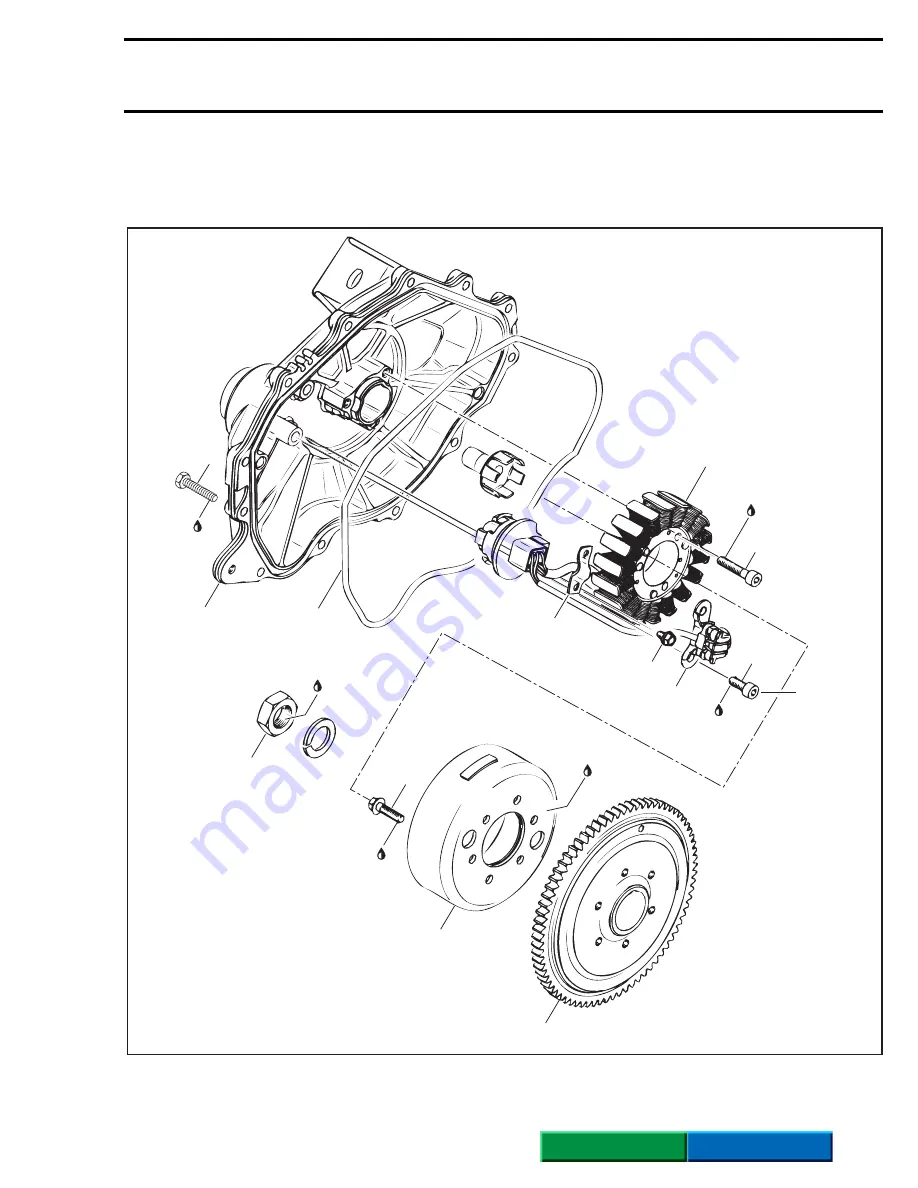
MAGNETO SYSTEM

0

947 Engine

F06D0IS

Loctite 242

Loctite 242

Loctite 242

Loctite 648

Loctite

648

Anti-seize

lubricant

9 N•m

(80 lbf•

in

)

13 N•m

(115 lbf•

in

)

115 N•m

(85 lbf•ft)

9 N•m

(80 lbf•

in

)

6

4

5

1

7

12

13

11

8

10

3

2

9

13 N•m

(115 lbf•

in

)

www.SeaDooManuals.net

FLAT RATE

PARTS

Содержание Bombardier GSX Limited 5625

Страница 1: ...GSX Limited www SeaDooManuals net ...

Страница 2: ...uced in any form without the prior written permission of Bombardier Inc Bombardier Inc 1997 Printed in Canada Registered trademarks of Bombardier Inc Loctite is a trademark of Loctite Corporation Snap on is a trademark of Snap on Tools Corpo ration Gelcote is a trademark of Gelcote International Limited www SeaDooManuals net ...

Страница 3: ...1 02 COOLING SYSTEM 01 Circuit 02 01 1 03 FUEL SYSTEM 01 Carburetion 03 01 1 04 ELECTRICAL SYSTEM 01 Ignition and Charging Systems 04 01 1 02 Starter 04 02 1 05 PROPULSION SYSTEM 01 Drive System and Jet Pump 05 01 1 06 TECHNICAL DATA 01 GSX Limited 06 01 1 07 WIRING DIAGRAM 07 01 1 TABLE OF CONTENTS www SeaDooManuals net VOLUME 2 VOLUME 1 1997 ...

Страница 4: ... with new ones where specified If the efficiency of a locking device is impaired it must be renewed This manual emphasizes particular information denoted by the wording and symbols NOTE Indicates supplementary information needed to fully complete an instruction Although the mere reading of such information does not eliminate the hazard your understanding of the information will promote its correct...

Страница 5: ... SYSTEM 0 947 Engine F06D0IS Loctite 242 Loctite 242 Loctite 242 Loctite 648 Loctite 648 Anti seize lubricant 9 N m 80 lbf in 13 N m 115 lbf in 115 N m 85 lbf ft 9 N m 80 lbf in 6 4 5 1 7 12 13 11 8 10 3 2 9 13 N m 115 lbf in www SeaDooManuals net FLAT RATE PARTS ...

Страница 6: ...e rotor or the flywheel the crank shaft must be locked Remove the pulse fitting beside the starter bracket on the lower crankcase half 1 Remove pulse fitting Turn engine manually until slot in crankshaft coun terweight is aligned with the crankcase hole In sert a M8 x 50 fixation screw to lock crankshaft CRANKSHAFT FIXATION SCREW P N 290 240 882 1 Crankshaft locked F06D1RA 1 2 F06D23A 1 F06D0KA 1 ...

Страница 7: ...d from crankshaft with puller P N 420 976 235 Install protective cap P N 290 877 414 to crank shaft Fully thread puller in engine flywheel 1 Puller 8 9 Stator and Trigger Coil Loosen screws no 10 and no 11 to remove the stator and trigger coil from the engine magneto cover 1 Screws CLEANING Clean all metal components in a solvent Clean crankshaft taper and threads F06D0LA 1 F06D0MA 1 CAUTION Clean...

Страница 8: ...le in flywheel 1 Protrusion 2 Hole Apply Loctite 648 green on screws no 7 retain ing rotor to flywheel and torque screws in a criss cross sequence to 13 N m 115 lbf in Apply Loctite 242 blue on crankshaft taper 1 Loctite 242 blue on crankshaft taper Install flywheel and make sure to align keyway with the crankshaft Woodruff key Apply Loctite 242 blue on nut no 6 Install nut with lock washer and to...

Страница 9: ...D17S Loctite 242 Loctite 242 Synthetic grease 1 2 10 36 rollers 8 9 7 8 Synthetic grease 3 5 6 34 N m 25 lbf ft 3 N m 26 lbf in 34 N m 25 lbf ft 26 4 19 20 21 Loctite 242 12 14 13 18 16 Synthetic grease 11 15 17 9 N m 80 lbf in 22 23 24 www SeaDooManuals net FLAT RATE PARTS ...

Страница 10: ... RPM and its rate of acceler ation To open the RAVE valves the MPEM activates a solenoid which directs the positive pressure from engine crankcase to the valves NOTE A check valve on the pressure line eliminates the negative pressure from the crankcase RAVE VALVE OPENED 1 Pulse from crankcase 2 Check valve 3 Positive pressure to solenoid 4 Solenoid activated 5 Positive crankcase pressure to RAVE v...

Страница 11: ...solenoid which blocks the crankcase positive pres sure The RAVE valves are opened to the atmosphere RAVE VALVE CLOSED 1 Pulse from crankcase 2 Check valve 3 Positive pressure blocked by the solenoid 4 Solenoid deactivated 5 RAVE valves are opened to atmosphere F06D16T 4 3 5 2 1 www SeaDooManuals net ...

Страница 12: ...e cover no 13 of the valve by releasing the spring no 14 1 Spring Remove the compression spring no 15 1 Remove spring Remove spring no 16 retaining bellows no 17 to valve piston no 18 1 Spring WARNING Firmly hold cover to valve base The com pression spring inside the valve is applying pressure against the cover F06D0QA 1 F06D0RA 1 F06D25A 1 F06D0SA 1 www SeaDooManuals net ...

Страница 13: ... Unscrew valve piston no 18 from sliding valve no 19 NOTE Hold the sliding valve to prevent it from turning 1 Unscrew piston 2 Hold sliding valve Remove compression spring no 22 1 Remove spring Remove supporting ring no 23 1 Remove supporting ring F06D0TA 1 F06D0TB 2 1 A06D26A 1 F06D27A 1 www SeaDooManuals net ...

Страница 14: ... no 19 1 Remove sliding valve Remove bellows no 17 1 Remove bellows 1 2 Cylinder Head and Cylinder Block Loosen cylinder head bolts no 3 following the se quence shown in the next photo UNTORQUING SEQUENCE FOR THE CYLINDER HEAD BOLTS F06D28A 1 F06D0UA 1 F06D0VA 1 F06D0WA 2 4 6 5 1 3 7 www SeaDooManuals net ...

Страница 15: ...E Studs must be removed prior cylinder block 1 Remove studs Remove cylinder block no 2 1 Remove cylinder block NOTE To ease removal a plastic tip hammer can be used Remove cylinder base gasket no 6 7 Piston To remove piston circlip no 8 insert a pointed tool in piston notch then pry it out and discard F06D29A 5 2 4 7 8 1 3 6 F06D0YA 1 WARNING Always wear safety glasses when removing piston circlip...

Страница 16: ...Bevel facing the O ring There is only one way to insert the sliding valve no 19 in valve housing no 21 1 Sliding valve ridge toward housing groove 7 Piston Install the pistons to the crankshaft connecting rods with the letters AUS over an arrow on the piston dome facing in direction of the exhaust port ENGINE MEASUREMENT TOLERANCES NEW PARTS min max WEAR LIMIT Cylinder Taper N A 0 05 mm 002 in 0 1...

Страница 17: ...locating dowels To easily slide cylinder block no 2 over pistons no 7 install on piston ring compressor P N 290 876 965 1 Ring compressor NOTE For each ring make sure to align ring end gap with piston locating pin Install studs no 25 Install cylinder block no 2 Install O rings no 26 NOTE The O rings must be installed and properly positioned in the cylinder block The O rings are meant to dampen stu...

Страница 18: ... 02 10 Torque bolts and nuts to 15 N m 11 lbf ft as per fol lowing sequence in the next photo Repeat the torqu ing sequence by retightening to 34 N m 25 lbf ft TORQUING SEQUENCE F06D0WB 3 1 12 4 5 15 7 10 8 14 6 11 9 13 2 www SeaDooManuals net ...

Страница 19: ...bf ft 3 Loctite 648 Loctite 242 Synthetic grease 23 N m 17 lbf ft Loctite 242 4 15 11 Loctite 518 7 9 N m 80 lbf in Loctite 242 8 9 6 23 Synthetic grease Loctite 518 Synthetic grease Loctite 518 13 Synthetic grease 23 N m 17 lbf ft 13 23 N m 17 lbf ft Loctite 518 12 Synthetic grease 12 Loctite 518 Synthetic grease 13 23 N m 17 lbf ft 40 N m 30 lbf ft Anti seize lubricant Anti seize lubricant 26 30...

Страница 20: ...he magneto flywheel removal Refer to ENGINE 01 01 Loosen the 6 Allen screws no 4 retaining the coupling flange no 3 to the PTO flywheel 1 Allen screw 6 Remove the coupling flange no 3 Loosen bolt no 5 retaining the PTO flywheel to the crankshaft 1 Bolt Remove the PTO flywheel no 2 using puller P N 290 976 237 Install puller to PTO flywheel Insert 6 M8 x 30 screws P N 290 940 481 through puller hol...

Страница 21: ...Reed Valve Remove both carburetor flanges 1 Carburetor flange Remove reed valves from crankcase 11 Crankcase Place engine upright on crankcase magneto side Loosen crankcase bolts no 12 and no 13 start ing from center to the outside Put engine back on a trestle and remove the up per crankcase half Insert a pry bar between crankcase lugs to sepa rate halves Be careful not to damage precision machine...

Страница 22: ...ng halves P N 290 876 330 6 Screw P N 290 940 755 NOTE To facilitate ring or distance ring installa tion lubricate their inside diameters Or use a bearing extractor such as Proto no 4332 and a press to remove 2 bearings at a time TYPICAL 1 Press bearings out 2 Bearing extractor 16 Counterbalance Shaft NOTE Do not needlessly remove counterbalance shaft bearings Use a press to remove counterweights ...

Страница 23: ...ing no 23 of starter drive assembly no 6 in crankcase 1 Bearing of starter drive assembly 10 Reed Valve Check reed valve petals no 24 for cracks or other defects The reed petals must lie completely flat against the reed valve body no 25 To check hold against light 1 No play In case of a play turn reed petals upside down and recheck If there is still a play replace petals Check perfect condition of...

Страница 24: ...rease on seal lips 14 Crankshaft Install crankshaft in crankcase lower half Pay attention to properly position drive pins of center and outer bearings Drive pins of outer bearings must be on the opposite side of the counterbalance shaft Drive pins of inner bearings must be on the same side as the counterbalance shaft 1 Outer bearing drive pins on this side 2 Inner bearing drive pins on this side S...

Страница 25: ... Crankcase Crankcase halves are factory matched and there fore are not interchangeable or available as single halves Make sure all locating dowels are in place 1 Dowel Prior to joining crankcase halves apply a light coat of Loctite 518 on mating surfaces Do not apply in excess as it will spread out inside crankcase NOTE On aluminum material it is recommended to use Loctite Primer N to reduce curin...

Страница 26: ...g no 23 of starter drive assembly use pusher P N 290 876 502 and handle P N 290 877 650 1 Handle 2 Pusher 2 PTO Flywheel Apply Loctite 242 blue on bolt no 5 Torque bolt no 5 to 115 N m 85 lbf ft Apply Loctite 648 on mating surface of PTO fly wheel and coupling flange 26 Filler Plug When engine assembly is completed add 30 mL 1 oz of Formula XP S synthetic oil to the counter balance shaft gear thro...

Страница 27: ... plastic made resonator 1 Resonator REMOVAL Tuned Pipe Remove seat Remove air vent tube support from body opening Disconnect water inlet hose at tuned pipe head 1 Water inlet hose Disconnect at the tuned pipe head the water sup ply hose of the water flow regulator valve 1 Water supply hose for the regulator valve 1 F06D13A 1 F06E08A 1 F06E09A www SeaDooManuals net ...

Страница 28: ... head 1 Water injection hose Disconnect the water bleed hose 1 Water bleed hose Loosen clamp retaining exhaust hose to tuned pipe cone 1 Loosen clamp Loosen and remove clamp retaining tuned pipe head to tuned pipe cone 1 Loosen and remove clamp 1 F06E0AA 1 F06E0BA 1 F06D14A 1 F06D1SA www SeaDooManuals net ...

Страница 29: ...e Loosen bolt of tuned pipe head above the engine magneto 1 Remove bolt Remove tuned pipe head Loosen bolt of tuned pipe cone beside the engine water outlet hose 1 Loosen bolt Remove tuned pipe cone Exhaust Manifold Remove tuned pipe head if not removed Remove 8 Allen screws with lock washers then withdraw exhaust manifold F06D2DA 1 1 F06D1TA F06D1UA 1 1 F06D1VA www SeaDooManuals net ...

Страница 30: ...anual section ENGINE 03 08 for procedure INSTALLATION Installation is essentially the reverse of removal procedures However pay particular attention to the following Exhaust Manifold Make sure new gaskets are properly positioned prior finalizing manifold installation Apply synthetic grease on threads of Allen screws Install and hand tighten Allen screws as per fol lowing photo 1 M10 x 60 Allen scr...

Страница 31: ...ly Loctite 242 blue on bolts Allen screws and nut Tune Pipe Torquing Sequence Hand tighten all fasteners before torquing any of them Torque Allen screws and nut at tuned pipe head flange to 25 N m 18 lbf ft 1 Torque Allen screws and nut to 25 N m 18 lbf ft Torque bolt of tuned pipe head above the engine magneto to 25 N m 18 lbf ft 1 Torque bolt to 25 N m 18 lbf ft Torque bolt of tuned pipe cone be...

Страница 32: ... flange to 40 N m 30 lbf ft 1 Torque Allen screws and nut to 40 N m 30 lbf ft Torque exhaust hose clamp of tuned pipe cone to 4 N m 35 lbf in 1 Torque clamp to 4 N m 35 lbf in Muffler Torque exhaust hose clamps of muffler to 4 N m 35 lbf in Resonator Torque exhaust hose clamps of resonator to 3 N m 27 lbf in 1 Torque clamps to 3 N m 27 lbf in 1 F06D1SA 1 F06D1TA 1 F06D14A 1 F06D1ZA www SeaDooManua...

Страница 33: ...ges located above and below exhaust ports 1 Water passages After water has circulated in the cylinder block water jackets it is directed in the 1 piece cylinder head which features improved combustion cham ber and spark plug cooling Water exits cylinder head water jackets through an outlet fitting 1 Engine water outlet Water circulates in the water outlet hose and is expelled out of the cooling sy...

Страница 34: ...r jacket of the tuned pipe head 1 Water supply of the water flow regulator valve The lower hose of the valve is the water supply and the upper hose is the regulated injection wa ter for the tuned pipe 1 Water supply from tuned pipe water jacket 2 Regulated injection water to the tuned pipe 3 Muffler CAUTION When servicing the hull always rotate wa tercraft CLOCKWISE seen from rear Rotat ing the wa...

Страница 35: ...Section 02 COOLING SYSTEM Subsection 01 CIRCUIT 02 01 3 Regulated water is injected in the tuned pipe by a calibrated fitting 1 Injection fitting 1 F06E0AA www SeaDooManuals net ...

Страница 36: ...ntrols fuel supply to the pump A check valve on the fuel outlet hose prevents air from entering in the system Inspection Disconnect inlet and outlet hoses from accelera tor pump nipples 1 Fuel inlet hose 2 Fuel outlet hose Using a suitable pump gauge tester perform the following test proceeding as follows Install pump gauge tester P N 295 000 083 on inlet nipple Obstruct outlet nipple with a finge...

Страница 37: ...by loosening adjustment screw until there is a small gap between lever tab and pump plunger 1 Turn adjustment screw 2 Small gap here Turn adjustment screw clockwise until lever tab touches plunger Then turn adjustment screw an additional 1 4 turn clockwise The adjustment is now complet ed Accelerator Pump Verification With engine stopped remove air intake silencer then activate throttle lever and ...

Страница 38: ...the right air fuel ratio on the entire RPM s range of the en gine To transfer the venting of the diaphragms 3 main components are used throttle position switch amplifier solenoid The throttle position switch is built in the throttle cable Its purpose is to signal the amplifier 1 Throttle position switch The amplifier boost the signal received from the throttle position switch and activates the sol...

Страница 39: ... intake silencer the resulted vacuum moves the dia phragms slightly leaning the mixture of the carbu retors Inspection Throttle Position Switch Disconnect the 3 wire connector housing from the amplifier Using a 12 V battery and jumpers connect the POSITIVE to the connector housing RED wire POSITION A and the negative to the connector housing BLACK wire POSITION B Using a voltmeter connect the posi...

Страница 40: ...ng the voltmeter should indi cate the battery voltage If not replace the ampli fier Solenoid Disconnect the wiring harness of the solenoid Apply pressure to the inlet nipple Air should be released to the outlet nipple for the atmosphere SOLENOID NOT ACTIVATED 1 Apply pressure to inlet nipple 2 Air should be released here Connect a 12 V battery to solenoid terminals Apply pressure to the inlet nipp...

Страница 41: ...irectly powered by the battery It has a micro processor inside of its sealed case The MPEM is responsible of the following electri cal functions interpreting information distributing information start stop function timer Digitally Encoded Security System ignition engine rev limiter rectifying AC to DC regulating charging current Fuses are directly mounted onto the MPEM To test the rectifier regula...

Страница 42: ...ve air intake silencer Disconnect the BLACK negative battery cable Disconnect the RED positive battery cable Disconnect starter cables and loosen Allen screws retaining starter bracket to engine 1 Positive starter cable 2 Negative starter cable 3 Allen screw Remove starter DISASSEMBLY Locate index marks on yoke and end covers 1 Index marks Loosen through bolts 1 Through bolts Remove end cover and ...

Страница 43: ... Remove the 3 washers from armature shaft 1 Washers Remove armature 1 Pull armature shaft Release brush wires of yoke from brush holder Remove brush holder 1 Remove brush holder To remove brushes from yoke loosen nut and re move washers 1 Loosen nut and remove washers Remove brushes F06H1HA 1 F06H1IA 1 F06H1JA 1 F06H1KA 1 F06H1LA 1 www SeaDooManuals net ...

Страница 44: ...llowing Install new O rings and gaskets Insert thrust washer onto armature shaft with the non metallic surface facing the end cover 1 Non metallic surface on this side Install the 3 washers onto armature shaft with the thicker one in the middle 1 Thick washer in the middle When installing end covers to yoke align index marks Apply Loctite 271 red on through bolts and torque to 6 N m 53 lbf in Appl...

Страница 45: ... output 0 8 kW Voltage 12 V Rated time 30 seconds Rotation Counterclockwise viewed from pinion side Weight 1 7 kg 3 7 lb Performance specification at 20 C 68 F No load 10 9 V 45 A max 8600 RPM Load 9 V 120 A max 5350 RPM Stall 2 25 V 390 A max 0 RPM Battery 12 V 19 Ah www SeaDooManuals net ...

Страница 46: ... carrier For disassembly and assembly procedures of the seal carrier refer to the 1997 Sea Doo Shop Manual section 08 03 JET PUMP For performance improvement the GSX Limited features a new jet pump with an impeller diame ter of 155 6 mm 6 1 8 in The jet pump housing and venturi are made of alu minum Servicing the jet pump is identical as with the oth er models For disassembly inspection and as sem...

Страница 47: ...ersize N A Stroke 78 20 mm 3 079 in Displacement 951 2 cm 58 in Corrected compression ratio 6 0 1 Cylinder head warpage maximum N A Piston ring type and quantity 2 Semi trapez Ring end gap New 0 25 0 40 mm 010 016 in Wear limit 1 00 mm 039 in Ring piston groove New 0 025 0 070 mm 001 003 in Wear limit 0 2 mm 008 in Piston cylinder wall clearance New minimum 0 110 mm 0043 in Wear limit 0 200 mm 008...

Страница 48: ... Ω Engine rev limiter setting 7200 50 RPM Battery Yuasa Exide 12 V 19 A h Fuse Starting system 5 A Charging system 2 x 15 A VTS system 7 5 A ADDITIONAL INFORMATION CARBURETION GSX Limited 5625 Carburetor Type Mikuni BN 46I diaphragm Fuel acceleration pump Quantity 2 Main jet 160 MAG 162 5 PTO Pilot jet 80 Spring 130 g or 95 g with 1 75 mm aluminum shim Adjustment Low speed screw 1 3 4 turn 1 4 Hig...

Страница 49: ...Steering nozzle pivoting angle 20 Minimum required water level 90 cm 35 in Drive shaft deflection maximum 0 5 mm 020 in Impeller outside diameter 155 6 mm 6 126 in Impeller wear ring clearance New 0 0 0 4 mm 000 016 in Wear limit 1 00 mm 040 in Impeller shaft end play new 0 12 0 54 mm 005 021 in Impeller shaft side play 0 05 mm 002 in Impeller pitch material Progressive pitch 9 21 stainless steel ...

Страница 50: ...injection reservoir Polyethylene Seat Polyurethane foam ADDITIONAL INFORMATION STANDARD EQUIPMENT GSX Limited 5625 Safety lanyard Standard Digitally Encoded Security System DESS Standard Fuel tank reserve Standard Monitoring beeper Standard Speedometer Standard Info Center gauge Standard Variable Trim System VTS Standard Reverse N A Storage compartment Standard Rearview mirrors Standard Rear grab ...

Страница 51: ...pipe fixation bolts screws 25 N m 18 lbf ft 1 Magneto cover screws 9 N m 80 lbf in 5 Starter mounting screws 10 N m 88 lbf in 1 Spark plugs 24 N m 17 lbf ft 5 JET PUMP Impeller 70 N m 52 lbf ft 2 Pump hull nuts 31 N m 23 lbf ft 1 Venturi pump housing screws 21 N m 16 lbf ft 1 VTS ring screws 14 N m 10 lbf ft 1 Pump housing cover screws 4 N m 35 lbf in 1 Inlet grate screws 8 N m 71 lbf in 1 Riding ...

Страница 52: ...www SeaDooManuals net ...

Страница 53: ...www SeaDooManuals net ...

Страница 54: ...www SeaDooManuals net ...

Страница 55: ...www SeaDooManuals net ...

Страница 56: ...www SeaDooManuals net ...

Отзывы: