


Section 09 HULL/BODY
Subsection 01 (ADJUSTMENT AND REPAIR)
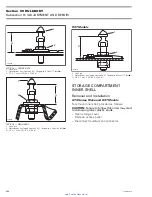
When installing inlet grate, apply Loctite 271 (red)
(P/N 293 800 005) on threads of M6 bolts.
Follow this sequence referring to the illustration:
Hand tighten screws from 1 to 4.
Torque screw from 1 to 3 to11 N•m (97 lbf•
in
).
Torque screw 4 to 26 N•m (19 lbf•ft).
F18L24A
1
3
2
4
RIDING PLATE
Removal
Remove inlet grate.
Remove jet pump. Refer to JET PUMP.
Remove the speed sensor from the riding plate (if
applicable).
Drain cooling system. Refer to COOLING SYS-
TEM.
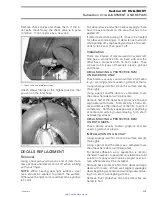
From inside hull, disconnect hoses from ride plate.
Unscrew hose fittings from ride plate.
CAUTION:
Removing hose fittings prior to
pulling out ride plate prevents the possibility
to damage fittings.
Loosen riding plate screws.
NOTE:
An impact screwdriver should be used to
loosen tight screws.
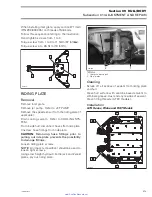
Using a low height hydraulic bottle jack and 2 steel
plates, pry out riding plate.
F05J03A
2
1
TYPICAL
1. Hydraulic bottle jack
2. Steel plates
Cleaning
Scrape off all excess of sealant from riding plate
and hull.
Clean hull surface with acetone based solvent to
eliminate grease, dust and any residue of sealant.
Clean fitting threads (4-TEC models).
Installation
GTX Series, Wake and RXT Models
3
F18L26A
4
5
1
7
2
8
6
smr2005-024
273
www.SeaDooManuals.net


