background image

EH330, EH430 and ECC Condensing Unit

Remote Low Side Cuber Service Manual

May 2015

Page 24

Cleaning, Sanitation and Maintenance - D Series 

This ice system requires three types of maintenance:

• 

Remove the build up of mineral scale from the ice 

machine’s water system and sensors.

• 

Sanitize the ice machine’s water system and the 

ice storage bin or dispenser.

• 

Clean the remote air cooled condenser.

It is the User’s responsibility to keep the ice machine and ice storage bin in a sanitary condition. Without 

human intervention, sanitation will not be maintained. Ice machines also require occasional cleaning of their 

water systems with a specifically designed chemical. This chemical dissolves mineral build up that forms during 

the ice making process.

Sanitize the ice storage bin as frequently as local health codes require, and every time the ice machine is 

cleaned and sanitized.

The ice machine’s water system should be cleaned 

and sanitized a minimum of twice per year.

1.  Remove the front panel.

2.  Remove the evaporator cover.

3.  Remove all ice from the storage bin or dispenser.

4.  Push and release the Clean button. The yellow 

Clean light will blink and the display will show 

C. The machine will harvest any ice, drain the 

reservoir and begin to refill it.Remove all ice from 

the storage bin or dispenser.

5.  Observe code display, when it blinks the 

characters “A d 1” immediately go to the next 

step.Observe code display, when it blinks the 

characters “A d 1” immediately go to the next step.

6.  Pour 24 ounces of Scotsman Clear 1 ice machine 

scale remover into the reservoir. The unit will 

circulate the scale remover, then drain and flush 

it. This will take 35 minutes, then the machine will 

stop and the display will show O.

7.  Mix a cleaning solution of 1 oz of ice machine 

cleaner to 12 ounces of water.

Note: If unit has not been de-scaled for an extended 

period of time and significant mineral scale remains, 

repeat steps 6 - 8.

8.  Remove curtain from unit.

9.  Locate ice thickness sensor. Squeeze mounting 

legs together to release sensor.

10. Remove water distributor from ice machine by 

disconnecting its hose, squeezing the retaining 

snaps together and pushing the distributor to the 

right as far as possible. Lift up to remove. Inspect 

distributor for restricted orifice holes. Be sure all 

holes are full open..

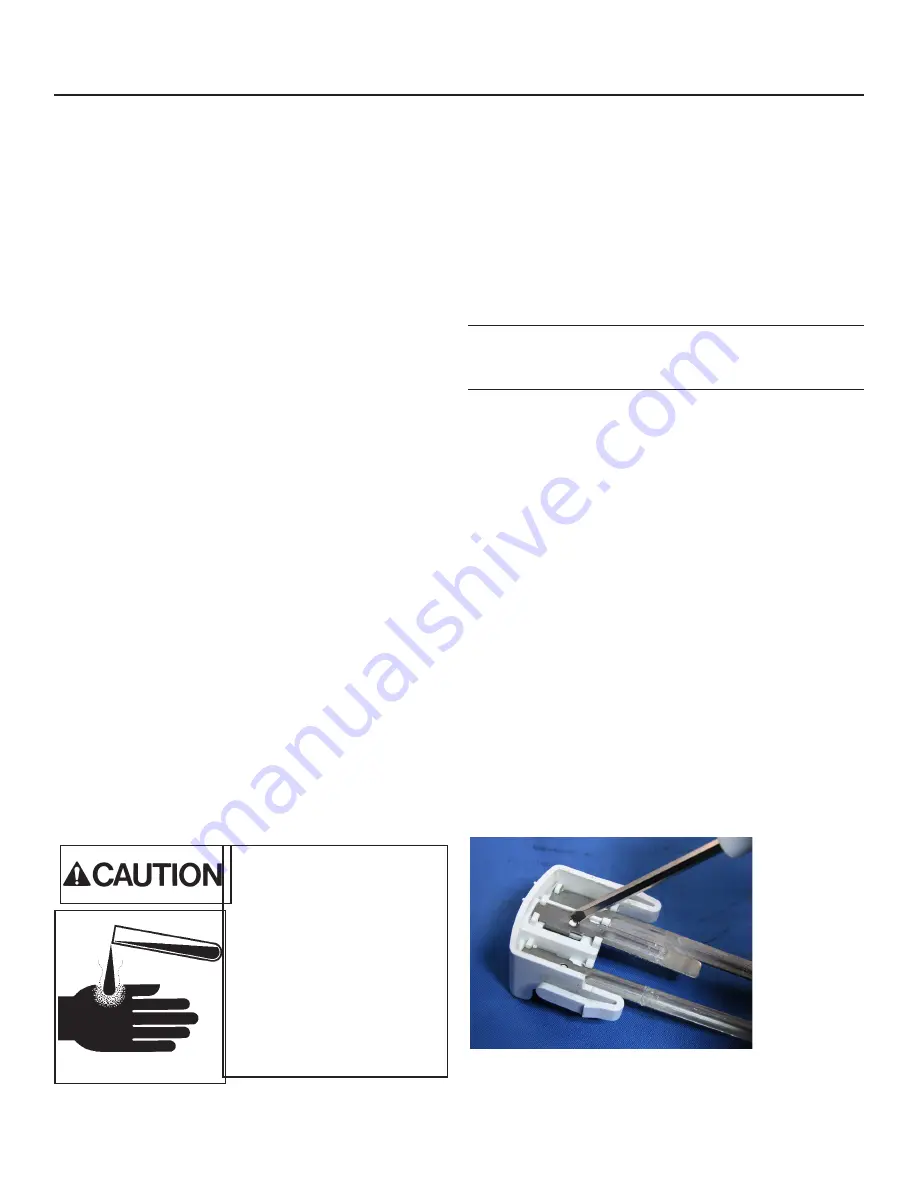
11. Locate water level sensor. Squeeze 

catches together and pull up to remove 

sensor. Separate probes from housing and 

wash all surfaces with ice machine scale 

remover  solution.  Return  probes  to  holder.                                                      

12. Wash the metal surfaces of the ice thickness 

sensor and the adjustment screw with ice machine 

cleaner solution. Also wash the water distributor, 

water level sensor probes and curtain with the ice 

Step 13 

Release 

probes by 

pushing in on 

white buttons 

and pulling 

probe down 

out of holder.

Ice machine scale remover 

contains acids. Acids can 

cause burns.

If concentrated cleaner comes 

in contact with skin, flush with 

water. If swallowed, do NOT 

induce vomiting. Give large 

amounts of water or milk. Call 

Physician immediately. Keep 

out of the reach of children.

Содержание ECC1200 Series

Страница 1: ...Service Manual for Prodigy Eclipse Cubers models EH330 C and EH430 C with ECC Condensing Unit ECC1200 ECC1410 ECC1800 Includes Prodigy Plus D Models ...

Страница 2: ...Up Page 20 Ice Thickness and Water Purge Adjustment Page 21 Cleaning Sanitation and Maintenance Page 22 Operational Characteristics 1200 lb system ECC1200 EH330 Page 29 Operational Characteristics 1400 lb system ECC1410 EH430 Page 29 Operational Characteristics 1800 lb system ECC1800 EH430 Page 30 Controller Information Page 32 Operation Page 33 System Operation Page 34 Refrigeration Details Page ...

Страница 3: ... altered in any way including the use of any part and or other components not specifically approved by Scotsman Scotsman reserves the right to make design changes and or improvements at any time Specifications and design are subject to change without notice System Information Warranty Refer to the warranty coverage in effect when the equipment was sold Warranty statements are included with each pr...

Страница 4: ...ng kit 75 feet Maximum Condensing Unit Elevation over Ice Making Head 35 feet Note Elevations greater than 20 feet require installation of a suction line trap at the 20 foot mark Maximum Ice Making Head Elevation over Condensing Unit 15 feet Line Routing Allowed One rise after a drop Allowed One drop after a rise Not Allowed More than one rise after a drop Not Allowed More than one drop after a ri...

Страница 5: ... 703 20 27 69 56 64 2 23 313 69 12 35 381 76 15 03 448 56 17 66 530 86 20 90 69 32 2 73 94 72 3 73 110 46 4 35 141 73 5 58 BACK VIEW ELECTRICAL CORD ACCESS HOLE 3 8 LIQUID LINE 1 2 COOL VAPOR LINE 3 8 FPT WATER INLET 3 4 SUCTION LINE INFERFACE CABLE ACCESS HOLE 3 4 FPT DRAIN 762 30 00 784 55 30 89 FRONT VIEW 609 60 24 00 762 30 00 393 70 15 50 MINIMUM BIN TOP OPENING 244 60 9 63 228 60 9 00 464 82...

Страница 6: ...NT VIEW 508 76 20 03 703 58 27 70 88 62 3 49 56 64 2 23 477 01 18 78 533 62 21 01 600 71 23 65 681 74 26 84 108 46 4 27 141 73 5 58 85 06 3 35 93 98 3 70 3 4 SUCTION LINE 1 2 COOL VAPOR LINE 3 8 LIQUID LINE INFERFACE CABLE ACCESS HOLE 3 8 FPT WATER INLET ELECTRICAL CORD ACCESS HOLE BACK VIEW 3 4 FPT DRAIN 762 30 00 393 70 15 50 MINUMUM TOP OPENING 244 60 9 63 228 60 9 00 50 80 2 00 609 60 24 00 46...

Страница 7: ...EH330 EH430 and ECC Condensing Unit Remote Low Side Cuber Service Manual May 2015 Page 6 Cabinet Drawings EH330D Ice Making Head ...

Страница 8: ...EH330 EH430 and ECC Condensing Unit Remote Low Side Cuber Service Manual May 2015 Page 7 Cabinet Drawings EH430D Ice Making Head ...

Страница 9: ...81 39 09 814 22 32 06 32 05 1 26 TYP TOP VIEW 1009 65 39 75 FRONT VIEW 83 67 3 29 74 12 2 92 163 02 6 42 248 87 9 80 491 69 19 36 63 50 2 50 887 73 34 95 750 06 29 53 330 86 13 03 SIDE VIEW LINE SET AND ELECTRICAL ATTACHMENT SIDE 1 2 COOL VAPOR LINE 3 8 LIQUID LINE 3 4 SUCTION LINE 88 ELECTRICAL INLET INTERFACE HARNESS ACCESS HOLE ...

Страница 10: ...ration connections can be made to go up or out the back by bending the line set tubing The electrical power cord and the water inlet line can also be routed through either of those areas The drain may be routed out the back or to the left side Water Pure water does not exist All water supplies contain some amounts of impurities although potable water is by definition fit for human consumption Beca...

Страница 11: ...ead and condensing unit if neither have quick connects use as is If one or both do obtain kit KTE6 to add quick connects to the line set Excess tubing must be shortened at the job site Installations with greater than 20 feet of vertical lift between ice machine and the compressor require a suction line trap The suction line requires careful handling and large radius bends to prevent kinking Roof m...

Страница 12: ...EH330 EH430 and ECC Condensing Unit Remote Low Side Cuber Service Manual July 2013 Page 11 System Example ...

Страница 13: ...or service on the condensing unit Roof Piercing The roof or wall must have an opening large enough for the three refrigeration tubes and the control wire to pass through The minimum recommended size is 4 ID In most areas the power supply may also pass through the same passage If there isn t a passage one must be created In most cases this must be done by a licensed and bonded roofer in order to ma...

Страница 14: ...and will have quick connects If line set has quick connects recover refrigerant from line set and cut one end of quick connects off If line set does not have quick connects must use KTE6 EH stub kit to add for condensing unit end Ice making head has quick connects prior models of EH330 and EH430 If line set has quick connects recover refrigerant from line set and cut one end of quick connects off ...

Страница 15: ...back Refrigeration Tubing Field bending will allow the tubing to be routed up or towards the back Adapters In many cases an adapter kit will be required when placing the head unit on a bin or dispenser See sales information for the correct kit Place adapter kit onto bin or dispenser top If adapter does NOT have gasket tape install tape such as Scotsman part number 19 0503 04 Note External drain tu...

Страница 16: ...onnector Note The power supply wires must be the correct size and type per the National Electric Code Locate the nameplate on the CU unit for the Voltage Phase Minimum Circuit Ampacity and Maximum Fuse Size Either fuses or HACR type circuit breakers may be used Follow all Local State and National Codes Three Phase Notice Check voltage between legs at contactor If there is a wild leg in the three p...

Страница 17: ...ect for this one 1 Connect water supply to water inlet fitting Note This NSF listed model has a 1 anti back flow air gap between the potable water inlet tube end and the highest possible reservoir water level no back flow device is required 2 Connect drain tubing to drain fitting 3 Route the drain tubing to building drain Follow local codes for drain air gap Use rigid drain tubes and route them se...

Страница 18: ...ine connection and vapor line connection 7 Shorten tubing to correct length clean ends and insert them into valve stubs Note Be sure tube and stubs are round dress with swage tool if needed 8 Add heat sink material to ball valve body 9 Open nitrogen and flow 1 psi nitrogen into liquid line and vapor line tubes and braze the liquid line vapor line and suction line tubes to the valve stubs At Head 1...

Страница 19: ...that the ice making section is installed indoors in a controlled environment 2 Confirm that all packing materials have been removed from all products 3 Confirm that the ice making section is level 4 Confirm that all the refrigerant connections have been made and checked for leaks 5 Confirm that the proper power supply has been turned on to the condensing unit 6 Confirm that cold potable water has ...

Страница 20: ...alve is Hot Gas on when the vapor inlet valve and harvest assist solenoid mechanism have power Compressor on when the compressor contactor is energized Ready to Harvest on when the ice thickness sensor has water touching it Sump Empty on when there is no water touching the mid length probe Sump Full on when water is touching the shortest probe SW2 on when the curtain is open SW1 on when the curtai...

Страница 21: ...or are operating Warm air will be discharged from the condenser Observe the Ready for Harvest indicator light It may blink early in the cycle that is normal The control will ignore that signal for the first 6 minutes of freeze During the Freeze cycle move the curtains and observe that the SW1 or SW2 light on the control board blinks On when the curtain moves away from the evaporator and Off when r...

Страница 22: ...Push and release the On button Check next harvest of ice Repeat steps 1 6 if needed Water Purge Setting The water purge is factory set to the automatic position suitable for most water conditions The setting can be changed to one of 5 manual settings or left on automatic Setting Water Type 1 Minimum RO water or equivalent 2 Moderate Low TDS non RO 3 Standard Use with typical water 4 Heavy High TDS...

Страница 23: ...ver into the reservoir 7 Allow the ice machine cleaner scale remover to circulate in the water system for at least 10 minutes 8 Push and release the Clean button again The yellow Clean light will be on continuously and the machine will drain and refill the reservoir to flush out the ice machine cleaner and residue 9 Allow the drain and refill process to continue for at least 20 minutes 10 Push and...

Страница 24: ...tely pour the remaining cleaning solution into the reservoir 22 Circulate the sanitizer solution for 10 minutes then push and release the Clean button 23 Allow the water system to be flushed of sanitizer for at least 20 minutes then push and release the Off button 24 Return the evaporator cover and front panel to their normal position and secure with the original fasteners 25 Push and release the ...

Страница 25: ...nks the characters A d 1 immediately go to the next step 6 Pour 24 ounces of Scotsman Clear 1 ice machine scale remover into the reservoir The unit will circulate the scale remover then drain and flush it This will take 35 minutes then the machine will stop and the display will show O 7 Mix a cleaning solution of 1 oz of ice machine cleaner to 12 ounces of water Note If unit has not been de scaled...

Страница 26: ... it 18 Observe code display when it blinks the characters Ad1 immediately go to the next step 19 Pour the sanitizing solution into the reservoir until it is full The unit will circulate the sanitizer then drain and flush it This will take 35 minutes then the machine will stop and the display will show O 20 Return the evaporator cover and front panel to their normal position and secure with the ori...

Страница 27: ...ridge long harvest and even a shut down on short freeze code 8 The primary procedure for correcting poor water flow is to scrub the spillway surface 1 Shut machine off 2 Remove right side panel liner and panel 3 Disconnect ice thickness sensor from its bracket and move out of the way 4 Scrub 4 to 6 strokes across the normal flow of water A clean nylon scrubbing pad is the recommended tool 5 Reasse...

Страница 28: ...e mineral scale removed 1 Remove the ice thickness sensor from the water distributor bracket 2 Separate the metal sensor from the plastic insulator bracket 3 Wipe the sensor with diluted ice machine scale remover 4 Scrub the white or dark gray plastic insulator bracket with diluted ice machine scale remover and remove all traces of mineral build up 5 Wipe the wire to the bulkhead with diluted ice ...

Страница 29: ... Manual May 2015 Page 28 Critical Maintenance Water Level Sensor 1 Remove Water Level Sensor 2 Release probes by pushing pints in 3 Pull down then lift up to remove probe 4 Clean all dirty and scale from the housing 5 Clean entire probe be sure circled area is clean ...

Страница 30: ...50 90 90 70 120 110 100 Freeze 14 minutes 16 to 17 minutes 25 to 27 minutes Harvest 1 5 minutes 1 to 1 5 minutes 5 to 1 minute System Pressures Condenser Temp Cabinet Temp Water Temp in degrees F 70 70 50 90 90 70 120 110 100 Suction at head end of Freeze 35 to 37 PSIG 35 PSIG 41 to 44 PSIG Suction at head Harvest Peak 85 to 105 PSIG 100 to 120 PSIG 120 to 130 PSIG Discharge at Condensing Unit Fre...

Страница 31: ...20 110 100 Suction at head end of Freeze 24 to 25 PSIG 29 to 32 PSIG 32 to 35 PSIG Suction at head Harvest Peak 80 to 100 PSIG 90 to 110 PSIG 140 to 160 PSIG Discharge at Condensing Unit Freeze 5 minutes in 240 to 260 PSIG 250 to 270 PSIG 370 to 380 PSIG Headmaster maintains a minimum discharge pressure during freeze of 217 PSIG 25 15 PSIG CPR Valve Setting 55 60 PSIG Note CPR allows a maximum low...

Страница 32: ...elease the On button Check next harvest of ice Repeat steps 1 6 if needed Water Purge Setting The water purge is factory set to the automatic position suitable for most water conditions The setting can be changed to one of 5 manual settings or left on automatic Setting Water Type 1 Minimum RO water or equivalent 2 Moderate Low TDS non RO 3 Standard Use with typical water 4 Heavy High TDS 5 Maximum...

Страница 33: ...anual Harvest b Bin is Full C Clean Cycle L Board Locked d Test Mode O Off E Self Test Failed 1 flashes Max Freeze Retrying 1 Max Freeze Time Shut Down 2 flashes Max Harvest Retrying 2 Max Harvest Time Shut Down 3 Slow Water Fill 4 High Discharge Temp 5 Sump Temp Sensor Failure 7 Discharge Temp Sensor Failure 8 flashes Short Freeze Retrying 8 Short Freeze Thin ice Setting Codes requires push butto...

Страница 34: ...of the machine Indicator Lights Power Status Water De scale Sanitize Indicator Lights Their Meanings Power Status Water De Scale Sanitize Steady Green Normal Normal bin full or making ice Blinking Green Self Test Failure Switching on or off Blinking Red Diagnostic shutdown or if making ice temperature sensor failure Lack of water Yellow Time to de scale and sanitize Blinking Yellow In Cleaning mod...

Страница 35: ...s Water Pump Inlet Water Valve Purge Valve Harvest Assist Solenoid Condensing Unit Compressor Contactor Condenser Bypass Valve Liquid Inlet Valve Receiver Accumulator CPR Valve Headmaster Coils Fan Motor Freeze In the air cooled condensing unit sub system the compressor is on the condenser by pass valve is closed the fan motor is rotating the fan blade Harvest During harvest the compressor and fan...

Страница 36: ...orator The low pressure refrigerant gas then flows into the suction line which carries it back to the condensing unit where it enters the accumulator In the accumulator most of any liquid carried with the suction gas is separated and only vapor flows out of the accumulator through the CPR valve and to the compressor where the cycle continues During harvest discharge gas flows through the open cond...

Страница 37: ...r indicator light It will re try to fill the reservoir in 20 minutes If successful the freeze cycle will continue 4 The compressor and fan motor start and the freezing process begins Note The controller is connected to two external relays in the EH head one for the condensing unit s compressor contactor and the other for the its solenoid valves A separate 24 volt transformer is in the condensing u...

Страница 38: ...he water pump and purge valve will be on for a period of time during the first part of harvest to purge the water reservoir of a portion of the water The inlet water solenoid valve opens to fill the reservoir when the water level sensor indicates an empty sump It continues to fill when the pump and purge valve have shut off and will stop filling when the water level sensor senses a full sump Harve...

Страница 39: ...0 minutes and then restart If it fails a third consecutive time the controller will shut the machine down and must be manually reset Time between resets 50 minutes Number of automatic resets 2 Max water fill time 5 minutes Machine will attempt a restart every 20 minutes Max discharge temp 250 degrees F Time interval between cleanings 6 months power on time adjustable in one month increments can be...

Страница 40: ... needed Test Mode Depress Off for 3 seconds release Then depress Clean for 3 seconds The sump will fill the first 30 seconds of the test If the sump is full it will overflow into the bin At 30 seconds the Water Inlet Valve will shut off and the Water Pump will turn on You will be able to see and hear the water running over the plates After 10 seconds the Purge and Vapor Inlet Valves will turn on W...

Страница 41: ...inking water light Restore water supply check water filters reset controller Check inlet water valve operation Check water level sensor Ice making section has exceeded maximum freeze time and controller has shut down the system Condenser coils may need cleaning Check condenser fan blade and motor Check for excessive air intake tem peratures at condenser coil Check compressor contactor Check compre...

Страница 42: ...let blocked check for ob struction No ice released vapor inlet valve does not open Check coil for continuity if open replace coil Check for 24 volts to coil during harvest if none check at relay in EH head Check low side pressure if pres sure does not rise during harvest and valve is electrically OK re place vapor inlet valve No ice Code 1 Displayed Freeze cycle too long Check for false sump full ...

Страница 43: ...achine separate to correct or restriction High volume of drinks dispensed cold plate melting ice Suggest pre cooler for water sup ply to cold plate Vapor inlet valve leaks through slightly during the freeze cycle Check valve body for similar temperatures on inlet and outlet the outlet should be colder and frost develops on the tubes to the evaporators Exceeding maximum freeze time compressor unit ...

Страница 44: ... Discharge pressure at 90 70 will peak at 280 290 PSIG and drop to 160 during harvest Typical cycle time is 12 to 13 minutes including 1 minute for harvest 0 10 20 30 40 50 60 ECC1410 with EH430 90 90 70 Freeze Cycle Low Side Pressure in PSIG Discharge pressure at 90 70 will peak at 280 290 PSIG and drop to 160 during harvest Typical cycle time is 12 to 13 minutes including 1 minute for harvest ...

Страница 45: ...44 Refrigeration Data 1800 0 10 20 30 40 50 60 ECC1800 with EH430 90 90 70 Freeze Cycle Low Side Pressure in PSIG Discharge pressure at 90 70 will peak at 240 250 PSIG operate between 230 and 240 and drop to 170 during harvest Typical cycle time is 13 14 minutes including 1 30 for harvest ...

Страница 46: ...n 2 To speed recovery use 3 Schrader valve removal access port tools and remove the valve cores from the ball valve access valves 3 Attach refrigeration manifold to all three ports use two manifolds or two extra hoses and a tee If only two connections are available connect to Liquid and Suction For single point recovery connect to liquid ball valve 4 Attach recovery system and recover refrigerant ...

Страница 47: ... valve receiver inlet coil 3 Shut the system off at the head push and hold the OFF button until it stops 4 Close the Liquid line and Vapor line ball valves 5 Push the head s manual harvest button or connect 115 volt power to head s vapor valve s and manually operate the compressor contactor 6 Close the suction line ball valve when suction pressure drops to zero PSIG 7 Shut the system off Refrigera...

Страница 48: ...w coil in position and secure with original fasteners 8 Attach dry nitrogen source to system and bleed nitrogen at 1 PSIG while brazing 9 Braze new coil stubs to unit tubing Be sure to NOT overheat the stubs Apply heat to the copper tubing first and move the flame toward the stub Heat the copper tubing for approximately 10 to 15 seconds then direct the heat to the stub Heat the stub for 2 to 5 sec...

Страница 49: ...atic Diagram MOTOR 1 ICE THICKNESS PROBE CURTAIN SWITCH 1 CURTAIN SWITCH 2 L1 L2 LINE 12V TRANSFORMER VALVE 1 CONTACTOR RELAY WATER PUMP WATER LEVEL SENSOR SUMP TEMP DISCHARGE TEMP ELECTRONIC CONTROL DUMP VALVE VALVE 2 MOTOR 2 HOT GAS HARVEST ASSIST HOT GAS HARVEST ASSIST WATER VALVE HGV RELAY TO COMPRESSOR SECTION ...

Страница 50: ... W CURTAIN SWITCH2 J6 1 2 3 4 LINE LOAD TRANSFORMER MOT PUMP SOLENOID SOLENOID HOT GAS WATER USECOPPERCONDUCTORSONLY THISUNITMUST BEGROUNDED CAUTION MORETHANONEDISCONNECTMEANSMAYBE REQUIREDTODISCONNECTALLPOWERTOTHISUNIT 17 3406 01 SEENAMEPLATEFOR PROPERVOLTAGEREQUIREMENTS ANDMAXIMUM FUSE SIZE BU W BK W R W V BN W ELECTRONIC CONTROL W DUMP VALVE BK 4 3 2 1 J1 3 2 1 J9 7 6 5 4 3 2 1 J2 2 1 J8 2 1 J7...

Страница 51: ...EH330 EH430 and ECC Condensing Unit Remote Low Side Cuber Service Manual July 2013 Page 50 EH330 D or EH430 D Schematic Diagram ...

Страница 52: ...EH330 EH430 and ECC Condensing Unit Remote Low Side Cuber Service Manual July 2013 Page 51 EH330 D or EH430 D Wiring Diagram ...

Страница 53: ...EH330 EH430 and ECC Condensing Unit Remote Low Side Cuber Service Manual July 2013 Page 52 ECC 3 Phase Schematic Diagram ...

Страница 54: ...EH330 EH430 and ECC Condensing Unit Remote Low Side Cuber Service Manual July 2013 Page 53 ECC 3 Phase Wiring Diagram ...

Страница 55: ...EH330 EH430 and ECC Condensing Unit Remote Low Side Cuber Service Manual July 2013 Page 54 ECC 1 Phase Schematic Diagram ...

Страница 56: ...EH330 EH430 and ECC Condensing Unit Remote Low Side Cuber Service Manual July 2013 Page 55 ECC 1 Phase Wiring Diagram ...

Страница 57: ...SCOTSMAN ICE SYSTEMS 775 Corporate Woods Parkway Vernon Hills IL 60061 www scotsman ice com 800 726 8762 800 533 6006 ...

Отзывы: